2017 Hyundai Elantra reset
[x] Cancel search: resetPage 237 of 571
3-145
Convenient features of your vehicle
3
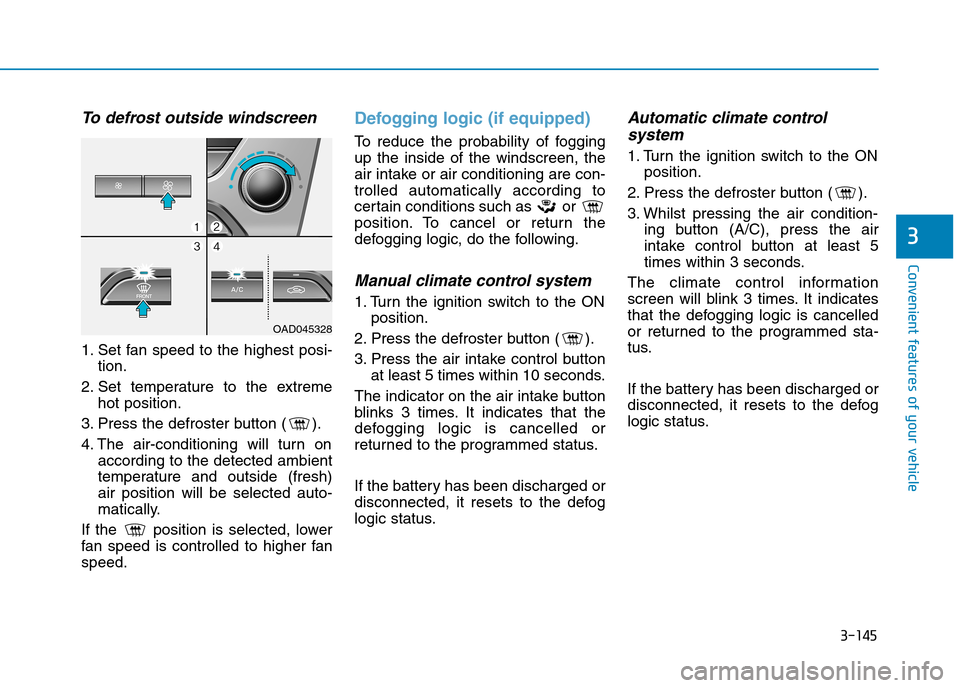
To d e f r o s t o u t s i d e w i n d s c r e e n
1. Set fan speed to the highest posi-
tion.
2. Set temperature to the extreme
hot position.
3. Press the defroster button ( ).
4. The air-conditioning will turn on
according to the detected ambient
temperature and outside (fresh)
air position will be selected auto-
matically.
If the position is selected, lower
fan speed is controlled to higher fan
speed.
Defogging logic (if equipped)
To r e d u c e t h e p r o b a b i l i t y o f f o g g i n g
up the inside of the windscreen, the
air intake or air conditioning are con-
trolled automatically according to
certain conditions such as or
position. To cancel or return the
defogging logic, do the following.
Manual climate control system
1. Turn the ignition switch to the ON
position.
2. Press the defroster button ( ).
3. Press the air intake control button
at least 5 times within 10 seconds.
The indicator on the air intake button
blinks 3 times. It indicates that the
defogging logic is cancelled or
returned to the programmed status.
If the battery has been discharged or
disconnected, it resets to the defog
logic status.
Automatic climate control
system
1. Turn the ignition switch to the ON
position.
2. Press the defroster button ( ).
3. Whilst pressing the air condition-
ing button (A/C), press the air
intake control button at least 5
times within 3 seconds.
The climate control information
screen will blink 3 times. It indicates
that the defogging logic is cancelled
or returned to the programmed sta-
tus.
If the battery has been discharged or
disconnected, it resets to the defog
logic status.
OAD045328
Page 238 of 571
3-146
Convenient features of your vehicle
Auto defogging system
(only for automatic climate
control system, if equipped)
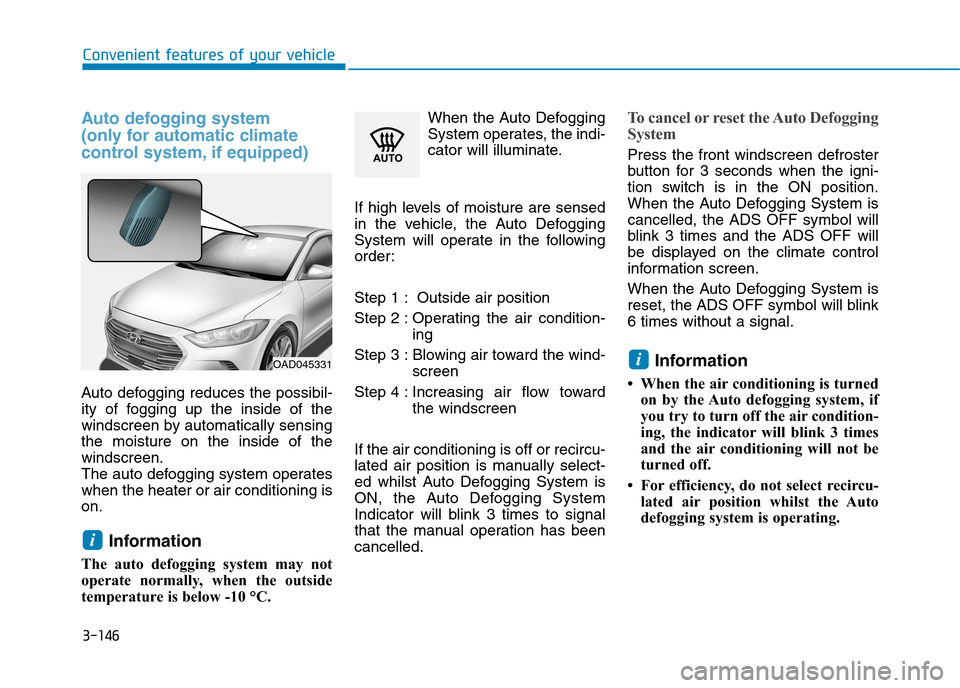
Auto defogging reduces the possibil-
ity of fogging up the inside of the
windscreen by automatically sensing
the moisture on the inside of the
windscreen.
The auto defogging system operates
when the heater or air conditioning is
on.
Information
The auto defogging system may not
operate normally, when the outside
temperature is below -10 °C.
When the Auto Defogging
System operates, the indi-
cator will illuminate.
If high levels of moisture are sensed
in the vehicle, the Auto Defogging
System will operate in the following
order:
Step 1 : Outside air position
Step 2 : Operating the air condition-
ing
Step 3 : Blowing air toward the wind-
screen
Step 4 : Increasing air flow toward
the windscreen
If the air conditioning is off or recircu-
lated air position is manually select-
ed whilst Auto Defogging System is
ON, the Auto Defogging System
Indicator will blink 3 times to signal
that the manual operation has been
cancelled.
To c a n c e l o r r e s e t t h e A u t o D e f o g g i n g
System
Press the front windscreen defroster
button for 3 seconds when the igni-
tion switch is in the ON position.
When the Auto Defogging System is
cancelled, the ADS OFF symbol will
blink 3 times and the ADS OFF will
be displayed on the climate control
information screen.
When the Auto Defogging System is
reset, the ADS OFF symbol will blink
6 times without a signal.
Information
• When the air conditioning is turned
on by the Auto defogging system, if
you try to turn off the air condition-
ing, the indicator will blink 3 times
and the air conditioning will not be
turned off.
• For efficiency, do not select recircu-
lated air position whilst the Auto
defogging system is operating.
i
i
OAD045331
Page 253 of 571

Steering wheel audio control
(if equipped)
The steering wheel audio control but-
ton is installed for your convenience.
Do not operate audio remote con-
trol buttons simultaneously.
VOLUME (VOL + / - ) (1)
•Move the VOLUME lever up to
increase volume.
•Move the VOLUME lever down to
decrease volume.
SEEK/PRESET ( / ) (2)
If the SEEK/PRESET lever is moved
up or down and held for 0.8 seconds
or more, it will function in the follow-
ing modes.
RADIO mode
It will function as the AUTO SEEK
select button. It will SEEK until you
release the button.
MEDIA mode
It will function as the FF/REW button.
If the SEEK/PRESET lever is moved
up or down, it will function in the fol-
lowing modes.
RADIO mode
It will function as the PRESET STA-
TION UP/DOWN button.
MEDIA mode
It will function as the TRACK UP/
DOWN button.
MODE ( ) (3)
Press the MODE button to select
Radio, Disc, or AUX.
MUTE ( ) (4)
•Press the button to mute the
sound.
•Press the button again to activate
the sound.
Information
Detailed information for audio control
buttons are described in the following
pages in this chapter.
i
NOTICE
OAD045425
OAD045444L
4-4
Multimedia System
■Ty p e A
■Ty p e B
Page 259 of 571
4-10
Multimedia System
Features of Your Audio
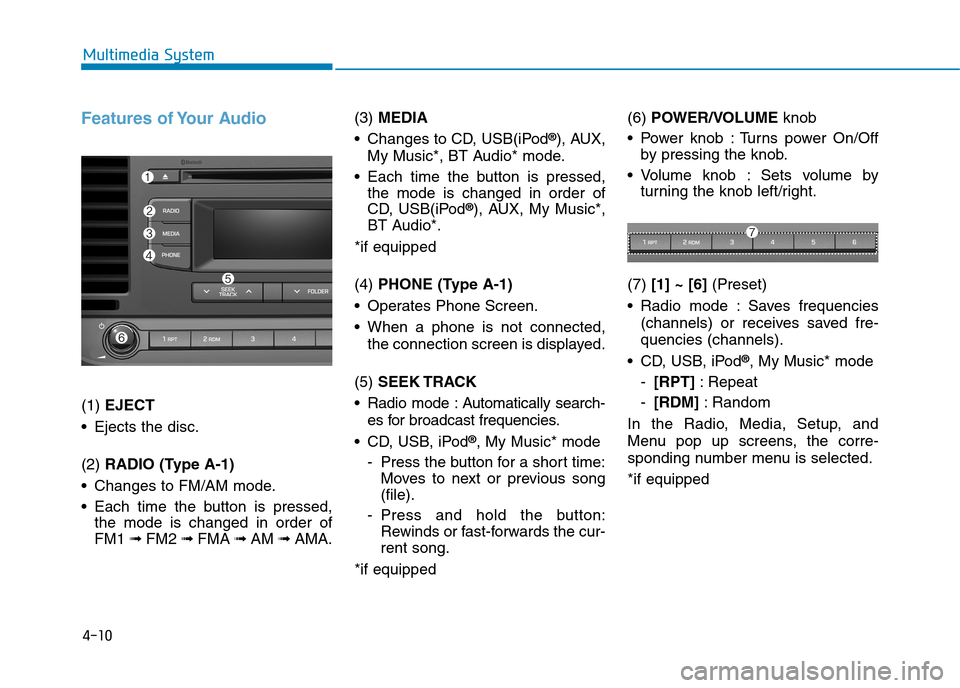
(1) EJECT
•Ejects the disc.
(2) RADIO (Type A-1)
•Changes to FM/AM mode.
•Each time the buttonis pressed,
the mode is changed in order of
FM1 ➟ FM2 ➟FMA ➟AM ➟AMA.
(3) MEDIA
•Changes to CD, USB(iPod®), AUX,
My Music*, BT Audio* mode.
•Each time the buttonis pressed,
the mode is changed in order of
CD, USB(iPod®), AUX, My Music*,
BT Audio*.
*if equipped
(4) PHONE (Type A-1)
•Operates Phone Screen.
•When a phone is not connected,
the connection screen is displayed.
(5) SEEK TRACK
•Radio mode :Automatically search-
es for broadcast frequencies.
•CD, USB, iPod®, My Music* mode
-Press the button for a short time:
Moves to next or previous song
(file).
-Press and hold the button:
Rewinds or fast-forwards the cur-
rent song.
*if equipped
(6) POWER/VOLUMEknob
•Power knob :Turns power On/Off
by pressing the knob.
•Volume knob : Sets volume by
turning the knob left/right.
(7) [1] ~ [6](Preset)
•Radio mode :Saves frequencies
(channels) or receives saved fre-
quencies (channels).
•CD, USB, iPod®, My Music* mode
-[RPT]:Repeat
-[RDM]:Random
In the Radio, Media, Setup, and
Menu pop up screens, the corre-
sponding number menu is selected.
*if equipped
Page 263 of 571
4-14
Multimedia System
Features of Your Audio
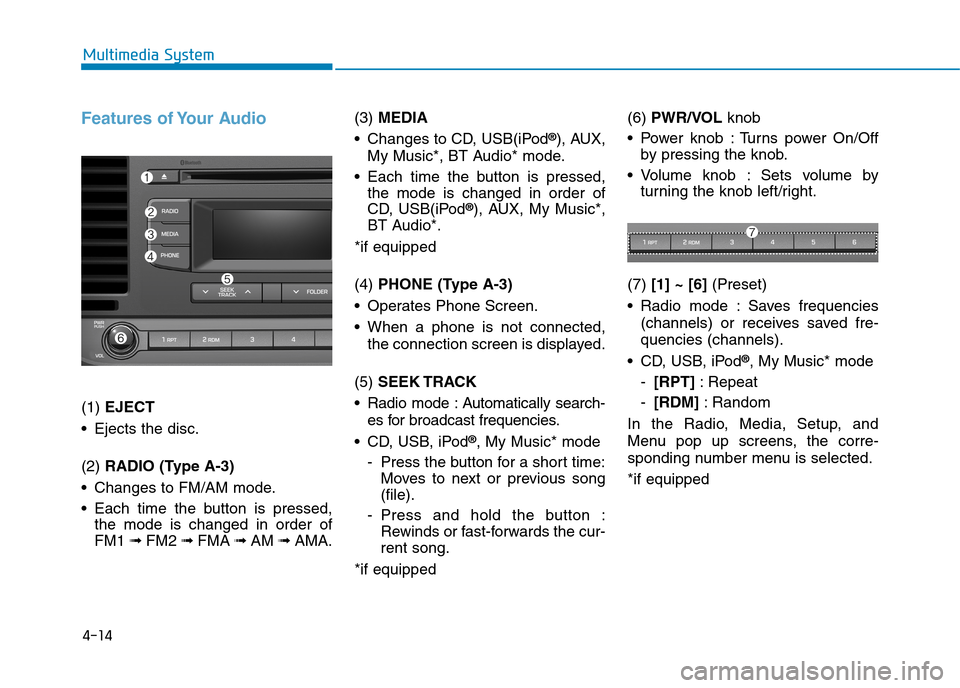
(1) EJECT
•Ejects the disc.
(2) RADIO (Type A-3)
•Changes to FM/AM mode.
•Each time the button is pressed,
the mode is changed in order of
FM1 ➟ FM2 ➟FMA ➟AM ➟AMA.
(3) MEDIA
•Changes to CD, USB(iPod®), AUX,
My Music*, BT Audio* mode.
•Each time the button is pressed,
the mode is changed in order of
CD, USB(iPod®), AUX, My Music*,
BT Audio*.
*if equipped
(4) PHONE (Type A-3)
•Operates Phone Screen.
•When a phone is not connected,
the connection screen is displayed.
(5) SEEK TRACK
•Radio mode :Automatically search-
es for broadcast frequencies.
•CD, USB, iPod®, My Music* mode
-Press the button for a short time:
Moves to next or previous song
(file).
-Press and hold the button :
Rewinds or fast-forwards the cur-
rent song.
*if equipped
(6) PWR/VOL knob
•Power knob :Turns power On/Off
by pressing the knob.
•Volume knob : Sets volume by
turning the knob left/right.
(7) [1] ~ [6](Preset)
•Radio mode :Saves frequencies
(channels) or receives saved fre-
quencies (channels).
•CD, USB, iPod®, My Music* mode
-[RPT]:Repeat
-[RDM]:Random
In the Radio, Media, Setup, and
Menu pop up screens, the corre-
sponding number menu is selected.
*if equipped
Page 267 of 571
4-18
Multimedia System
Features of Your Audio
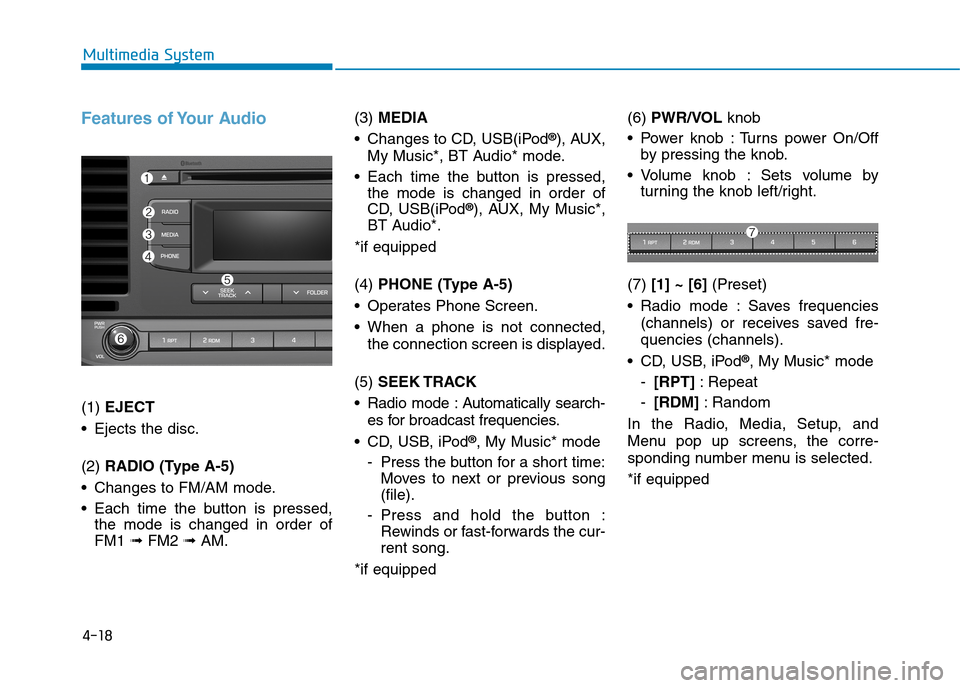
(1) EJECT
•Ejects the disc.
(2) RADIO (Type A-5)
•Changes to FM/AM mode.
•Each time the button is pressed,
the mode is changed in order of
FM1 ➟ FM2 ➟AM.
(3) MEDIA
•Changes to CD, USB(iPod®), AUX,
My Music*, BT Audio* mode.
•Each time the button is pressed,
the mode is changed in order of
CD, USB(iPod®), AUX, My Music*,
BT Audio*.
*if equipped
(4) PHONE (Type A-5)
•Operates Phone Screen.
•When a phone is not connected,
the connection screen is displayed.
(5) SEEK TRACK
•Radio mode :Automatically search-
es for broadcast frequencies.
•CD, USB, iPod®, My Music* mode
-Press the button for a short time:
Moves to next or previous song
(file).
-Press and hold the button :
Rewinds or fast-forwards the cur-
rent song.
*if equipped
(6) PWR/VOL knob
•Power knob :Turns power On/Off
by pressing the knob.
•Volume knob : Sets volume by
turning the knob left/right.
(7) [1] ~ [6](Preset)
•Radio mode :Saves frequencies
(channels) or receives saved fre-
quencies (channels).
•CD, USB, iPod®, My Music* mode
-[RPT]:Repeat
-[RDM]:Random
In the Radio, Media, Setup, and
Menu pop up screens, the corre-
sponding number menu is selected.
*if equipped
Page 275 of 571
4-26
Multimedia System
Information
-Using the iPod®Device
• Some iPod®models may not sup-
port communication protocol and
files may not properly play.
Supported iPod®models :
- iPhone®3GS/4
- iPod®touch 1st~4th generation
- iPod®nano 1st~6th generation
- iPod®classic
• The order of search or playback of
songs in the iPod®can be different
from the order searched in the audio
system.
• If the iPod®is disabled due to its
own malfunction, reset the iPod®
(Reset: Refer to iPod®manual).
• An iPod®may not operate normally
on low battery.
(Continued)
(Continued)
• Some iPod®devices, such as the
iPhone®, can be connected through
the Bluetooth®Wireless Technology
interface. The device must have audio
Bluetooth®Wireless Technology capa-
bility (such as for stereo headphone
Bluetooth®Wireless Technology ). The
device can play, but it will not be con-
trolled by the audio system.
• To use iPod®features within the
audio, use the cable provided upon
purchasing an iPod®device.
•Skipping or improper operation
may occur depending on the charac-
teristics of your iPod®/iPhone®
device.
• If your iPhone®is connected to both
the Bluetooth®Wireless Technology
and USB, the sound may not be
properly played. In your iPhone®,
select the Dock connector or
Bluetooth®Wireless Technology to
change the sound output (source).
(Continued)
(Continued)
• When connecting an iPod®with the
iPod®Power Cable, insert the con-
nector to the multimedia socket
completely. If not inserted complete-
ly, communications between iPod®
and audio may be interrupted.
• When adjusting the sound effects of
the iPod®and the audio system, the
sound effects of both devices will
overlap and might reduce or distort
the quality of the sound.
• Deactivate (turn off) the equaliser
function of an iPod®when adjusting
the audio system’s volume, and turn
off the equaliser of the audio system
when using the equaliser of an
iPod®.
• When not using an iPod®with the
audio system, detach the iPod®cable
from the iPod®, otherwise the iPod®
may remain in accessory mode, and
may not work properly.
• Use only the original iPod®cable.
Other cables may not be recognised.
i
Page 279 of 571
![Hyundai Elantra 2017 Owners Manual - RHD (UK. Australia) 4-30
Multimedia System
Radio Mode
(Type A-1, Type A-2, Type A-3,
Ty p e A - 4 w i t h R D S )
With the Radio Mode Button
SEEK
Press the [SEEK TRACK]button.
•Press the button for a short time : Hyundai Elantra 2017 Owners Manual - RHD (UK. Australia) 4-30
Multimedia System
Radio Mode
(Type A-1, Type A-2, Type A-3,
Ty p e A - 4 w i t h R D S )
With the Radio Mode Button
SEEK
Press the [SEEK TRACK]button.
•Press the button for a short time :](/manual-img/35/14544/w960_14544-278.png)
4-30
Multimedia System
Radio Mode
(Type A-1, Type A-2, Type A-3,
Ty p e A - 4 w i t h R D S )
With the Radio Mode Button
SEEK
Press the [SEEK TRACK]button.
•Press the button for a short time :
Changes the frequency.
•Press the button for a short time :
Automatically searches for the next
frequency.
Preset SEEK
Press the [1]~ [6]button.
•Press the button for a short time :
Plays the frequency saved in the
corresponding button.
•Pressing and holding the button:
Pressing and holding the desired
button from [1]~ [6]will save the
currently playing broadcast to the
selected button and sound a BEEP.
SCAN
Press the [TA/SCAN]button.
•Pressing and holding the button:
The broadcast frequency increas-
es and previews each broadcast
for 5 seconds each. After scanning
all frequencies, returns and plays
the current broadcast frequency.
Selecting through manual search
Tu r n t h e TUNE knob left/right to
adjust the frequency.
Traffic Announcement (TA)
Press the [TA/SCAN]button for a shor t
time : Set [On/Off] TA (Traffic
Announcement) mode.