2017 Hyundai Elantra drive mode
[x] Cancel search: drive modePage 239 of 571
3-147
Convenient features of your vehicle
3
Do not remove the sensor cover
located on the upper end of the
driver side windscreen glass.
Damage to system parts could
occur and may not be covered by
your vehicle warranty.
Cluster ionizer (if equipped)
When the ignition switch is in the ON
position, the clean air function turns
on automatically.
Also, the clean air function turns off
automatically, when the ignition
switch is in the OFF position.
Sunroof inside air recirculation
(if equipped)
If the sunroof opens whilst the heater
or Air Conditioning system operates,
the outside (fresh) air will be select-
ed automatically for ventilating the
vehicle. Then, if you select the recir-
culated air position, the outside
(fresh) air will be selected automati-
cally after 3 minutes.
If you close the sunroof, the intake
mode will be changed to the previous
selected mode.
NOTICE
CCLLIIMMAATTEE CCOONNTTRROOLL AADDDDIITTIIOONNAALL FFEEAATTUURREESS
Page 273 of 571
4-24
Multimedia System
Information
-Using the USB Device
•To use an external USB device,
make sure the device is not connect-
ed when starting up the vehicle.
Connect the device after starting up.
• If you start the engine when the
USB device is connected, it may
damage the USB device. (USB flash-
drives are very sensitive to electric
shock.)
• If the engine is started up or turned
off whilst the external USB device is
connected, the external USB device
may not work.
• The System may not play inauthen-
tic MP3 or WMA files.
1) It can only play MP3 files with the
compression rate between 8Kbps ~
320Kbps.
2) It can only play WMA music files
with the compression rate between
8Kbps ~ 320Kbps.
• Take precautions for static electrici-
ty when connecting or disconnecting
the external USB device.
(Continued)
(Continued)
• An encrypted MP3 PLAYER is not
recognisable.
• Depending on the condition of the
external USB device, the connected
external USB device can be
unrecognisable.
• When the formatted byte/sector set-
ting of External USB device is not
either 512BYTE or 2048BYTE, then
the device will not be recognised.
• Use only a USB device formatted to
FAT 12/16/32.
•USB devices without USB I/F
authentication may not be recognis-
able.
• Make sure the USB connection ter-
minal does not come in contact with
the human body or other objects.
• If you repeatedly connect or discon-
nect the USB device in a short peri-
od of time, it may break the device.
• You may hear a strange noise when
connecting or disconnecting a USB
device.
(Continued)
(Continued)
• If you disconnect the external USB
device during playback in USB
mode, the external USB device can
be damaged or may malfunction.
Therefore, disconnect the external
USB device when the audio is
turned off or in another mode (e.g,
Radio, CD).
• Depending on the type and capacity
of the external USB device or the
type of the files stored in the device,
there is a difference in the time
taken for recognition of the device.
• Do not use the USB device for pur-
poses other than playing music files.
• Playing videos through the USB is
not supported.
(Continued)
i
Page 278 of 571
4-29
Multimedia System
4
(Continued)
•Bluetooth®Wireless Technology
connection may become intermit-
tently disconnected in some mobile
phones. Follow these steps to try
again.
1) Turn the Bluetooth®Wireless
Technology function within the
mobile phone off/on and try
again.
2) Turn the mobile phone power
Off/On and try again.
3) Completely remove the mobile
phone battery, reboot, and then
try again.
4) Reboot the audio system and try
again.
5) Delete all paired devices, pair and
try again.
•It is possible to pair up to five
Bluetooth®Wireless Technology
devices to the audio system.
•Phone contact names should be
saved in English or they may not be
displayed correctly.
(Continued)
(Continued)
•The Handsfree call volume and
quality may differ depending on the
mobile phone.
•Only one Bluetooth®Wireless
Technology device can be connected
at a time.
• In some mobile phones, starting the
ignition whilst talking through a
Bluetooth®Wireless Technology
enabled handsfree phone, will result
in the call becoming disconnected.
(Switch the call back to your mobile
phone when starting the ignition.)
• If the mobile phone is not paired or
connected, it is not possible to enter
Phone mode. Once a phone is paired
or connected, the guidance screen
will be displayed.
•Bluetooth®Wireless Technology
Handsfree is a feature that
enables drivers to practice safe
driving. Connecting the audio
system with a Bluetooth®
Wireless Technology phone
allows the user to conveniently
make calls, receive calls, and
manage the phone book. Before
using the Bluetooth®Wireless
Te ch n o l o g y , c a r e f u l ly r e a d t h e
contents of this User Manual.
•Excessive use or operations
whilst driving may lead to negli-
gent driving practices and be
the cause of accidents.
•Do not operate the device exces-
sively whilst driving.
•Viewing the screen for pro-
longed periods of time is dan-
gerous and may lead to acci-
dents.
•When driving,view the screen
only for short periods of time.
NOTICE
Page 377 of 571
Driving your vehicle
Before driving .......................................................5-3
Before entering the vehicle ...........................................5-3
Before starting .................................................................5-3
Ignition switch ........................................................5-4
Key ignition switch ............................................................5-5
Engine start/stop button .................................................5-9
Manual transmission............................................5-17
Manual transmission operation ..................................5-17
Good driving practices ..................................................5-19
Automatic transmission .......................................5-21
Automatic transmission operation ..............................5-21
Parking ...............................................................................5-27
Good driving practices ..................................................5-27
Braking system ...................................................5-29
Power brakes ..................................................................5-29
Disc brakes wear indicator ...........................................5-30
Rear drum brakes ...........................................................5-30
Parking brake ...................................................................5-30
Anti-lock brake system (ABS) .....................................5-33
Electronic stability control (ESC) ................................5-35
Ve h i c l e s tab i l i t y m a n a g e m e n t ( V S M ) . . . . . . . . . . . . . . . . . . . . . . . . . . 5 - 3 8
Hill-start assist control (HAC) ......................................5-40
Emergency stop signal (ESS) .......................................5-40
Good braking practices..................................................5-41
Drive mode integrated control system .............5-42
Blind spot detection system (BSD) ...................5-44
BSD (Blind spot detection)/
LCA (Lane change assist)..............................................5-45
RCTA (rear cross traffic alert) .....................................5-48
Limitations of the system .............................................5-51
Cruise control .......................................................5-53
Cruise control operation................................................5-53
Special driving conditions ...................................5-58
Hazardous driving conditions.......................................5-58
Rocking the vehicle ....................................................5-58
Smooth cornering ...........................................................5-59
Driving at night ................................................................5-59
Driving in the rain ...........................................................5-60
Driving in flooded areas ................................................5-61
Highway driving ...............................................................5-61
Winter driving .......................................................5-62
Snow or icy conditions ..................................................5-62
Winter precautions .........................................................5-64
Ve h i c l e w e i g h t . . . . . . . . . . . . . . . . . . . . . . . . . . . . . . . . . . . . . . . . . . . . . . . . . . . . . . 5 - 6 7
Overloading.......................................................................5-67
Tr a i l e r To w i n g . . . . . . . . . . . . . . . . . . . . . . . . . . . . . . . . . . . . . . . . . . . . . . . . . . . . . . . 5 - 6 8
5
Page 397 of 571
5-21
Driving your vehicle
5
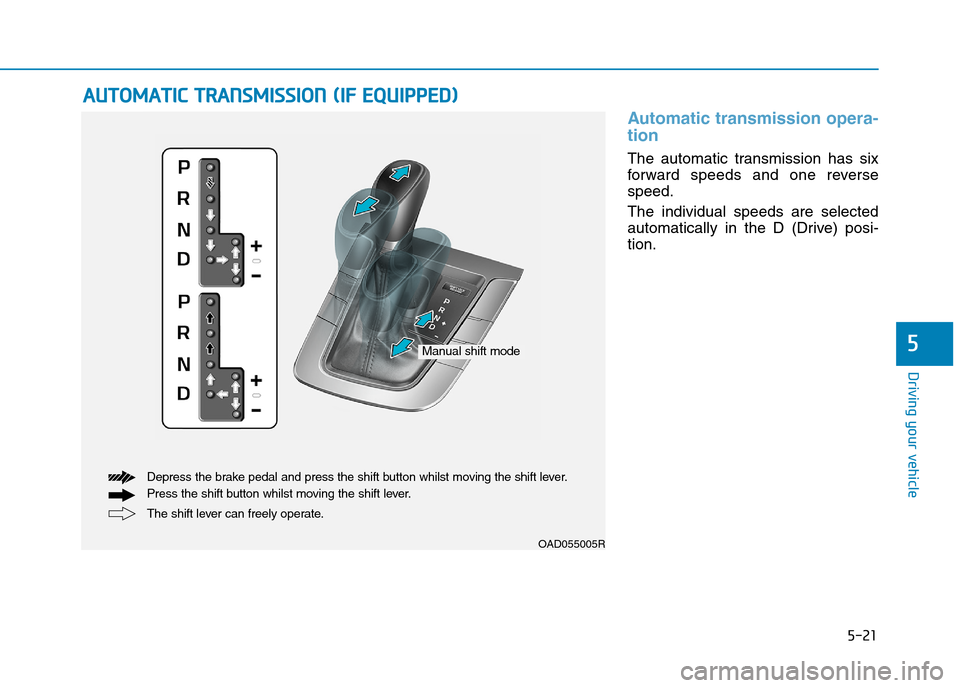
Automatic transmission opera-
tion
The automatic transmission has six
forward speeds and one reverse
speed.
The individual speeds are selected
automatically in the D (Drive) posi-
tion.
AAUUTTOOMMAATTIICC TTRRAANNSSMMIISSSSIIOONN ((IIFF EEQQUUIIPPPPEEDD))
OAD055005R
The shift lever can freely operate.
Depress the brake pedal and press the shift button whilst moving the shift lever.
Press the shift button whilst moving the shift lever.
Manual shift mode
Page 398 of 571
5-22
Driving your vehicle
Shift lever position
The indicator in the instrument clus-
ter displays the shift lever position
when the ignition switch is in the ON
position.
P (Park)
Always come to a complete stop
before shifting into P (Park).
To s h i f t f r o m P ( P a r k ) , y o u m u s t
press firmly on the brake pedal and
make sure your foot is off the accel-
erator pedal.
If you have done all of the above
and still cannot shift the lever out of
P (Park), see "Shift-Lock Release"
in this chapter.
The shift lever must be in P (Park)
before turning the engine off.
To r e d u c e t h e r i s k o f s e r i o u s
injury or death:
•ALWAYS check the surround-
ing areas near your vehicle for
people, especially children,
before shifting a vehicle into
D (Drive) or R (Reverse).
•Before leaving the driver's
seat, always make sure the
shift lever is in the P (Park)
position, then set the parking
brake, and place the ignition
switch in the LOCK/OFF posi-
tion. Unexpected and sudden
vehicle movement can occur
if these precautions are not
followed.
•When using Manual Shift
Mode, do not use engine brak-
ing (shifting from a high gear
to lower gear) rapidly on slip-
pery roads. The vehicle may
slip causing an accident.
WA R N I N G
•Shifting into P (Park) whilst
the vehicle is in motion may
cause you to lose control of
the vehicle.
•After the vehicle has stopped,
always make sure the shift
lever is in P (Park), apply the
parking brake, and turn the
engine off.
•Do not use the P (Park) posi-
tion in place of the parking
brake.
WA R N I N G
Page 399 of 571
5-23
Driving your vehicle
5
R (Reverse)
Use this position to drive the vehicle
rearward.
Always come to a complete stop
before shifting into or out of R
(Reverse); you may damage the
transmission if you shift into R
(Reverse) whilst the vehicle is in
motion.
N (Neutral)
The wheels and transmission are not
engaged.
Use N (Neutral) if you need to restart
a stalled engine, or if it is necessary
to stop with the engine ON. Shift into
P (Park) if you need to leave your
vehicle for any reason.
Always depress the brake pedal
when you are shifting from N
(Neutral) to another gear.
D (Drive)
This is the normal driving position.
The transmission will automatically
shift through a 6-gear sequence, pro-
viding the best fuel economy and
power.
For extra power when passing anoth-
er vehicle or driving uphill, depress
the accelerator fully. The transmis-
sion will automatically downshift to
the next lower gear (or gears, as
appropriate).
The DRIVE MODE switch, located on
the shift lever console, allows the driv-
er to switch from NORMAL mode to
ECO or SPORT mode (if equipped).
For more information, refer to
"Drive Mode Integrated Control
System" later in this chapter.
NOTICE
Do not shift into gear unless
your foot is firmly on the brake
pedal. Shifting into gear when
the engine is running at high
speed can cause the vehicle to
move very rapidly. You could
lose control of the vehicle and
hit people or objects.
WA R N I N G
Page 400 of 571
5-24
Driving your vehicle
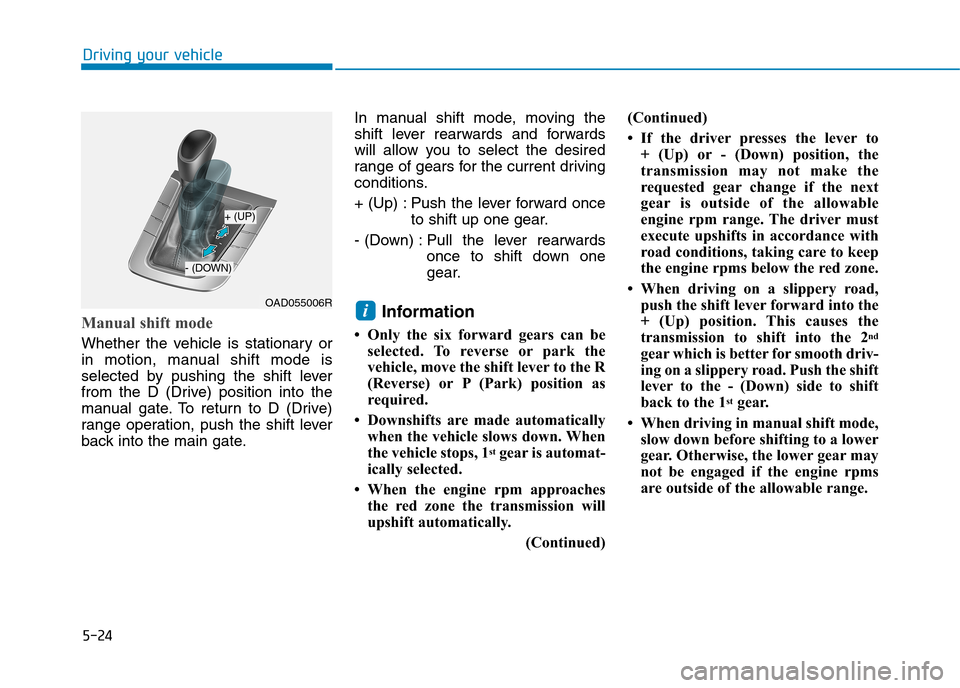
Manual shift mode
Whether the vehicle is stationary or
in motion, manual shift mode is
selected by pushing the shift lever
from the D (Drive) position into the
manual gate. To return to D (Drive)
range operation, push the shift lever
back into the main gate.
In manual shift mode, moving the
shift lever rearwards and forwards
will allow you to select the desired
range of gears for the current driving
conditions.
+ (Up) : Push the lever forward once
to shift up one gear.
- (Down) : Pull the lever rearwards
once to shift down one
gear.
Information
• Only the six forward gears can be
selected. To reverse or park the
vehicle, move the shift lever to the R
(Reverse) or P (Park) position as
required.
• Downshifts are made automatically
when the vehicle slows down. When
the vehicle stops, 1stgear is automat-
ically selected.
• When the engine rpm approaches
the red zone the transmission will
upshift automatically.
(Continued)
(Continued)
• If the driver presses the lever to
+ (Up) or - (Down) position, the
transmission may not make the
requested gear change if the next
gear is outside of the allowable
engine rpm range. The driver must
execute upshifts in accordance with
road conditions, taking care to keep
the engine rpms below the red zone.
• When driving on a slippery road,
push the shift lever forward into the
+ (Up) position. This causes the
transmission to shift into the 2nd
gear which is better for smooth driv-
ing on a slippery road. Push the shift
lever to the - (Down) side to shift
back to the 1stgear.
• When driving in manual shift mode,
slow down before shifting to a lower
gear. Otherwise, the lower gear may
not be engaged if the engine rpms
are outside of the allowable range.
iOAD055006R
+ (UP)
- (DOWN)