2017 HONDA ODYSSEY remote control
[x] Cancel search: remote controlPage 278 of 565
Continued277
uuRear Entertainment System*uOperating the System
Features
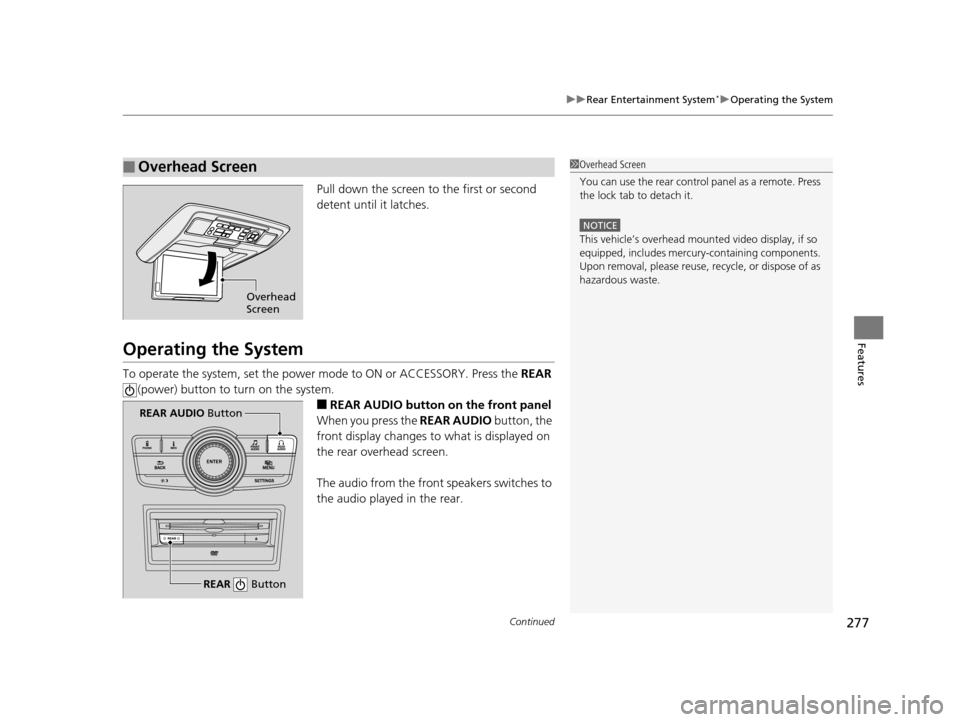
Pull down the screen to the first or second
detent until it latches.
Operating the System
To operate the system, set the power mode to ON or ACCESSORY. Press the REAR
(power) button to turn on the system.
■REAR AUDIO button on the front panel
When you press the REAR AUDIO button, the
front display changes to what is displayed on
the rear overhead screen.
The audio from the front speakers switches to
the audio played in the rear.
■Overhead Screen1 Overhead Screen
You can use the rear control panel as a remote. Press
the lock tab to detach it.
NOTICE
This vehicle’s overhead mount ed video display, if so
equipped, includes mercur y-containing components.
Upon removal, please reuse, recycle, or dispose of as
hazardous waste.
Overhead
Screen
REAR Button
REAR AUDIO Button
17 US ODYSSEY (KA KC)-31TK86600.book 277 ページ 2016年10月24日 月曜日 午後4時2分
Page 279 of 565
278
uuRear Entertainment System*uOperating the System
Features
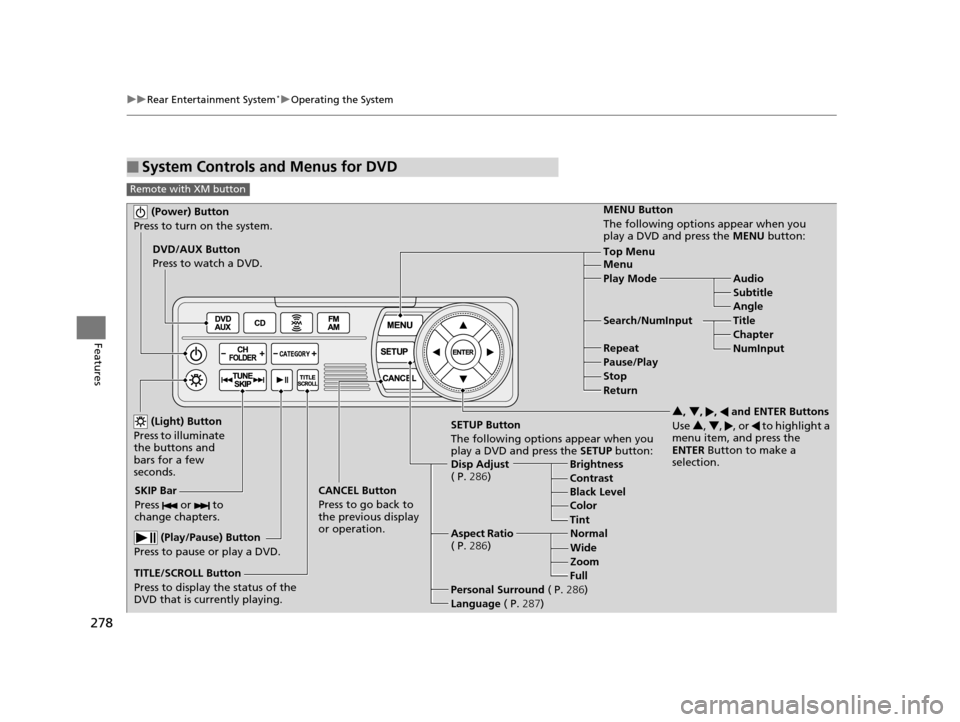
■System Controls and Menus for DVD
Remote with XM button
(Power) Button
Press to turn on the system.
DVD/AUX Button
Press to watch a DVD.
(Light) Button
Press to illuminate
the buttons and
bars for a few
seconds.
SKIP Bar
Press or to
change chapters.
(Play/Pause) Button
Press to pause or play a DVD.
TITLE/SCROLL Button
Press to display the status of the
DVD that is currently playing. MENU Button
The following options appear when you
play a DVD and press the
MENU button:
Top Menu
Menu
Play Mode Audio Subtitle
Angle
Search/NumInput Title Chapter
NumInput
Repeat
Pause/Play
Stop
Return
SETUP Button
The following options appear when you
play a DVD and press the SETUP button:
Disp Adjust
( P. 286) Brightness
Contrast
Black Level
Color
CANCEL Button
Press to go back to
the previous display
or operation. 3
, 4 , , and ENTER Buttons
Use 3, 4 , , or to highlight a
menu item, and press the
ENTER Button to make a
selection.
Tint
Normal
Wide Zoom
Full
Aspect Ratio
( P. 286)
Personal Surround ( P.286)
Language ( P.287)
17 US ODYSSEY (KA KC)-31TK86600.book 278 ページ 2016年10月24日 月曜日 午後4時2分
Page 283 of 565
uuRear Entertainment System*uOperating the System
282
Features
Rear Control:
Disables controls from the remote.
1. Press the SETTINGS button to display Settings menu in front.
2. Rotate to select Rear Ent Settings, then press .
3. Rotate to select Rear Control, then press .
4. Rotate to select On or Off , then press .
Rear Speaker:
Mutes the sounds from the rear speakers.
1. Press the SETTINGS button to display Settings menu in front.
2. Rotate to select Rear Ent Settings, then press .
3. Rotate to select Rear Speaker, then press .
4. Rotate to select On or Off , then press .
■TITLE/SCROLL button on the remote
Press the TITLE/SCROLL button while the DVD is playing to see the current status of
title, chapter, elapsed time, angle, su btitle, audio, and sound characteristics.
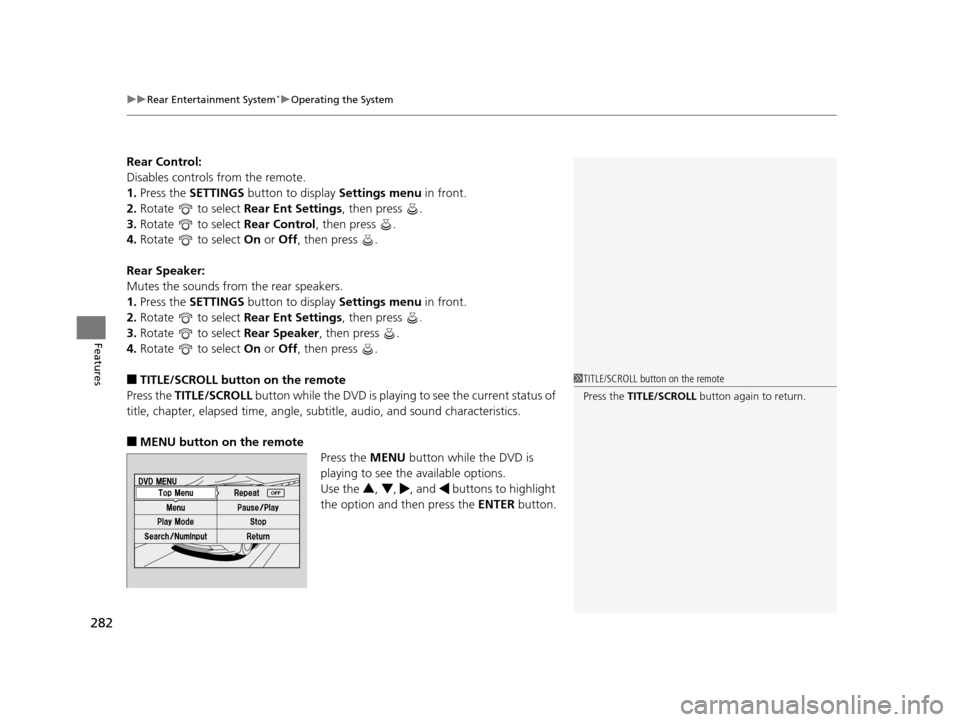
■MENU button on the remote
Press the MENU button while the DVD is
playing to see the available options.
Use the 3, 4 , , and buttons to highlight
the option and then press the ENTER button.
1TITLE/SCROLL button on the remote
Press the TITLE/SCROLL button again to return.
17 US ODYSSEY (KA KC)-31TK86600.book 282 ページ 2016年10月24日 月曜日 午後4時2分
Page 289 of 565
288
uuRear Entertainment System*uOperating the System
Features
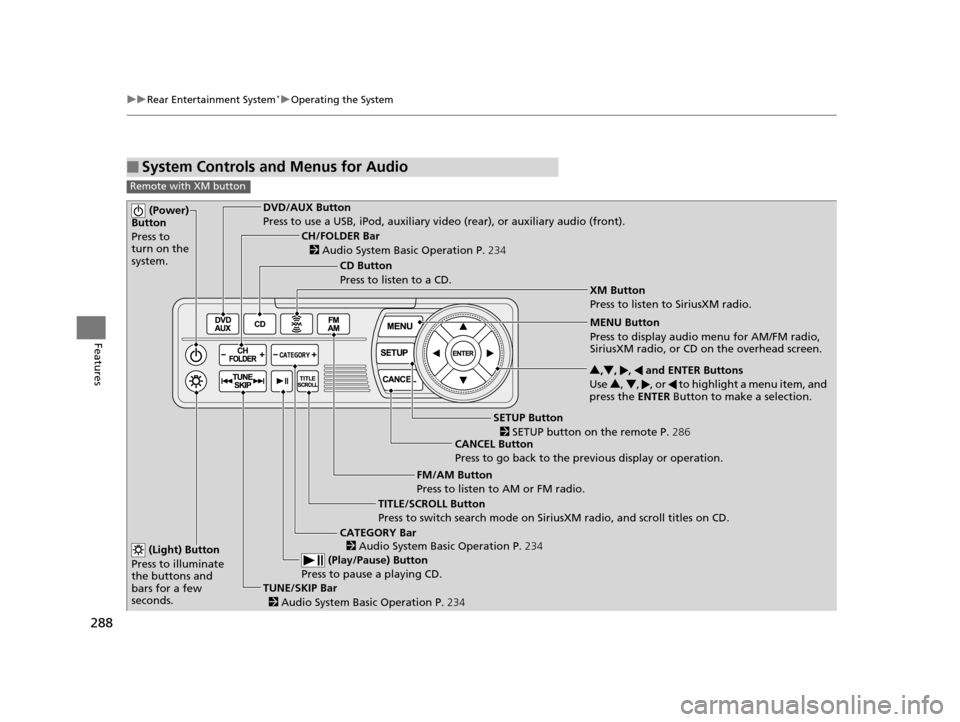
■System Controls and Menus for Audio
Remote with XM button
(Power)
Button
Press to
turn on the
system.DVD/AUX Button
Press to use a USB, iPod, auxiliary vi deo (rear), or auxiliary audio (front).
(Light) Button
Press to illuminate
the buttons and
bars for a few
seconds.
TUNE/SKIP Bar (Play/Pause) Button
Press to pause a playing CD.
TITLE/SCROLL Button
Press to switch search mode on Siri usXM radio, and scroll titles on CD.
CANCEL Button
Press to go back to the previous display or operation. 3
,4 , , and ENTER Buttons
Use 3, 4 , , or to highlight a menu item, and
press the ENTER Button to make a selection.
CATEGORY Bar
CH/FOLDER Bar
CD Button
Press to listen to a CD.
FM/AM Button
Press to listen to AM or FM radio.
SETUP Button XM Button
Press to listen to SiriusXM radio.
MENU Button
Press to display audio menu for AM/FM radio,
SiriusXM radio, or CD on the overhead screen.
2
Audio System Basic Operation P. 234
2
Audio System Basic Operation P. 234
2 SETUP button on the remote P. 286
2 Audio System Basic Operation P. 234
17 US ODYSSEY (KA KC)-31TK86600.book 288 ページ 2016年10月24日 月曜日 午後4時2分
Page 292 of 565
291
uuRear Entertainment System*uOperating the System
Features
■Playing a CD
Press the CD button.
The available options appear on the overh ead screen are Repeat, Random, and Scan.
These functions are the same as those of the front audio system.
2 Playing a CD P. 252
To scroll your audio data title, press the TITLE/SCROLL button for five seconds.
■Playing iPod and a USB flash drive
Press the DVD/AUX button.
Press the AUX button.
The available options appear on the overh ead screen are Repeat, Random, and Scan.
These functions are the same as those of the front audio system.
2 Playing an iPod P. 255
2 Playing a USB Flash Drive P. 262
To scroll your audio data title, press the TITLE/SCROLL button for five seconds.
1System Controls and Menus for Audio
You can also insert an audio CD compatible with the
system, or recorded in MP3/WMA/AAC formats into
the lower slot and play. The front passengers can
listen to the same CD, or select another audio source.
2 Playable Discs P. 293
2 Audio Sources for Front and Rear Seats
P. 292
Remote with XM button
Remote without XM button
17 US ODYSSEY (KA KC)-31TK86600.book 291 ページ 2016年10月24日 月曜日 午後4時2分
Page 326 of 565
325Continued
Features
HomeLink® Universal Transceiver*
The HomeLink ® Universal Transceiver can be programmed to operate up to three
remote controlled devices around your home, such as garage doors, lighting, or
home security systems.
Refer to the safety information that came wi th your garage door opener to test that
the safety features are functioning properly. If you do not have the safety
information, contact the manufacturer.
Before programming HomeLink, make sure that people and objects are out of the
way of the garage or gate to prevent potential injury or damage.
When programming a garage door opener, park just outside the garage door’s
path.
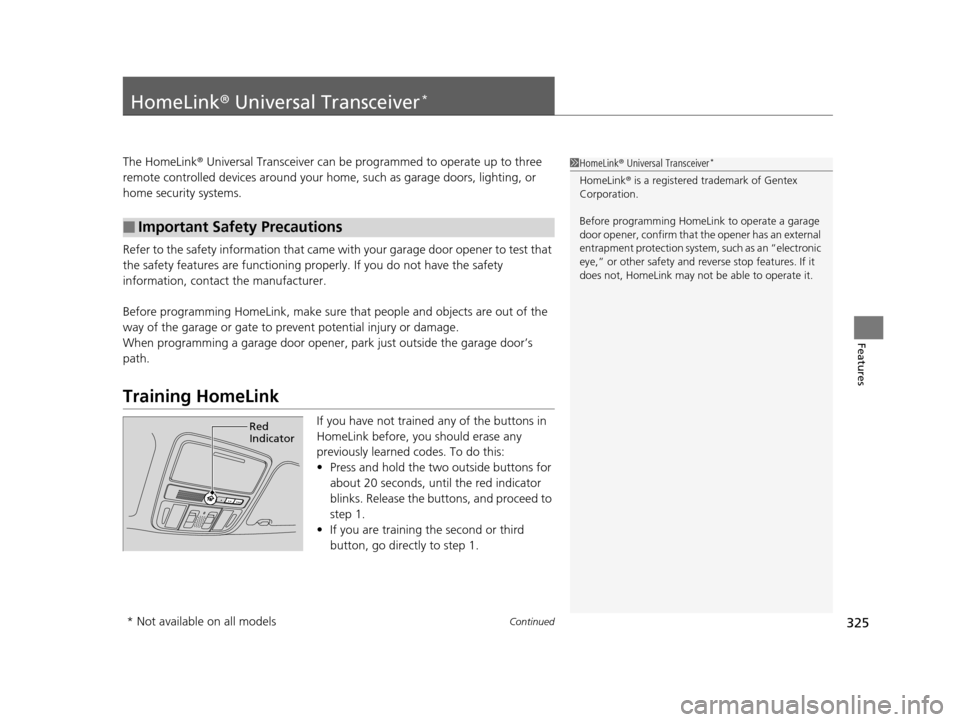
Training HomeLink
If you have not trained any of the buttons in
HomeLink before, you should erase any
previously learned codes. To do this:
• Press and hold the two outside buttons for
about 20 seconds, until the red indicator
blinks. Release the bu ttons, and proceed to
step 1.
• If you are training the second or third
button, go directly to step 1.
■Important Safety Precautions
1HomeLink ® Universal Transceiver*
HomeLink® is a registered tra demark of Gentex
Corporation.
Before programming HomeLi nk to operate a garage
door opener, confirm that the opener has an external
entrapment protection system, such as an “electronic
eye,” or other safety and re verse stop features. If it
does not, HomeLink may not be able to operate it.
Red
Indicator
* Not available on all models
17 US ODYSSEY (KA KC)-31TK86600.book 325 ページ 2016年10月24日 月曜日 午後4時2分
Page 327 of 565
uuHomeLink ® Universal Transceiver*u Training HomeLink
326
Features
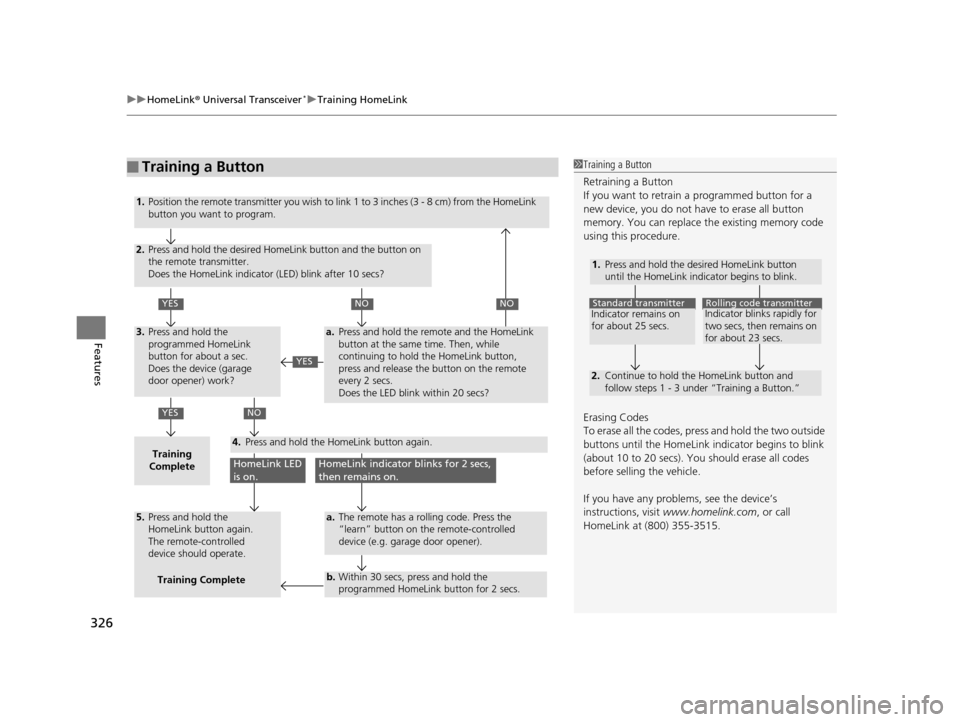
■Training a Button1Training a Button
Retraining a Button
If you want to retrain a programmed button for a
new device, you do not ha ve to erase all button
memory. You can replace the existing memory code
using this procedure.
Erasing Codes
To erase all the codes, press and hold the two outside
buttons until the HomeLink i ndicator begins to blink
(about 10 to 20 secs). You should erase all codes
before selling the vehicle.
If you have any problems, see the device’s
instructions, visit www.homelink.com , or call
HomeLink at (800) 355-3515.
1.
2.
Standard transmitterIndicator remains on
for about 25 secs.Rolling code transmitterIndicator blinks rapidly for
two secs, then remains on
for about 23 secs.
Press and hold the desired HomeLink button
until the HomeLink indicator begins to blink.
Continue to hold the HomeLink button and
follow steps 1 - 3 under “Training a Button.”
1.
2.
YES
YES
YES
NONO
NO
HomeLink LED
is on.HomeLink indicator blinks for 2 secs,
then remains on.
3.
Training
Complete4.
5.
a.
a.
b.
Position the remote transmitter you wish to link 1 to 3 inches (3 - 8 cm) from the HomeLink
button you want to program.
Press and hold the desired HomeLink button and the button on
the remote transmitter.
Does the HomeLink indicator (LED) blink after 10 secs?
Press and hold the
programmed HomeLink
button for about a sec.
Does the device (garage
door opener) work?
Press and hold the remote and the HomeLink
button at the same time. Then, while
continuing to hold the HomeLink button,
press and release the button on the remote
every 2 secs.
Does the LED blink within 20 secs?
The remote has a rolling code. Press the
“learn” button on the remote-controlled
device (e.g. garage door opener).
Within 30 secs, press and hold the
programmed HomeLink button for 2 secs.
Press and hold the HomeLink button again.
Press and hold the
HomeLink button again.
The remote-controlled
device should operate.Training Complete
17 US ODYSSEY (KA KC)-31TK86600.book 326 ページ 2016年10月24日 月曜日 午後4時2分
Page 328 of 565
327Continued
Features
Bluetooth® HandsFreeLink ®
See the Navigation System Manual for how to operate the Bluetooth® HandsFreeLink® .
Bluetooth ® HandsFreeLink ® (HFL) allows you to place and receive phone calls using
your vehicle’s audio system, without handling your cell phone.
Using HFL
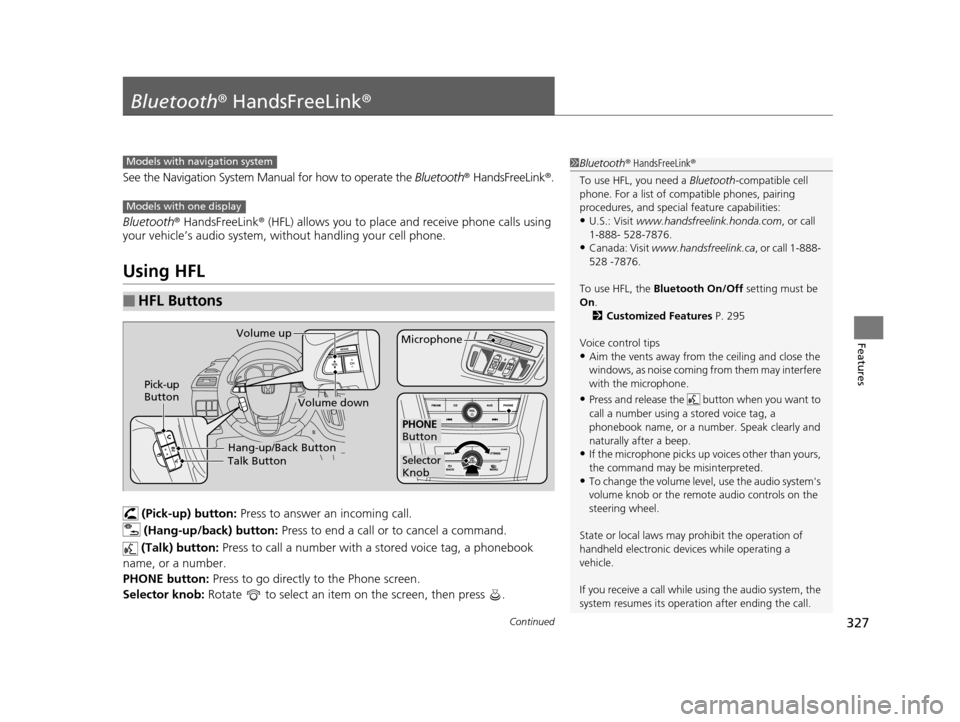
(Pick-up) button: Press to answer an incoming call.
(Hang-up/back) button: Press to end a call or to cancel a command.
(Talk) button: Press to call a number with a stored voice tag, a phonebook
name, or a number.
PHONE button: Press to go directly to the Phone screen.
Selector knob: Rotate to select an item on the screen, then press .
■HFL Buttons
1Bluetooth ® HandsFreeLink ®
To use HFL, you need a Bluetooth-compatible cell
phone. For a list of compatible phones, pairing
procedures, and special feature capabilities:
•U.S.: Visit www.handsfreelink.honda.com , or call
1-888- 528-7876.
•Canada: Visit www.handsfreelink.ca , or call 1-888-
528 -7876.
To use HFL, the Bluetooth On/Off setting must be
On .
2 Customized Features P. 295
Voice control tips
•Aim the vents away from the ceiling and close the
windows, as noise coming fr om them may interfere
with the microphone.
•Press and release the but ton when you want to
call a number using a stored voice tag, a
phonebook name, or a numbe r. Speak clearly and
naturally after a beep.
•If the microphone picks up vo ices other than yours,
the command may be misinterpreted.
•To change the volume level, use the audio system's
volume knob or the remote audio controls on the
steering wheel.
State or local laws may pr ohibit the operation of
handheld electronic devi ces while operating a
vehicle.
If you receive a call while using the audio system, the
system resumes its operati on after ending the call.
Models with navigation system
Models with one display
Talk ButtonVolume up
MicrophoneHang-up/Back Button
Pick-up
Button
Volume down
Selector
Knob
PHONE
Button
17 US ODYSSEY (KA KC)-31TK86600.book 327 ページ 2016年10月24日 月曜日 午後4時2分