Page 23 of 543
21
Quick Reference Guide
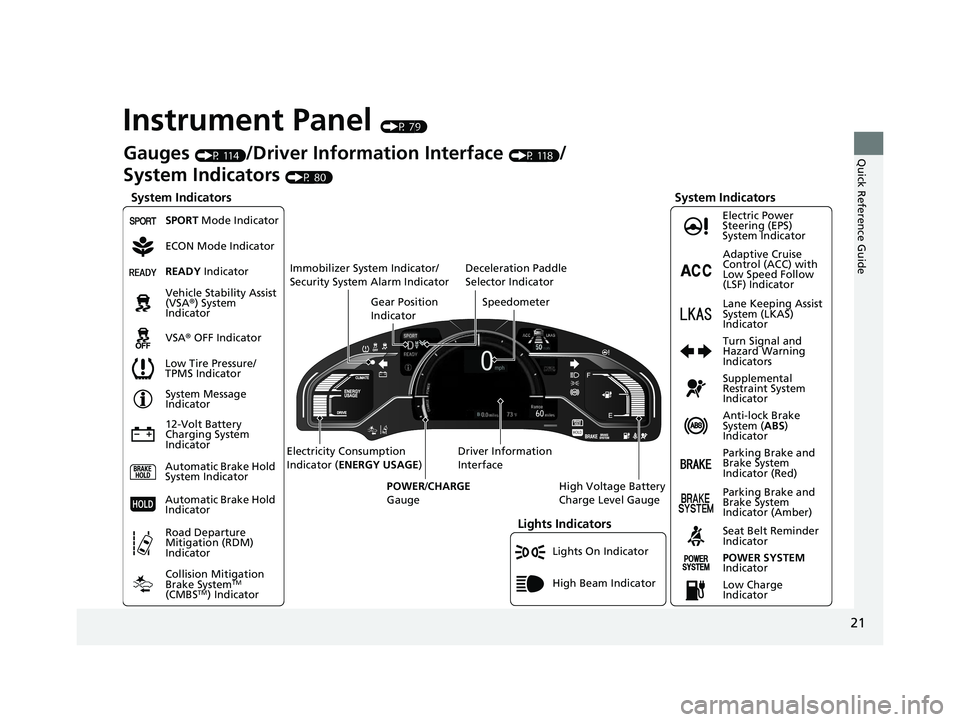
Instrument Panel (P 79)
Lights On Indicator
System Indicators
12-Volt Battery
Charging System
IndicatorAnti-lock Brake
System (
ABS)
Indicator
Vehicle Stability Assist
(VSA®
) System
Indicator
VSA ® OFF Indicator Electric Power
Steering (EPS)
System Indicator
Lights Indicators
High Beam Indicator
Seat Belt Reminder
Indicator
System Indicators
System Message
Indicator
Parking Brake and
Brake System
Indicator (Red) Supplemental
Restraint System
Indicator
Gauges (P 114)/Driver Information Interface (P 118)/
System Indicators
(P 80)
Low Tire Pressure/
TPMS Indicator Turn Signal and
Hazard Warning
Indicators
Speedometer
Automatic Brake Hold
System Indicator Parking Brake and
Brake System
Indicator (Amber)
SPORT Mode Indicator
Collision Mitigation
Brake System
TM
(CMBSTM) Indicator
Road Departure
Mitigation (RDM)
Indicator
Immobilizer System Indicator/
Security System Alarm Indicator
Automatic Brake Hold
IndicatorREADY Indicator
POWER SYSTEM
Indicator
Gear Position
Indicator
High Voltage Battery
Charge Level Gauge
Driver Information
Interface
Electricity Consumption
Indicator (
ENERGY USAGE )
POWER /CHARGE
Gauge
Low Charge
Indicator Adaptive Cruise
Control (ACC) with
Low Speed Follow
(LSF) Indicator
Lane Keeping Assist
System (LKAS)
Indicator
Deceleration Paddle
Selector Indicator
ECON Mode Indicator
17 CLARITY BEV CSS-31TRV6000.book 21 ページ 2017年4月14日 金曜日 午前11時
8分
Page 94 of 543
92
uuIndicators u
Instrument Panel
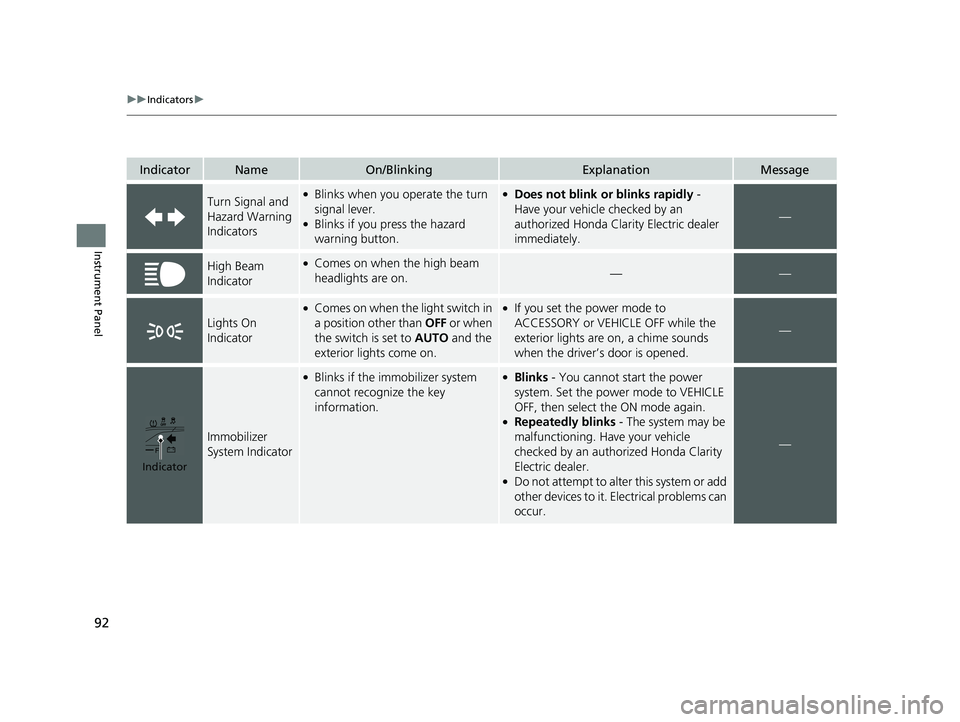
IndicatorNameOn/BlinkingExplanationMessage
Turn Signal and
Hazard Warning
Indicators●Blinks when you operate the turn
signal lever.
●Blinks if you press the hazard
warning button.
●Does not blink or blinks rapidly -
Have your vehicle checked by an
authorized Honda Clarity Electric dealer
immediately.
—
High Beam
Indicator●Comes on when the high beam
headlights are on.——
Lights On
Indicator
●Comes on when the light switch in
a position other than OFF or when
the switch is set to AUTO and the
exterior lights come on.●If you set the power mode to
ACCESSORY or VEHICLE OFF while the
exterior lights are on, a chime sounds
when the driver’s door is opened.
—
Immobilizer
System Indicator
●Blinks if the immobilizer system
cannot recognize the key
information.●Blinks - You cannot start the power
system. Set the power mode to VEHICLE
OFF, then select the ON mode again.
●Repeatedly blinks - The system may be
malfunctioning. Have your vehicle
checked by an author ized Honda Clarity
Electric dealer.
●Do not attempt to alter this system or add
other devices to it. Electrical problems can
occur.
—
Indicator
17 CLARITY BEV CSS-31TRV6000.book 92 ページ 2017年4月14日 金曜日 午前11時 8分
Page 149 of 543
147Continued
Controls
Opening and Closing the Windows
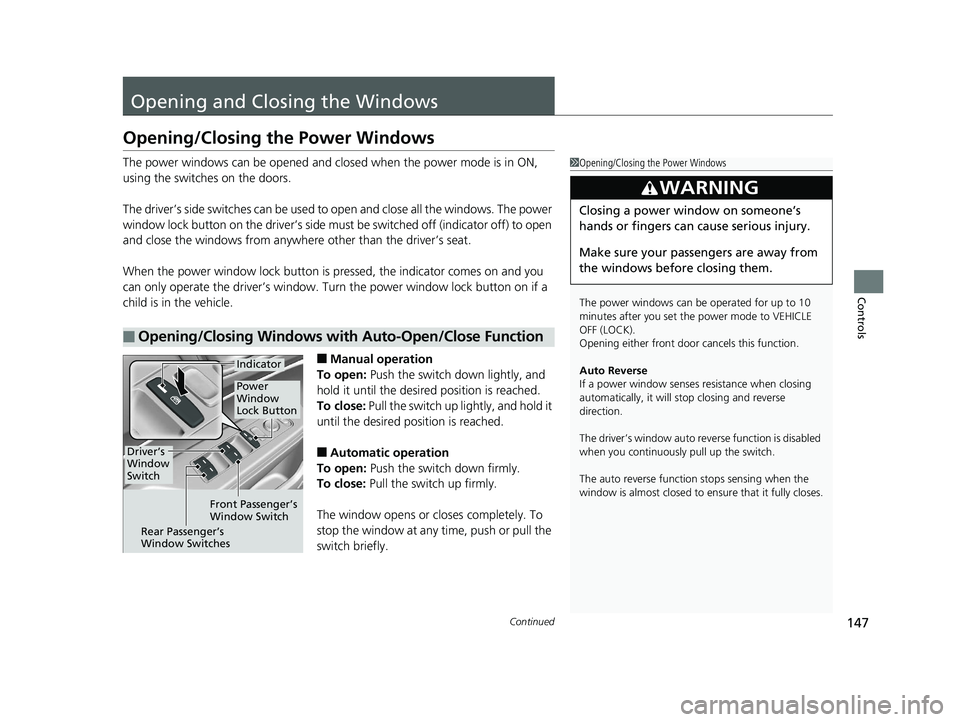
Opening/Closing the Power Windows
The power windows can be opened and closed when the power mode is in ON,
using the switches on the doors.
The driver’s side switches can be used to open and close all the windows. The power
window lock button on the driver’s side must be switched off (indicator off) to open
and close the windows from anywhere other than the driver’s seat.
When the power window lock button is pressed, the indicator comes on and you
can only operate the driver’s window. Turn the power window lock button on if a
child is in the vehicle.
■Manual operation
To open: Push the switch down lightly, and
hold it until the desired position is reached.
To close: Pull the switch up lightly, and hold it
until the desired position is reached.
■Automatic operation
To open: Push the switch down firmly.
To close: Pull the switch up firmly.
The window opens or closes completely. To
stop the window at any time, push or pull the
switch briefly.
■Opening/Closing Windows with Auto-Open/Close Function
1 Opening/Closing the Power Windows
The power windows can be operated for up to 10
minutes after you set the power mode to VEHICLE
OFF (LOCK).
Opening either front door cancels this function.
Auto Reverse
If a power window senses resistance when closing
automatically, it will stop closing and reverse
direction.
The driver’s window auto re verse function is disabled
when you continuously pull up the switch.
The auto reverse function stops sensing when the
window is almost closed to en sure that it fully closes.
3WARNING
Closing a power window on someone’s
hands or fingers can cause serious injury.
Make sure your passengers are away from
the windows before closing them.
Driver’s
Window
Switch
Front Passenger’s
Window Switch
Rear Passenger’s
Window Switches
Power
Window
Lock Button
Indicator
17 CLARITY BEV CSS-31TRV6000.book 147 ページ 2017年4月14日 金曜日 午前11 時8分
Page 177 of 543
175
uuInterior Lights/Interior Convenience Items uInterior Convenience Items
Continued
Controls
Interior Convenience Items
Press the release button to open the glove
box.
■Glove Box1Glove Box
The glove box light comes on when the parking lights
are on.
3WARNING
An open glove box can cause serious injury
to your passenger in a crash, even if the
passenger is wearing the seat belt.
Always keep the glove box closed while
driving.
Glove Box
Release Button
17 CLARITY BEV CSS-31TRV6000.book 175 ページ 2017年4月14日 金曜日 午前11 時8分
Page 183 of 543
Continued181
uuInterior Lights/Interior Convenience Items uInterior Convenience Items
Controls
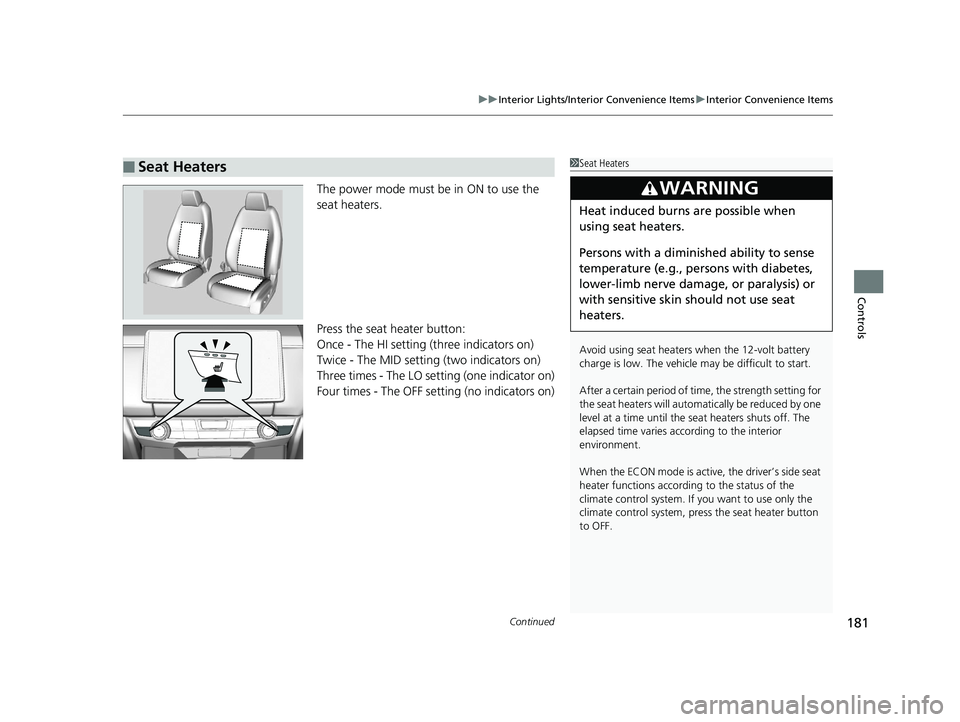
The power mode must be in ON to use the
seat heaters.
Press the seat heater button:
Once - The HI setting (three indicators on)
Twice - The MID setting (two indicators on)
Three times - The LO setting (one indicator on)
Four times - The OFF setting (no indicators on)
■Seat Heaters1Seat Heaters
Avoid using seat heaters when the 12-volt battery
charge is low. The vehicle may be difficult to start.
After a certain period of time, the strength setting for
the seat heaters will automatically be reduced by one
level at a time until the seat heaters shuts off. The
elapsed time varies according to the interior
environment.
When the ECON mode is active, the driver’s side seat
heater functions accordi ng to the status of the
climate control system. If you want to use only the
climate control system, press the seat heater button
to OFF.
3WARNING
Heat induced burns are possible when
using seat heaters.
Persons with a diminished ability to sense
temperature (e.g., persons with diabetes,
lower-limb nerve damage, or paralysis) or
with sensitive skin should not use seat
heaters.
17 CLARITY BEV CSS-31TRV6000.book 181 ページ 2017年4月14日 金曜日 午前11 時8分
Page 288 of 543
286
uuCustomized Features u
Features
Driver Assist System SetupForward Collision Warning Distance
ACC Forward Vehicle Detect Beep
Lane Keeping Assist Suspend Beep
Road Departure Mi tigation Setting
Adjust Outside Temp. Display
“Trip A” Reset Timing
“Trip B” Reset Timing
Vehicle
Meter Setup
Adjust Alarm Volume
New Message Notifications
Turn By Turn Auto Display
Speed/Distance units
CancelTPMS Calibration
Calibrate
Fuel Efficiency Backlight
Memory Position LinkDriving Position Setup
Reverse Alert Tone
17 CLARITY BEV CSS-31TRV6000.book 286 ページ 2017年4月14日 金曜日 午前11 時8分
Page 303 of 543
301
uuCustomized Features u
Continued
Features
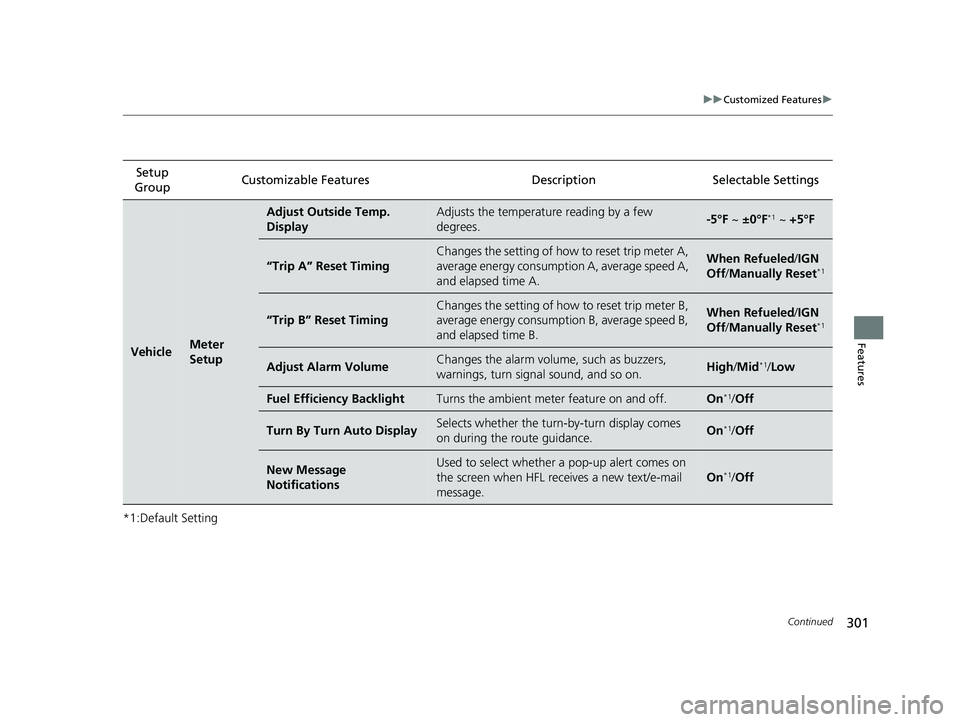
*1:Default SettingSetup
Group Customizable Features Description Selectable Settings
VehicleMeter
Setup
Adjust Outside Temp.
DisplayAdjusts the temperature reading by a few
degrees.-5°F ~
±0°F*1 ~ +5°F
“Trip A” Reset Timing
Changes the setting of how to reset trip meter A,
average energy consumpti on A, average speed A,
and elapsed time A.When Refueled /IGN
Off /Manually Reset*1
“Trip B” Reset Timing
Changes the setting of how to reset trip meter B,
average energy consumption B, average speed B,
and elapsed time B.When Refueled /IGN
Off /Manually Reset*1
Adjust Alarm VolumeChanges the alarm volu me, such as buzzers,
warnings, turn signal sound, and so on.High /Mid*1/ Low
Fuel Efficiency BacklightTurns the ambient meter feature on and off.On*1/Off
Turn By Turn Auto DisplaySelects whether the turn -by-turn display comes
on during the route guidance.On*1/ Off
New Message
NotificationsUsed to select whether a pop-up alert comes on
the screen when HFL receives a new text/e-mail
message.
On*1/Off
17 CLARITY BEV CSS-31TRV6000.book 301 ページ 2017年4月14日 金曜日 午前11 時8分
Page 372 of 543
uuWhen Driving uRoad Departure Mitigation (RDM) System
370
Driving
The system becomes ready to start sear ching for lane markings when all the
following conditions are met:
• The vehicle is traveling between about 45 and 90 mph (72 and 145 km/h).
• The vehicle is on a straight or slightly curved road.
• The turn signals are off.
• The brake pedal is not depressed.
• The wipers are not in continuous operation.
• The vehicle is not accelerating or braking, and the steering wheel is not being
turned.
• The system makes a determination that the driver is not actively accelerating,
braking or steering.
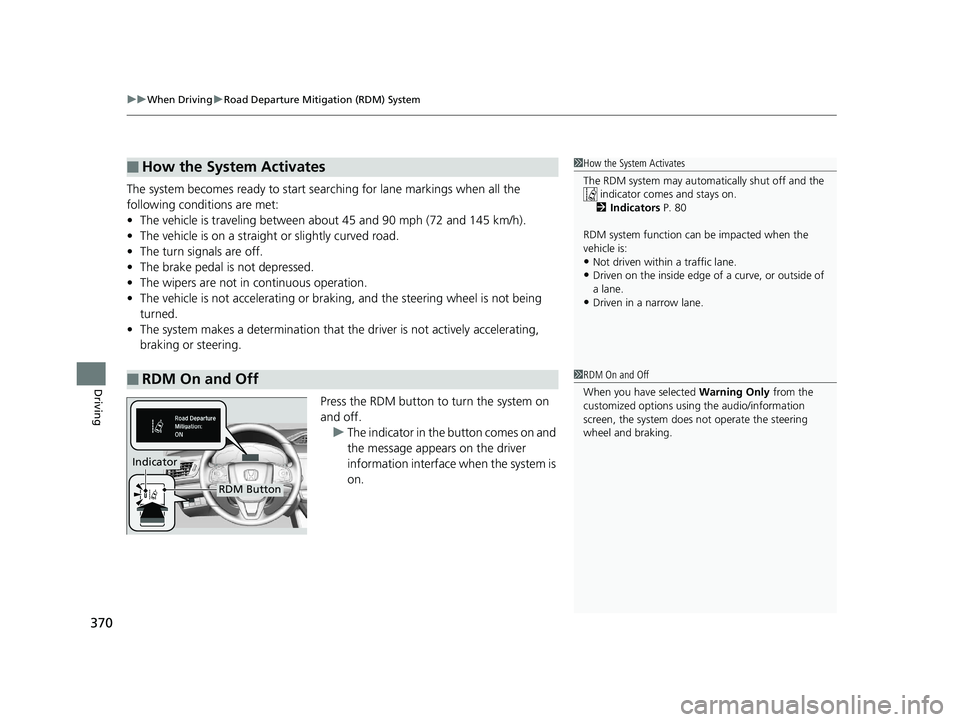
Press the RDM button to turn the system on
and off.u The indicator in the button comes on and
the message appears on the driver
information interface when the system is
on.
■How the System Activates
■RDM On and Off
1How the System Activates
The RDM system may automa tically shut off and the
indicator comes and stays on.
2 Indicators P. 80
RDM system function can be impacted when the
vehicle is:
•Not driven within a traffic lane.•Driven on the inside edge of a curve, or outside of
a lane.
•Driven in a narrow lane.
1 RDM On and Off
When you have selected Warning Only from the
customized options using the audio/information
screen, the system does not operate the steering
wheel and braking.
RDM Button
Indicator
17 CLARITY BEV CSS-31TRV6000.book 370 ページ 2017年4月14日 金曜日 午前11 時8分