2017 GMC SIERRA 1500 clock
[x] Cancel search: clockPage 411 of 494
GMC Sierra/Sierra Denali Owner Manual (GMNA-Localizing-U.S./Canada/
Mexico-9955992) - 2017 - crc - 5/3/16
410 Vehicle Care
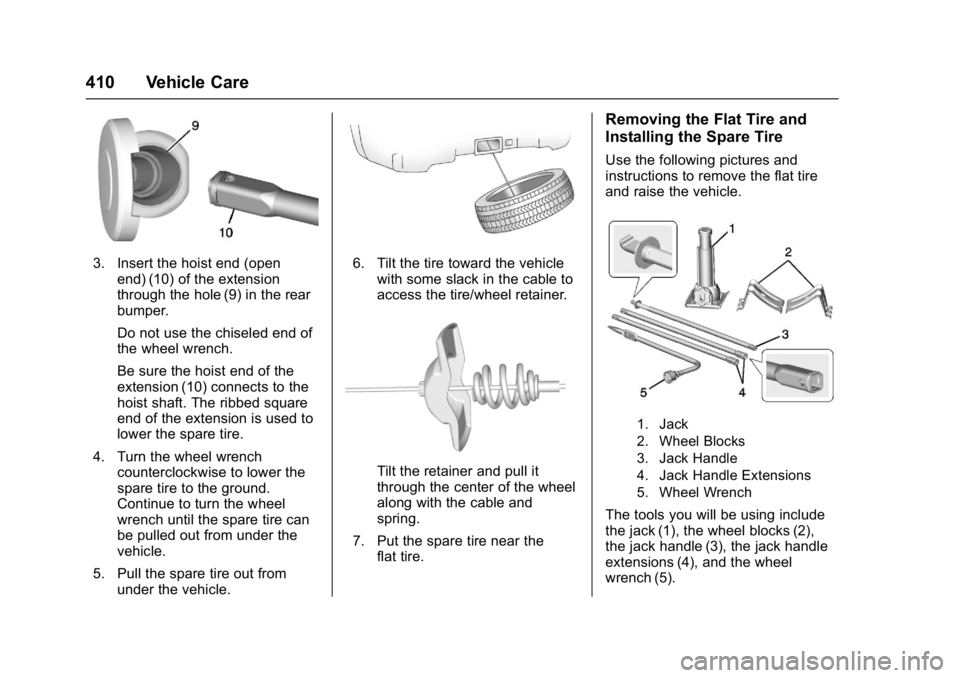
3. Insert the hoist end (openend) (10) of the extension
through the hole (9) in the rear
bumper.
Do not use the chiseled end of
the wheel wrench.
Be sure the hoist end of the
extension (10) connects to the
hoist shaft. The ribbed square
end of the extension is used to
lower the spare tire.
4. Turn the wheel wrench counterclockwise to lower the
spare tire to the ground.
Continue to turn the wheel
wrench until the spare tire can
be pulled out from under the
vehicle.
5. Pull the spare tire out from under the vehicle.6. Tilt the tire toward the vehiclewith some slack in the cable to
access the tire/wheel retainer.
Tilt the retainer and pull it
through the center of the wheel
along with the cable and
spring.
7. Put the spare tire near the flat tire.
Removing the Flat Tire and
Installing the Spare Tire
Use the following pictures and
instructions to remove the flat tire
and raise the vehicle.
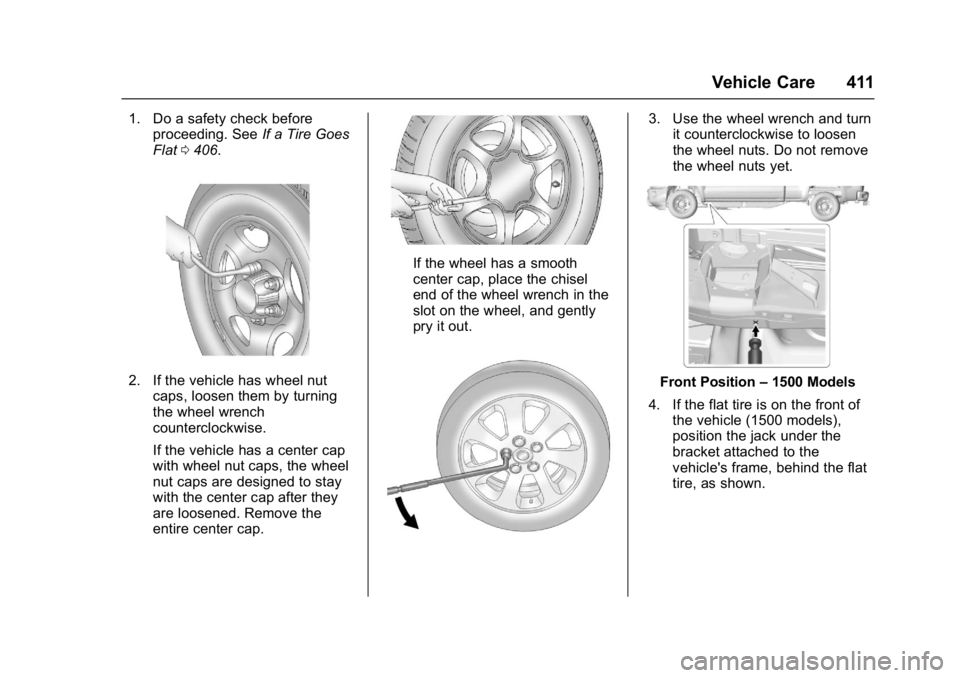
1. Jack
2. Wheel Blocks
3. Jack Handle
4. Jack Handle Extensions
5. Wheel Wrench
The tools you will be using include
the jack (1), the wheel blocks (2),
the jack handle (3), the jack handle
extensions (4), and the wheel
wrench (5).
Page 412 of 494
GMC Sierra/Sierra Denali Owner Manual (GMNA-Localizing-U.S./Canada/
Mexico-9955992) - 2017 - crc - 5/3/16
Vehicle Care 411
1. Do a safety check beforeproceeding. See If a Tire Goes
Flat 0406.
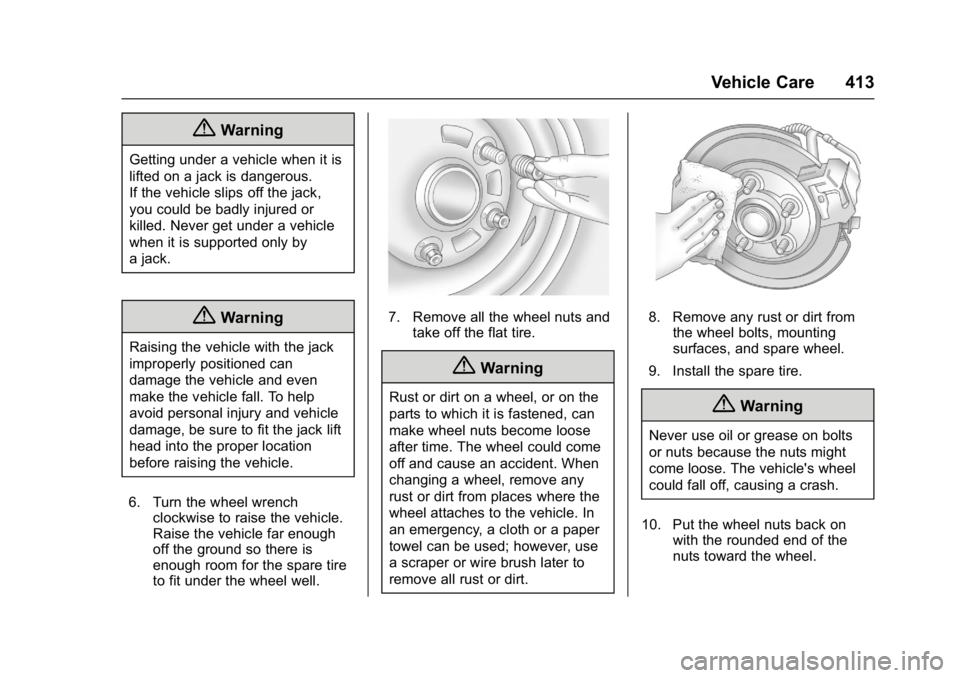
2. If the vehicle has wheel nut
caps, loosen them by turning
the wheel wrench
counterclockwise.
If the vehicle has a center cap
with wheel nut caps, the wheel
nut caps are designed to stay
with the center cap after they
are loosened. Remove the
entire center cap.
If the wheel has a smooth
center cap, place the chisel
end of the wheel wrench in the
slot on the wheel, and gently
pry it out.
3. Use the wheel wrench and turnit counterclockwise to loosen
the wheel nuts. Do not remove
the wheel nuts yet.
Front Position –1500 Models
4. If the flat tire is on the front of the vehicle (1500 models),
position the jack under the
bracket attached to the
vehicle's frame, behind the flat
tire, as shown.
Page 414 of 494
GMC Sierra/Sierra Denali Owner Manual (GMNA-Localizing-U.S./Canada/
Mexico-9955992) - 2017 - crc - 5/3/16
Vehicle Care 413
{Warning
Getting under a vehicle when it is
lifted on a jack is dangerous.
If the vehicle slips off the jack,
you could be badly injured or
killed. Never get under a vehicle
when it is supported only by
a jack.
{Warning
Raising the vehicle with the jack
improperly positioned can
damage the vehicle and even
make the vehicle fall. To help
avoid personal injury and vehicle
damage, be sure to fit the jack lift
head into the proper location
before raising the vehicle.
6. Turn the wheel wrench clockwise to raise the vehicle.
Raise the vehicle far enough
off the ground so there is
enough room for the spare tire
to fit under the wheel well.
7. Remove all the wheel nuts andtake off the flat tire.
{Warning
Rust or dirt on a wheel, or on the
parts to which it is fastened, can
make wheel nuts become loose
after time. The wheel could come
off and cause an accident. When
changing a wheel, remove any
rust or dirt from places where the
wheel attaches to the vehicle. In
an emergency, a cloth or a paper
towel can be used; however, use
a scraper or wire brush later to
remove all rust or dirt.
8. Remove any rust or dirt fromthe wheel bolts, mounting
surfaces, and spare wheel.
9. Install the spare tire.
{Warning
Never use oil or grease on bolts
or nuts because the nuts might
come loose. The vehicle's wheel
could fall off, causing a crash.
10. Put the wheel nuts back on with the rounded end of the
nuts toward the wheel.
Page 415 of 494
GMC Sierra/Sierra Denali Owner Manual (GMNA-Localizing-U.S./Canada/
Mexico-9955992) - 2017 - crc - 5/3/16
414 Vehicle Care
11. Tighten each wheel nut byhand. Then use the wheel
wrench to tighten the nuts until
the wheel is held against
the hub.
12. Turn the wheel wrench counterclockwise to lower the
vehicle. Lower the jack
completely.
{Warning
If wheel studs are damaged, they
can break. If all the studs on a
wheel broke, the wheel could
come off and cause a crash.
If any stud is damaged because
of a loose-running wheel, it could
be that all of the studs are
damaged. To be sure, replace all
studs on the wheel. If the stud
holes in a wheel have become
larger, the wheel could collapse in
operation. Replace any wheel if
its stud holes have become larger
or distorted in any way. Inspect
hubs and hub‐piloted wheels for
damage. Because of loose
(Continued)
Warning (Continued)
running wheels, piloting pad
damage may occur and require
replacement of the entire hub, for
proper centering of the wheels.
When replacing studs, hubs,
wheel nuts or wheels, be sure to
use GM original equipment parts.
{Warning
Wheel nuts that are improperly or
incorrectly tightened can cause
the wheels to become loose or
come off. The wheel nuts should
be tightened with a torque wrench
to the proper torque specification
after replacing. Follow the torque
specification supplied by the
aftermarket manufacturer when
using accessory locking wheel
nuts. SeeCapacities and
Specifications 0453 for original
equipment wheel nut torque
specifications.
Caution
Improperly tightened wheel nuts
can lead to brake pulsation and
rotor damage. To avoid expensive
brake repairs, evenly tighten the
wheel nuts in the proper
sequence and to the proper
torque specification. See
Capacities and Specifications
0 453 for the wheel nut torque
specification.
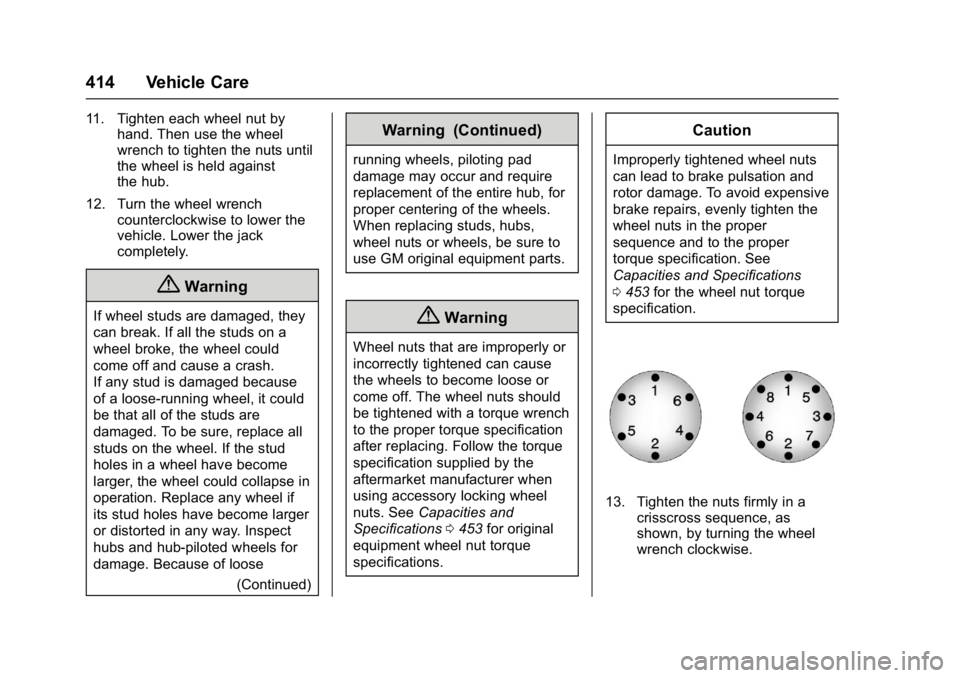
13. Tighten the nuts firmly in a crisscross sequence, as
shown, by turning the wheel
wrench clockwise.
Page 417 of 494
GMC Sierra/Sierra Denali Owner Manual (GMNA-Localizing-U.S./Canada/
Mexico-9955992) - 2017 - crc - 5/3/16
416 Vehicle Care
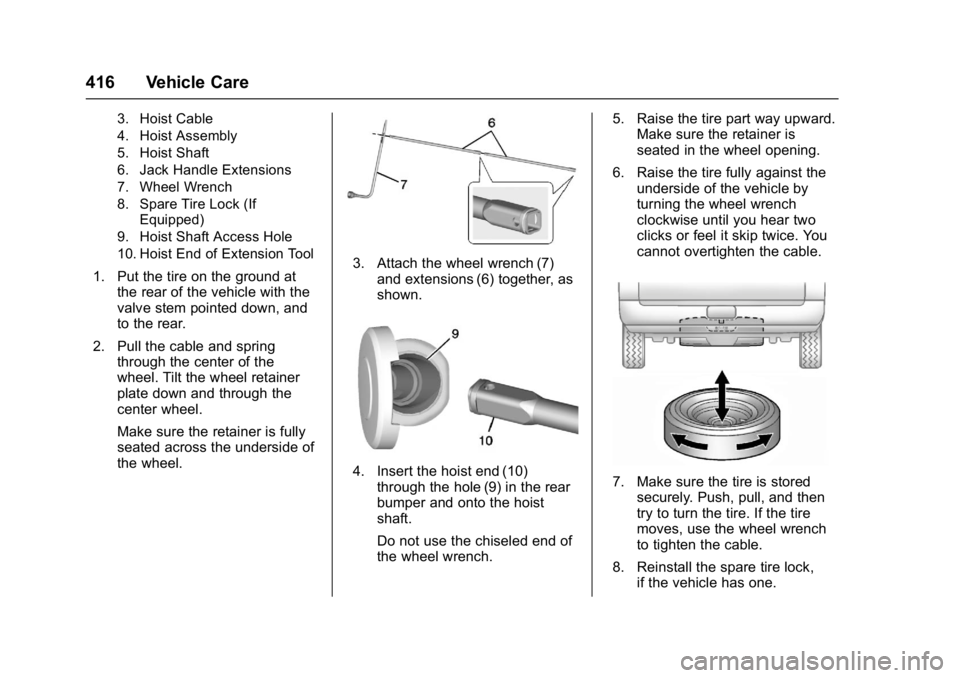
3. Hoist Cable
4. Hoist Assembly
5. Hoist Shaft
6. Jack Handle Extensions
7. Wheel Wrench
8. Spare Tire Lock (IfEquipped)
9. Hoist Shaft Access Hole
10. Hoist End of Extension Tool
1. Put the tire on the ground at the rear of the vehicle with the
valve stem pointed down, and
to the rear.
2. Pull the cable and spring through the center of the
wheel. Tilt the wheel retainer
plate down and through the
center wheel.
Make sure the retainer is fully
seated across the underside of
the wheel.3. Attach the wheel wrench (7)and extensions (6) together, as
shown.
4. Insert the hoist end (10)through the hole (9) in the rear
bumper and onto the hoist
shaft.
Do not use the chiseled end of
the wheel wrench. 5. Raise the tire part way upward.
Make sure the retainer is
seated in the wheel opening.
6. Raise the tire fully against the underside of the vehicle by
turning the wheel wrench
clockwise until you hear two
clicks or feel it skip twice. You
cannot overtighten the cable.7. Make sure the tire is storedsecurely. Push, pull, and then
try to turn the tire. If the tire
moves, use the wheel wrench
to tighten the cable.
8. Reinstall the spare tire lock, if the vehicle has one.
Page 484 of 494

GMC Sierra/Sierra Denali Owner Manual (GMNA-Localizing-U.S./Canada/
Mexico-9955992) - 2017 - crc - 5/3/16
Index 483
California (cont'd)Perchlorate Materials
Requirements . . . . . . . . . . . . . . . 341
California
Proposition
65 Warning . . . . . . . . . .340, 366, 418
Canadian Vehicle Owners . . . . . . . . 2
Capacities and Specifications . . . . . . . . . . . . . . . . . 453
Carbon Monoxide Engine Exhaust . . . . . . . . . . . . . . . 266
Tailgate . . . . . . . . . . . . . . . . . . . . . . . . . 36
Winter Driving . . . . . . . . . . . . . . . . 248
Cargo
Tie-Downs . . . . . . . . . . . . . . . . . . . . .110
Cargo Lamp . . . . . . . . . . . . . . . . . . . . 172
Caution, Danger, and Warning . . . . 3
CD Player . . . . . . . . . . . . . . . . . . . . . . 191
Center Console Storage . . . . . . . . 109
Center High-Mounted Stoplamp (CHMSL) and
Cargo Lamp . . . . . . . . . . . . . . . . . . . 375
Chains, Tire . . . . . . . . . . . . . . . . . . . . 405
Charging
Wireless . . . . . . . . . . . . . . . . . . . . . . .118
Charging System Light . . . . . . . . . 132
Check Ignition Transmission Lock . . . 371 Check (cont'd)
Malfunction Indicator
Engine Light . . . . . . . . . . . . . . . . 133
Child Restraints
Infants and Young Children . . . . . 83
Lower Anchors and Tethersfor Children . . . . . . . . . . . . . . . . . . . 88
Older Children . . . . . . . . . . . . . . . . . . 81
Securing . . . . . . . . . . . . . . . . . . . . 95, 98
Systems . . . . . . . . . . . . . . . . . . . . . . . . 85
Cleaning Exterior Care . . . . . . . . . . . . . . . . . 427
Interior Care . . . . . . . . . . . . . . . . . . 432
Climate Control Systems
Dual Automatic . . . . . . . . . . . . . . . 231
Clock . . . . . . . . . . . . . . . . . . . . . . . . . . . 115
Cluster, Instrument . . . . . . . . . . . . . 121
Collision Damage Repair . . . . . . . 464
Compartments Storage . . . . . . . . . . . . . . . . . . . . . . . 108
Compass . . . . . . . . . . . . . . . . . . . . . . . 115 Messages . . . . . . . . . . . . . . . . . . . . 146
Connections
OnStar
®. . . . . . . . . . . . . . . . . . . . . . 473
Control . . . . . . . . . . . . . . . . . . . . . . . . . 286 Traction and ElectronicStability . . . . . . . . . . . . . . . . . . . . . 284 Control Light
Hill Descent . . . . . . . . . . . . . . . . . . 136
Control of a Vehicle . . . . . . . . . . . . . 239
Convex Mirrors . . . . . . . . . . . . . . . . . . 41
Coolant Engine . . . . . . . . . . . . . . . . . . . . . . . . 357
Engine Temperature Gauge . . 127
Engine TemperatureWarning Light . . . . . . . . . . . . . . . 138
Cooling System . . . . . . . . . . . . . . . . . 356 Engine Messages . . . . . . . . . . . . 146
Courtesy Transportation Program . . . . . . . . . . . . . . . . . . . . . . . 463
Cruise Control . . . . . . . . . . . . . . . . . . 287 Light . . . . . . . . . . . . . . . . . . . . . . . . . . 140
Cupholders . . . . . . . . . . . . . . . . . . . . . 108
Customer Assistance . . . . . . . . . . . 460
Offices . . . . . . . . . . . . . . . . . . . . . . . . 459
Text Telephone (TTY)Users . . . . . . . . . . . . . . . . . . . . . . . 460
Customer Information
Service PublicationsOrdering Information . . . . . . . . 466
Customer Satisfaction Procedure . . . . . . . . . . . . . . . . . . . . . 457