2017 GMC SIERRA 1500 seat adjustment
[x] Cancel search: seat adjustmentPage 6 of 494

GMC Sierra/Sierra Denali Owner Manual (GMNA-Localizing-U.S./Canada/
Mexico-9955992) - 2017 - crc - 5/3/16
In Brief 5
In Brief
Instrument Panel
Instrument Panel . . . . . . . . . . . . . . . . 6
Initial Drive Information
Initial Drive Information . . . . . . . . . . 8
Remote Keyless Entry (RKE)System . . . . . . . . . . . . . . . . . . . . . . . . 8
Remote Vehicle Start . . . . . . . . . . . 9
Door Locks . . . . . . . . . . . . . . . . . . . . . 9
Windows . . . . . . . . . . . . . . . . . . . . . . . . 9
Seat Adjustment . . . . . . . . . . . . . . . 10
Memory Features . . . . . . . . . . . . . . 11
Heated and Ventilated Seats . . . 11
Head Restraint Adjustment . . . . 12
Safety Belts . . . . . . . . . . . . . . . . . . . . 12
Passenger Sensing System . . . 12
Mirror Adjustment . . . . . . . . . . . . . . 13
Interior Lighting . . . . . . . . . . . . . . . . 14
Exterior Lighting . . . . . . . . . . . . . . . 15
Windshield Wiper/Washer . . . . . . 15
Climate Controls . . . . . . . . . . . . . . . 16
Transmission . . . . . . . . . . . . . . . . . . 17
Four-Wheel Drive . . . . . . . . . . . . . . 17
Vehicle Features
Infotainment System . . . . . . . . . . . 19
Radio(s) . . . . . . . . . . . . . . . . . . . . . . . 19
Satellite Radio . . . . . . . . . . . . . . . . . 19 Portable Audio Devices . . . . . . . . 20
Bluetooth
®. . . . . . . . . . . . . . . . . . . . . 20
Steering Wheel Controls . . . . . . . 20
Cruise Control . . . . . . . . . . . . . . . . . 21
Driver Information Center (DIC) . . . . . . . . . . . . . . . . . 21
Forward Collision Alert (FCA) System . . . . . . . . . . . . . . . . . . . . . . . 22
Forward Automatic Braking (FAB) . . . . . . . . . . . . . . . . 22
Lane Departure Warning (LDW) . . . . . . . . . . . . . . . 22
Lane Keep Assist (LKA) . . . . . . . 22
Rear Vision Camera (RVC) . . . . 23
Parking Assist . . . . . . . . . . . . . . . . . 23
Power Outlets . . . . . . . . . . . . . . . . . 23
Universal Remote System . . . . . 23
Sunroof . . . . . . . . . . . . . . . . . . . . . . . . 24
Performance and Maintenance
Traction Control/Electronic Stability Control . . . . . . . . . . . . . . 24
Tire Pressure Monitor . . . . . . . . . . 25
Fuel (Except L86 6.2L Engine) . . . . . . . . . . . . . . . . . . . . . . . 25
Fuel (L86 6.2L Engine) . . . . . . . . 25
E85 or FlexFuel . . . . . . . . . . . . . . . . 26
Engine Oil Life System . . . . . . . . 26
Driving for Better Fuel Economy . . . . . . . . . . . . . . . . . . . . . 26 Roadside Assistance
Program . . . . . . . . . . . . . . . . . . . . . . 27
Page 11 of 494
GMC Sierra/Sierra Denali Owner Manual (GMNA-Localizing-U.S./Canada/
Mexico-9955992) - 2017 - crc - 5/3/16
10 In Brief
or when Retained Accessory Power
(RAP) is active. SeeRetained
Accessory Power (RAP) 0262.
Press the switch to lower the
window. Pull the switch up to
raise it. See Windows046 and
Power Windows 046.
Power Sliding Rear Window
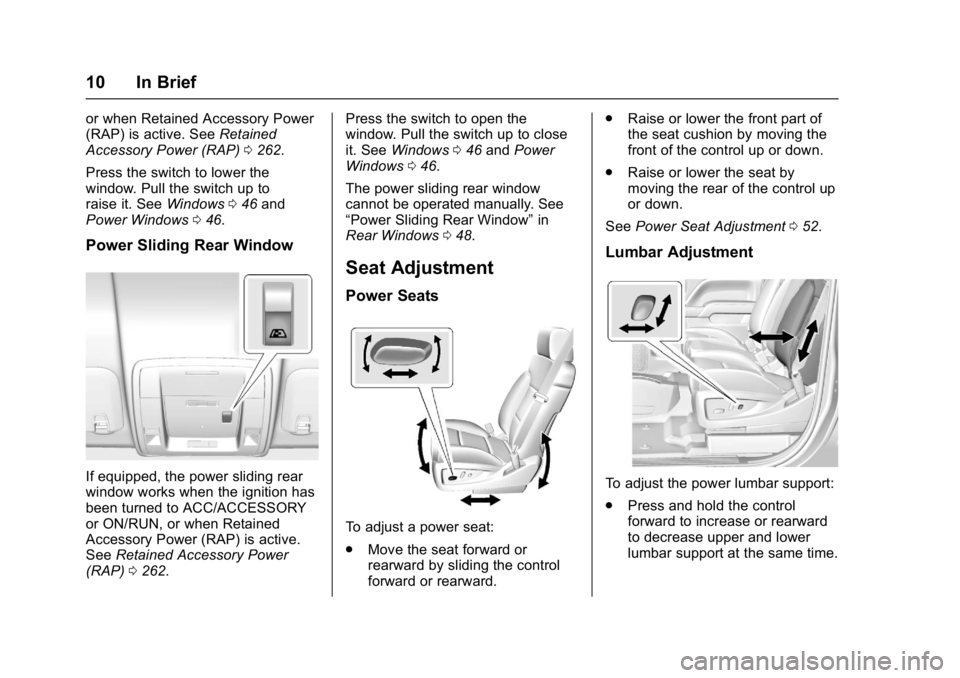
If equipped, the power sliding rear
window works when the ignition has
been turned to ACC/ACCESSORY
or ON/RUN, or when Retained
Accessory Power (RAP) is active.
See Retained Accessory Power
(RAP) 0262. Press the switch to open the
window. Pull the switch up to close
it. See
Windows 046 and Power
Windows 046.
The power sliding rear window
cannot be operated manually. See
“Power Sliding Rear Window” in
Rear Windows 048.
Seat Adjustment
Power Seats
To adjust a power seat:
.
Move the seat forward or
rearward by sliding the control
forward or rearward. .
Raise or lower the front part of
the seat cushion by moving the
front of the control up or down.
. Raise or lower the seat by
moving the rear of the control up
or down.
See Power Seat Adjustment 052.
Lumbar Adjustment
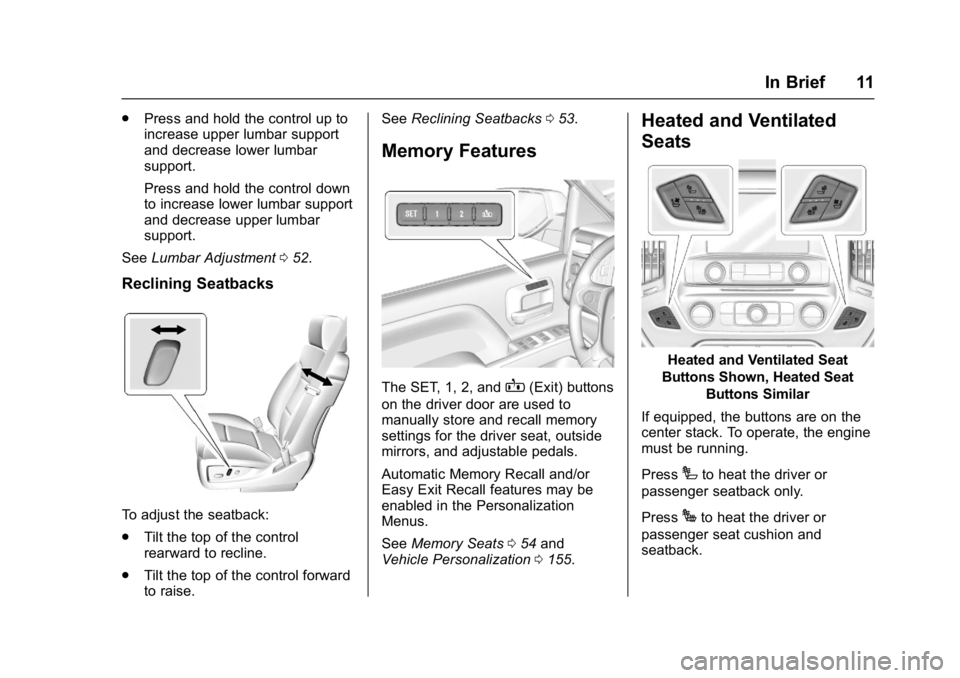
To adjust the power lumbar support:
.
Press and hold the control
forward to increase or rearward
to decrease upper and lower
lumbar support at the same time.
Page 12 of 494
GMC Sierra/Sierra Denali Owner Manual (GMNA-Localizing-U.S./Canada/
Mexico-9955992) - 2017 - crc - 5/3/16
In Brief 11
.Press and hold the control up to
increase upper lumbar support
and decrease lower lumbar
support.
Press and hold the control down
to increase lower lumbar support
and decrease upper lumbar
support.
See Lumbar Adjustment 052.
Reclining Seatbacks
To adjust the seatback:
.
Tilt the top of the control
rearward to recline.
. Tilt the top of the control forward
to raise. See
Reclining Seatbacks 053.
Memory Features
The SET, 1, 2, andB(Exit) buttons
on the driver door are used to
manually store and recall memory
settings for the driver seat, outside
mirrors, and adjustable pedals.
Automatic Memory Recall and/or
Easy Exit Recall features may be
enabled in the Personalization
Menus.
See Memory Seats 054 and
Vehicle Personalization 0155.
Heated and Ventilated
Seats
Heated and Ventilated Seat
Buttons Shown, Heated Seat Buttons Similar
If equipped, the buttons are on the
center stack. To operate, the engine
must be running.
Press
Ito heat the driver or
passenger seatback only.
Press
Jto heat the driver or
passenger seat cushion and
seatback.
Page 13 of 494
GMC Sierra/Sierra Denali Owner Manual (GMNA-Localizing-U.S./Canada/
Mexico-9955992) - 2017 - crc - 5/3/16
12 In Brief
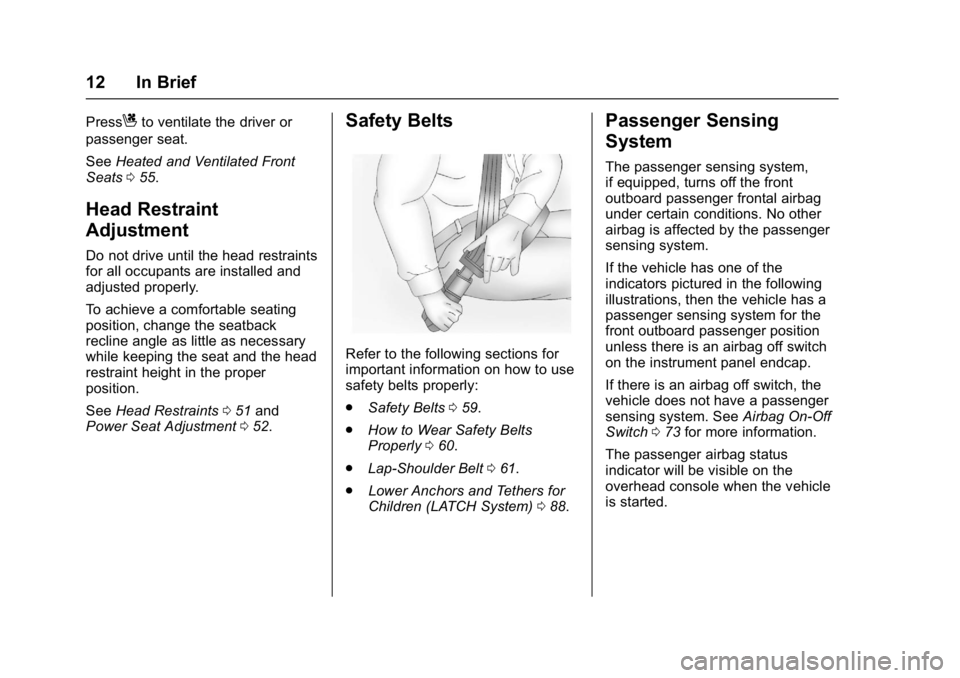
PressCto ventilate the driver or
passenger seat.
See Heated and Ventilated Front
Seats 055.
Head Restraint
Adjustment
Do not drive until the head restraints
for all occupants are installed and
adjusted properly.
To achieve a comfortable seating
position, change the seatback
recline angle as little as necessary
while keeping the seat and the head
restraint height in the proper
position.
See Head Restraints 051 and
Power Seat Adjustment 052.
Safety Belts
Refer to the following sections for
important information on how to use
safety belts properly:
.
Safety Belts 059.
. How to Wear Safety Belts
Properly 060.
. Lap-Shoulder Belt 061.
. Lower Anchors and Tethers for
Children (LATCH System) 088.
Passenger Sensing
System
The passenger sensing system,
if equipped, turns off the front
outboard passenger frontal airbag
under certain conditions. No other
airbag is affected by the passenger
sensing system.
If the vehicle has one of the
indicators pictured in the following
illustrations, then the vehicle has a
passenger sensing system for the
front outboard passenger position
unless there is an airbag off switch
on the instrument panel endcap.
If there is an airbag off switch, the
vehicle does not have a passenger
sensing system. See Airbag On-Off
Switch 073 for more information.
The passenger airbag status
indicator will be visible on the
overhead console when the vehicle
is started.
Page 15 of 494

GMC Sierra/Sierra Denali Owner Manual (GMNA-Localizing-U.S./Canada/
Mexico-9955992) - 2017 - crc - 5/3/16
14 In Brief
2. Press the arrows on the controlpad while the indicator light on
the (1) or (3) button is
illuminated, to move the mirror
up, down, right, or left.
3. Adjust each outside mirror so that a little of the vehicle and
the area behind it can be seen.
4. Press either (1) or (3) again to deselect the mirror.
See Power Mirrors 042.
If equipped with power folding
mirrors: 1. Press (2) to fold the mirrors out to the driving position.
2. Press (2) again to fold the mirrors in to the folded position.
For manual, power, and auto folding
mirrors, see Folding Mirrors 043.
The mirrors may also include a
memory function that works with the
memory seats. See Memory
Seats 054.Interior Mirror
Adjustment
Adjust the mirror for a clear view of
the area behind the vehicle.
Manual Dimming Rearview Mirror
If equipped, push the tab forward for
daytime use and pull it for nighttime
use to avoid glare from the
headlamps from behind. See
Manual Rearview Mirror 045.
Automatic Dimming Rearview
Mirror
If equipped, the mirror will
automatically reduce the glare of the
headlamps from behind. The
dimming feature comes on when the
vehicle is started.
See Automatic Dimming Rearview
Mirror 045.
Interior Lighting
Dome Lamps
There are dome lamps in the
overhead console and the headliner,
if equipped.
To change the dome lamp settings,
press the following:
OFF : Turns the lamps off, even
when a door is open.
DOOR : The lamps come on
automatically when a door is
opened.
ON : Turns all dome lamps on.
Page 51 of 494
GMC Sierra/Sierra Denali Owner Manual (GMNA-Localizing-U.S./Canada/
Mexico-9955992) - 2017 - crc - 5/3/16
50 Seats and Restraints
Seats and
Restraints
Head Restraints
Head Restraints . . . . . . . . . . . . . . . 51
Front Seats
Power Seat Adjustment . . . . . . . . 52
Lumbar Adjustment . . . . . . . . . . . . 52
Reclining Seatbacks . . . . . . . . . . . 53
Memory Seats . . . . . . . . . . . . . . . . . 54
Heated and Ventilated FrontSeats . . . . . . . . . . . . . . . . . . . . . . . . . 55
Rear Seats
Rear Seats (Double Cab FullBench) . . . . . . . . . . . . . . . . . . . . . . . 57
Rear Seats (Split Bench) . . . . . . 58
Safety Belts
Safety Belts . . . . . . . . . . . . . . . . . . . . 59
How to Wear Safety Belts Properly . . . . . . . . . . . . . . . . . . . . . . 60
Lap-Shoulder Belt . . . . . . . . . . . . . 61
Safety Belt Use During Pregnancy . . . . . . . . . . . . . . . . . . . . 64
Lap Belt . . . . . . . . . . . . . . . . . . . . . . . 64
Safety Belt Extender . . . . . . . . . . . 65
Safety System Check . . . . . . . . . . 65 Safety Belt Care . . . . . . . . . . . . . . . 65
Replacing Safety Belt System
Parts after a Crash . . . . . . . . . . . 66
Airbag System
Airbag System . . . . . . . . . . . . . . . . . 66
Where Are the Airbags? . . . . . . . 68
When Should an AirbagInflate? . . . . . . . . . . . . . . . . . . . . . . . 69
What Makes an Airbag Inflate? . . . . . . . . . . . . . . . . . . . . . . . 71
How Does an Airbag Restrain? . . . . . . . . . . . . . . . . . . . . . 71
What Will You See after an Airbag Inflates? . . . . . . . . . . . . . . 71
Airbag On-Off Switch . . . . . . . . . . 73
Passenger Sensing System . . . 75
Servicing the Airbag-Equipped Vehicle . . . . . . . . . . . . . . . . . . . . . . . 79
Adding Equipment to the Airbag-Equipped Vehicle . . . . . 79
Airbag System Check . . . . . . . . . . 80
Replacing Airbag System Parts after a Crash . . . . . . . . . . . . . . . . . 81
Child Restraints
Older Children . . . . . . . . . . . . . . . . . 81
Infants and Young Children . . . . 83
Child Restraint Systems . . . . . . . 85
Where to Put the Restraint . . . . . 87 Lower Anchors and Tethers for
Children (LATCH System) . . . . 88
Replacing LATCH System Parts After a Crash . . . . . . . . . . . . . . . . . 94
Securing Child Restraints (With
the Safety Belt in the
Rear Seat) . . . . . . . . . . . . . . . . . . . 95
Securing Child Restraints (With the Safety Belt in the Center
Front Seat) . . . . . . . . . . . . . . . . . . . 98
Securing Child Restraints (With the Safety Belt in the Front
Passenger Seat) . . . . . . . . . . . . . 98
Page 53 of 494
GMC Sierra/Sierra Denali Owner Manual (GMNA-Localizing-U.S./Canada/
Mexico-9955992) - 2017 - crc - 5/3/16
52 Seats and Restraints
the head restraint rearward, grasp
the head restraint and pull forward
fully until the mechanism releases
and allows the head restraint to
return to the full rear position.
The front seat outboard head
restraints are not removable.
Rear Seats
The rear seat has adjustable
headrests in the outboard seating
positions.
The height of the headrest can be
adjusted. Pull the headrest up to
raise it. To lower the headrest, push
the headrest down.
If you are installing a child restraint
in the rear seat, see“Securing a
Child Restraint Designed for the
LATCH System” underLower
Anchors and Tethers for Children
(LATCH System) 088.
Front Seats
Power Seat Adjustment
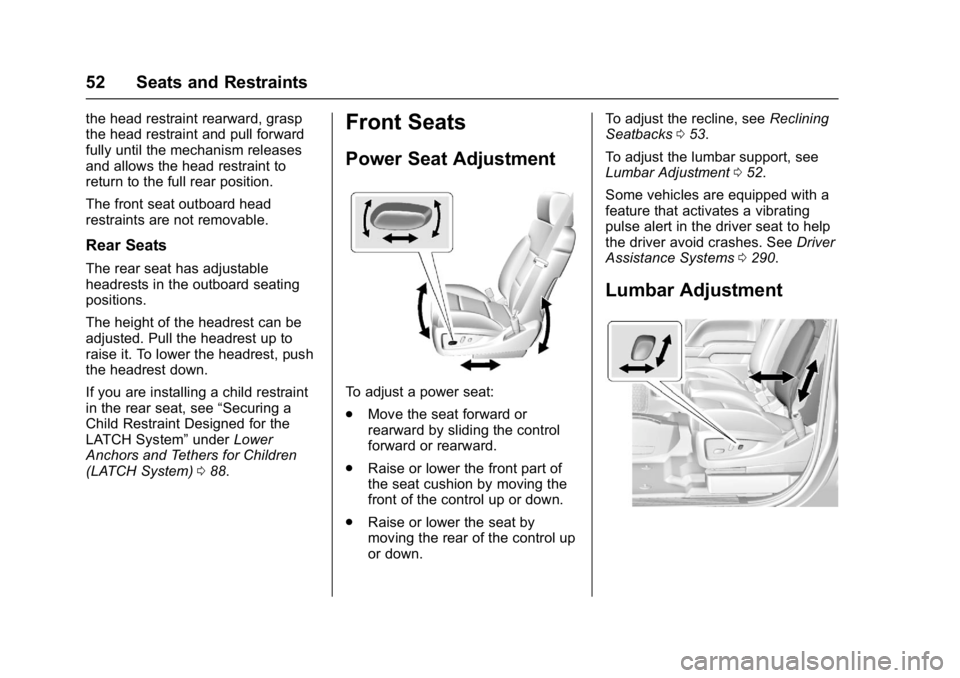
To adjust a power seat:
.
Move the seat forward or
rearward by sliding the control
forward or rearward.
. Raise or lower the front part of
the seat cushion by moving the
front of the control up or down.
. Raise or lower the seat by
moving the rear of the control up
or down. To adjust the recline, see
Reclining
Seatbacks 053.
To adjust the lumbar support, see
Lumbar Adjustment 052.
Some vehicles are equipped with a
feature that activates a vibrating
pulse alert in the driver seat to help
the driver avoid crashes. See Driver
Assistance Systems 0290.
Lumbar Adjustment
Page 64 of 494
GMC Sierra/Sierra Denali Owner Manual (GMNA-Localizing-U.S./Canada/
Mexico-9955992) - 2017 - crc - 5/3/16
Seats and Restraints 63
To unlatch the belt, push the button
on the buckle. The belt should
return to its stowed position.
Always stow the safety belt slowly.
If the safety belt webbing returns
quickly to the stowed position, the
retractor may lock and cannot be
pulled out. If this happens, pull the
safety belt straight out firmly to
unlock the webbing, and then
release it. If the webbing is still
locked in the retractor, see your
dealer.
Before a door is closed, be sure the
safety belt is out of the way. If a
door is slammed against a safety
belt, damage can occur to both the
safety belt and the vehicle.
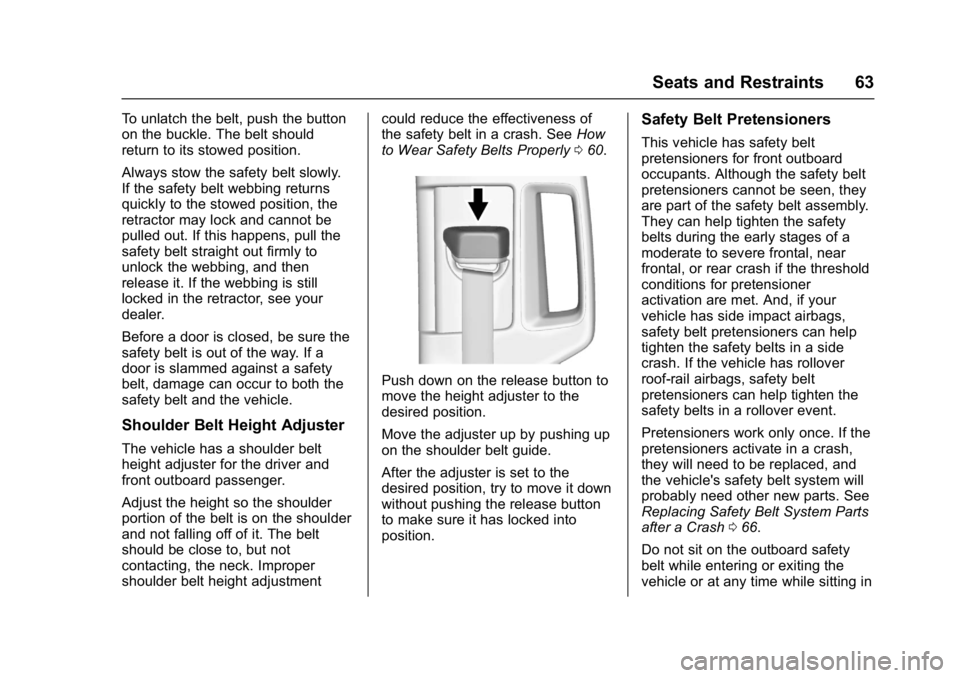
Shoulder Belt Height Adjuster
The vehicle has a shoulder belt
height adjuster for the driver and
front outboard passenger.
Adjust the height so the shoulder
portion of the belt is on the shoulder
and not falling off of it. The belt
should be close to, but not
contacting, the neck. Improper
shoulder belt height adjustmentcould reduce the effectiveness of
the safety belt in a crash. See
How
to Wear Safety Belts Properly 060.
Push down on the release button to
move the height adjuster to the
desired position.
Move the adjuster up by pushing up
on the shoulder belt guide.
After the adjuster is set to the
desired position, try to move it down
without pushing the release button
to make sure it has locked into
position.
Safety Belt Pretensioners
This vehicle has safety belt
pretensioners for front outboard
occupants. Although the safety belt
pretensioners cannot be seen, they
are part of the safety belt assembly.
They can help tighten the safety
belts during the early stages of a
moderate to severe frontal, near
frontal, or rear crash if the threshold
conditions for pretensioner
activation are met. And, if your
vehicle has side impact airbags,
safety belt pretensioners can help
tighten the safety belts in a side
crash. If the vehicle has rollover
roof-rail airbags, safety belt
pretensioners can help tighten the
safety belts in a rollover event.
Pretensioners work only once. If the
pretensioners activate in a crash,
they will need to be replaced, and
the vehicle's safety belt system will
probably need other new parts. See
Replacing Safety Belt System Parts
after a Crash 066.
Do not sit on the outboard safety
belt while entering or exiting the
vehicle or at any time while sitting in