2017 GENESIS G90 transmission
[x] Cancel search: transmissionPage 4 of 524

I
IN
N T
TR
R O
O D
DU
U C
CT
T I
IO
O N
N
Introduction
F4
Congratulations, and thank you for choosing the Genesis Brand. We are
pleased to welcome you to the growing number of distinguished people who
drive the Genesis Brand. We are very proud of the advanced engineering and
high-quality construction of each Genesis Brand Product we build.
Your Owner’s Manual will introduce you to the features and operation of your
new Genesis Brand Product. To become familiar with your new Genesis Brand
Product, so that you can fully enjoy it, read this Owner’s Manual carefully
before driving your new vehicle.
This manual contains important safety information and instructions intended
to familiarize you with your vehicle’s controls and safety features so you can
safely operate your vehicle.
This manual also contains information on maintenance designed to enhance
safe operation of the vehicle. It is recommended that all service and mainte-
nance on your car be performed by an authorized Dealer of Genesis Brand
Products. Dealer of Genesis Brand Products are prepared to provide high-
quality service, maintenance and any other assistance that may be required.
This Owner’s Manual should be considered a permanent part of your vehicle,
and should be kept in the vehicle so you can refer to it at any time. The man-
ual should stay with the vehicle if you sell it to provide the next owner with
important operating, safety and maintenance information.
Copyright 2016 Genesis Motors USA. All rights reserved. No part of this pub-
lication may be reproduced, stored in any retrieval system or transmitted in
any form or by any means without the prior written permission of Genesis
Motors USA.Severe engine and transmission damage may result from the use of
poor quality fuels and lubricants that do not meet Genesis Brand
specifications. You must always use high quality fuels and lubricants
that meet the specifications listed on Page 8-6 in the Vehicle
Specifications section of the Owner's Manual.
CAUTION
G G
E
EN
N E
ES
SI
IS
S
M
M O
OT
TO
O R
RS
S
U
U S
SA
A
Page 18 of 524

1. Instrument cluster ...................................3-60
2. Horn ........................................................3-19
3. Driver’s front air bag ...............................2-59
4. Engine Start/Stop button ..........................5-7
5. DIS navigation system .............................4-4
6. Climate control system.........................3-141
7. Clock .....................................................3-151
8. Hazard warning flasher ............................6-2
9. Passenger’s front air bag .......................2-59
10. Driver’s knee air bag ............................2-59
11. Glove box ...........................................3-14412. Automatic transmission ........................5-11
13. Multi-view camera system..................3-116
14. Parking assist system ........................3-117
15. Auto hold ..............................................5-31
16. Drive mode integrated control
system ..................................................5-44
17. Seat warmers and coolers ...................2-28
18. Heated steering wheel button ..............3-18
19. Rear curtain folding button .................3-153
20. Center control panel ...............................4-4
21. Center console storage ......................3-143
I I N
N S
ST
T R
R U
U M
M E
EN
N T
T
P
P A
A N
N E
EL
L
O
O V
VE
ER
R V
V I
IE
E W
W
(
( I
I)
)
1-5
01
The actual shape may differ from the illustration.
OHI016004
Page 126 of 524

3-24
Convenient features of your vehicle
Programming HomeLink®
Please note the following:
When programming a garage dooropener, it is advised to park the
vehicle outside of the garage.
It is recommended that a new bat- tery be placed in the hand-held
transmitter of the device being pro-
grammed to HomeLink
®for quicker
training and accurate transmission
of the radio-frequency signal.
Some vehicles may require the ignition switch to be placed in the
ACC (or "Accessories") position for
programming and/or operation of
HomeLink
®.
In the event that there are still pro- gramming difficulties or questions
after following the programming
steps listed below, contact
HomeLink
®at: www.homelink.com,
www.youtube.com/HomeLinkGentex
or by calling 1-800-355-3515.
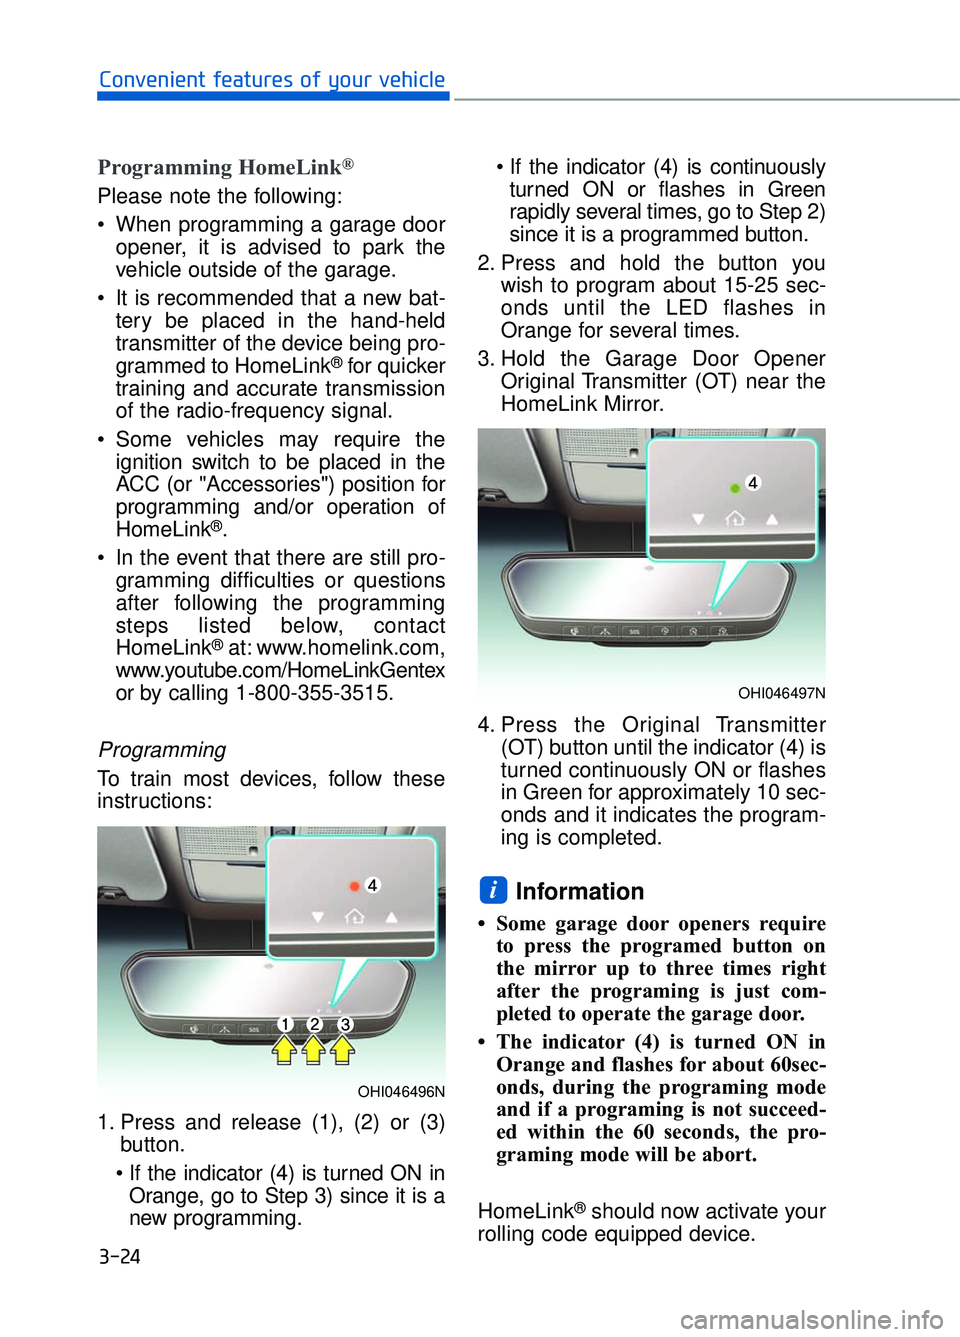
Programming
To train most devices, follow these
instructions:
1. Press and release (1), (2) or (3) button.
Orange, go to Step 3) since it is a
new programming.
turned ON or flashes in Green
rapidly several times, go to Step 2)
since it is a programmed button.
2. Press and hold the button you wish to program about 15-25 sec-
onds until the LED flashes in
Orange for several times.
3. Hold the Garage Door Opener Original Transmitter (OT) near the
HomeLink Mirror.
4. Press the Original Transmitter (OT) button until the indicator (4) is
turned continuously ON or flashes
in Green for approximately 10 sec-
onds and it indicates the program-
ing is completed.
Information
• Some garage door openers requireto press the programed button on
the mirror up to three times right
after the programing is just com-
pleted to operate the garage door.
• The indicator (4) is turned ON in Orange and flashes for about 60sec-
onds, during the programing mode
and if a programing is not succeed-
ed within the 60 seconds, the pro-
graming mode will be abort.
HomeLink
®should now activate your
rolling code equipped device.
i
OHI046496N
OHI046497N
Page 134 of 524

4. Press the Original Transmitter (OT)button until the indicator (4) is
turned continuously ON or flashes
in Green for approximately 10 sec-
onds and it indicates the program-
ing is completed.
Information
• Some garage door openers requireto press the programed button on
the mirror up to three times right
after the programing is just com-
pleted to operate the garage door.
• The indicator (4) is turned ON in Orange and flashes for about 60sec
during the programing mode and if
a programing is not succeeded with-
in the 60 seconds, the programing
mode will be abort.
Programming HomeLink®
Please note the following:
When programming a garage dooropener, it is advised to park the
vehicle outside of the garage.
It is recommended that a new bat- tery be placed in the hand-held
transmitter of the device being pro-
grammed to HomeLink
®for quicker
training and accurate transmission
of the radio-frequency signal.
Some vehicles may require the ignition switch to be placed in the
ACC (or "Accessories") position for
programming and/or operation of
HomeLink
®.
In the event that there are still pro- gramming difficulties or questions
after following the programming
steps listed below, contact
HomeLink
®at: www.homelink.com,
www.youtube.com/HomeLinkGentex
or by calling 1-800-355-3515.
i
3-32
Convenient features of your vehicle
Before programming HomeLink
®
to a garage door opener or gate
operator, make sure people and
objects are out of the way of the
device to prevent potential harm
or damage. Do not use the
HomeLink
®with any garage door
opener that lacks the safety stop
and reverse features required by
U.S. federal safety standards (this
includes any garage door opener
model manufactured before April
1, 1982). A garage door that can-
not detect an object - signaling
the door to stop and reverse -
does not meet current U.S. feder-
al safety standards. Using a
garage door opener without
these features increases the risk
of serious injury or death.
WARNING
Page 166 of 524

Outside temperature gauge
This gauge indicates the current out-
side air temperatures by 1°F (1°C).
- Temperature range :-40°F ~ 140°F
(-40°C ~ 60°C)
The outside temperature on the dis-
play may not change immediately
like a general thermometer (to avoid
distracting the driver).
To change the temperature unit from
°F to °C or °C to °F, it can be selected
by one of the following methods:
- Go to the 'User Settings ➝Other
Features ➝Temperature Unit' on
the LCD display.
- Press the AUTO button for 3 sec- onds while pressing the OFF button
on the climate control system.
Both the temperature unit on the
cluster LCD display and climate con-
trol screen will change.
Transmission shift indicator
This indicator displays which auto-
matic transmission shift lever is
selected.
P
R
N
D
1, 2, 3, 4, 5, 6, 7, 8
Shift indicator pop-up
The pop-up displays the current gear
position selected for 2 seconds
(P/R/N/D).
3-64
Convenient features of your vehicle
OHI046111NOHI046112
OHI046113
Page 184 of 524

Check haptic steering wheelsystem (if equipped)
This warning message is displayed if
there is a problem with the haptic
steering wheel system. Have the
vehicle inspected by an authorized
Dealer of Genesis Brand Products.
Check shift lever
This warning message is displayed if
there is a problem with the shift lever.
Have the vehicle inspected by an
authorized Dealer of Genesis Brand
Products.
Shifter Malfunction
This warning message is displayed if
there is a problem with the automatic
transmission system. Have the vehi-
cle inspected by an authorized Dealer
of Genesis Brand Products.
3-82
Convenient features of your vehicle
OHI046135L
OHI046133L
OHI046134L
Page 194 of 524

3. Door
- Enable on Speed: All doors will beautomatically locked when the vehi-
cle speed exceeds 9 mph (15 km/h).
- Enable on Shift: All doors will be automatically locked if the automat-
ic transmission shift lever is shifted
from the P (Park) position to the R
(Reverse), N (Neutral), or D (Drive)
position.
- Disable: The auto door unlock oper- ation will be canceled.
- Vehicle Off: All doors will be auto- matically unlocked when the Engine
Star/Stop button is set to the OFF
position.
- On Shift to P: All doors will be auto- matically unlocked if the automatic
transmission shift lever is shifted to
the P (Park) position.
- To activate or deactivate the two press unlock function. If activated,
the driver's door will unlock if the
door is unlocked. When the door is
unlocked again within 4 seconds,
all doors will unlock.
To activate or deactivate the lock
sound when the doors are locked
and unlocked.
To activate or deactivate the Smart
Trunk system.
For more information, refer to the
"Smart Trunk" in this chapter.
4. Lights
- Off: The one touch turn signal func-
tion will be deactivated.
- 3, 5, 7 Flashes: The turn signal indi- cator will blink 3, 5, or 7 times when
the turn signal lever is moved slightly.
For more information, refer to
"Light" in this chapter.
To select the color of the ambient
light.
- Polar White/Ocean Blue/Lake Blue Green/Orchid Green/Freesia Yellow/
Sunrise Red/Aurora Purple
To select the brightness of the ambient
light.
- Level 1~4
3-92
Convenient features of your vehicle
OHI046206N
OHI046165L
Page 262 of 524

Before Driving ........................................................................\
......5-5
Before Entering the Vehicle......................................................................5-\
5
Before Starting ........................................................................\
.....................5-5
Engine Start/Stop Button ........................................................................\
..5-7
Automatic Transmission ............................................................5-11
Automatic Transmission Operation .......................................................5-11
LCD Display Messages........................................................................\
......5-17
Good Driving Practices ........................................................................\
.....5-19
All Wheel Drive (AWD) ..............................................................5-21
Using All Wheel Drive (AWD) ..................................................................5-21
Emergency Precautions ........................................................................\
...5-23
Braking System ........................................................................\
..5-25
Power Brakes........................................................................\
......................5-25
Disc Brakes Wear Indicator.....................................................................5-2\
6
Electronic Parking Brake (EPB) .............................................................5-26
Auto Hold ........................................................................\
.............................5-31
Anti-lock Brake System (ABS) ...............................................................5-35
Electronic Stability Control (ESC) ..........................................................5-37
Vehicle Stability Management (VSM) ...................................................5-40
Hill-Start Assist Control (HAC) ...............................................................5-41
Good Braking Practices.................................................................\
...........5-42
Genesis Adaptive Control Suspension.....................................5-43
Electronic Control Suspension (ECS) ....................................................5-43
Dynamic Stability Damping Control (DSDC) ........................................5-43
Drive Mode Integrated Control System ..................................5-44
Blind Spot Detection System (BSD) ........................................5-49
Blind Spot Detection (BSD) / Lane Change Assist (LCA) ................5-50
Rear Cross Traffic Alert (RCTA) .............................................................5-53
Limitations of the System .......................................................................5\
-56
Smart Blind Spot Detection System (SBSD) ..........................5-57
Limitations of the System .......................................................................5\
-58
5
D Dr
ri
iv
v i
in
n g
g
y
y o
o u
ur
r
v
v e
e h
h i
ic
c l
le
e