2017 GENESIS G90 instrument cluster
[x] Cancel search: instrument clusterPage 18 of 524

1. Instrument cluster ...................................3-60
2. Horn ........................................................3-19
3. Driver’s front air bag ...............................2-59
4. Engine Start/Stop button ..........................5-7
5. DIS navigation system .............................4-4
6. Climate control system.........................3-141
7. Clock .....................................................3-151
8. Hazard warning flasher ............................6-2
9. Passenger’s front air bag .......................2-59
10. Driver’s knee air bag ............................2-59
11. Glove box ...........................................3-14412. Automatic transmission ........................5-11
13. Multi-view camera system..................3-116
14. Parking assist system ........................3-117
15. Auto hold ..............................................5-31
16. Drive mode integrated control
system ..................................................5-44
17. Seat warmers and coolers ...................2-28
18. Heated steering wheel button ..............3-18
19. Rear curtain folding button .................3-153
20. Center control panel ...............................4-4
21. Center console storage ......................3-143
I I N
N S
ST
T R
R U
U M
M E
EN
N T
T
P
P A
A N
N E
EL
L
O
O V
VE
ER
R V
V I
IE
E W
W
(
( I
I)
)
1-5
01
The actual shape may differ from the illustration.
OHI016004
Page 87 of 524

2-67
02
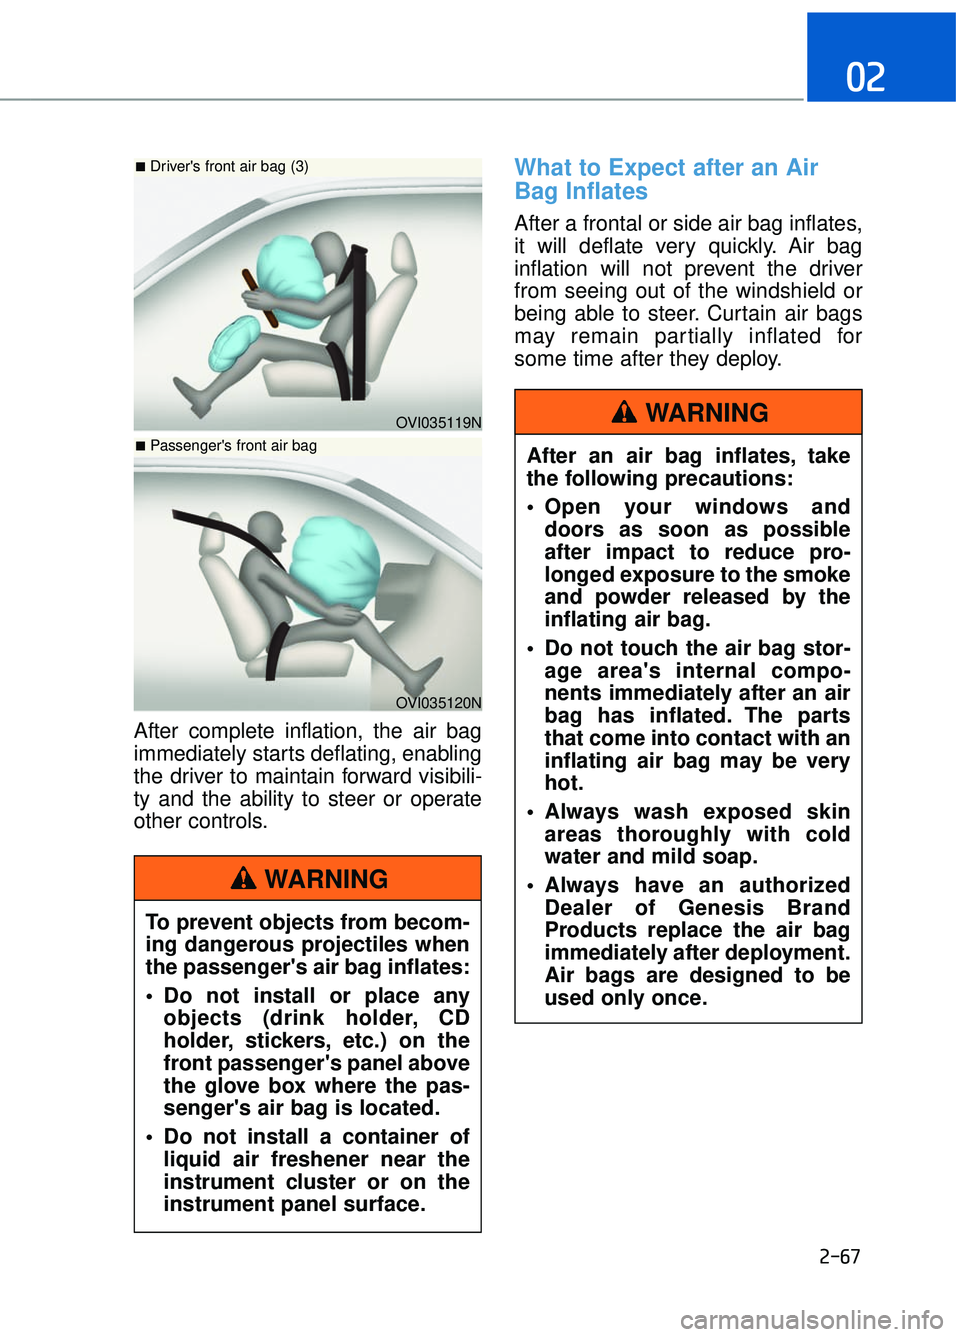
After complete inflation, the air bag
immediately starts deflating, enabling
the driver to maintain forward visibili-
ty and the ability to steer or operate
other controls.
What to Expect after an Air
Bag Inflates
After a frontal or side air bag inflates,
it will deflate very quickly. Air bag
inflation will not prevent the driver
from seeing out of the windshield or
being able to steer. Curtain air bags
may remain partially inflated for
some time after they deploy.
OVI035119N
■Driver's front air bag (3)
OVI035120N
■Passenger's front air bag
To prevent objects from becom-
ing dangerous projectiles when
the passenger's air bag inflates:
• Do not install or place anyobjects (drink holder, CD
holder, stickers, etc.) on the
front passenger's panel above
the glove box where the pas-
senger's air bag is located.
Do not install a container of liquid air freshener near the
instrument cluster or on the
instrument panel surface.
WARNING
After an air bag inflates, take
the following precautions:
Open your windows anddoors as soon as possible
after impact to reduce pro-
longed exposure to the smoke
and powder released by the
inflating air bag.
Do not touch the air bag stor- age area's internal compo-
nents immediately after an air
bag has inflated. The parts
that come into contact with an
inflating air bag may be very
hot.
Always wash exposed skin areas thoroughly with cold
water and mild soap.
Always have an authorized Dealer of Genesis Brand
Products replace the air bag
immediately after deployment.
Air bags are designed to be
used only once.
WARNING
Page 104 of 524

Smart Trunk ........................................................................\
........3-54
Fuel Filler Door ........................................................................\
..3-57
Opening the Fuel Filler Door ..................................................................3-57
Closing the Fuel Filler Door ....................................................................3-57\
Emergency Fuel Filler Door Release ....................................................3-59
Instrument Cluster .....................................................................3-6\
0
Instrument Cluster Control ......................................................................3-\
61
Gauges and Meters ........................................................................\
...........3-61
Warning and Indicator Lights .................................................................3-65
LCD Display Messages........................................................................\
......3-75
LCD Display ........................................................................\
.........3-86
LCD Display Control......................................................................\
.............3-86
LCD Modes ........................................................................\
..........................3-87
Trip Computer ........................................................................\
.....3-95
Head-Up Display ........................................................................\
3-98
Light ........................................................................\
...................3-101
Exterior Lights........................................................................\
..................3-101
Interior Lights ........................................................................\
...................3-108
Welcome System........................................................................\
..............3-111
Wipers and Washers ................................................................3-112
Windshield Wipers ........................................................................\
...........3-112
Windshield Washers ........................................................................\
........3-114
Driver Assist System................................................................3-115
Rear View Camera ........................................................................\
...........3-115
Multi-View Camera System ..................................................................3-116
Parking Assist System ........................................................................\
....3-117
Defroster ........................................................................\
...........3-121
Rear Window Defroster ........................................................................\
.3-121
Front Wiper Deicer........................................................................\
..........3-121
3
Page 119 of 524

3-17
03
S
ST
T E
EE
ER
R I
IN
N G
G
W
W H
HE
EE
EL
L
Motor-Driven Power Steering
(MDPS)
The system assists you with steering
the vehicle. If the engine is turned off
or if the power steering system
becomes inoperative, you may still
steer the vehicle, but it will require
increased steering effort.
Should you notice any change in the
effort required to steer during normal
vehicle operation, have the system
checked by an authorized Dealer of
Genesis Brand Products.
If the Motor-Driven Power Steering
(MDPS) System does not operate
normally, the warning light ( )
will illuminate on the instrument
cluster. You may steer the vehicle,
but it will require increased steer-
ing efforts. Take your vehicle to an
authorized Dealer of Genesis
Brand Products and have the sys-
tem checked as soon as possible.
Information
The following symptoms may occur
during normal vehicle operation:
• The steering effort may be high imme-
diately after the Engine Start/Stop
button is in the ON position.
This happens as the system per-
forms the MDPS system diagnostics.
When the diagnostics is completed,
the steering wheel will return to its
normal condition.
• A click noise may be heard from the MDPS relay after the Engine
Start/Stop button is in the ON or
OFF position.
(Continued)(Continued)
• Motor noise may be heard when the
vehicle is at a stop or at a low driv-
ing speed.
• When you operate the steering wheel in low temperature, abnormal
noise may occur. If temperature
rises, the noise will disappear. This
is a normal condition.
• When an error is detected from the MDPS, the assistant function of
steering effort will not be activated
in order to prevent fatal accidents.
Instrument cluster warning lights
may be on or the steering effort may
be high. When the following symp-
toms occur, immediately drive the
vehicle to a safe area and check it.
i
NOTICE
Page 120 of 524

3-18
Convenient features of your vehicle
Tilt Steering / Telescope Steering
Adjust the steering wheel so it points
toward your chest, not toward your
face. Make sure you can see the
instrument cluster warning lights and
gauges. Always adjust the position of
the steering wheel before driving.
To change the steering wheel angle
and height:
Move the switch (1) up and down toadjust the angle (2).
Move the switch forward or rear- ward to adjust the height (3).
Do not adjust the steering wheel
longer than necessary when the
engine is turned off. This may result
in unnecessary battery drain.
Heated Steering Wheel
When the Engine Start/Stop button is
in the ON position or when the engine
is running, press the heated steering
wheel button to warm the steering
wheel. The indicator on the button will
illuminate.
To turn the heated steering wheel off,
press the button again. The indicator
on the button will turn off.
Each time you push the switch, the temperature setting changes as
follows:
When the heated steering wheel switch is pressed to high ( ) :
The heated steering wheel switch
automatically changes to the low
position after 30 minutes. You can
turn off the heated steering wheel
by pressing the switch to the OFF
position.
Do not install any cover or accesso-
ry on the steering wheel. This cover
or accessory could cause damage
to the heated steering wheel sys-
tem.
NOTICE
NOTICE
OHI046046
NEVER adjust the steering
wheel while driving. This may
cause loss of vehicle control
resulting in an accident.
WARNING
OHI046047
OFF →HIGH ( ) →LOW ( )
→
Page 163 of 524

Instrument Cluster Control
Adjusting instrument clusterillumination
When the vehicle's parking lights or
headlights are on, press the illumina-
tion control button to adjust the
brightness of the instrument panel
illumination.
When pressing the illumination con-
trol button, the interior switch illumi-
nation intensity is also adjusted.
The brightness of the instrument
panel illumination is displayed.
If the brightness reaches the maxi- mum or minimum level, a chime
will sound.
Gauges and Meters
Speedometer
The speedometer indicates the speed
of the vehicle and is calibrated in miles
per hour (mph) and/or kilometers per
hour (km/h).
Tachometer
The tachometer indicates the approx-
imate number of engine revolutions
per minute (rpm).
Use the tachometer to select the cor-
rect shift points and to prevent lug-
ging and/or over-revving the engine.
Do not operate the engine within
the tachometer's RED ZONE. This
may cause severe engine damage.
NOTICE
3-61
03
OHI046412
OHI046101L
OHI046110L
OHI046102
Page 179 of 524

Key not in vehicle
This warning message is displayed if
the smart key is not in the vehicle
when you press the Engine Start/Stop
button.
When attempting to start the vehicle,
always have the smart key with you.
Door / Hood / Trunk open
This warning message is displayed
indicating which door, or the hood, or
the trunk is open.
If the door/hood/trunk open warning
message is blocked with another
warning message, an icon will appear
on the top of the LCD display.
Sunroof open
This warning message is displayed
if you turn off the engine when the
sunroof is open.
3-77
03
OHI046115L
OHI046125
OHI046126
Before driving the vehicle, you
should confirm that the door/
hood/trunk is fully closed. Also,
check there is no door/hood/
trunk open warning light or
message displayed on the
instrument cluster.
CAUTION
Page 248 of 524

3-146
Convenient features of your vehicle
To charge a cellular phone
The wireless cellular phone charging
system charges only the Qi-enabled
cellular phones ( ). Read the label
on the cellular phone accessory
cover or visit your cellular phone
manufacturer’s website to check
whether your cellular phone supports
the Qi technology.
The wireless charging process starts
when you put a Qi-enabled cellular
phone on the wireless charging unit.
1. Remove other items, including thesmart key, from the wireless charg-
ing unit. If not, the wireless charg-
ing process may be interrupted.
2. The indicator illuminates in orange during the charging process. The
indicator color changes to green,
when the charging process is
completed.
3. You can turn ON or OFF the wire- less charging function in the user
settings mode on the instrument
cluster. (For further information,
refer to the "LCD Modes" in this
chapter.)
Slightly change the cellular phone
position, when the cellular phone is
not being charged. Make sure that
the indicator illuminates in orange.
The indicator color may not change
to green in accordance with the cel-
lular phone type, even though the
charging process is completed. The
indicator blinks in orange for 10 sec-
onds when there is a malfunction
with the wireless charging system. In
this case, temporarily stop the charg-
ing process, and re-attempt to wire-
lessly charge your cellular phone
again. The system warns you with a mes-
sage on the LCD display when you
do not take out the cellular phone
from the wireless charging unit with
the front door open and the Engine
Start/Stop button in the OFF posi-
tion.
The wireless cellular phone
charging system may not sup-
port certain cellular phones,
which are not verified for the Qi
specification ( ).
Locate your cell phone well in the middle of the wireless cellular
phone charging system. Even
when your cell phone locates
slightly to one side, the charging
speed may decrease.
The wireless charging process may temporarily stop, when a
smart key function operates (i.e.
starting the engine, opening the
doors, closing the doors).
For certain cell phones, the indi- cator color may not change to
green, even when the wireless
charging process is properly
completed.
The wireless charging process may temporarily stop, when tempera-
ture abnormally increases inside
the wireless cellular phone charg-
ing system. The wireless charging
process restarts, when tempera-
ture falls to a proper level.
The wireless charging processmay temporarily stop when there
is any metallic item, such as a
coin, between the wireless cellu-
lar phone charging system and a
cellular phone.
NOTICE