2017 FORD TAURUS tire pressure
[x] Cancel search: tire pressurePage 264 of 504
•Dry your vehicle with a chamois or softterry cloth towel to eliminate waterspotting.
•Immediately remove fuel spillages, birddroppings, insect deposits and road tar.These may cause damage to yourvehicle’s paintwork or trim over time.We recommend Motorcraft Bug andTar Remover.
•Remove any exterior accessories, forexample antennas, before entering acar wash.
Note:Suntan lotions and insect repellentscan damage painted surfaces. If thesesubstances come in contact with yourvehicle, wash the affected area as soon aspossible.
Exterior Chrome Parts
•Apply a high quality-cleaning productto bumpers and other chrome parts.Follow the manufacturer’s instructions.We recommend Motorcraft CustomBright Metal Cleaner.
•Do not apply the cleaning product tohot surfaces. Do not leave the cleaningproduct on chrome surfaces longerthan the time recommended.
•Using other non-recommendedcleaners can result in severe andpermanent cosmetic damage.
Note:Never use abrasive materials, forexample steel wool or plastic pads as theycan scratch the chrome surface.
Note:Do not use chrome cleaner, metalcleaner or polish on wheels or wheel covers.
Exterior Plastic Parts
For routine cleaning we recommendMotorcraft Detail Wash. If tar or greasespots are present, we recommendMotorcraft Bug and Tar Remover.
Stripes or Graphics (If Equipped)
Hand washing your vehicle is preferredhowever, pressure washing may be usedunder the following conditions:
•Do not use water pressure higher than2,000 psi (14,000 kPa).
•Do not use water hotter than 179°F(82°C).
•Use a spray with a 40° wide sprayangle pattern.
•Keep the nozzle at a 12 in (305 mm)distance and 90° angle to yourvehicle's surface.
Note:Holding the pressure washer nozzleat an angle to the vehicle's surface maydamage graphics and cause the edges topeel away from the vehicle's surface.
Underbody
Flush the complete underside of yourvehicle frequently. Keep body and doordrain holes free of debris or foreignmaterial.
Under Hood
For removing black rubber marks fromunder the hood we recommend MotorcraftWheel and Tire Cleaner or Motorcraft Bugand Tar Remover.
WAXING
Regular waxing is necessary to protect yourcar's paint from the elements. Werecommend that you wash and wax thepainted surface once or twice a year.
When washing and waxing, park yourvehicle in a shaded area out of directsunlight. Always wash your vehicle beforeapplying wax.
261
Taurus (CPH) Canada/United States of America, enUSA, First Printing
Vehicle Care
Page 265 of 504
•Use a quality wax that does not containabrasives.
•Follow the manufacturer’s instructionsto apply and remove the wax.
•Apply a small amount of wax in aback-and-forth motion, not in circles.
•Do not allow wax to come in contactwith any non-body (low-gloss black)colored trim. The wax will discolor orstain the parts over time.
•Roof racks.
•Bumpers.
•Grained door handles.
•Side moldings.
•Mirror housings.
•Windshield cowl area.
•Do not apply wax to glass areas.
•After waxing, your car's paint shouldfeel smooth, and be free of streaks andsmudges.
CLEANING THE ENGINE
Engines are more efficient when they areclean because grease and dirt buildup keepthe engine warmer than normal.
When washing:
•Take care when using a power washerto clean the engine. The high-pressurefluid could penetrate the sealed partsand cause damage.
•Do not spray a hot engine with coldwater to avoid cracking the engineblock or other engine components.
•Spray Motorcraft Engine Shampoo andDegreaser on all parts that requirecleaning and pressure rinse clean. InCanada, use Motorcraft EngineShampoo.
•Never wash or rinse the engine while itis hot or running; water in the runningengine may cause internal damage.
•Never wash or rinse any ignition coil,spark plug wire or spark plug well, orthe area in and around these locations.
•Cover the battery, power distributionbox, and air filter assembly to preventwater damage when cleaning theengine.
CLEANING THE WINDOWS AND
WIPER BLADES
Car wash chemicals and environmentalfallout can result in windshield and wiperblade contamination. Dirty windshield andwipers will result in poor windshield wiperoperation. Keep the windshield and wiperblades clean to maintain windshield wiperperformance.
To clean the windshield and wiper blades:
•Clean the windshield with anon-abrasive glass cleaner. Whencleaning the interior of the windshield,avoid getting any glass cleaner on theinstrument panel or door panels. Wipeany glass cleaner off these surfacesimmediately.
•For windshields contaminated withtree sap, chemicals, wax or bugs, cleanthe entire windshield using steel wool(no greater than 0000 grade) in acircular motion and rinse with water.
•Clean the wiper blades with isopropylrubbing alcohol or windshield washerconcentrate.
Note: Do not use razor blades or othersharp objects to clean or remove decalsfrom the inside of the heated rear window.The vehicle warranty does not coverdamage caused to the heated rear windowgrid lines.
262
Taurus (CPH) Canada/United States of America, enUSA, First Printing
Vehicle Care
Page 269 of 504
•With your foot on the brake, shiftthrough all the gears while the engineis running.
•We recommend that you change theengine oil before you use your vehicleagain.
Fuel system
•Fill the fuel tank with high-quality fueluntil the first automatic shutoff of thefuel pump nozzle.
Cooling system
•Protect against freezing temperatures.
•When removing your vehicle fromstorage, check coolant fluid level.Confirm that there are no coolingsystem leaks and that fluid is at therecommended level.
Battery
•Check and recharge as necessary. Keepconnections clean.
•If storing your vehicle for more than 30days without recharging the battery,we recommend that you disconnectthe battery cables to maintain batterycharge for quick starting.
Note:It is necessary to reset memoryfeatures if battery cables are disconnected.
Brakes
•Make sure the brakes and parking brakerelease fully.
Tires
•Maintain recommended air pressure.
Miscellaneous
•Make sure all linkages, cables, leversand pins under your vehicle are coveredwith grease to prevent rust.
•Move vehicles at least 25 ft (7.5 m)every 15 days to lubricate working partsand prevent corrosion.
Removing Vehicle From Storage
When your vehicle is ready to come out ofstorage, do the following:
•Wash your vehicle to remove any dirtor grease film build-up on windowsurfaces.
•Check windshield wipers for anydeterioration.
•Check under the hood for any foreignmaterial that may have collectedduring storage such as mice or squirrelnests.
•Check the exhaust for any foreignmaterial that may have collectedduring storage.
•Check tire pressures and set tireinflation per the Tire Label.
•Check brake pedal operation. Driveyour vehicle 15 ft (4.5 m) back andforth to remove rust build-up.
•Check fluid levels (including coolant,oil and gas) to make sure there are noleaks, and fluids are at recommendedlevels.
•If you remove the battery, clean thebattery cable ends and check fordamage.
Contact an authorized dealer if you haveany concerns or issues.
266
Taurus (CPH) Canada/United States of America, enUSA, First Printing
Vehicle Care
Page 270 of 504
GENERAL INFORMATION
A decal with tire pressure data is locatedin the driver’s door opening.
Check and set the tire pressure at theambient temperature in which you areintending to drive your vehicle and whenthe tires are cold.
Note:Check your tire pressures regularly tooptimize fuel economy.
Note:Use only approved wheel and tiresizes. Using other sizes could damage yourvehicle and will make the National TypeApproval invalid.
Note:If you change the diameter of the tiresfrom that fitted at the factory, thespeedometer may not display the correctspeed. Take your vehicle to an authorizeddealer to have the engine managementsystem reprogrammed.
TIRE SEALANT AND INFLATOR
KIT (If Equipped)
Note:The temporary mobility kit canistercontains enough sealant compound for onetire repair only. See your authorized Forddealer for additional replacement sealantcanisters.
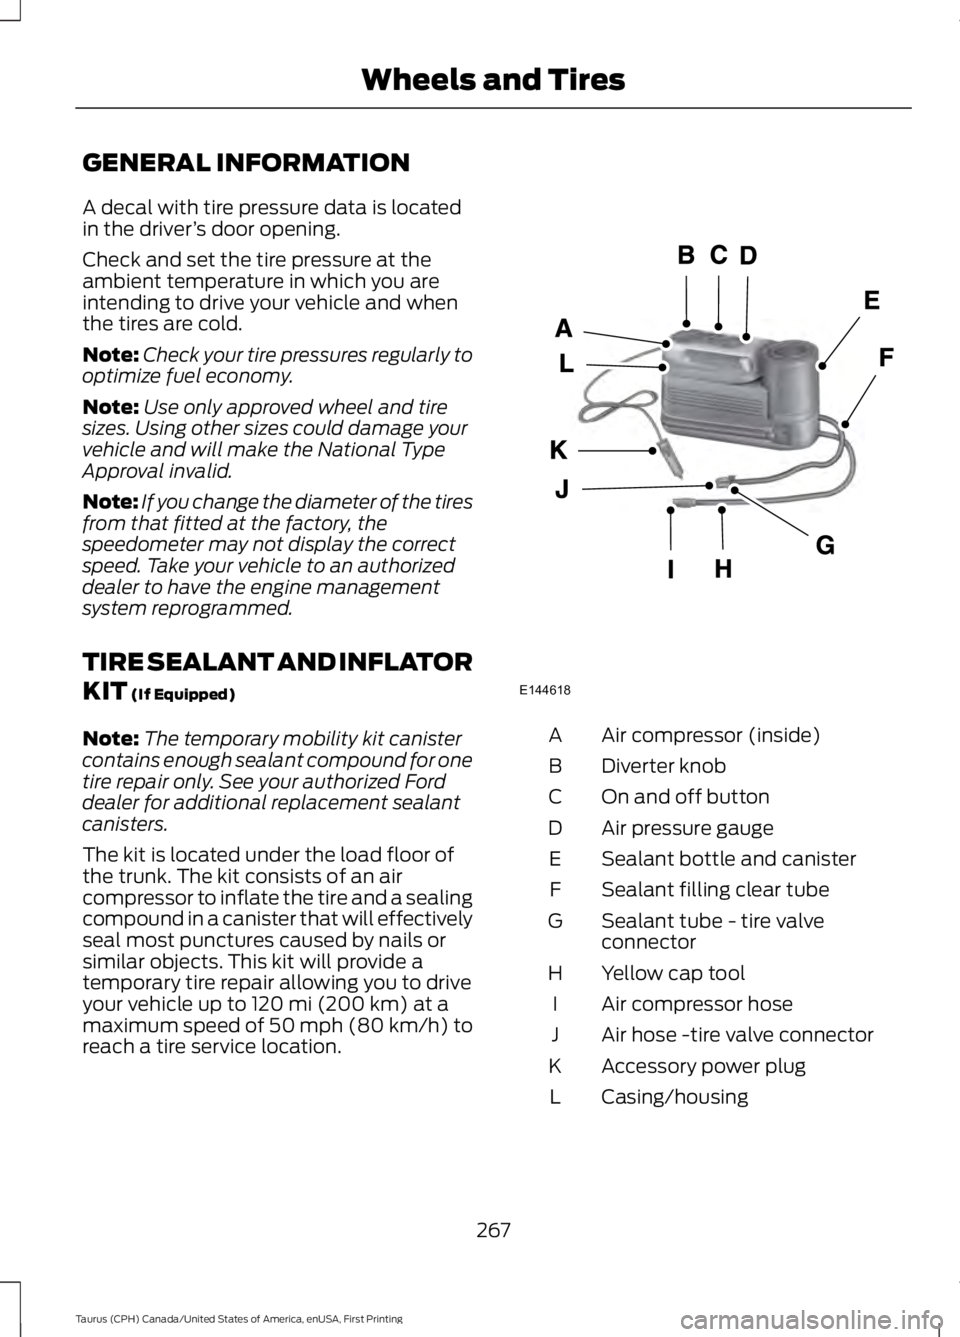
The kit is located under the load floor ofthe trunk. The kit consists of an aircompressor to inflate the tire and a sealingcompound in a canister that will effectivelyseal most punctures caused by nails orsimilar objects. This kit will provide atemporary tire repair allowing you to driveyour vehicle up to 120 mi (200 km) at amaximum speed of 50 mph (80 km/h) toreach a tire service location.
Air compressor (inside)A
Diverter knobB
On and off buttonC
Air pressure gaugeD
Sealant bottle and canisterE
Sealant filling clear tubeF
Sealant tube - tire valveconnectorG
Yellow cap toolH
Air compressor hoseI
Air hose -tire valve connectorJ
Accessory power plugK
Casing/housingL
267
Taurus (CPH) Canada/United States of America, enUSA, First Printing
Wheels and TiresE144618
Page 271 of 504

General Information
WARNING
Failure to follow these guidelinescould result in an increased risk ofloss of vehicle control, injury or death.
Note:Do not use the kit if a tire has becomeseverely damaged by driving the vehicle witha tire that has insufficient air pressure. Onlypunctured areas located within the tire treadcan be sealed with the kit.
Do not attempt to repair punctures largerthan ¼ inch (6 millimeters) or damage tothe tire's sidewall. The tire may notcompletely seal.
Loss of air pressure may adversely affecttire performance. For this reason:
Note:Do not drive the vehicle above50 mph (80 km/h).
Note:Do not drive further than 120 mi(200 km). Drive only to the closestauthorized Ford dealer or tire repair shop tohave your tire inspected.
•Drive carefully and avoid abruptsteering maneuvers.
•Periodically monitor tire inflationpressure in the affected tire. If the tireis losing pressure, have the vehicletowed.
•Read the information in the Tips forUse of the Kit section to make sure safeoperation of the kit and your vehicle.
Tips for Use of the Kit
Read the following list of tips to ensuresafe operation of the kit:
•Before operating the kit, make sureyour vehicle is safely off the road andaway from moving traffic. Turn on thehazard lights.
•Always set the parking brake to ensurethe vehicle does not moveunexpectedly.
•Do not remove any foreign objects,such as nails or screws, from the tire.
•When using the kit, leave the enginerunning (only if the vehicle is outdoorsor in a well-ventilated area) so thecompressor does not drain the vehiclebattery.
•Do not allow the compressor tooperate continuously for more than 15minutes. This will help prevent thecompressor from overheating.
•Never leave the kit unattended whenit is operating.
•Sealant compound contains latex.Make sure that you use the non-latexgloves provided to avoid an allergicreaction.
•Keep the kit away from children.
•Only use the kit when the ambienttemperature is between -22°F (-30°C)and 158°F (70°C).
•Only use the sealing compound beforethe use by date. The use by date is onthe lower right hand corner of the labellocated on the sealant canister(bottle). Check the use by dateregularly and replace the canister afterfour years.
•Do not store the kit unsecured insidethe passenger compartment of thevehicle as it may cause injury during asudden stop or crash. Always store thekit in its original location.
•After sealant use, the tire pressuremonitoring system sensor and valvestem on the wheel must be replacedby an authorized Ford dealer.
268
Taurus (CPH) Canada/United States of America, enUSA, First Printing
Wheels and Tires
Page 272 of 504

•When inflating a tire or other objects,use the black air hose only. Do not usethe transparent hose which is designedfor sealant application only.
•Operating the kit could cause anelectrical disturbance in radio, CD, andDVD player operation.
What to do when a Tire IsPunctured
A tire puncture within the tire tread areacan be repaired in two stages with the kit.
•In the first stage, the tire will bereinflated with a sealing compoundand air. After the tire has beenreinflated, you will need to drive thevehicle a short distance 4 mi (6 km) todistribute the sealant in the tire.
•In the second stage, you will need tocheck the tire pressure and adjust, ifnecessary, to the vehicle tire inflationpressure.
First Stage: Reinflating the Tirewith Sealing Compound and Air
WARNINGS
Do not stand directly over the kitwhile inflating the tire. If you noticeany unusual bulges or deformationsin the tire sidewall during inflation, stopand call roadside assistance.
If the tire does not inflate to therecommended tire pressure within15 minutes, stop and call roadsideassistance.
Preparation: Park the vehicle in a safe, leveland secure area, away from moving traffic.Turn the hazard lights on. Apply the parkingbrake and turn the engine off. Inspect theflat tire for visible damage.
Sealant compound contains latex. Toavoid any allergic reactions, use thenon-latex gloves located in the accessorybox on the underside of the kit housing.
Do not remove any foreign object that haspierced the tire. If a puncture is located inthe tire sidewall, stop and call roadsideassistance.
1. Remove the valve cap from the tirevalve.
2. Unwrap the clear tube from thecompressor housing.
3. Remove the tube cap and fasten themetal connector of the tube to the tirevalve, turning clockwise. Make sure theconnection is tightly fastened.
4. Plug the power cable into the 12-voltpower point in the vehicle.
5. Remove the warning sticker found onthe canister and place it on the top ofthe instrument panel or the center ofthe dash.
6. Start the vehicle only if the vehicle isoutdoors or in a well-ventilated area.
269
Taurus (CPH) Canada/United States of America, enUSA, First Printing
Wheels and TiresE144619
Page 273 of 504
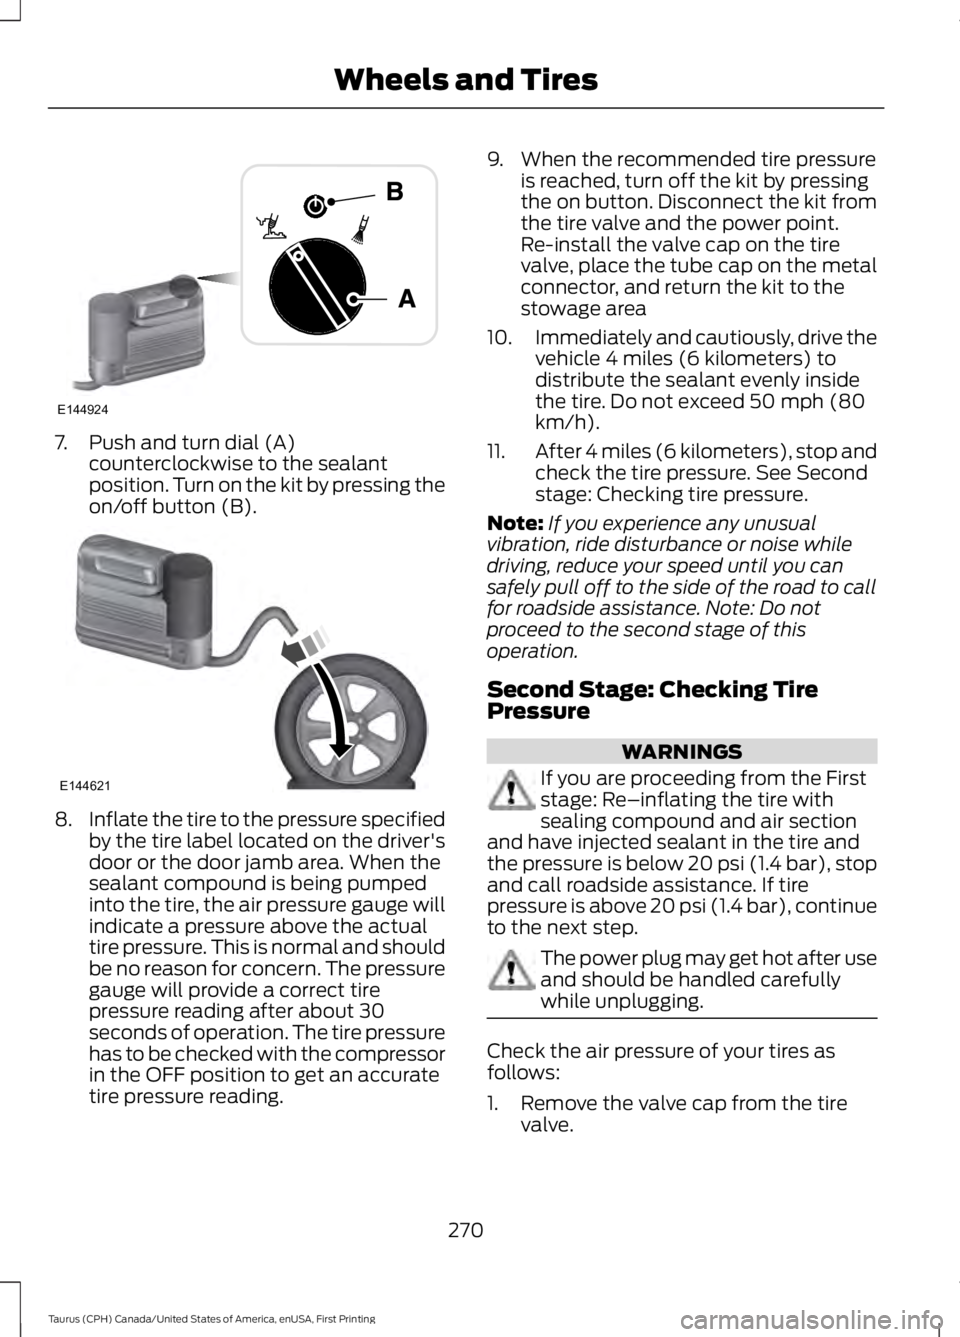
7. Push and turn dial (A)counterclockwise to the sealantposition. Turn on the kit by pressing theon/off button (B).
8.Inflate the tire to the pressure specifiedby the tire label located on the driver'sdoor or the door jamb area. When thesealant compound is being pumpedinto the tire, the air pressure gauge willindicate a pressure above the actualtire pressure. This is normal and shouldbe no reason for concern. The pressuregauge will provide a correct tirepressure reading after about 30seconds of operation. The tire pressurehas to be checked with the compressorin the OFF position to get an accuratetire pressure reading.
9. When the recommended tire pressureis reached, turn off the kit by pressingthe on button. Disconnect the kit fromthe tire valve and the power point.Re-install the valve cap on the tirevalve, place the tube cap on the metalconnector, and return the kit to thestowage area
10.Immediately and cautiously, drive thevehicle 4 miles (6 kilometers) todistribute the sealant evenly insidethe tire. Do not exceed 50 mph (80km/h).
11.After 4 miles (6 kilometers), stop andcheck the tire pressure. See Secondstage: Checking tire pressure.
Note:If you experience any unusualvibration, ride disturbance or noise whiledriving, reduce your speed until you cansafely pull off to the side of the road to callfor roadside assistance. Note: Do notproceed to the second stage of thisoperation.
Second Stage: Checking TirePressure
WARNINGS
If you are proceeding from the Firststage: Re–inflating the tire withsealing compound and air sectionand have injected sealant in the tire andthe pressure is below 20 psi (1.4 bar), stopand call roadside assistance. If tirepressure is above 20 psi (1.4 bar), continueto the next step.
The power plug may get hot after useand should be handled carefullywhile unplugging.
Check the air pressure of your tires asfollows:
1. Remove the valve cap from the tirevalve.
270
Taurus (CPH) Canada/United States of America, enUSA, First Printing
Wheels and TiresE144924 E144621
Page 274 of 504

2. Unhook the black hose from the sideof the compressor and fasten firmly onthe valve stem by turning clockwise.
3.Push and turn the dial clockwise to theair position. Turn on the kit by pressingthe on button.
4. Adjust the tire to the recommendedinflation pressure from the tire labellocated on the driver's door or doorjamb area. The tire pressure has to bechecked with the compressor in theOFF position to get the correct tirepressure reading.
5. Turn the compressor off by pressingthe on/off button.
6.When the tire pressure reading with thecompressor in the off position iscorrect, disconnect the hose, re-installthe valve cap on the tire valve, unplugthe compressor, and return the kit tothe stowage area.
What to do after the Tire has beenSealed
After using the kit to seal your tire, you willneed to replace the sealant canister andclear tube (hose). You can obtain andreplace sealing compound and spare partsat an authorized Ford dealer or tire dealer.Empty sealant bottles may be disposed ofat home. However, liquid residue from thesealing compound should be disposed byyour local authorized Ford dealer or tiredealer, or in accordance with local wastedisposal regulations.
Note:After the sealing compound has beenused, the maximum vehicle speed is 50 mph(80 km/h) and the maximum drivingdistance is 120 mi (200 km). The sealed tireshould be inspected immediately.
Note:After sealant use, the tire pressuremonitoring system sensor and valve stemon the wheel must be replaced by anauthorized Ford dealer.
You can check the tire pressure any timewithin the 120 mi (200 km) by performingthe procedure from Second stage:Checking tire pressure listed previously.
Removal of the sealant canister fromthe kit
1. Unwrap the clear tube from thecompressor housing.
271
Taurus (CPH) Canada/United States of America, enUSA, First Printing
Wheels and TiresE144622 E144623