2017 FORD TAURUS automatic transmission
[x] Cancel search: automatic transmissionPage 157 of 504
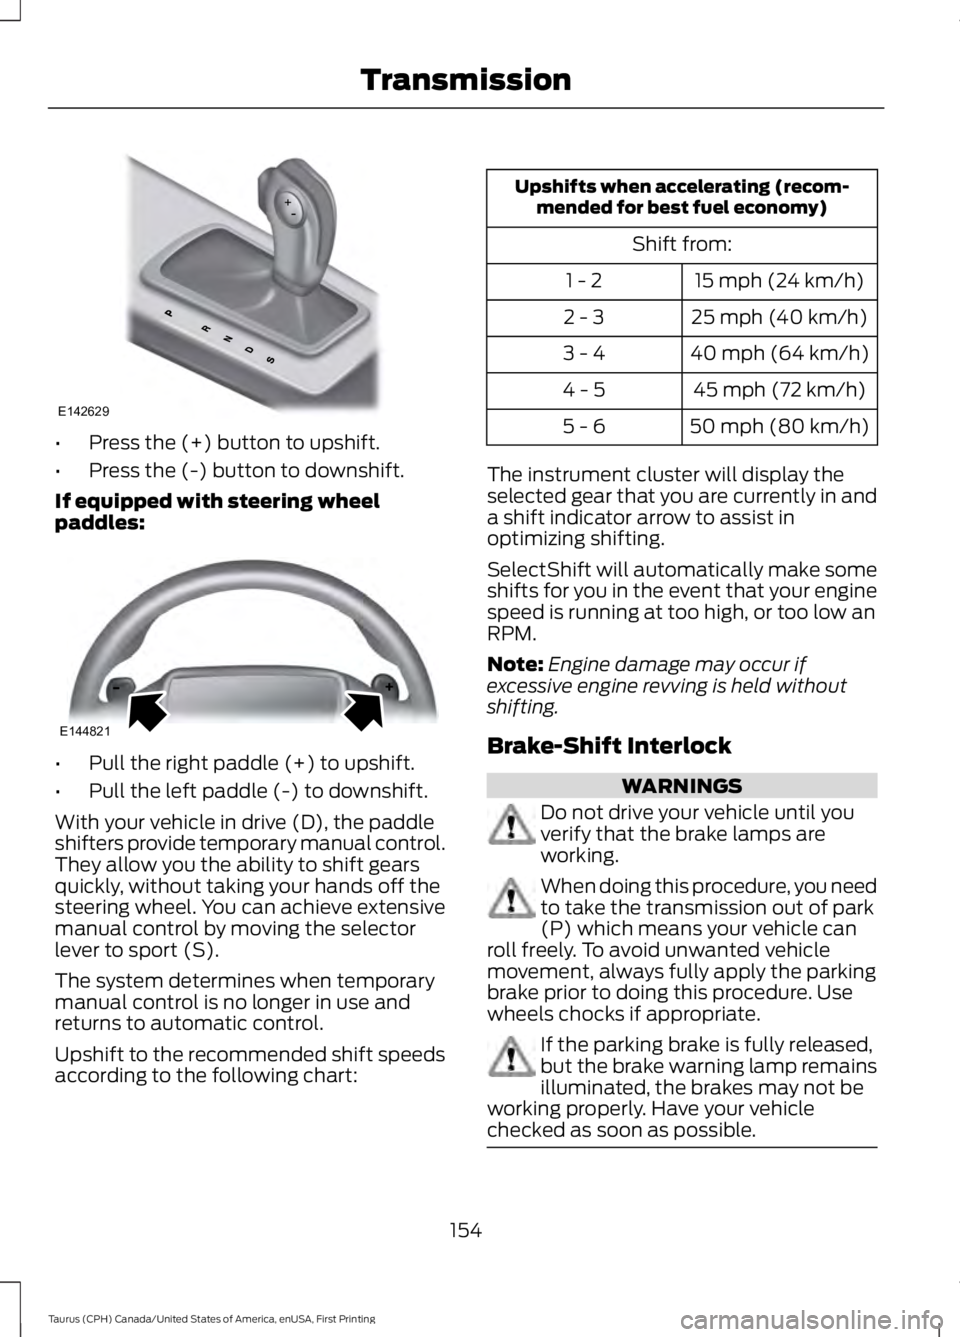
•Press the (+) button to upshift.
•Press the (-) button to downshift.
If equipped with steering wheelpaddles:
•Pull the right paddle (+) to upshift.
•Pull the left paddle (-) to downshift.
With your vehicle in drive (D), the paddleshifters provide temporary manual control.They allow you the ability to shift gearsquickly, without taking your hands off thesteering wheel. You can achieve extensivemanual control by moving the selectorlever to sport (S).
The system determines when temporarymanual control is no longer in use andreturns to automatic control.
Upshift to the recommended shift speedsaccording to the following chart:
Upshifts when accelerating (recom-mended for best fuel economy)
Shift from:
15 mph (24 km/h)1 - 2
25 mph (40 km/h)2 - 3
40 mph (64 km/h)3 - 4
45 mph (72 km/h)4 - 5
50 mph (80 km/h)5 - 6
The instrument cluster will display theselected gear that you are currently in anda shift indicator arrow to assist inoptimizing shifting.
SelectShift will automatically make someshifts for you in the event that your enginespeed is running at too high, or too low anRPM.
Note:Engine damage may occur ifexcessive engine revving is held withoutshifting.
Brake-Shift Interlock
WARNINGS
Do not drive your vehicle until youverify that the brake lamps areworking.
When doing this procedure, you needto take the transmission out of park(P) which means your vehicle canroll freely. To avoid unwanted vehiclemovement, always fully apply the parkingbrake prior to doing this procedure. Usewheels chocks if appropriate.
If the parking brake is fully released,but the brake warning lamp remainsilluminated, the brakes may not beworking properly. Have your vehiclechecked as soon as possible.
154
Taurus (CPH) Canada/United States of America, enUSA, First Printing
TransmissionE142629 E144821
Page 158 of 504
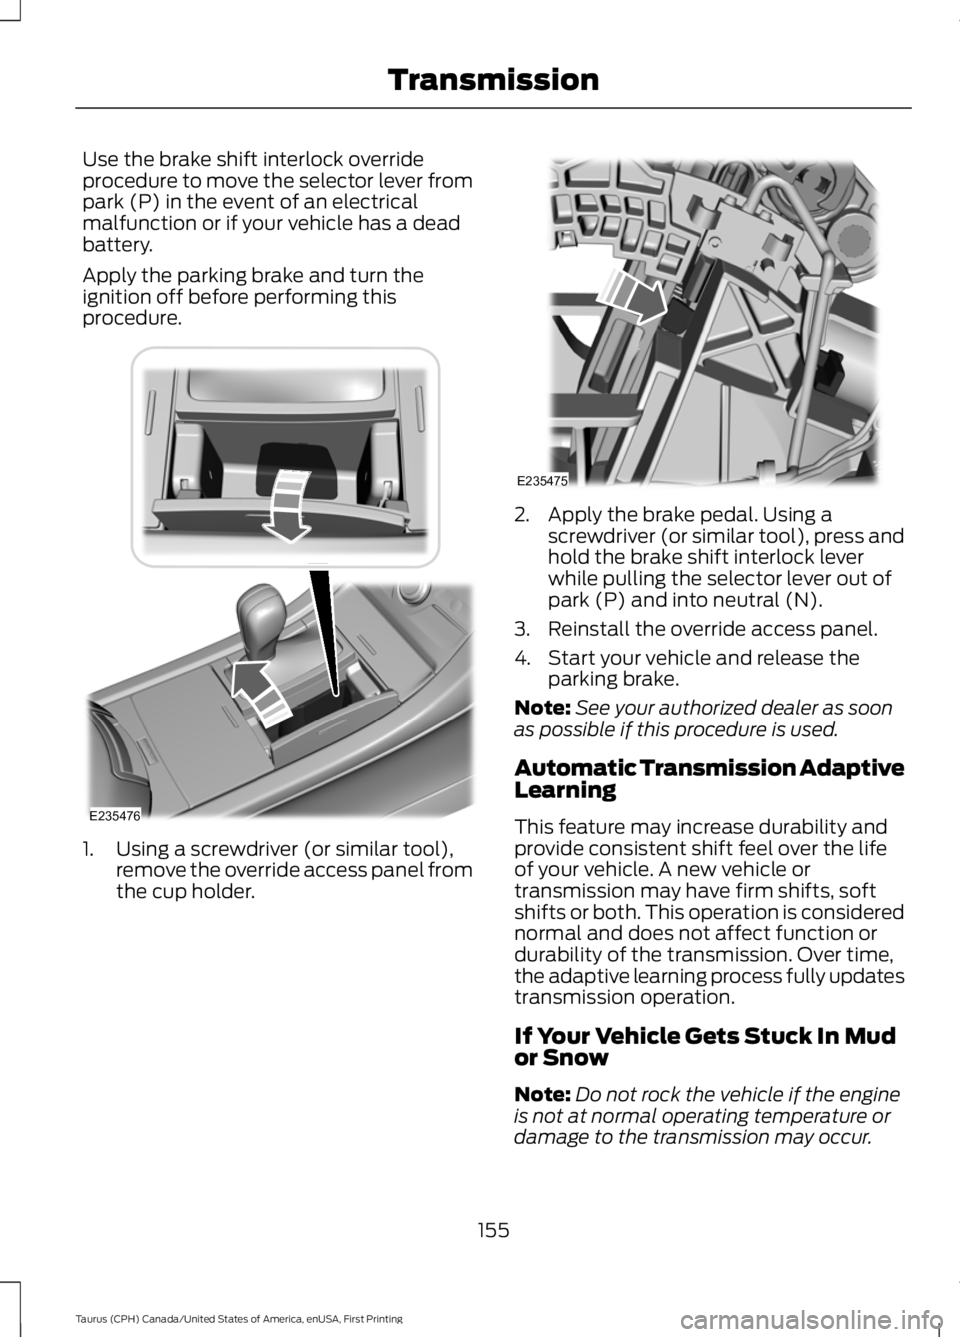
Use the brake shift interlock overrideprocedure to move the selector lever frompark (P) in the event of an electricalmalfunction or if your vehicle has a deadbattery.
Apply the parking brake and turn theignition off before performing thisprocedure.
1. Using a screwdriver (or similar tool),remove the override access panel fromthe cup holder.
2. Apply the brake pedal. Using ascrewdriver (or similar tool), press andhold the brake shift interlock leverwhile pulling the selector lever out ofpark (P) and into neutral (N).
3. Reinstall the override access panel.
4. Start your vehicle and release theparking brake.
Note:See your authorized dealer as soonas possible if this procedure is used.
Automatic Transmission AdaptiveLearning
This feature may increase durability andprovide consistent shift feel over the lifeof your vehicle. A new vehicle ortransmission may have firm shifts, softshifts or both. This operation is considerednormal and does not affect function ordurability of the transmission. Over time,the adaptive learning process fully updatestransmission operation.
If Your Vehicle Gets Stuck In Mudor Snow
Note:Do not rock the vehicle if the engineis not at normal operating temperature ordamage to the transmission may occur.
155
Taurus (CPH) Canada/United States of America, enUSA, First Printing
TransmissionE235476 E235475
Page 173 of 504

PRINCIPLE OF OPERATION
WARNINGS
To help avoid personal injury, pleaseread and understand the limitationsof the system as contained in thissection. Sensing is only an aid for some(generally large and fixed) objects whenmoving on a flat surface at parking speeds.Certain objects with surfaces that absorbultrasonic waves, surrounding vehicle'sparking aid systems, traffic controlsystems, fluorescent lamps, inclementweather, air brakes, and external motorsand fans may also affect the function ofthe sensing system; this may includereduced performance or a false activation.
To help avoid personal injury, alwaysuse caution when in reverse (R) andwhen using the sensing system.
This system is not designed toprevent contact with small or movingobjects. The system is designed toprovide a warning to assist the driver indetecting large stationary objects to avoiddamaging your vehicle. The system maynot detect smaller objects, particularlythose close to the ground.
Certain add-on devices such as largetrailer hitches, bike or surfboard racksand any device that may block thenormal detection zone of the system, maycreate false beeps.
Note:Keep the sensors, located on thebumper or fascia, free from snow, ice andlarge accumulations of dirt. If the sensorsare covered, the system’s accuracy can beaffected. Do not clean the sensors withsharp objects.
Note:If your vehicle sustains damage tothe bumper or fascia, leaving it misalignedor bent, the sensing zone may be alteredcausing inaccurate measurement ofobstacles or false alarms.
Note:The sensing system cannot be turnedoff when a MyKey is present. See Principleof Operation (page 51).
Note:If you attach certain add-on devicessuch as a trailer or bike rack, the rear sensingsystem may detect that add-on device andtherefore provide warnings. It is suggestedthat you disable the rear sensing systemwhen you attach an add-on device to yourvehicle to prevent these warnings.
The sensing system warns the driver ofobstacles within a certain range of yourvehicle. The system turns on automaticallywhenever you switch the ignition on.
You can turn the system on oroff by pressing the parking aidbutton. If your vehicle does nothave a parking aid button, the system canbe switched off through the informationdisplay menu or from the pop-up messagethat appears once you shift thetransmission into reverse (R). See GeneralInformation (page 89).
If a fault is present in the system, a warningmessage appears in the informationdisplay. See Information Messages(page 98).
REAR PARKING AID
The rear sensors are only active when thetransmission is in reverse (R). As yourvehicle moves closer to the obstacle, therate of the audible warning increases.When the obstacle is less than 12 in(30 cm) away, the warning soundscontinuously. If the system detects astationary or receding object farther than12 in (30 cm) from the corners of thebumper, the tone sounds for only threeseconds. Once the system detects anobject approaching, the warning soundsagain.
170
Taurus (CPH) Canada/United States of America, enUSA, First Printing
Parking AidsE139213
Page 174 of 504

Coverage area of up to 6 ft (1.8 m) fromthe rear bumper. There may be decreasedcoverage area at the outer corners of thebumper.
The system detects certain objects whilethe transmission is in reverse (R) :
•Your vehicle is moving toward astationary object at a speed of 3 mph(5 km/h) or less.
•Your vehicle is not moving, but amoving object is approaching the rearof your vehicle at a speed of 3 mph(5 km/h) or less.
•Your vehicle is moving at a speed ofless than 3 mph (5 km/h) and a movingobject is approaching the rear of yourvehicle at a speed of less than 3 mph(5 km/h).
The system provides audio warnings onlywhen your vehicle is moving or when yourvehicle is stationary and the detectedobstacle is less than 12 in (30 cm) awayfrom the bumper.
ACTIVE PARK ASSIST
WARNINGS
The system is designed to aid thedriver. It is not intended to replaceyour attention and judgment. You arestill responsible to drive with due care andattention.
At all times, you are responsible forcontrolling your vehicle, supervisingthe system and intervening, ifrequired. Failure to take care may result inthe loss of control of your vehicle, seriouspersonal injury or death.
The sensors may not detect objectsin heavy rain or other conditions thatcause interference.
Active park assist does not apply thebrakes under any circumstances.
Note:Keep the sensors, located on thebumper or fascia, free from snow, ice andlarge accumulations of dirt. Covered sensorscan affect the systems accuracy. Do notclean the sensors with sharp objects.
Note:The sensors may not detect objectswith surfaces that absorb ultrasonic waves.
Active Park Assist is an electric parking aidthat uses ultrasonic sensors. The systemdetects an available parallel parking spaceand automatically steers your vehicle intothe space (hands-free) while you controlthe accelerator, gearshift and brakes. Thesystem visually and audibly instructs youto park your vehicle.
The system may not function correctly ifsomething passes between the frontbumper and the parking space (apedestrian or cyclist) or if the edge of theneighboring parked vehicle is high off theground (for example, a bus, tow truck orflatbed truck). If you are uncomfortablewith the proximity to any vehicle or object,you may choose to override the system.
171
Taurus (CPH) Canada/United States of America, enUSA, First Printing
Parking AidsE130178
Page 176 of 504
Note:Active park assist may not detectvehicles with overhanging loads (a bus or atruck), street furniture and other items. Youmust make sure the selected space issuitable for parking.
Note:You should drive your vehicle within5 ft (1.5 m) and as parallel to the othervehicles as possible while passing a parkingspace.
Note:The system always offers the lastdetected parking space (for example, if yourvehicle detects multiple spaces while youare driving, it offers the last one).
Note:If driven above approximately 22 mph(35 km/h), the display screen shows amessage to alert you to reduce your vehiclespeed.
Automatic Steering into ParkingSpace
Note:If vehicle speed exceeds 6 mph(10 km/h) or the maneuver is interrupted(driver input is detected), the systemswitches off and you need to take fullcontrol of your vehicle.
Note:If a maneuver is interrupted beforecompletion, the system switches off. Thesteering wheel position will not indicate theactualy position of the steering and you haveto take full control of your vehicle.
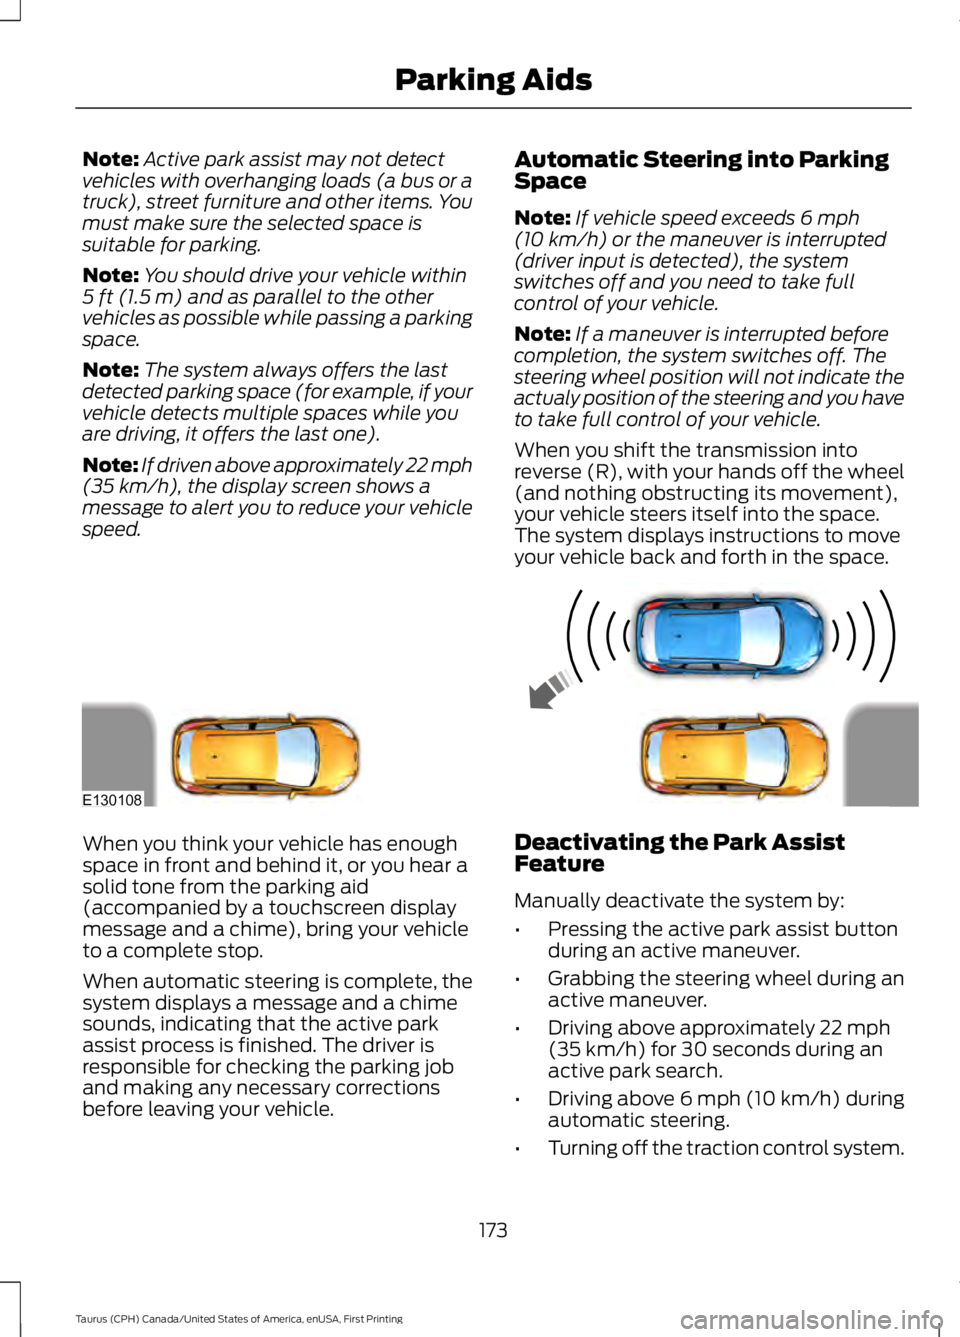
When you shift the transmission intoreverse (R), with your hands off the wheel(and nothing obstructing its movement),your vehicle steers itself into the space.The system displays instructions to moveyour vehicle back and forth in the space.
When you think your vehicle has enoughspace in front and behind it, or you hear asolid tone from the parking aid(accompanied by a touchscreen displaymessage and a chime), bring your vehicleto a complete stop.
When automatic steering is complete, thesystem displays a message and a chimesounds, indicating that the active parkassist process is finished. The driver isresponsible for checking the parking joband making any necessary correctionsbefore leaving your vehicle.
Deactivating the Park AssistFeature
Manually deactivate the system by:
•Pressing the active park assist buttonduring an active maneuver.
•Grabbing the steering wheel during anactive maneuver.
•Driving above approximately 22 mph(35 km/h) for 30 seconds during anactive park search.
•Driving above 6 mph (10 km/h) duringautomatic steering.
•Turning off the traction control system.
173
Taurus (CPH) Canada/United States of America, enUSA, First Printing
Parking AidsE130108
Page 195 of 504

Note:The Blind Spot Information Systemdoes not prevent contact with other vehiclesor objects; nor detect parked vehicles,people, animals or infrastructure (fences,guardrails, trees). It’s only designed to alertyou to vehicles in the blind spot zones.
Note:When a vehicle passes quicklythrough the blind spot zone, typically fewerthan two seconds, the system does nottrigger.
Using the System
The Blind Spot Information System turnson when you start the engine and you driveyour vehicle forward above 3 mph(5 km/h).
For automatic transmissions, the BlindSpot Information System remains on whilethe transmission is in drive (D). If shiftedinto reverse (R) or park (P) the Blind SpotInformation System turns off. Once shiftedback into drive (D), the Blind SpotInformation System turns back on whenyou drive your vehicle above 3 mph(5 km/h).
For manual transmissions, the Blind SpotInformation System is on for all gearsexcept the reverse (R).
Note:The Blind Spot Information Systemdoes not function in reverse (R) or park (P).
System Lights and Messages
The Blind Spot Information Systemilluminates an amber alert indicator in theoutside mirror on the side of your vehiclethe approaching vehicle is coming from.
The alert indicator dims when the systemdetects nighttime darkness.
System Sensor Blockage
The system uses radar sensors that arelocated behind the bumper fascia on eachside of your vehicle. Any dirt, mud andsnow in front of the sensors and/or drivingin heavy rain can cause systemdegradation. Also, other types ofobstructions in front of the sensor cancause system degradation. This is referredto as a ‘blocked’ condition.
Note:Do not apply bumper stickers and/orrepair compound to these areas, this cancause degraded system performance.
If the system detects a degradedperformance condition, a message warningof a blocked sensor will appear in theinformation display. Also the system alertindicators will remain ON and the systemwill no longer provide any vehicle warnings.You can clear the information displaywarning but the alert indicators will remainilluminated.
192
Taurus (CPH) Canada/United States of America, enUSA, First Printing
Driving AidsE142442 E205199
Page 212 of 504
Before Towing a Trailer
Practice turning, stopping and backing upto get the feel of your vehicle-trailercombination before starting on a trip.When turning, make wider turns so thetrailer wheels clear curbs and otherobstacles.
When Towing a Trailer
•Do not drive faster than 70 mph(113 km/h) during the first 500 mi(800 km).
•Do not make full-throttle starts.
•Check your hitch, electrical connectionsand trailer wheel lug nuts thoroughlyafter you have traveled 50 mi (80 km).
•When stopped in congested or heavytraffic during hot weather, place thegearshift in position P to aid engine andtransmission cooling and to help A/Cperformance.
•Turn off the speed control with heavyloads or in hilly terrain. The speedcontrol may turn off automaticallywhen you are towing on long, steepgrades.
•Shift to a lower gear when driving downa long or steep hill. Do not apply thebrakes continuously, as they mayoverheat and become less effective.
•If your transmission is equipped with aGrade Assist or Tow/Haul feature, usethis feature when towing. This providesengine braking and helps eliminateexcessive transmission shifting foroptimum fuel economy andtransmission cooling.
•Allow more distance for stopping witha trailer attached. Anticipate stops andbrake gradually.
•Avoid parking on a grade. However, ifyou must park on a grade:
1. Turn the steering wheel to point yourvehicle tires away from traffic flow.
2. Set your vehicle parking brake.
3. Place the automatic transmission inposition P.
4. Place wheel chocks in front and backof the trailer wheels. (Chocks notincluded with vehicle.)
Launching or Retrieving a Boat orPersonal Watercraft (PWC)
Note:Disconnect the wiring to the trailerbefore backing the trailer into the water.
Note:Reconnect the wiring to the trailerafter removing the trailer from the water.
When backing down a ramp during boatlaunching or retrieval:
•Do not allow the static water level torise above the bottom edge of the rearbumper.
•Do not allow waves to break higherthan 6 in (15 cm) above the bottomedge of the rear bumper.
Exceeding these limits may allow water toenter vehicle components:
•Causing internal damage to thecomponents.
•Affecting driveability, emissions, andreliability.
Replace the rear axle lubricant anytimethe rear axle has been submerged in water.Water may have contaminated the rearaxle lubricant, which is not normallychecked or changed unless a leak issuspected or other axle repair is required.
209
Taurus (CPH) Canada/United States of America, enUSA, First Printing
Towing
Page 219 of 504
Note:When you try to restart your vehicleafter a fuel shutoff, the vehicle makes surethat various systems are safe to restart.Once your vehicle determines that thesystems are safe, then the vehicle will allowyou to restart.
Note:In the event that your vehicle doesnot restart after your third attempt, contactan authorized dealer.
JUMP STARTING THE VEHICLE
WARNINGS
Batteries normally produce explosivegases which can cause personalinjury. Therefore, do not allowflames, sparks or lighted substances tocome near the battery. When working nearthe battery, always shield your face andprotect your eyes. Always provide correctventilation.
Keep batteries out of reach ofchildren. Batteries contain sulfuricacid. Avoid contact with skin, eyes orclothing. Shield your eyes when workingnear the battery to protect against possiblesplashing of acid solution. In case of acidcontact with skin or eyes, flushimmediately with water for a minimum of15 minutes and get prompt medicalattention. If acid is swallowed, call aphysician immediately.
Use only adequately sized cableswith insulated clamps.
Preparing Your Vehicle
Do not attempt to push-start yourautomatic transmission vehicle.
Note:Attempting to push-start a vehiclewith an automatic transmission may causetransmission damage.
Note:Use only a 12-volt supply to start yourvehicle.
Note:Do not disconnect the battery of thedisabled vehicle as this could damage thevehicle electrical system.
Park the booster vehicle close to the hoodof the disabled vehicle, making sure thetwo vehicles do not touch.
Connecting the Jumper Cables
WARNINGS
Do not attach the cables to fuel lines,engine rocker covers, the intakemanifold or electrical componentsas grounding points. Stay clear of movingparts. To avoid reverse polarityconnections, make sure that you correctlyidentify the positive (+) and negative (-)terminals on both the disabled and boostervehicles before connecting the cables.
Do not attach the end of the positivecable to the studs or L-shaped eyeletlocated above the positive (+)terminal of your vehicle’s battery. Highcurrent may flow through and causedamage to the fuses.
Do not connect the end of thesecond cable to the negative (-)terminal of the battery to be jumped.A spark may cause an explosion of thegases that surround the battery.
Note:In the illustration, the bottom vehiclerepresents the booster vehicle.
216
Taurus (CPH) Canada/United States of America, enUSA, First Printing
Roadside Emergencies