2017 FORD TAURUS warning
[x] Cancel search: warningPage 262 of 504
CHANGING THE ENGINE AIR
FILTER
WARNING
Do not start the engine with the aircleaner removed. This can causedamage not covered by the vehicleWarranty and can result in serious injury.
When changing the air filter element, useonly the air filter element listed. SeeCapacities and Specifications (page297).
For vehicles with EcoBoost engines, whenservicing the air cleaner, it is important thatno foreign material enters the air inductionsystem. The engine and turbocharger aresusceptible to damage from even smallparticles.
Change the air filter element at the correctinterval. See Scheduled Maintenance(page 447).
Note: Failure to use the correct air filterelement may result in severe enginedamage. Resulting component damagemay not be covered by the vehicle Warranty.
To replace the air filter element do thefollowing:
1. Switch the ignition off.
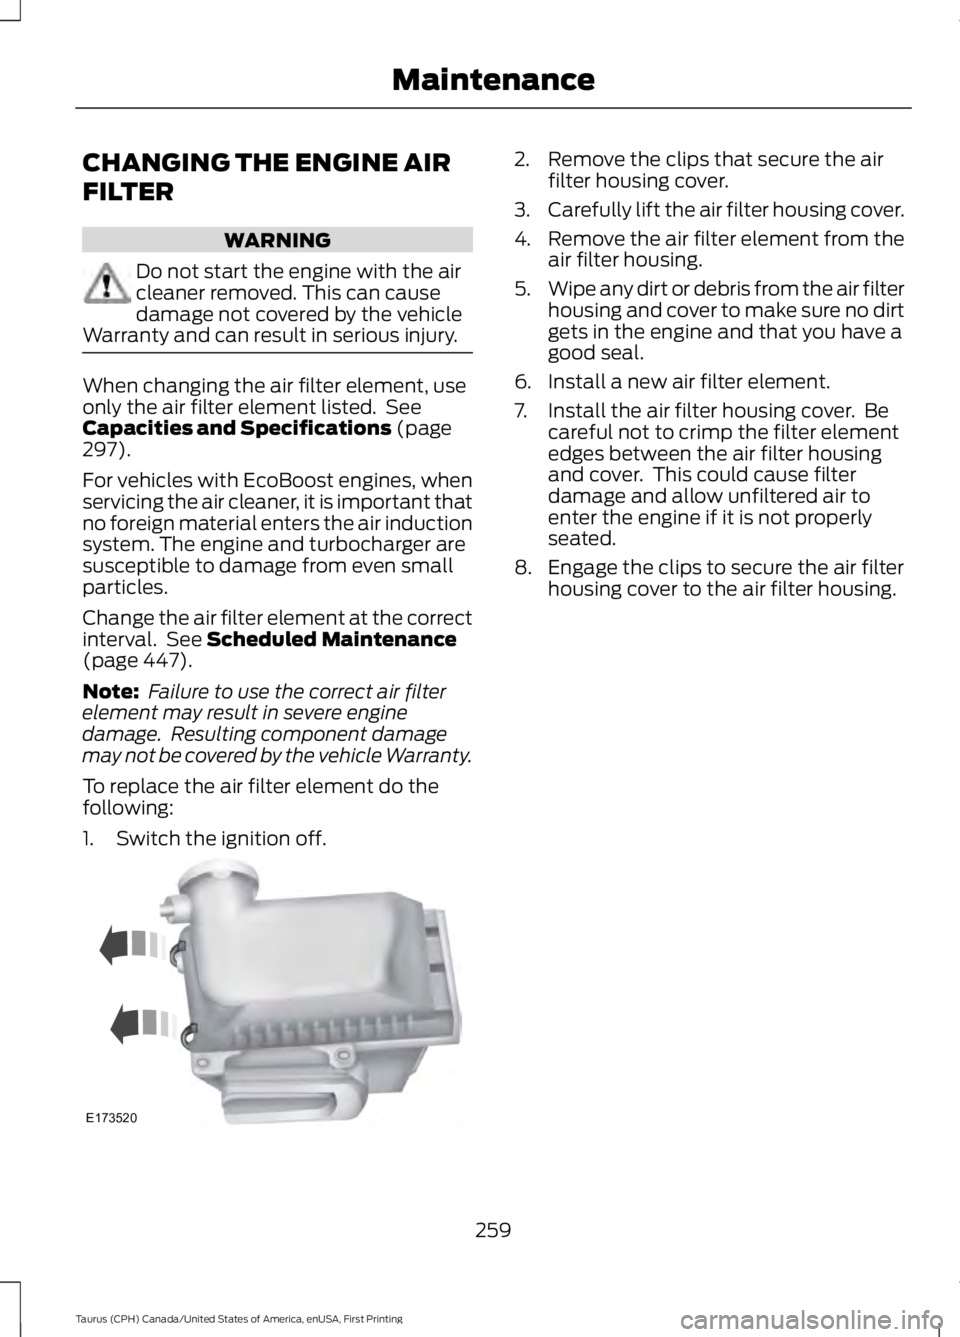
2. Remove the clips that secure the airfilter housing cover.
3.Carefully lift the air filter housing cover.
4.Remove the air filter element from theair filter housing.
5.Wipe any dirt or debris from the air filterhousing and cover to make sure no dirtgets in the engine and that you have agood seal.
6. Install a new air filter element.
7. Install the air filter housing cover. Becareful not to crimp the filter elementedges between the air filter housingand cover. This could cause filterdamage and allow unfiltered air toenter the engine if it is not properlyseated.
8. Engage the clips to secure the air filterhousing cover to the air filter housing.
259
Taurus (CPH) Canada/United States of America, enUSA, First Printing
MaintenanceE173520
Page 266 of 504
CLEANING THE INTERIOR
WARNINGS
Do not use cleaning solvents, bleachor dye on the vehicle’s safety belts,as these actions may weaken thebelt webbing.
On vehicles equipped withseat-mounted airbags, do not usechemical solvents or strongdetergents. Such products couldcontaminate the side airbag system andaffect performance of the side airbag in acollision.
For fabric, carpets, cloth seats, safety beltsand seats equipped with side airbags:
•Remove dust and loose dirt with avacuum cleaner.
•Remove light stains and soil withMotorcraft Professional StrengthCarpet & Upholstery Cleaner.
•If grease or tar is present on thematerial, spot-clean the area first withMotorcraft Spot and Stain Remover. InCanada, use Motorcraft Multi-PurposeCleaner.
•If a ring forms on the fabric after spotcleaning, clean the entire areaimmediately (but do not oversaturate)or the ring will set.
•Do not use household cleaningproducts or glass cleaners, which canstain and discolor the fabric and affectthe flame retardant abilities of the seatmaterials.
CLEANING THE INSTRUMENT
PANEL AND INSTRUMENT
CLUSTER LENS
WARNING
Do not use chemical solvents orstrong detergents when cleaning thesteering wheel or instrument panelto avoid contamination of the airbagsystem.
Note:Follow the same procedure ascleaning leather seats for cleaning leatherinstrument panels and leather interior trimsurfaces. See Cleaning Leather Seats(page 264).
Clean the instrument panel and clusterlens with a clean, damp and soft cloth,then use a clean, dry and soft cloth to drythese areas.
•Avoid cleaners or polishes that increasethe gloss of the upper portion of theinstrument panel. The dull finish in thisarea helps protect you fromundesirable windshield reflection.
•Do not use any household cleaningproducts or glass cleaners as thesemay damage the finish of theinstrument panel, interior trim andcluster lens.
•Wash or wipe your hands clean if youhave been in contact with certainproducts such as insect repellent andsuntan lotion to avoid possible damageto the interior painted surfaces.
•Do not allow air fresheners and handsanitizers to spill onto interior surfaces.If a spill occurs, wipe off immediately.Your warranty may not cover thesedamages.
If a staining liquid like coffee or juice hasbeen spilled on the instrument panel or oninterior trim surfaces:
263
Taurus (CPH) Canada/United States of America, enUSA, First Printing
Vehicle Care
Page 271 of 504

General Information
WARNING
Failure to follow these guidelinescould result in an increased risk ofloss of vehicle control, injury or death.
Note:Do not use the kit if a tire has becomeseverely damaged by driving the vehicle witha tire that has insufficient air pressure. Onlypunctured areas located within the tire treadcan be sealed with the kit.
Do not attempt to repair punctures largerthan ¼ inch (6 millimeters) or damage tothe tire's sidewall. The tire may notcompletely seal.
Loss of air pressure may adversely affecttire performance. For this reason:
Note:Do not drive the vehicle above50 mph (80 km/h).
Note:Do not drive further than 120 mi(200 km). Drive only to the closestauthorized Ford dealer or tire repair shop tohave your tire inspected.
•Drive carefully and avoid abruptsteering maneuvers.
•Periodically monitor tire inflationpressure in the affected tire. If the tireis losing pressure, have the vehicletowed.
•Read the information in the Tips forUse of the Kit section to make sure safeoperation of the kit and your vehicle.
Tips for Use of the Kit
Read the following list of tips to ensuresafe operation of the kit:
•Before operating the kit, make sureyour vehicle is safely off the road andaway from moving traffic. Turn on thehazard lights.
•Always set the parking brake to ensurethe vehicle does not moveunexpectedly.
•Do not remove any foreign objects,such as nails or screws, from the tire.
•When using the kit, leave the enginerunning (only if the vehicle is outdoorsor in a well-ventilated area) so thecompressor does not drain the vehiclebattery.
•Do not allow the compressor tooperate continuously for more than 15minutes. This will help prevent thecompressor from overheating.
•Never leave the kit unattended whenit is operating.
•Sealant compound contains latex.Make sure that you use the non-latexgloves provided to avoid an allergicreaction.
•Keep the kit away from children.
•Only use the kit when the ambienttemperature is between -22°F (-30°C)and 158°F (70°C).
•Only use the sealing compound beforethe use by date. The use by date is onthe lower right hand corner of the labellocated on the sealant canister(bottle). Check the use by dateregularly and replace the canister afterfour years.
•Do not store the kit unsecured insidethe passenger compartment of thevehicle as it may cause injury during asudden stop or crash. Always store thekit in its original location.
•After sealant use, the tire pressuremonitoring system sensor and valvestem on the wheel must be replacedby an authorized Ford dealer.
268
Taurus (CPH) Canada/United States of America, enUSA, First Printing
Wheels and Tires
Page 272 of 504

•When inflating a tire or other objects,use the black air hose only. Do not usethe transparent hose which is designedfor sealant application only.
•Operating the kit could cause anelectrical disturbance in radio, CD, andDVD player operation.
What to do when a Tire IsPunctured
A tire puncture within the tire tread areacan be repaired in two stages with the kit.
•In the first stage, the tire will bereinflated with a sealing compoundand air. After the tire has beenreinflated, you will need to drive thevehicle a short distance 4 mi (6 km) todistribute the sealant in the tire.
•In the second stage, you will need tocheck the tire pressure and adjust, ifnecessary, to the vehicle tire inflationpressure.
First Stage: Reinflating the Tirewith Sealing Compound and Air
WARNINGS
Do not stand directly over the kitwhile inflating the tire. If you noticeany unusual bulges or deformationsin the tire sidewall during inflation, stopand call roadside assistance.
If the tire does not inflate to therecommended tire pressure within15 minutes, stop and call roadsideassistance.
Preparation: Park the vehicle in a safe, leveland secure area, away from moving traffic.Turn the hazard lights on. Apply the parkingbrake and turn the engine off. Inspect theflat tire for visible damage.
Sealant compound contains latex. Toavoid any allergic reactions, use thenon-latex gloves located in the accessorybox on the underside of the kit housing.
Do not remove any foreign object that haspierced the tire. If a puncture is located inthe tire sidewall, stop and call roadsideassistance.
1. Remove the valve cap from the tirevalve.
2. Unwrap the clear tube from thecompressor housing.
3. Remove the tube cap and fasten themetal connector of the tube to the tirevalve, turning clockwise. Make sure theconnection is tightly fastened.
4. Plug the power cable into the 12-voltpower point in the vehicle.
5. Remove the warning sticker found onthe canister and place it on the top ofthe instrument panel or the center ofthe dash.
6. Start the vehicle only if the vehicle isoutdoors or in a well-ventilated area.
269
Taurus (CPH) Canada/United States of America, enUSA, First Printing
Wheels and TiresE144619
Page 273 of 504
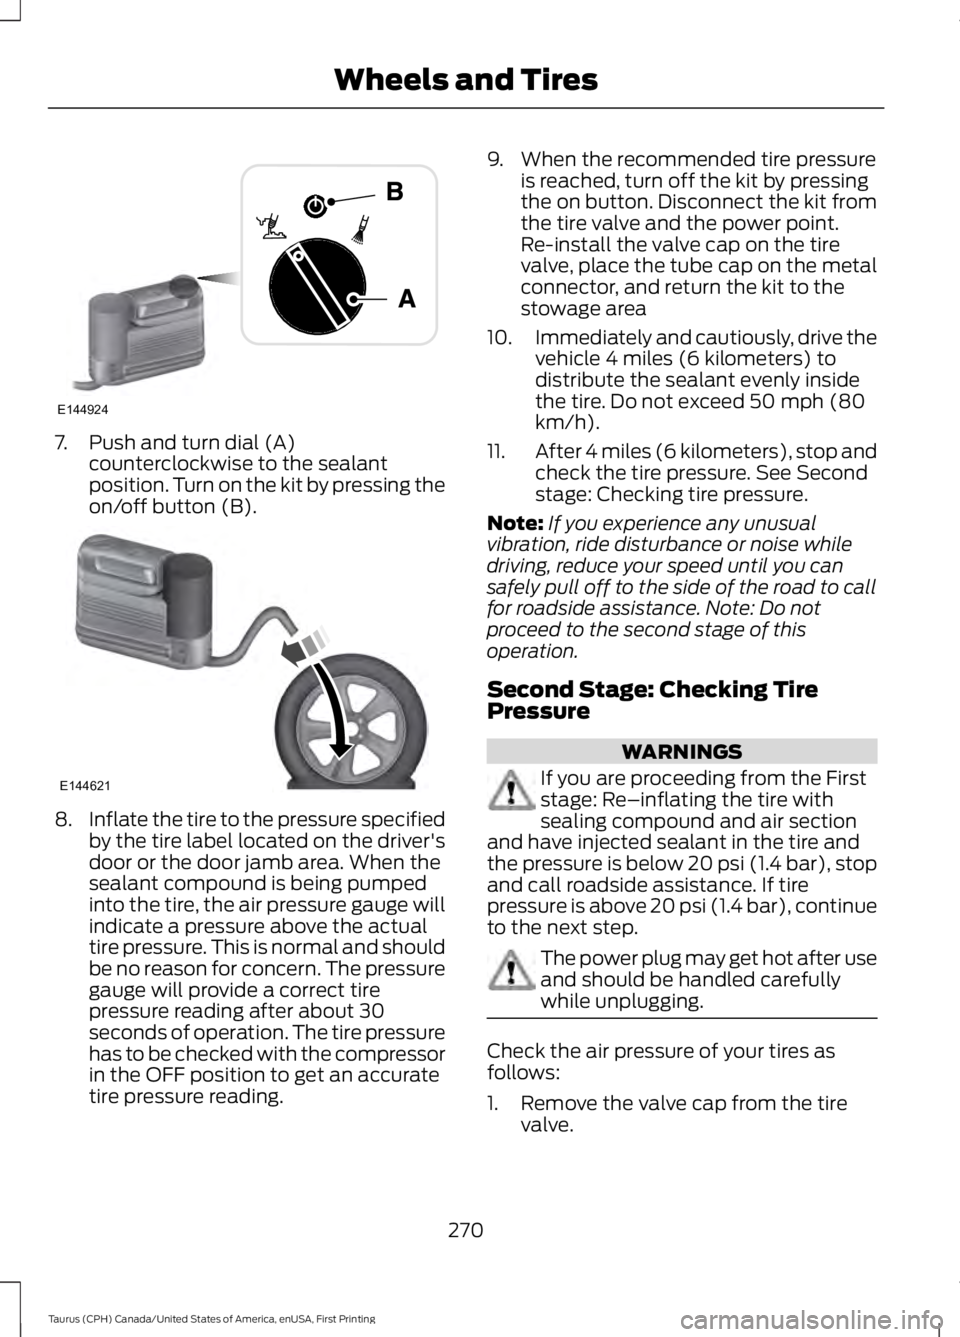
7. Push and turn dial (A)counterclockwise to the sealantposition. Turn on the kit by pressing theon/off button (B).
8.Inflate the tire to the pressure specifiedby the tire label located on the driver'sdoor or the door jamb area. When thesealant compound is being pumpedinto the tire, the air pressure gauge willindicate a pressure above the actualtire pressure. This is normal and shouldbe no reason for concern. The pressuregauge will provide a correct tirepressure reading after about 30seconds of operation. The tire pressurehas to be checked with the compressorin the OFF position to get an accuratetire pressure reading.
9. When the recommended tire pressureis reached, turn off the kit by pressingthe on button. Disconnect the kit fromthe tire valve and the power point.Re-install the valve cap on the tirevalve, place the tube cap on the metalconnector, and return the kit to thestowage area
10.Immediately and cautiously, drive thevehicle 4 miles (6 kilometers) todistribute the sealant evenly insidethe tire. Do not exceed 50 mph (80km/h).
11.After 4 miles (6 kilometers), stop andcheck the tire pressure. See Secondstage: Checking tire pressure.
Note:If you experience any unusualvibration, ride disturbance or noise whiledriving, reduce your speed until you cansafely pull off to the side of the road to callfor roadside assistance. Note: Do notproceed to the second stage of thisoperation.
Second Stage: Checking TirePressure
WARNINGS
If you are proceeding from the Firststage: Re–inflating the tire withsealing compound and air sectionand have injected sealant in the tire andthe pressure is below 20 psi (1.4 bar), stopand call roadside assistance. If tirepressure is above 20 psi (1.4 bar), continueto the next step.
The power plug may get hot after useand should be handled carefullywhile unplugging.
Check the air pressure of your tires asfollows:
1. Remove the valve cap from the tirevalve.
270
Taurus (CPH) Canada/United States of America, enUSA, First Printing
Wheels and TiresE144924 E144621
Page 277 of 504
Traction AA A B C
WARNING
The traction grade assignedto this tire is based onstraight-ahead braking tractiontests, and does not includeacceleration, cornering,hydroplaning or peak tractioncharacteristics.
The traction grades, from highestto lowest are AA, A, B, and C. Thegrades represent the tire’s abilityto stop on wet pavement asmeasured under controlledconditions on specifiedgovernment test surfaces ofasphalt and concrete. A tiremarked C may have poor tractionperformance.
Temperature A B C
WARNING
The temperature grade forthis tire is established for atire that is properly inflated andnot overloaded. Excessive speed,underinflation, or excessiveloading, either separately or incombination, can cause heatbuildup and possible tire failure.
The temperature grades are A(the highest), B and C,representing the tire’s resistanceto the generation of heat and itsability to dissipate heat whentested under controlled conditionson a specified indoor laboratory
test wheel. Sustained hightemperature can cause thematerial of the tire to degenerateand reduce tire life, and excessivetemperature can lead to suddentire failure. The grade Ccorresponds to a level ofperformance which all passengercar tires must meet under theFederal Motor Vehicle SafetyStandard No. 139. Grades B and Arepresent higher levels ofperformance on the laboratorytest wheel than the minimumrequired by law.
Glossary of Tire Terminology
*Tire label: A label showing theoriginal equipment tire sizes,recommended inflation pressureand the maximum weight the
vehicle can carry.
*Tire Identification Number(TIN): A number on the sidewallof each tire providing informationabout the tire brand andmanufacturing plant, tire size anddate of manufacture. Also referredto as DOT code.
*Inflation pressure: A measureof the amount of air in a tire.
274
Taurus (CPH) Canada/United States of America, enUSA, First Printing
Wheels and Tires
Page 281 of 504
*Treadwear The treadwear gradeis a comparative rating based onthe wear rate of the tire whentested under controlled conditionson a specified government testcourse. For example, a tire graded150 would wear one and one-halftimes as well on the governmentcourse as a tire graded 100.
*Traction: The traction grades,from highest to lowest are AA, A,B, and C. The grades represent thetire's ability to stop on wetpavement as measured undercontrolled conditions on specifiedgovernment test surfaces ofasphalt and concrete. A tiremarked C may have poor tractionperformance.
*Temperature: The temperaturegrades are A (the highest), B andC, representing the tire'sresistance to the generation ofheat and its ability to dissipateheat when tested under controlledconditions on a specified indoorlaboratory test wheel.
M.Maximum InflationPressure: Indicates the tiremanufacturers' maximumpermissible pressure or thepressure at which the maximumload can be carried by the tire. Thispressure is normally higher thanthe vehicle manufacturer'srecommended cold inflationpressure which can be found onthe Safety ComplianceCertification Label (affixed to
either the door hinge pillar,door-latch post, or the door edge
that meets the door-latch post,next to the driver's seatingposition), or Tire Label which islocated on the B-Pillar or the edgeof the driver’s door. The coldinflation pressure should never beset lower than the recommendedpressure on the vehicle label.
The tire suppliers may haveadditional markings, notes orwarnings such as standard loador radial tubeless.
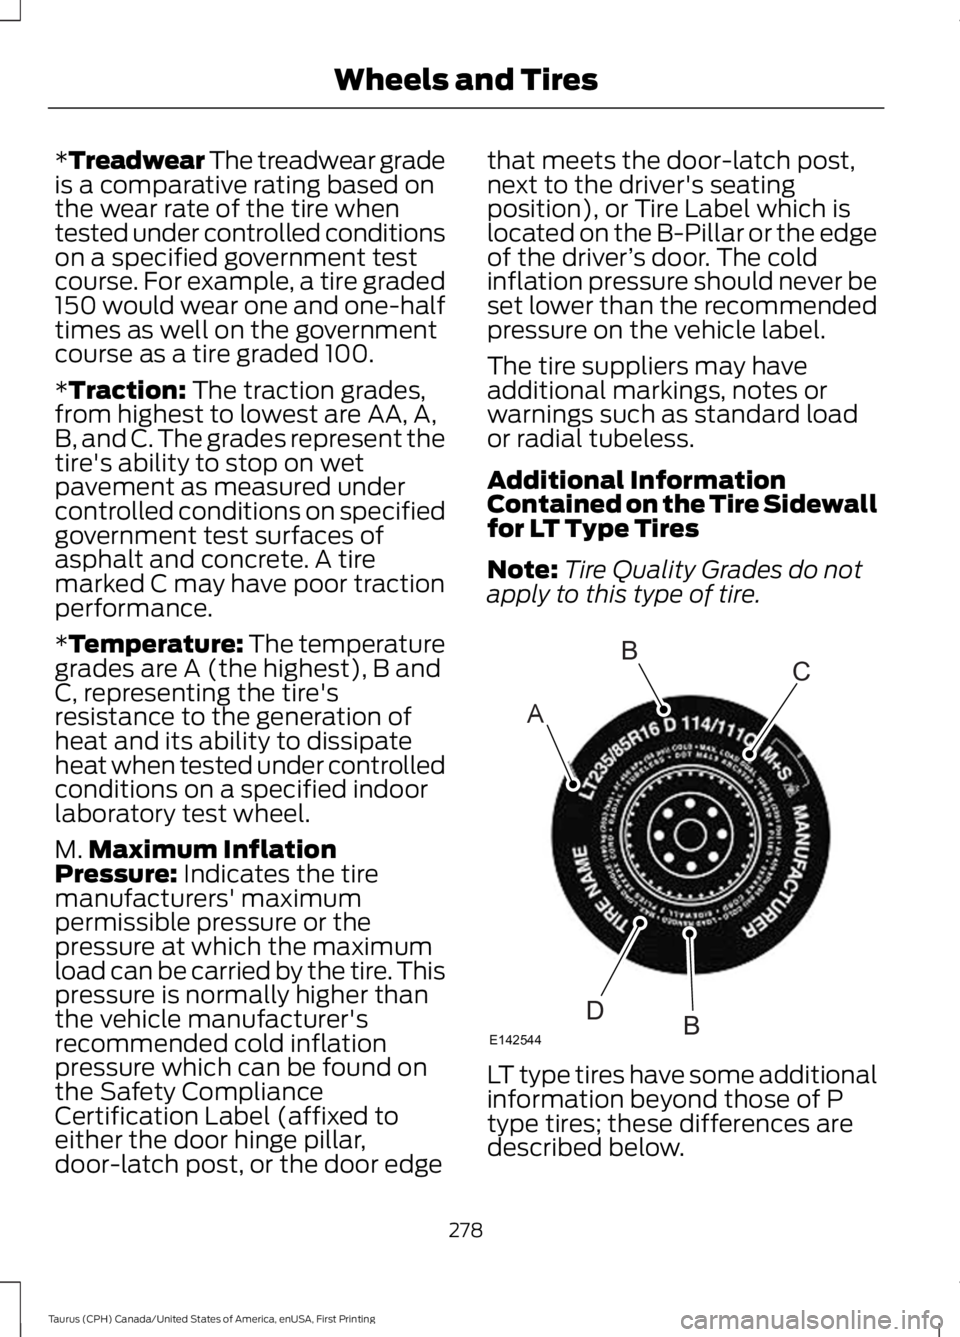
Additional InformationContained on the Tire Sidewallfor LT Type Tires
Note:Tire Quality Grades do notapply to this type of tire.
LT type tires have some additionalinformation beyond those of Ptype tires; these differences aredescribed below.
278
Taurus (CPH) Canada/United States of America, enUSA, First Printing
Wheels and TiresA
BC
BDE142544
Page 283 of 504
C.80: Indicates the aspect ratiowhich gives the tire's ratio ofheight to width. Numbers of 70 orlower indicate a short sidewall.
D.D: Indicates a diagonal type tire.
R: Indicates a radial type tire.
E.16: Indicates the wheel or rimdiameter in inches. If you changeyour wheel size, you will have topurchase new tires to match thenew wheel diameter.
Recommended Tire Pressuresand Inflating Your Tires
Safe operation of your vehiclerequires that your tires areproperly inflated. Remember thata tire can lose up to half of its airpressure without appearing flat.
Every day before you drive, checkyour tires. If one looks lower thanthe others, use a tire gauge tocheck the pressure of all tires andadjust if required.
At least once a month and beforelong trips, inspect each tire andcheck the tire pressure with a tiregauge (including spare, ifequipped). Inflate all tires to theinflation pressure recommendedby Ford Motor Company.
WARNING
Under-inflation is the mostcommon cause of tire failuresand may result in severe tirecracking, tread separation orblowout, with unexpected loss ofvehicle control and increased riskof injury. Under-inflation increasessidewall flexing and rollingresistance, resulting in heatbuildup and internal damage tothe tire. It also may result inunnecessary tire stress, irregularwear, loss of vehicle control andaccidents. A tire can lose up tohalf of its air pressure and notappear to be flat!
You are strongly urged to buy areliable tire pressure gauge, asautomatic service station gaugesmay be inaccurate. Fordrecommends the use of a digitalor dial-type tire pressure gaugerather than a stick-type tirepressure gauge. Use therecommended cold inflationpressure for optimum tireperformance and wear.Under-inflation or over-inflationmay cause uneven treadwearpatterns.
280
Taurus (CPH) Canada/United States of America, enUSA, First Printing
Wheels and Tires