2017 FORD TAURUS remove seats
[x] Cancel search: remove seatsPage 24 of 504
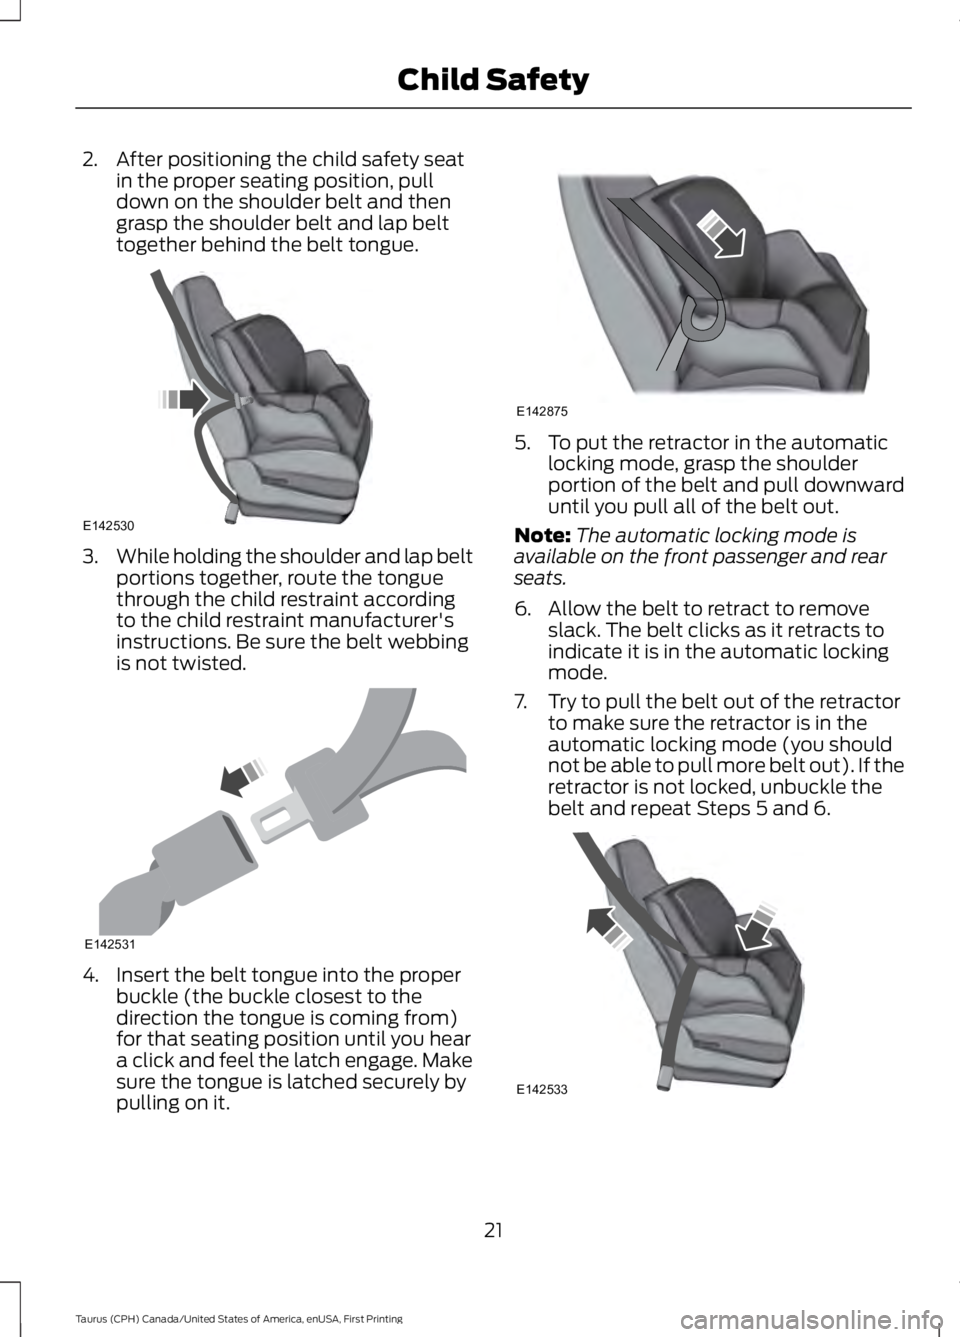
2. After positioning the child safety seatin the proper seating position, pulldown on the shoulder belt and thengrasp the shoulder belt and lap belttogether behind the belt tongue.
3.While holding the shoulder and lap beltportions together, route the tonguethrough the child restraint accordingto the child restraint manufacturer'sinstructions. Be sure the belt webbingis not twisted.
4. Insert the belt tongue into the properbuckle (the buckle closest to thedirection the tongue is coming from)for that seating position until you heara click and feel the latch engage. Makesure the tongue is latched securely bypulling on it.
5. To put the retractor in the automaticlocking mode, grasp the shoulderportion of the belt and pull downwarduntil you pull all of the belt out.
Note:The automatic locking mode isavailable on the front passenger and rearseats.
6. Allow the belt to retract to removeslack. The belt clicks as it retracts toindicate it is in the automatic lockingmode.
7. Try to pull the belt out of the retractorto make sure the retractor is in theautomatic locking mode (you shouldnot be able to pull more belt out). If theretractor is not locked, unbuckle thebelt and repeat Steps 5 and 6.
21
Taurus (CPH) Canada/United States of America, enUSA, First Printing
Child SafetyE142530 E142531 E142875 E142533
Page 25 of 504
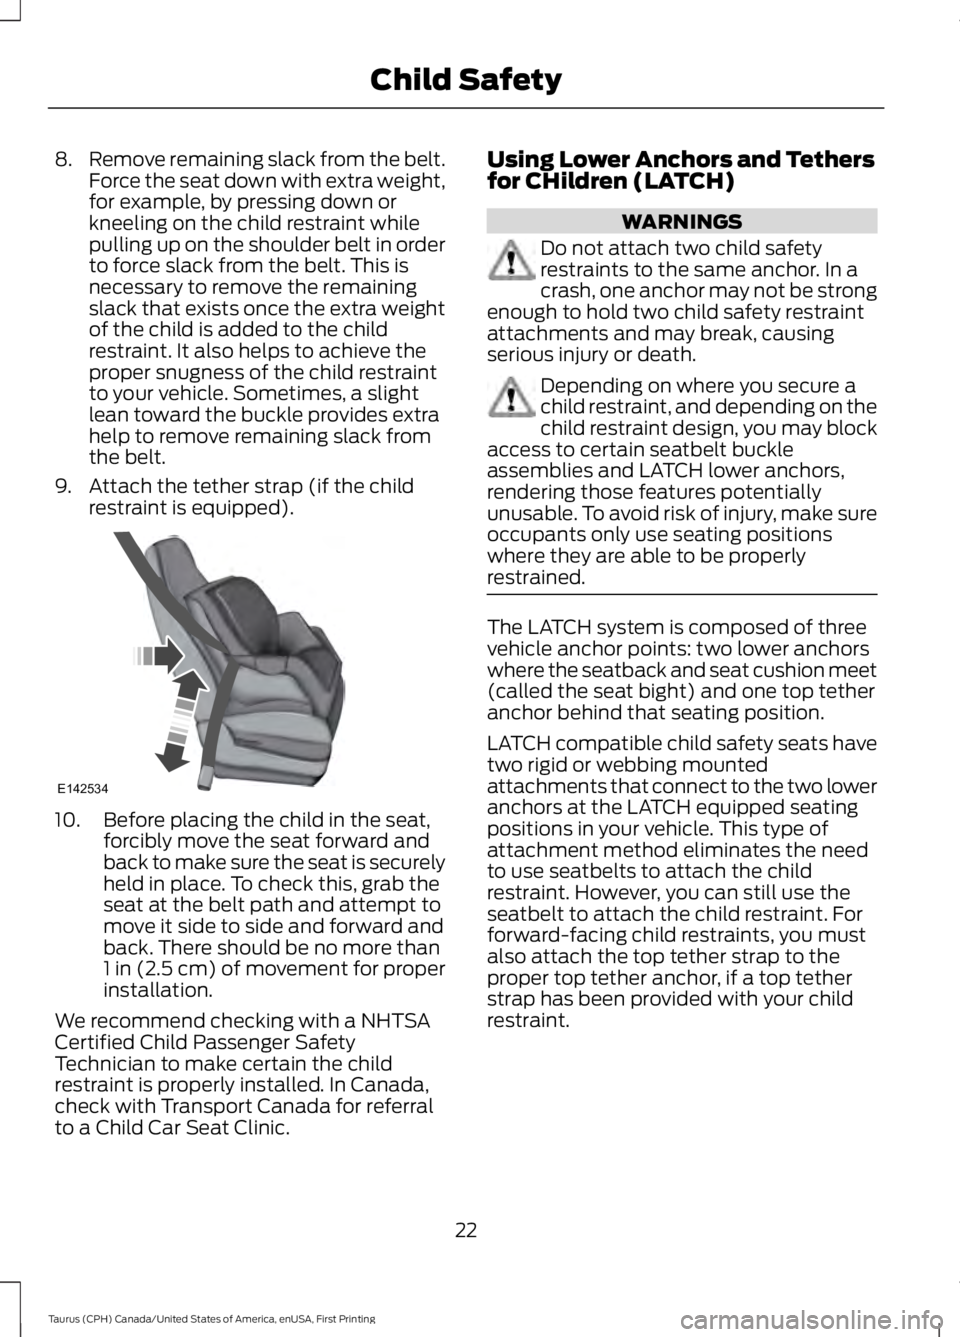
8.Remove remaining slack from the belt.Force the seat down with extra weight,for example, by pressing down orkneeling on the child restraint whilepulling up on the shoulder belt in orderto force slack from the belt. This isnecessary to remove the remainingslack that exists once the extra weightof the child is added to the childrestraint. It also helps to achieve theproper snugness of the child restraintto your vehicle. Sometimes, a slightlean toward the buckle provides extrahelp to remove remaining slack fromthe belt.
9. Attach the tether strap (if the childrestraint is equipped).
10. Before placing the child in the seat,forcibly move the seat forward andback to make sure the seat is securelyheld in place. To check this, grab theseat at the belt path and attempt tomove it side to side and forward andback. There should be no more than1 in (2.5 cm) of movement for properinstallation.
We recommend checking with a NHTSACertified Child Passenger SafetyTechnician to make certain the childrestraint is properly installed. In Canada,check with Transport Canada for referralto a Child Car Seat Clinic.
Using Lower Anchors and Tethersfor CHildren (LATCH)
WARNINGS
Do not attach two child safetyrestraints to the same anchor. In acrash, one anchor may not be strongenough to hold two child safety restraintattachments and may break, causingserious injury or death.
Depending on where you secure achild restraint, and depending on thechild restraint design, you may blockaccess to certain seatbelt buckleassemblies and LATCH lower anchors,rendering those features potentiallyunusable. To avoid risk of injury, make sureoccupants only use seating positionswhere they are able to be properlyrestrained.
The LATCH system is composed of threevehicle anchor points: two lower anchorswhere the seatback and seat cushion meet(called the seat bight) and one top tetheranchor behind that seating position.
LATCH compatible child safety seats havetwo rigid or webbing mountedattachments that connect to the two loweranchors at the LATCH equipped seatingpositions in your vehicle. This type ofattachment method eliminates the needto use seatbelts to attach the childrestraint. However, you can still use theseatbelt to attach the child restraint. Forforward-facing child restraints, you mustalso attach the top tether strap to theproper top tether anchor, if a top tetherstrap has been provided with your childrestraint.
22
Taurus (CPH) Canada/United States of America, enUSA, First Printing
Child SafetyE142534
Page 29 of 504
If your backless booster seat has aremovable shield, remove the shield. If avehicle seating position has a low seatback or no head restraint, a backlessbooster seat may place your child's head(as measured at the tops of the ears)above the top of the seat. In this case,move the backless booster to anotherseating position with a higher seat back orhead restraint and lap and shoulder belts,or consider using a high back booster seat.
•High back booster seats
If, with a backless booster seat, you cannotfind a seating position that adequatelysupports your child's head, a high backbooster seat would be a better choice.
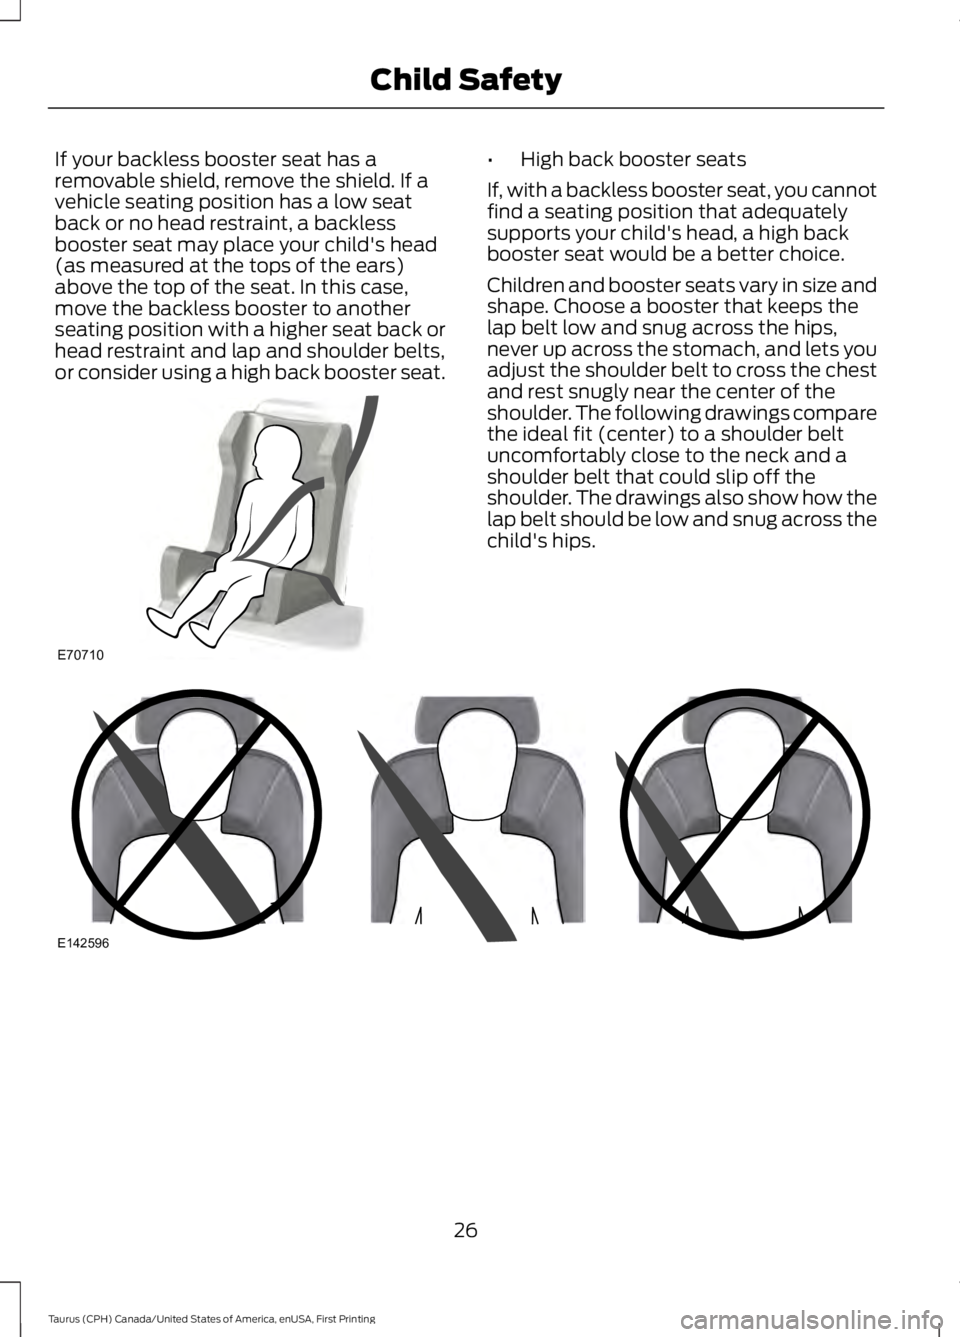
Children and booster seats vary in size andshape. Choose a booster that keeps thelap belt low and snug across the hips,never up across the stomach, and lets youadjust the shoulder belt to cross the chestand rest snugly near the center of theshoulder. The following drawings comparethe ideal fit (center) to a shoulder beltuncomfortably close to the neck and ashoulder belt that could slip off theshoulder. The drawings also show how thelap belt should be low and snug across thechild's hips.
26
Taurus (CPH) Canada/United States of America, enUSA, First Printing
Child SafetyE70710 E142596
Page 31 of 504
WARNINGS
To avoid risk of injury, do not leave
WARNINGS
children or pets unattended in your vehicle.
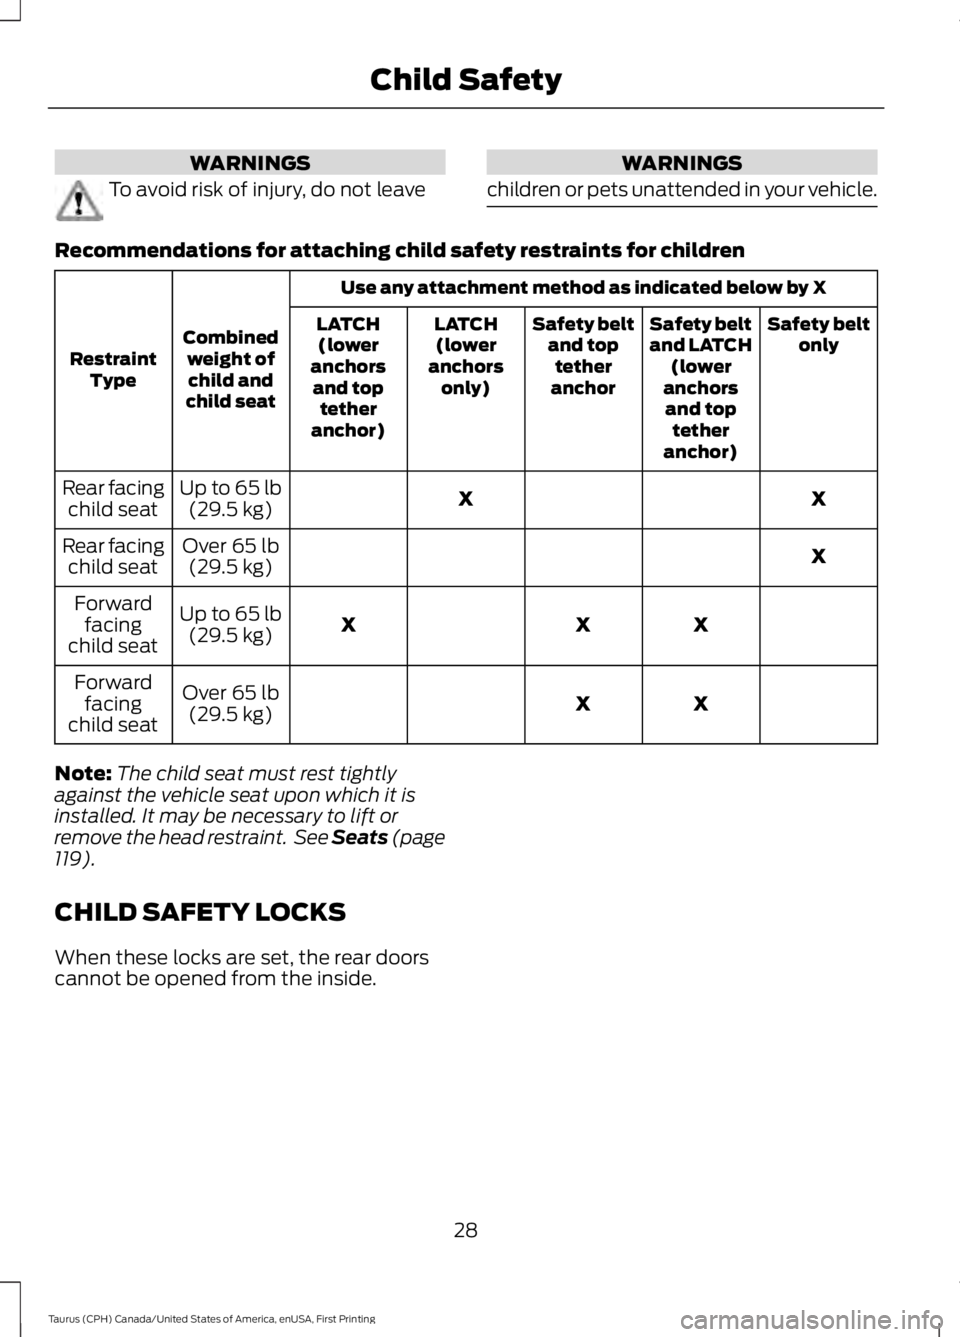
Recommendations for attaching child safety restraints for children
Use any attachment method as indicated below by X
Combinedweight ofchild andchild seat
RestraintType
Safety beltonlySafety beltand LATCH(loweranchorsand toptetheranchor)
Safety beltand toptetheranchor
LATCH(loweranchorsonly)
LATCH(loweranchorsand toptetheranchor)
XXUp to 65 lb(29.5 kg)Rear facingchild seat
XOver 65 lb(29.5 kg)Rear facingchild seat
XXXUp to 65 lb(29.5 kg)
Forwardfacingchild seat
XXOver 65 lb(29.5 kg)
Forwardfacingchild seat
Note:The child seat must rest tightlyagainst the vehicle seat upon which it isinstalled. It may be necessary to lift orremove the head restraint. See Seats (page119).
CHILD SAFETY LOCKS
When these locks are set, the rear doorscannot be opened from the inside.
28
Taurus (CPH) Canada/United States of America, enUSA, First Printing
Child Safety
Page 44 of 504
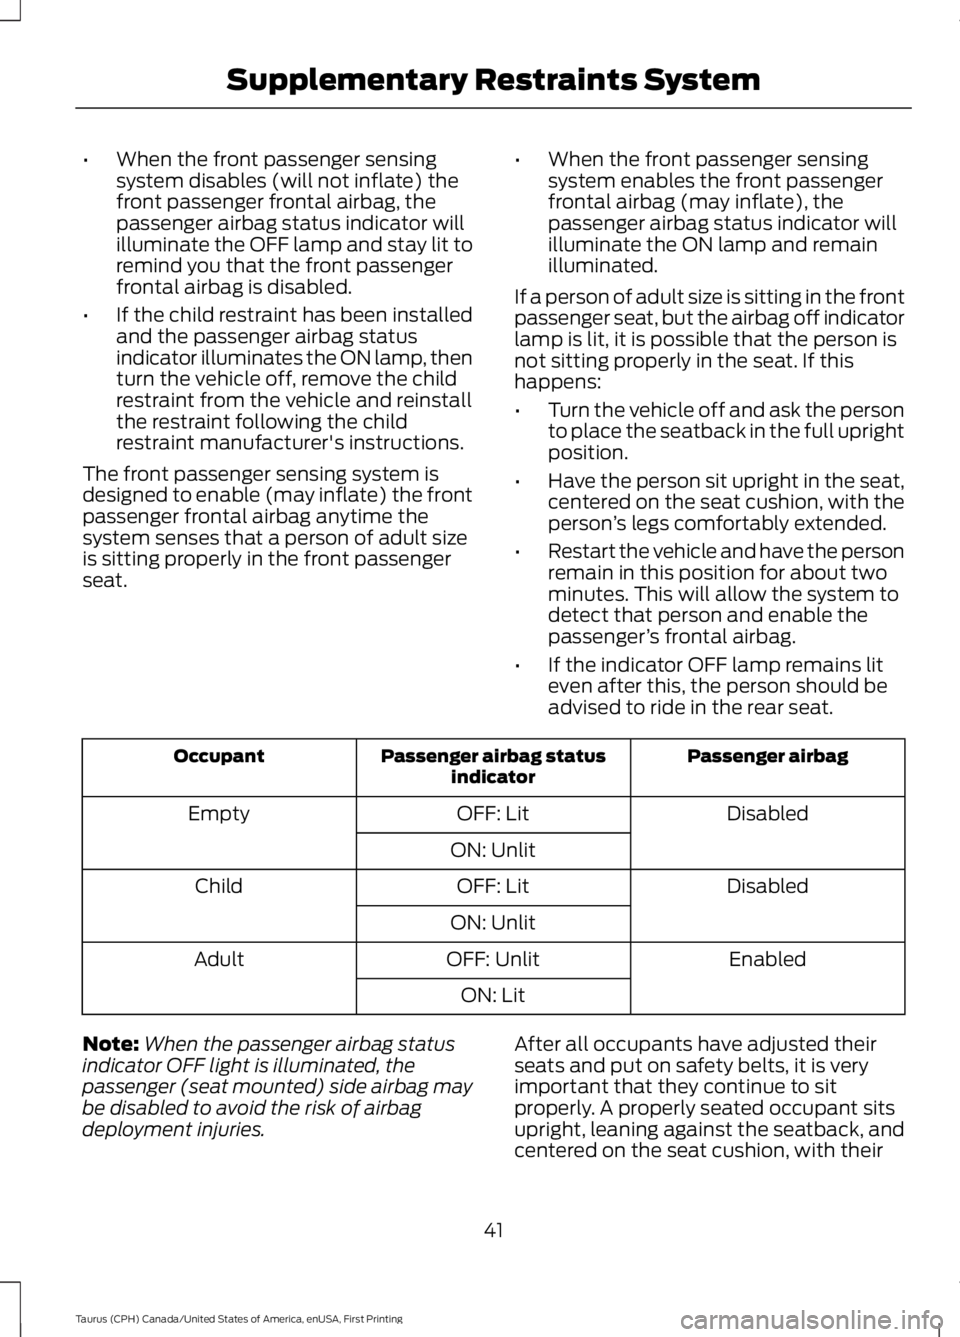
•When the front passenger sensingsystem disables (will not inflate) thefront passenger frontal airbag, thepassenger airbag status indicator willilluminate the OFF lamp and stay lit toremind you that the front passengerfrontal airbag is disabled.
•If the child restraint has been installedand the passenger airbag statusindicator illuminates the ON lamp, thenturn the vehicle off, remove the childrestraint from the vehicle and reinstallthe restraint following the childrestraint manufacturer's instructions.
The front passenger sensing system isdesigned to enable (may inflate) the frontpassenger frontal airbag anytime thesystem senses that a person of adult sizeis sitting properly in the front passengerseat.
•When the front passenger sensingsystem enables the front passengerfrontal airbag (may inflate), thepassenger airbag status indicator willilluminate the ON lamp and remainilluminated.
If a person of adult size is sitting in the frontpassenger seat, but the airbag off indicatorlamp is lit, it is possible that the person isnot sitting properly in the seat. If thishappens:
•Turn the vehicle off and ask the personto place the seatback in the full uprightposition.
•Have the person sit upright in the seat,centered on the seat cushion, with theperson’s legs comfortably extended.
•Restart the vehicle and have the personremain in this position for about twominutes. This will allow the system todetect that person and enable thepassenger’s frontal airbag.
•If the indicator OFF lamp remains liteven after this, the person should beadvised to ride in the rear seat.
Passenger airbagPassenger airbag statusindicatorOccupant
DisabledOFF: LitEmpty
ON: Unlit
DisabledOFF: LitChild
ON: Unlit
EnabledOFF: UnlitAdult
ON: Lit
Note:When the passenger airbag statusindicator OFF light is illuminated, thepassenger (seat mounted) side airbag maybe disabled to avoid the risk of airbagdeployment injuries.
After all occupants have adjusted theirseats and put on safety belts, it is veryimportant that they continue to sitproperly. A properly seated occupant sitsupright, leaning against the seatback, andcentered on the seat cushion, with their
41
Taurus (CPH) Canada/United States of America, enUSA, First Printing
Supplementary Restraints System
Page 118 of 504
HINTS ON CONTROLLING THE
INTERIOR CLIMATE
General Hints
WARNING
Prolonged use of recirculated air maycause the windows to fog up. If thewindows fog up, follow the settingsfor demisting the windshield.
Note:You may feel a small amount of airfrom the footwell air vents regardless of theair distribution setting.
Note:To reduce humidity build-up insideyour vehicle, do not drive with the systemswitched off or with recirculated air alwaysswitched on.
Note:Do not place objects under the frontseats as this may interfere with the airflowto the rear seats.
Note:Remove any snow, ice or leaves fromthe air intake area at the base of thewindshield.
Note:To improve the time to reach acomfortable temperature in hot weather,drive with the windows open until you feelcold air through the air vents.
Manual Climate Control
Note:To reduce fogging of the windshieldduring humid weather, adjust the airdistribution control to the windshield airvents position.
Automatic Climate Control
Note: Adjusting the settings when yourvehicle interior is extremely hot or cold isnot necessary. The system automaticallyadjusts to heat or cool the interior to yourselected temperature as quickly as possible.For the system to function efficiently, theinstrument panel and side air vents shouldbe fully open.
Note:If you select AUTO during coldtemperatures, the system directs airflow tothe windshield and side window vents. Inaddition, the fan may run at a slower speeduntil the engine warms up.
Note:If you select AUTO during hottemperatures, or the inside of the vehicle ishot, the system automatically usesrecirculated air to maximize interior cooling.When the interior reaches the selectedtemperature, the system automaticallyswitches to using outside air.
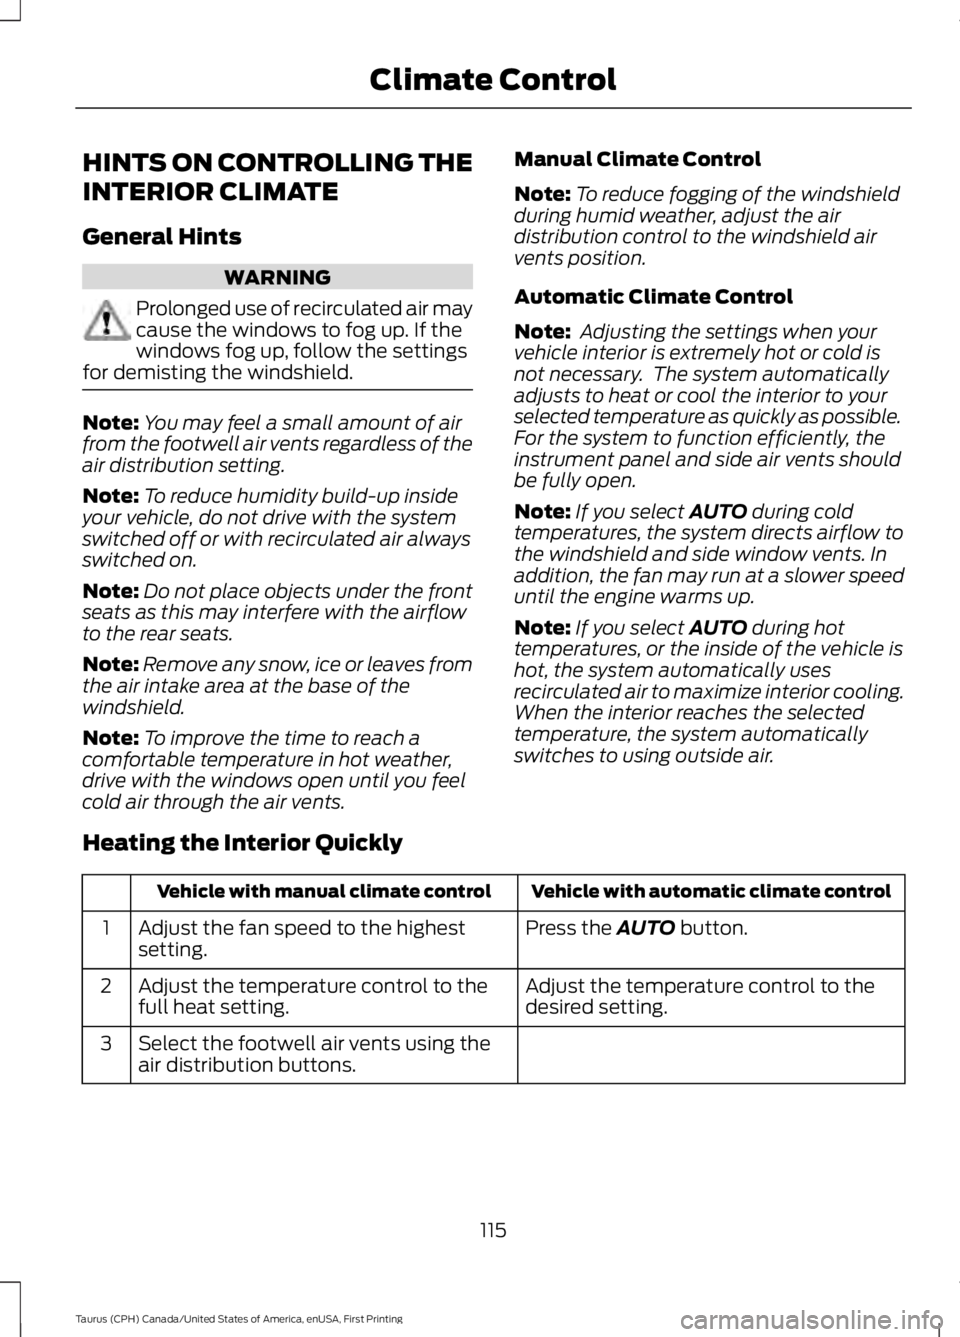
Heating the Interior Quickly
Vehicle with automatic climate controlVehicle with manual climate control
Press the AUTO button.Adjust the fan speed to the highestsetting.1
Adjust the temperature control to thedesired setting.Adjust the temperature control to thefull heat setting.2
Select the footwell air vents using theair distribution buttons.3
115
Taurus (CPH) Canada/United States of America, enUSA, First Printing
Climate Control
Page 123 of 504
WARNINGS
Install the head restraint properly tohelp minimize the risk of neck injuryin the event of a crash.
Note:Adjust the seatback to an uprightdriving position before adjusting the headrestraint. Adjust the head restraint so thatthe top of it is level with the top of your headand as far forward as possible. Make surethat you remain comfortable. If you areextremely tall, adjust the head restraint toits highest position.
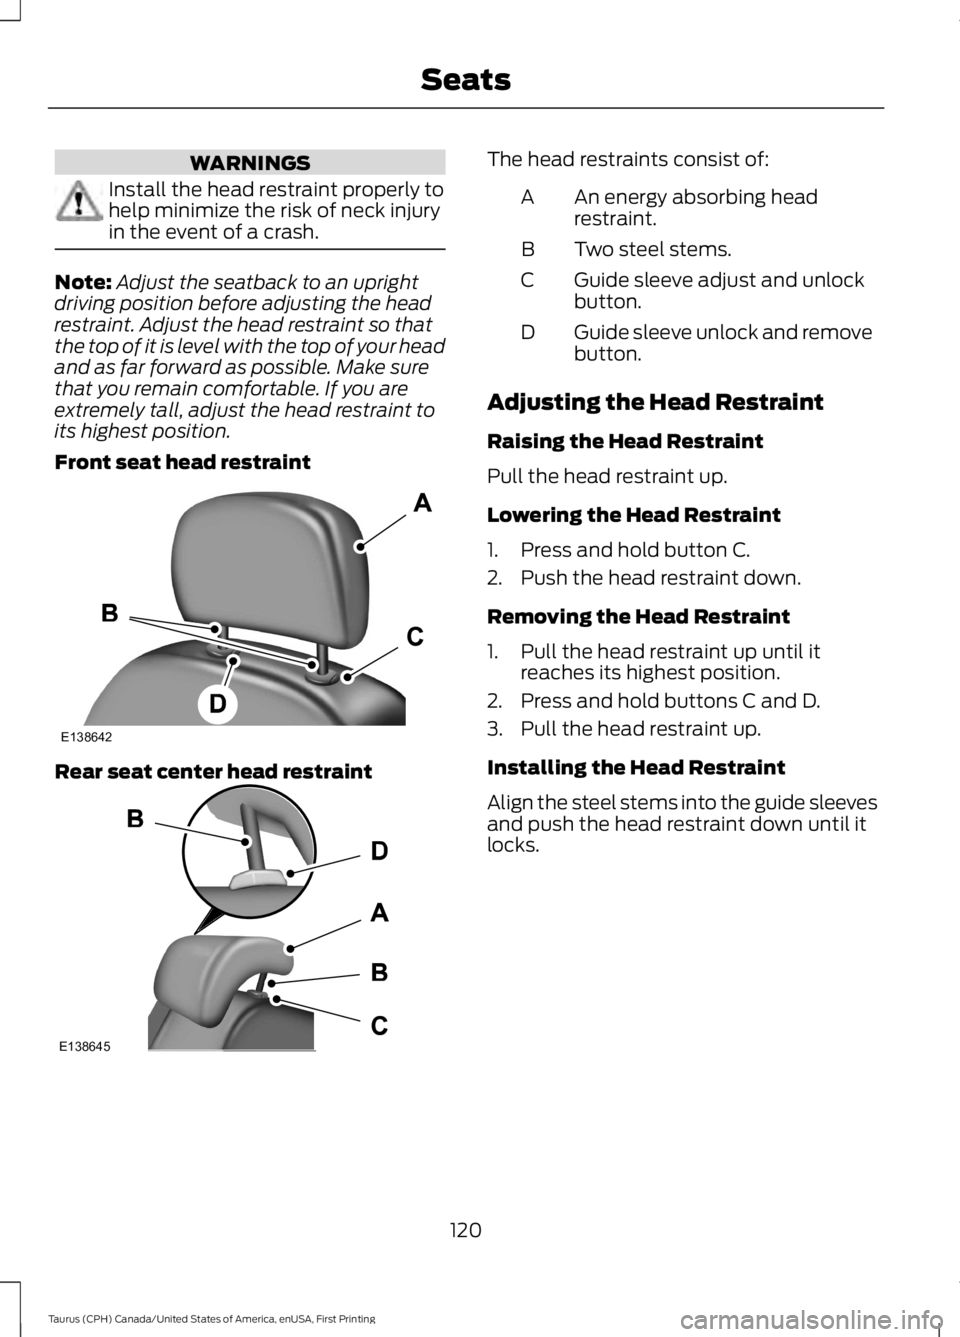
Front seat head restraint
Rear seat center head restraint
The head restraints consist of:
An energy absorbing headrestraint.A
Two steel stems.B
Guide sleeve adjust and unlockbutton.C
Guide sleeve unlock and removebutton.D
Adjusting the Head Restraint
Raising the Head Restraint
Pull the head restraint up.
Lowering the Head Restraint
1. Press and hold button C.
2. Push the head restraint down.
Removing the Head Restraint
1. Pull the head restraint up until itreaches its highest position.
2. Press and hold buttons C and D.
3. Pull the head restraint up.
Installing the Head Restraint
Align the steel stems into the guide sleevesand push the head restraint down until itlocks.
120
Taurus (CPH) Canada/United States of America, enUSA, First Printing
SeatsE138642 E138645
Page 124 of 504
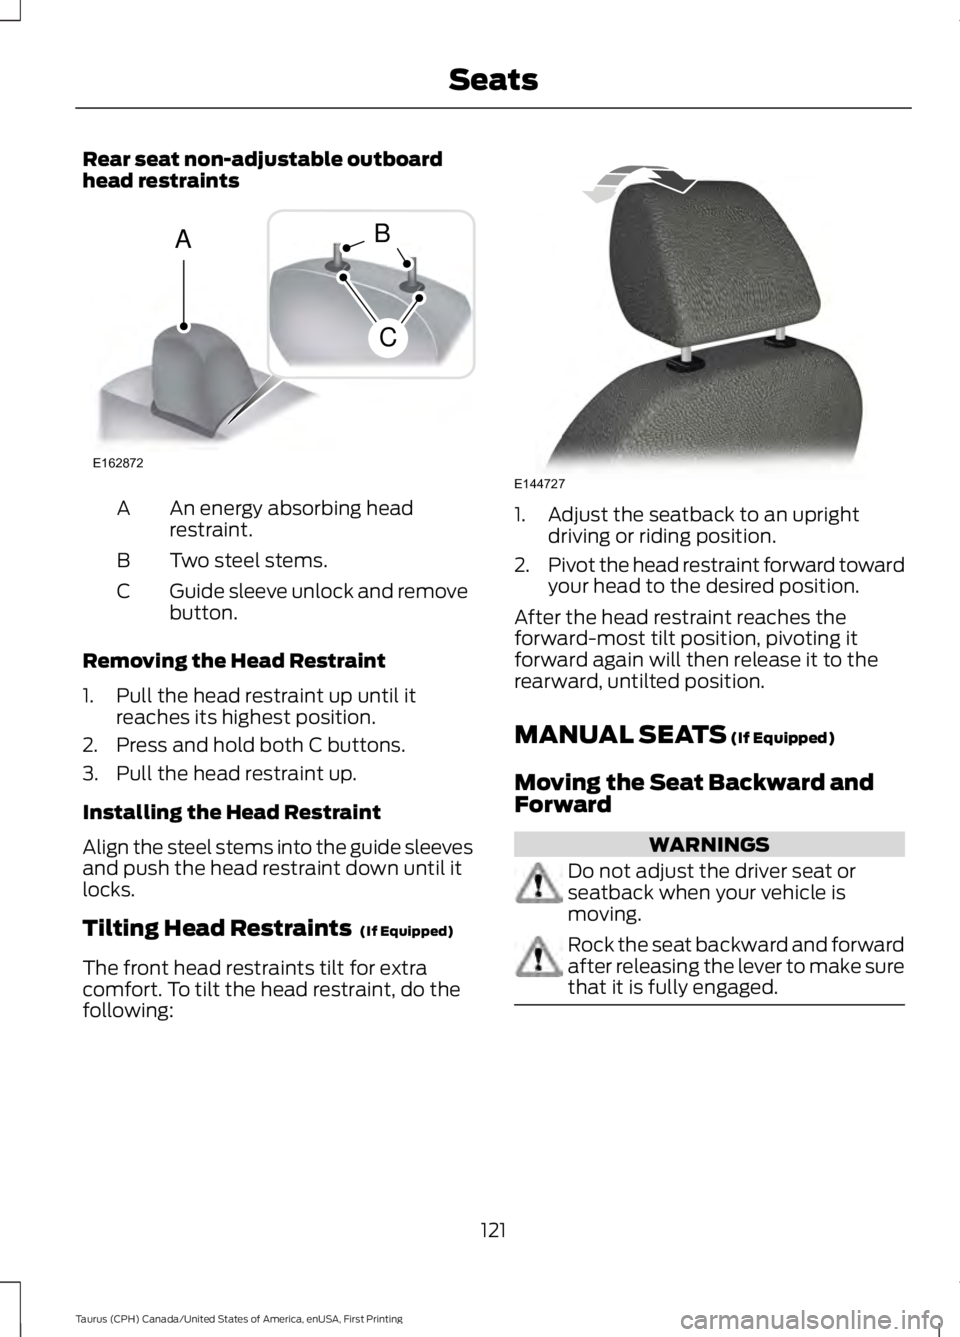
Rear seat non-adjustable outboardhead restraints
An energy absorbing headrestraint.A
Two steel stems.B
Guide sleeve unlock and removebutton.C
Removing the Head Restraint
1. Pull the head restraint up until itreaches its highest position.
2. Press and hold both C buttons.
3. Pull the head restraint up.
Installing the Head Restraint
Align the steel stems into the guide sleevesand push the head restraint down until itlocks.
Tilting Head Restraints (If Equipped)
The front head restraints tilt for extracomfort. To tilt the head restraint, do thefollowing:
1. Adjust the seatback to an uprightdriving or riding position.
2.Pivot the head restraint forward towardyour head to the desired position.
After the head restraint reaches theforward-most tilt position, pivoting itforward again will then release it to therearward, untilted position.
MANUAL SEATS (If Equipped)
Moving the Seat Backward andForward
WARNINGS
Do not adjust the driver seat orseatback when your vehicle ismoving.
Rock the seat backward and forwardafter releasing the lever to make surethat it is fully engaged.
121
Taurus (CPH) Canada/United States of America, enUSA, First Printing
SeatsE162872
A
C
B E144727