2017 FORD TAURUS instrument panel
[x] Cancel search: instrument panelPage 4 of 504

Introduction
About This Manual...........................................7
Symbols Glossary.............................................7
Data Recording..................................................9
California Proposition 65..............................11
Perchlorate.........................................................11
Ford Credit..........................................................11
Replacement PartsRecommendation.......................................12
Special Notices................................................12
Mobile CommunicationsEquipment.....................................................13
Export Unique Options..................................13
Environment
Protecting the Environment........................15
At a Glance
Instrument Panel Overview........................16
Child Safety
General Information.......................................18
Installing Child Restraints............................19
Booster Seats..................................................25
Child Restraint Positioning..........................27
Child Safety Locks.........................................28
Seatbelts
Principle of Operation..................................30
Fastening the Seatbelts................................31
Seatbelt Height Adjustment......................33
Seatbelt Warning Lamp and IndicatorChime.............................................................33
Seatbelt Reminder........................................34
Child Restraint and SeatbeltMaintenance................................................35
Seatbelt Extension........................................36
Personal Safety System™
Personal Safety System™..........................37
Supplementary RestraintsSystem
Principle of Operation..................................38
Driver and Passenger Airbags...................39
Front Passenger Sensing System............40
Side Airbags.....................................................42
Safety Canopy™............................................43
Crash Sensors and Airbag Indicator.......44
Airbag Disposal...............................................45
Keys and Remote Controls
General Information on RadioFrequencies.................................................46
Remote Control..............................................46
Replacing a Lost Key or RemoteControl...........................................................50
MyKey™
Principle of Operation...................................51
Creating a MyKey............................................52
Clearing All MyKeys.......................................53
Checking MyKey System Status...............54
Using MyKey With Remote StartSystems.........................................................55
MyKey Troubleshooting...............................55
Doors and Locks
Locking and Unlocking.................................57
Keyless Entry...................................................60
Interior Luggage CompartmentRelease..........................................................62
Security
Passive Anti-Theft System........................64
Anti-Theft Alarm............................................65
Steering Wheel
Adjusting the Steering Wheel - VehiclesWith: Manual Adjustable SteeringColumn..........................................................66
1
Taurus (CPH) Canada/United States of America, enUSA, First Printing
Table of Contents
Page 7 of 504

Jump Starting the Vehicle.........................216
Post-Crash Alert System...........................218
Customer Assistance
Getting the Services You Need................219
In California (U.S. Only)............................220
The Better Business Bureau (BBB) AutoLine Program (U.S. Only).......................221
Utilizing the Mediation/ArbitrationProgram (Canada Only)........................222
Getting Assistance Outside the U.S. andCanada........................................................222
Ordering Additional Owner'sLiterature.....................................................223
Reporting Safety Defects (U.S.Only).............................................................224
Reporting Safety Defects (CanadaOnly).............................................................224
Fuses
Fuse Specification Chart..........................226
Changing a Fuse...........................................234
Maintenance
General Information...................................236
Opening and Closing the Hood..............236
Under Hood Overview - 2.0LEcoBoost™................................................238
Under Hood Overview - 3.5LDuratec........................................................239
Under Hood Overview - 3.5LEcoboost™................................................240
Engine Oil Dipstick - 2.0LEcoBoost™.................................................241
Engine Oil Dipstick - 3.5L Duratec/3.5LEcoboost™.................................................241
Engine Oil Check...........................................241
Oil Change Indicator Reset......................243
Engine Coolant Check...............................243
Automatic Transmission Fluid Check -2.0L EcoBoost™......................................247
Automatic Transmission Fluid Check -3.5L Duratec/3.5L Ecoboost™...........247
Brake Fluid Check.........................................251
Power Steering Fluid Check......................251
Washer Fluid Check.....................................251
Fuel Filter........................................................252
Changing the 12V Battery.........................252
Checking the Wiper Blades.....................254
Changing the Wiper Blades.....................254
Adjusting the Headlamps.........................255
Changing a Bulb...........................................256
Bulb Specification Chart...........................257
Changing the Engine Air Filter................259
Vehicle Care
General Information...................................260
Cleaning Products......................................260
Cleaning the Exterior.................................260
Waxing..............................................................261
Cleaning the Engine....................................262
Cleaning the Windows and WiperBlades..........................................................262
Cleaning the Interior...................................263
Cleaning the Instrument Panel andInstrument Cluster Lens.......................263
Cleaning Leather Seats.............................264
Repairing Minor Paint Damage..............264
Cleaning the Wheels..................................264
Vehicle Storage............................................265
Wheels and Tires
General Information...................................267
Tire Sealant and Inflator Kit.....................267
Tire Care...........................................................273
Using Summer Tires...................................286
Using Snow Chains.....................................286
Tire Pressure Monitoring System...........287
Changing a Road Wheel............................291
Technical Specifications..........................296
4
Taurus (CPH) Canada/United States of America, enUSA, First Printing
Table of Contents
Page 19 of 504

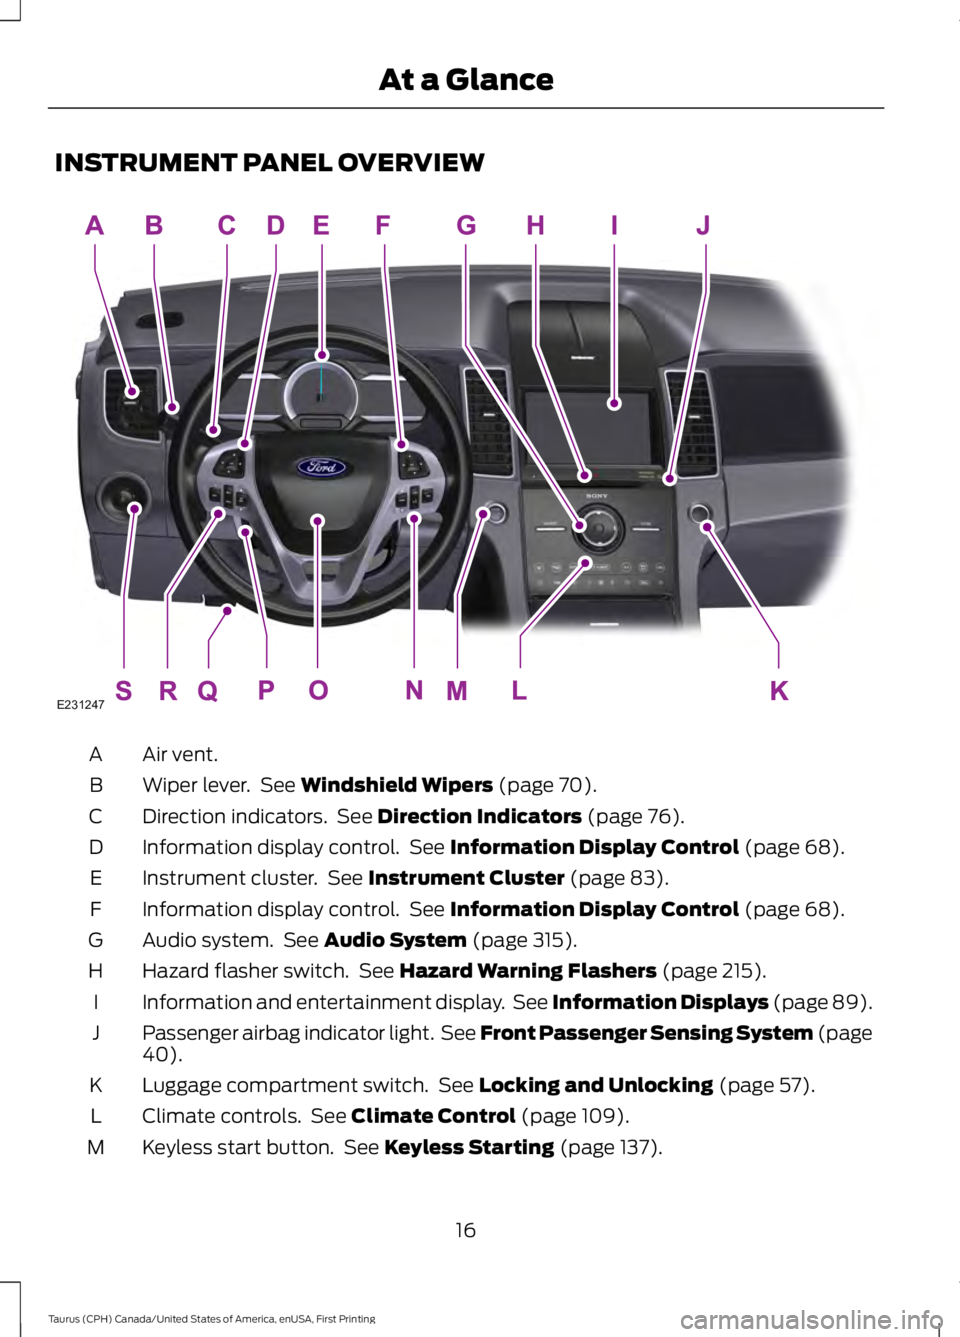
INSTRUMENT PANEL OVERVIEW
Air vent.A
Wiper lever. See Windshield Wipers (page 70).B
Direction indicators. See Direction Indicators (page 76).C
Information display control. See Information Display Control (page 68).D
Instrument cluster. See Instrument Cluster (page 83).E
Information display control. See Information Display Control (page 68).F
Audio system. See Audio System (page 315).G
Hazard flasher switch. See Hazard Warning Flashers (page 215).H
Information and entertainment display. See Information Displays (page 89).I
Passenger airbag indicator light. See Front Passenger Sensing System (page40).J
Luggage compartment switch. See Locking and Unlocking (page 57).K
Climate controls. See Climate Control (page 109).L
Keyless start button. See Keyless Starting (page 137).M
16
Taurus (CPH) Canada/United States of America, enUSA, First Printing
At a GlanceE231247
Page 43 of 504

Children must always be properlyrestrained. Accident statistics suggest thatchildren are safer when properly restrainedin the rear seating positions than in thefront seating position. Failure to followthese instructions may increase the risk ofinjury in a crash.
FRONT PASSENGER SENSING
SYSTEM
WARNINGS
Even with Advanced RestraintsSystems, children 12 and undershould be properly restrained in arear seating position. Failure to follow thiscould seriously increase the risk of injury ordeath.
Sitting improperly out of position orwith the seatback reclined too farcan take off weight from the seatcushion and affect the decision of the frontpassenger sensing system, resulting inserious injury or death in a crash. Alwayssit upright against your seatback, with yourfeet on the floor.
Any alteration or modification to thefront passenger seat may affect theperformance of the front passengersensing system which could seriouslyincrease the risk of injury or death.
This system works with sensors that arepart of the front passenger seat and safetybelt to detect the presence of aproperly-seated occupant and determineif the front passenger frontal airbag shouldbe enabled (may inflate) or not.
The front passenger sensing system usesa passenger airbag status indicator thatwill illuminate indicating that the frontpassenger frontal airbag is either ON(enabled) or OFF (disabled).
The indicator lamp is located in the centerstack of the instrument panel.
Note:The passenger airbag status indicatorOFF and ON indicator lamps will illuminatefor a short period of time when the ignitionis first turned on to confirm it is functional.
The front passenger sensing system isdesigned to disable (will not inflate) thefront passenger frontal airbag when thefront passenger seat is unoccupied, or arear facing infant seat, a forward-facingchild restraint, or a booster seat isdetected. Even with this technology,parents are strongly encouraged toalways properly restrain children in the rearseat. The sensor also turns off thepassenger front airbag and seat-mountedside airbag when the passenger seat isempty.
40
Taurus (CPH) Canada/United States of America, enUSA, First Printing
Supplementary Restraints SystemE142846 E151849
Page 47 of 504

The system consists of the following:
•Safety Canopy curtain airbags locatedabove the trim panels over the frontand rear side windows identified by alabel or wording on the headliner orroof-pillar trim.
•A flexible headliner which opens abovethe side doors to allow air curtaindeployment
· Crash sensors and monitoringsystem with a readinessindicator. See Crash Sensorsand Airbag Indicator (page 44).
Properly restrain children 12 years old andunder in the rear seats. The Safety Canopywill not interfere with children restrainedusing a properly installed child or boosterseat because it is designed to inflatedownward from the headliner above thedoors along the side window opening.
The design and development of the SafetyCanopy included recommended testingprocedures that were developed by agroup of automotive safety experts knownas the Side Airbag Technical WorkingGroup. These recommended testingprocedures help reduce the risk of injuriesrelated to the deployment of side airbags(including the Safety Canopy).
CRASH SENSORS AND
AIRBAG INDICATOR
WARNING
Modifying or adding equipment tothe front end of the vehicle (includingframe, bumper, front end bodystructure and tow hooks) may affect theperformance of the airbag system,increasing the risk of injury. Do not modifythe front end of the vehicle.
Your vehicle has a collection of crash andoccupant sensors which provideinformation to the restraints controlmodule. The restraints control moduledeploys (activates) the front seatbeltpretensioners, driver airbag, passengerairbag, seat mounted side airbags and theSafety Canopy. Based on the type of crash,the restraints control module will deploythe appropriate safety devices.
The restraints control module alsomonitors the readiness of the above safetydevices plus the crash and occupantsensors. The readiness of the safetysystem is indicated by a warning indicatorlight in the instrument cluster or by abackup tone if the warning light is notworking. Routine maintenance of theairbag is not required.
A difficulty with the system is indicated byone or more of the following:
The readiness light will notilluminate immediately after theignition is turned on.
•The readiness light will either flash orstay lit.
•A series of five beeps will be heard. Thetone pattern will repeat periodicallyuntil the problem, the light or both arerepaired.
44
Taurus (CPH) Canada/United States of America, enUSA, First Printing
Supplementary Restraints SystemE75004 E67017 E67017
Page 53 of 504

Note:If you remote start your vehicle withan integrated keyhead transmitter, you mustswitch the ignition on before driving yourvehicle. If you remote start your vehicle withan intelligent access transmitter, you mustpress the push button ignition switch on theinstrument panel once while applying thebrake pedal before driving your vehicle.
The power windows do not work duringremote start and the radio does not turnon automatically.
The parking lamps remain on and thevehicle runs for 5, 10 or 15 minutes,depending on the setting.
Extending the Engine Running Time
To extend the engine running time durationof your vehicle during remote start, repeatsteps 1 and 2 while the engine is running.If the duration is set to 10 minutes, theduration extends by another 10 minutes.For example, if your vehicle had beenrunning from the first remote start for 5minutes, your vehicle continues to run nowfor a total of 20 minutes. You can extendthe remote start up to a maximum of 35minutes.
Wait at least five seconds before remotestarting after the engine stops running.
Turning Your Vehicle Off After RemoteStarting
Press the button once. Theparking lamps turn off.
You may have to be closer to your vehicleto remotely switch off your vehicle afterremote starting. This is due to the addednoise of your running vehicle.
You can switch this feature on or off in theinformation display. See GeneralInformation (page 89).
Memory Feature (If Equipped)
You can use the remote control to recallmemory settings for the driver seat, powermirrors, power steering column and poweradjustable foot pedals. Press the unlockbutton on the remote control or unlockyour vehicle with the intelligent access keyto recall the memory positions. You canprogram the remote control or intelligentaccess key to recall memory positions. SeeMemory Function (page 125).
REPLACING A LOST KEY OR
REMOTE CONTROL
Replacement keys or remote controls canbe purchased from an authorized dealer.Authorized dealers can program remotecontrols for your vehicle. See PassiveAnti-Theft System (page 64).
50
Taurus (CPH) Canada/United States of America, enUSA, First Printing
Keys and Remote ControlsE138625
Page 61 of 504

Opening the LuggageCompartment
With the Remote Control
Press the button twice withinthree seconds.
From the Instrument Panel
Press the button on theinstrument panel.
Activating Intelligent Access (If
Equipped)
The intelligent access key must be within3 ft (1 m) of your vehicle.
Unlocking the Doors
Pull a front exterior door handle to unlockand open the door. Do not touch the locksensor on the front of the handle.
Locking the Doors
The locking sensors are on the front doorhandles.
Touch a locking sensor once to lock yourvehicle and arm the alarm. There is a briefdelay before you can unlock your vehicleagain.
Note:Keep the door handle clean to makesure the system operates correctly.
Note:Your vehicle does not automaticallylock. If you do not touch a locking sensoryour vehicle will remain unlocked.
Opening the Luggage Compartment
Press the exterior release button hiddenabove the license plate.
Smart Unlocks for IntegratedKeyhead Transmitter (If Equipped)
This helps to prevent you from lockingyourself out of your vehicle if the key is stillin the ignition.
When you open one of the front doors andlock your vehicle with the power door lockcontrol, all the doors will lock then unlockand the horn will sound twice if the key isstill in the ignition.
You can still lock your vehicle with the keyin the ignition by either:
•Using the keyless entry keypad with thedriver door closed.
•Pressing the lock button on the remotecontrol even if the doors are not closed.
58
Taurus (CPH) Canada/United States of America, enUSA, First Printing
Doors and LocksE138630 E159323 E185863 E144402
Page 75 of 504

GENERAL INFORMATION
Condensation in Lamp Assemblies
Exterior lamps have vents toaccommodate normal changes in airpressure.
Condensation can be a natural by-productof this design. When moist air enters thelamp assembly through the vents, there isa possibility that condensation can occurwhen the temperature is cold. Whennormal condensation occurs, a fine mistcan form on the interior of the lens. Thefine mist eventually clears and exitsthrough the vents during normal operation.
Clearing time may take as long as 48 hoursunder dry weather conditions.
Examples of acceptable condensation are:
•The presence of a fine mist (no streaks,drip marks or large droplets).
•A fine mist covers less than 50% of thelens.
Examples of unacceptable condensationare:
•A water puddle inside the lamp.
•Streaks, drip marks or large dropletspresent on the interior of the lens.
If you see any unacceptable condensation,have your vehicle checked by an authorizeddealer.
LIGHTING CONTROL
Off.A
Parking lamps, instrument panellamps, license plate lamps andtail lamps.
B
Headlamps.C
High Beams
Push the lever away from you to switchthe high beam on.
Push the lever away from you again or pullthe lever toward you to switch the highbeam off.
72
Taurus (CPH) Canada/United States of America, enUSA, First Printing
LightingE224599
A E167827