2017 FORD SUPER DUTY stop start
[x] Cancel search: stop startPage 394 of 636
As an added safety feature, your vehicle
has been equipped with a Tire Pressure
Monitoring System (TPMS) that
illuminates a low tire pressure telltale
when one or more of your tires is
significantly under-inflated. Accordingly,
when the low tire pressure telltale
illuminates, you should stop and check
your tires as soon as possible, and inflate
them to the proper pressure. Driving on a
significantly under-inflated tire causes the
tire to overheat and can lead to tire failure.
Under-inflation also reduces fuel efficiency
and tire tread life, and may affect the
vehicle
’s handling and stopping ability.
Please note that the TPMS is not a
substitute for proper tire maintenance, and
it is the driver ’s responsibility to maintain
correct tire pressure, even if under-inflation
has not reached the level to trigger
illumination of the TPMS low tire pressure
telltale.
Your vehicle has also been equipped with
a TPMS malfunction indicator to indicate
when the system is not operating properly.
The TPMS malfunction indicator is
combined with the low tire pressure
telltale. When the system detects a
malfunction, the telltale will flash for
approximately one minute and then remain
continuously illuminated. This sequence
will continue upon subsequent vehicle
start-ups as long as the malfunction exists.
When the malfunction indicator is
illuminated, the system may not be able
to detect or signal low tire pressure as
intended. TPMS malfunctions may occur
for a variety of reasons, including the
installation of replacement or alternate
tires or wheels on the vehicle that prevent
the TPMS from functioning properly.
Always check the TPMS malfunction
telltale after replacing one or more tires or
wheels on your vehicle to ensure that the
replacement or alternate tires and wheels
allow the TPMS to continue to function
properly. This device complies with Part 15 of the
FCC Rules and with Industry Canada
license-exempt RSS standard(s).
Operation is subject to the following two
conditions:
•
This device may not cause harmful
interference.
• This device must accept any
interference received, including
interference that may cause undesired
operation.
Changing Tires With a Tire Pressure
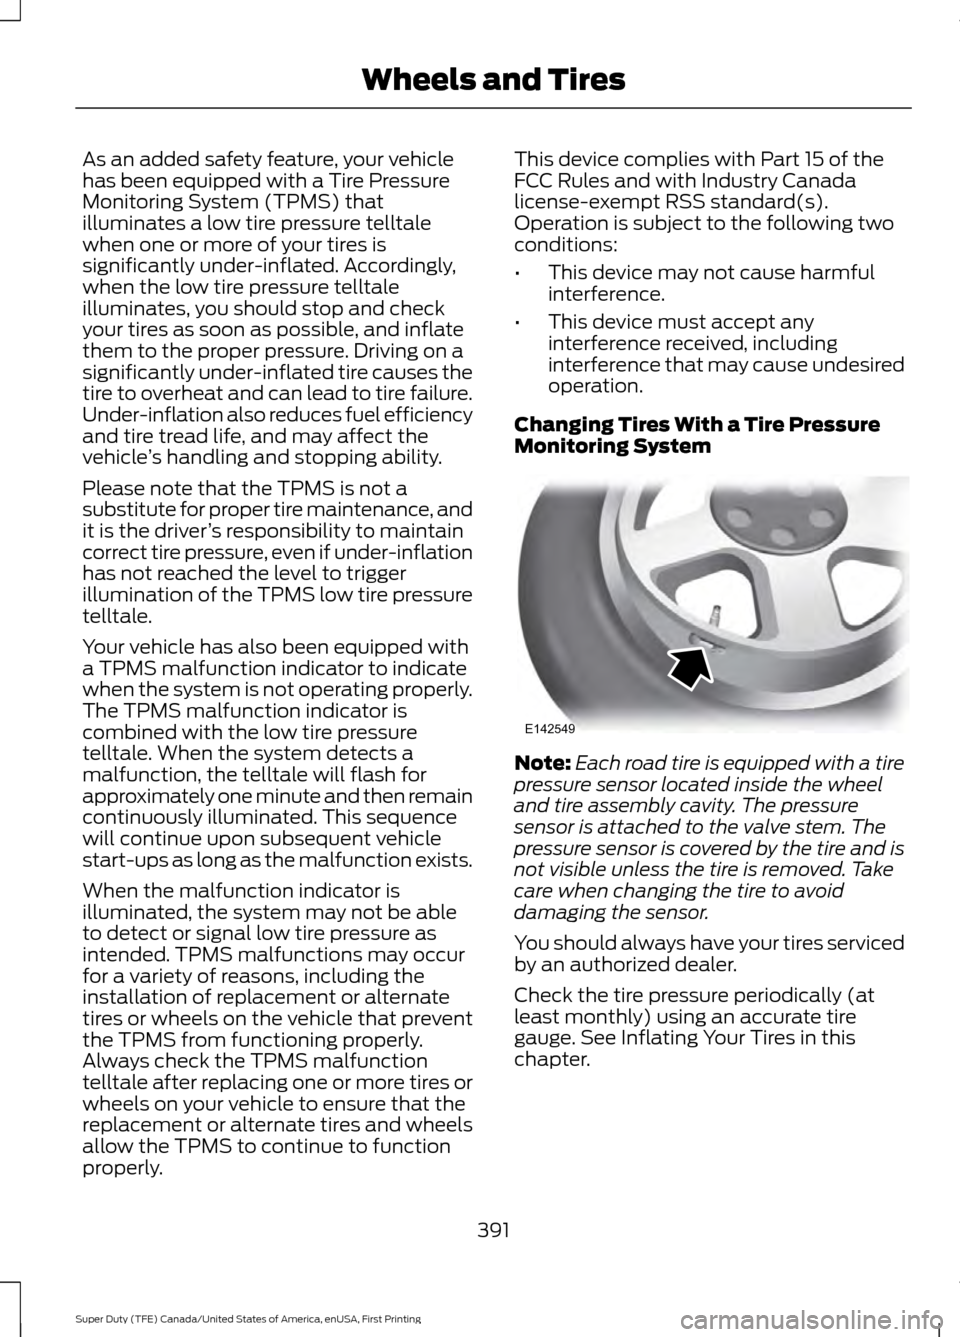
Monitoring System Note:
Each road tire is equipped with a tire
pressure sensor located inside the wheel
and tire assembly cavity. The pressure
sensor is attached to the valve stem. The
pressure sensor is covered by the tire and is
not visible unless the tire is removed. Take
care when changing the tire to avoid
damaging the sensor.
You should always have your tires serviced
by an authorized dealer.
Check the tire pressure periodically (at
least monthly) using an accurate tire
gauge. See Inflating Your Tires in this
chapter.
391
Super Duty (TFE) Canada/United States of America, enUSA, First Printing Wheels and TiresE142549
Page 398 of 636
•
To reduce the chances of interference
from another vehicle, perform the
system reset procedure at least three
feet (one meter) away from another
Ford Motor Company vehicle
undergoing the system reset procedure
at the same time.
• Do not wait more than two minutes
between resetting each tire sensor or
the system will time-out and the entire
procedure will have to be repeated on
all four wheels.
• A double horn will sound indicating the
need to repeat the procedure.
Performing the System Reset Procedure
(Single Rear Wheel)
Read the entire procedure before
attempting.
1. Drive the vehicle above 20 mph
(32 km/h) for at least two minutes,
then park in a safe location where you
can easily get to all four tires and have
access to an air pump.
2. Place the ignition in the off position and
keep the key in the ignition.
3. Cycle the ignition to the on position with the engine off.
4. Turn the hazard flashers on then off three times. You must accomplish this
within 10 seconds. If the reset mode
has been entered successfully, the horn
will sound once, the system indicator
will flash and a message is shown in
the information display. If this does not
occur, please try again starting at Step
2. If after repeated attempts to enter
the reset mode, the horn does not
sound, the system indicator does not
flash and no message is shown in the
information display, seek service from
your authorized dealer. 5. Train the tire pressure monitoring
system sensors in the tires using the
following system reset sequence
starting with the left front tire in the
following clockwise order: Left front
(driver's side front tire), Right front
(passenger's side front tire), Right rear
(passenger's side rear tire), Left rear
(driver's side rear tire).
6. Remove the valve cap from the valve stem on the left front tire. Decrease the
air pressure until the horn sounds.
Note: The single horn chirp confirms that
the sensor identification code has been
learned by the module for this position. If a
double horn is heard, the reset procedure
was unsuccessful, and you must repeat it.
7. Remove the valve cap from the valve stem on the right front tire. Decrease
the air pressure until the horn sounds.
8. Remove the valve cap from the valve stem on the right rear tire. Decrease the
air pressure until the horn sounds.
9. Remove the valve cap from the valve stem on the left rear tire. Decrease the
air pressure until the horn sounds.
Training is complete after the horn
sounds for the last tire trained (driver's
side rear tire), the system indicator
stops flashing, and a message is shown
in the information display.
10. Turn the ignition off. If two short horn
beeps are heard, the reset procedure
was unsuccessful and you must
repeat it. If after repeating the
procedure and two short beeps are
heard when the ignition is turned to
off, seek assistance from your
authorized dealer.
395
Super Duty (TFE) Canada/United States of America, enUSA, First Printing Wheels and Tires
Page 399 of 636
11.
Set all four tires to the recommended
air pressure as indicated on the
Safety Compliance Certification
Label (affixed to either the door hinge
pillar, door-latch post, or the door
edge that meets the door-latch post,
next to the driver's seating position)
or Tire Label located on the B-Pillar
or the edge of the driver's door.
Performing the System Reset Procedure
(Dual Rear Wheel)
For further information see
Understanding Your Tire Pressure
Monitoring System and refer to Dual
Rear Wheel, earlier in this section.
Read the entire procedure before
attempting.
1. Drive the vehicle above
20 mph
(32 km/h) for at least two minutes,
then park in a safe location where you
can easily get to all four tires and have
access to an air pump.
2. Place the ignition in the off position and
keep the key in the ignition.
3. Cycle the ignition to the on position with the engine off.
4. Turn the hazard flashers on then off three times. You must accomplish this
within 10 seconds. If the reset mode
has been entered successfully, the horn
will sound once, the system indicator
will flash and a message is shown in
the information display. If this does not
occur, please try again starting at Step
2. If after repeated attempts to enter
the reset mode, the horn does not
sound, the system indicator does not
flash and no message is shown in the
information display, seek service from
your authorized dealer. 5. Train the tire pressure monitoring
system sensors in the tires using the
following system reset sequence
starting with the left front tire in the
following order: Left front (driver's side
front tire), Right front (passenger's side
front tire), Right outer rear (passenger's
side rear outer tire), Right inner rear
(passenger's side rear inner tire), Left
outer rear (driver's side rear outer tire),
Left inner rear (driver's side rear inner
tire).
6. Remove the valve cap from the valve stem on the left front tire. Decrease the
air pressure until the horn sounds.
Note: The single horn chirp confirms that
the sensor identification code has been
learned by the module for this position. If a
double horn is heard, the reset procedure
was unsuccessful, and you must repeat it.
7. Remove the valve cap from the valve stem on the right front tire. Decrease
the air pressure until the horn sounds.
8. Remove the valve cap from the valve stem on the right outer rear tire.
Decrease the air pressure until the horn
sounds.
9. Remove the valve cap from the valve stem on the right inner rear tire.
Decrease the air pressure until the horn
sounds.
10. Remove the valve cap from the valve
stem on the left outer rear tire.
Decrease the air pressure until the
horn sounds.
11. Remove the valve cap from the valve
stem on the left inner rear tire.
Decrease the air pressure until the
horn sounds. Training is complete
after the horn sounds for the last tire
trained, the system indicator stops
flashing, and a message is shown in
the information display.
396
Super Duty (TFE) Canada/United States of America, enUSA, First Printing Wheels and Tires
Page 488 of 636
AppLink issues
Possible solution(s)
Possible cause(s)
Issue
login on the app on the
phone before using them with AppLink. Also, some may have a "Ford SYNC"
setting, so check the app's
settings menu on the phone.
Closing and restarting apps may help SYNC find the
application if you cannot
discover it inside the vehicle. On an Android device, if
apps have an "Exit' or 'Quit'
Sometime apps do not
properly close and re-open their connection to SYNC, over ignition cycles, for example.
My phone is connected, my
app(s) are running, but I still cannot find any apps. option, select that then
restart the app. If the app
does not have that option, you can also manually
"Force Close" the app by
going to the phone's settings
menu, selecting 'Apps.' then finding the particular app
and choosing 'Force stop.' Don't forget to restart the
app afterwards, then select "Find New Apps" on SYNC.
On an iPhone with iOS7+, to force close an app, doubletab the home button then
swipe up on the app to close it. Tab the home button
again, then select the app again to restart it. After a
few seconds, the app should then appear in SYNC'sMobile App's Menu.
Reset the Bluetooth on your phone by turning it off and
then turning Bluetooth back
on. If you are in your vehicle, SYNC should be able to
automatically re-connect to your phone if you press the "Phone" button.
There is a Bluetooth bug on
some order versions of theAndroid operating systemthat may cause apps that
were found on your previous
vehicle drive to not be found
again if you have not turned off Bluetooth.
My Android phone is
connected, my app(s) are running, I restarted them,but I still cannot find any apps.
485
Super Duty (TFE) Canada/United States of America, enUSA, First Printing SYNC™ (If Equipped)
Page 494 of 636
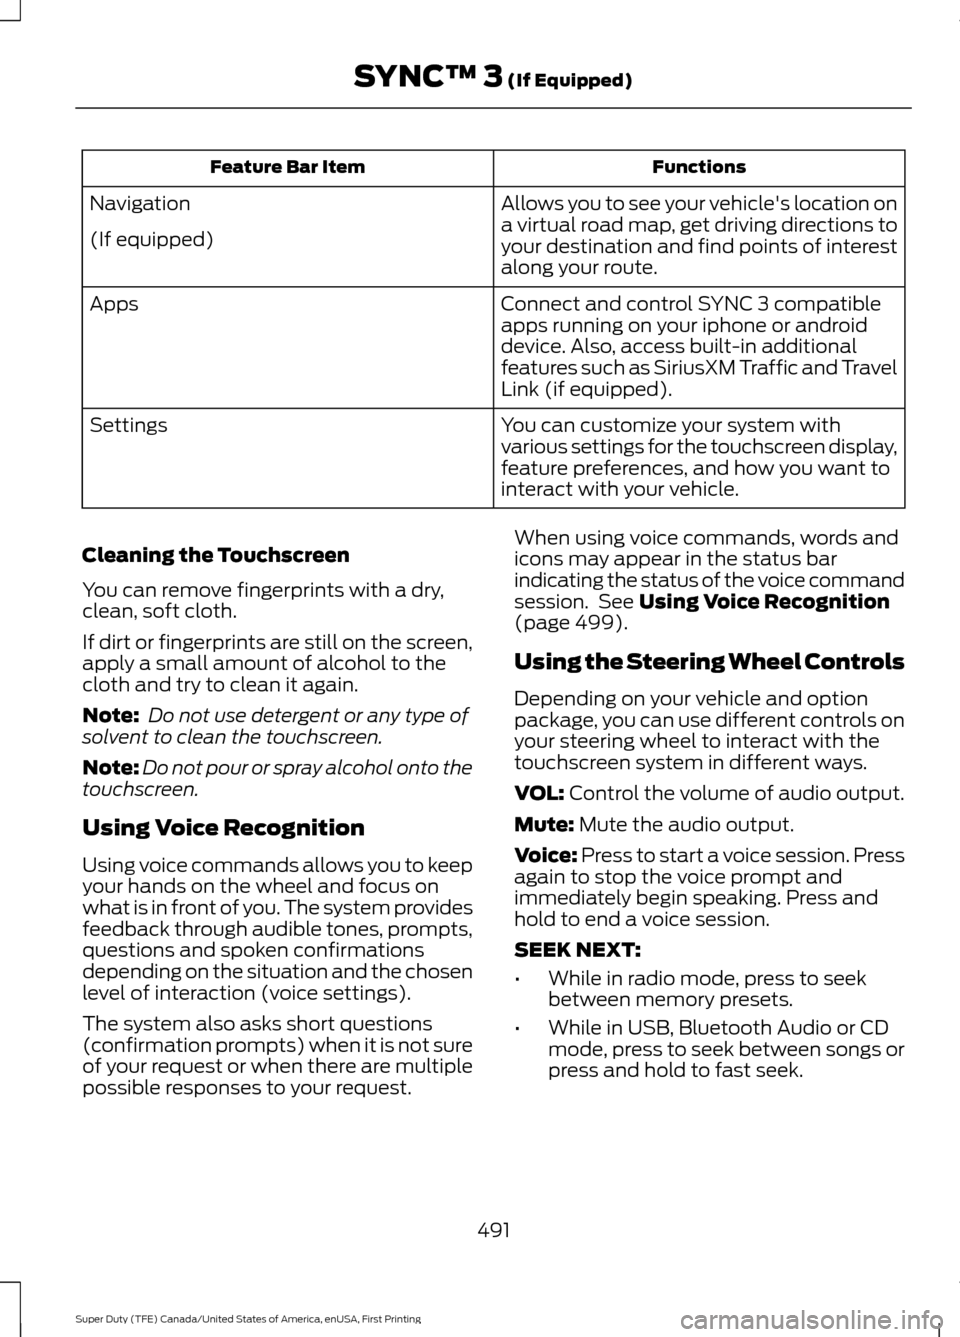
Functions
Feature Bar Item
Allows you to see your vehicle's location on
a virtual road map, get driving directions to
your destination and find points of interest
along your route.
Navigation
(If equipped)
Connect and control SYNC 3 compatible
apps running on your iphone or android
device. Also, access built-in additional
features such as SiriusXM Traffic and Travel
Link (if equipped).
Apps
You can customize your system with
various settings for the touchscreen display,
feature preferences, and how you want to
interact with your vehicle.
Settings
Cleaning the Touchscreen
You can remove fingerprints with a dry,
clean, soft cloth.
If dirt or fingerprints are still on the screen,
apply a small amount of alcohol to the
cloth and try to clean it again.
Note: Do not use detergent or any type of
solvent to clean the touchscreen.
Note: Do not pour or spray alcohol onto the
touchscreen.
Using Voice Recognition
Using voice commands allows you to keep
your hands on the wheel and focus on
what is in front of you. The system provides
feedback through audible tones, prompts,
questions and spoken confirmations
depending on the situation and the chosen
level of interaction (voice settings).
The system also asks short questions
(confirmation prompts) when it is not sure
of your request or when there are multiple
possible responses to your request. When using voice commands, words and
icons may appear in the status bar
indicating the status of the voice command
session. See Using Voice Recognition
(page 499).
Using the Steering Wheel Controls
Depending on your vehicle and option
package, you can use different controls on
your steering wheel to interact with the
touchscreen system in different ways.
VOL:
Control the volume of audio output.
Mute:
Mute the audio output.
Voice:
Press to start a voice session. Press
again to stop the voice prompt and
immediately begin speaking. Press and
hold to end a voice session.
SEEK NEXT:
• While in radio mode, press to seek
between memory presets.
• While in USB, Bluetooth Audio or CD
mode, press to seek between songs or
press and hold to fast seek.
491
Super Duty (TFE) Canada/United States of America, enUSA, First Printing SYNC™ 3
(If Equipped)
Page 528 of 636
3D city models are complete 3D models
of entire city areas including navigable
roads, parks, rivers and rendered buildings.
3D landmarks and city models appear in
3D map mode only. Coverage of these
varies and improves with updated map
releases.
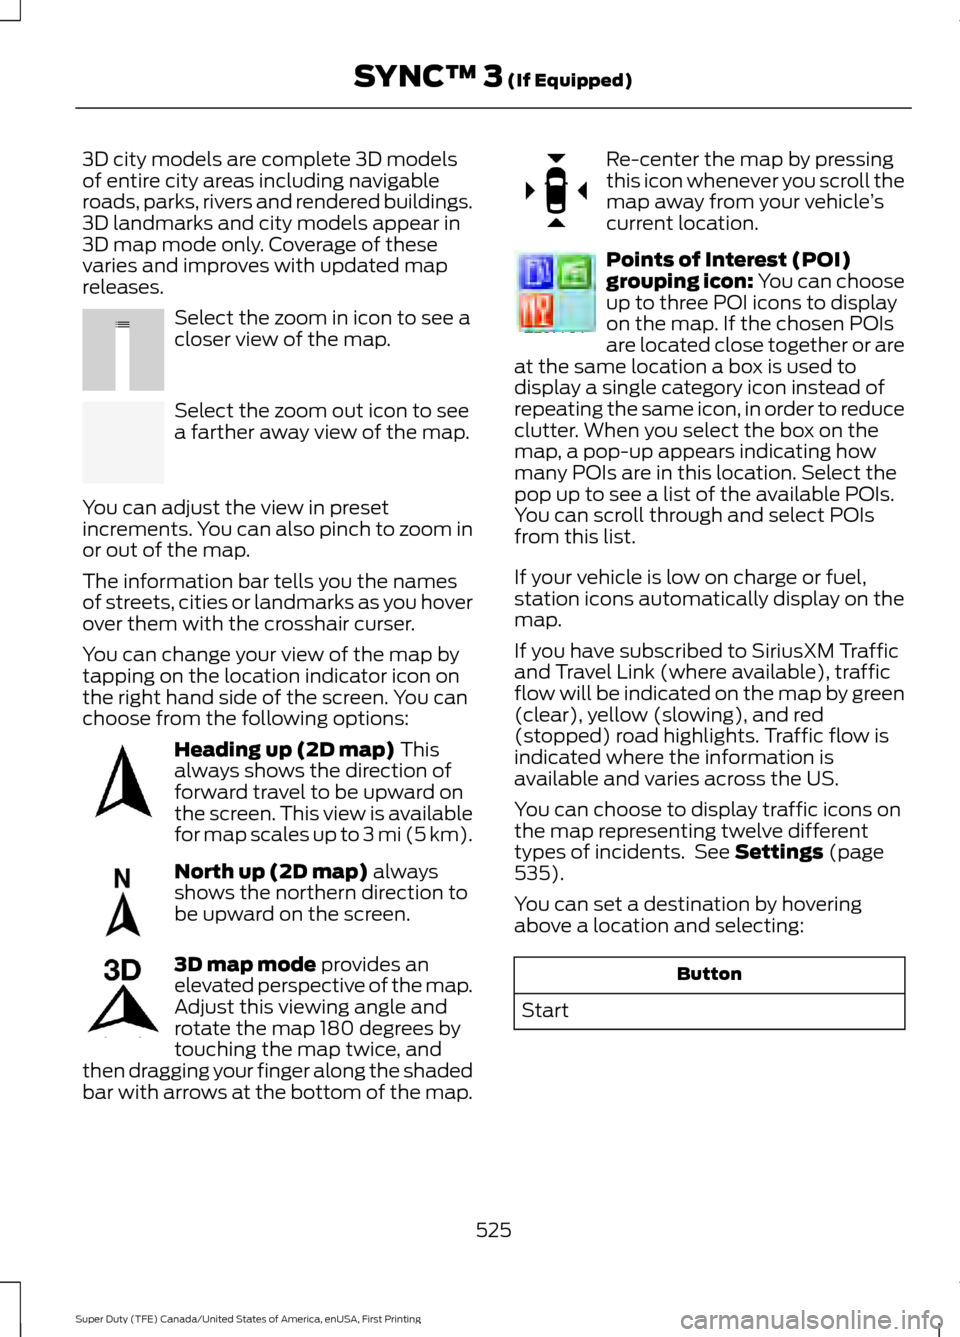
Select the zoom in icon to see a
closer view of the map.
Select the zoom out icon to see
a farther away view of the map.
You can adjust the view in preset
increments. You can also pinch to zoom in
or out of the map.
The information bar tells you the names
of streets, cities or landmarks as you hover
over them with the crosshair curser.
You can change your view of the map by
tapping on the location indicator icon on
the right hand side of the screen. You can
choose from the following options: Heading up (2D map) This
always shows the direction of
forward travel to be upward on
the screen. This view is available
for map scales up to
3 mi (5 km). North up (2D map)
always
shows the northern direction to
be upward on the screen. 3D map mode
provides an
elevated perspective of the map.
Adjust this viewing angle and
rotate the map 180 degrees by
touching the map twice, and
then dragging your finger along the shaded
bar with arrows at the bottom of the map. Re-center the map by pressing
this icon whenever you scroll the
map away from your vehicle
’s
current location. Points of Interest (POI)
grouping icon: You can choose
up to three POI icons to display
on the map. If the chosen POIs
are located close together or are
at the same location a box is used to
display a single category icon instead of
repeating the same icon, in order to reduce
clutter. When you select the box on the
map, a pop-up appears indicating how
many POIs are in this location. Select the
pop up to see a list of the available POIs.
You can scroll through and select POIs
from this list.
If your vehicle is low on charge or fuel,
station icons automatically display on the
map.
If you have subscribed to SiriusXM Traffic
and Travel Link (where available), traffic
flow will be indicated on the map by green
(clear), yellow (slowing), and red
(stopped) road highlights. Traffic flow is
indicated where the information is
available and varies across the US.
You can choose to display traffic icons on
the map representing twelve different
types of incidents. See
Settings (page
535).
You can set a destination by hovering
above a location and selecting: Button
Start
525
Super Duty (TFE) Canada/United States of America, enUSA, First Printing SYNC™ 3
(If Equipped)E207752 E207753 E207750 E207749 E207748 E207751 E207754
Page 557 of 636
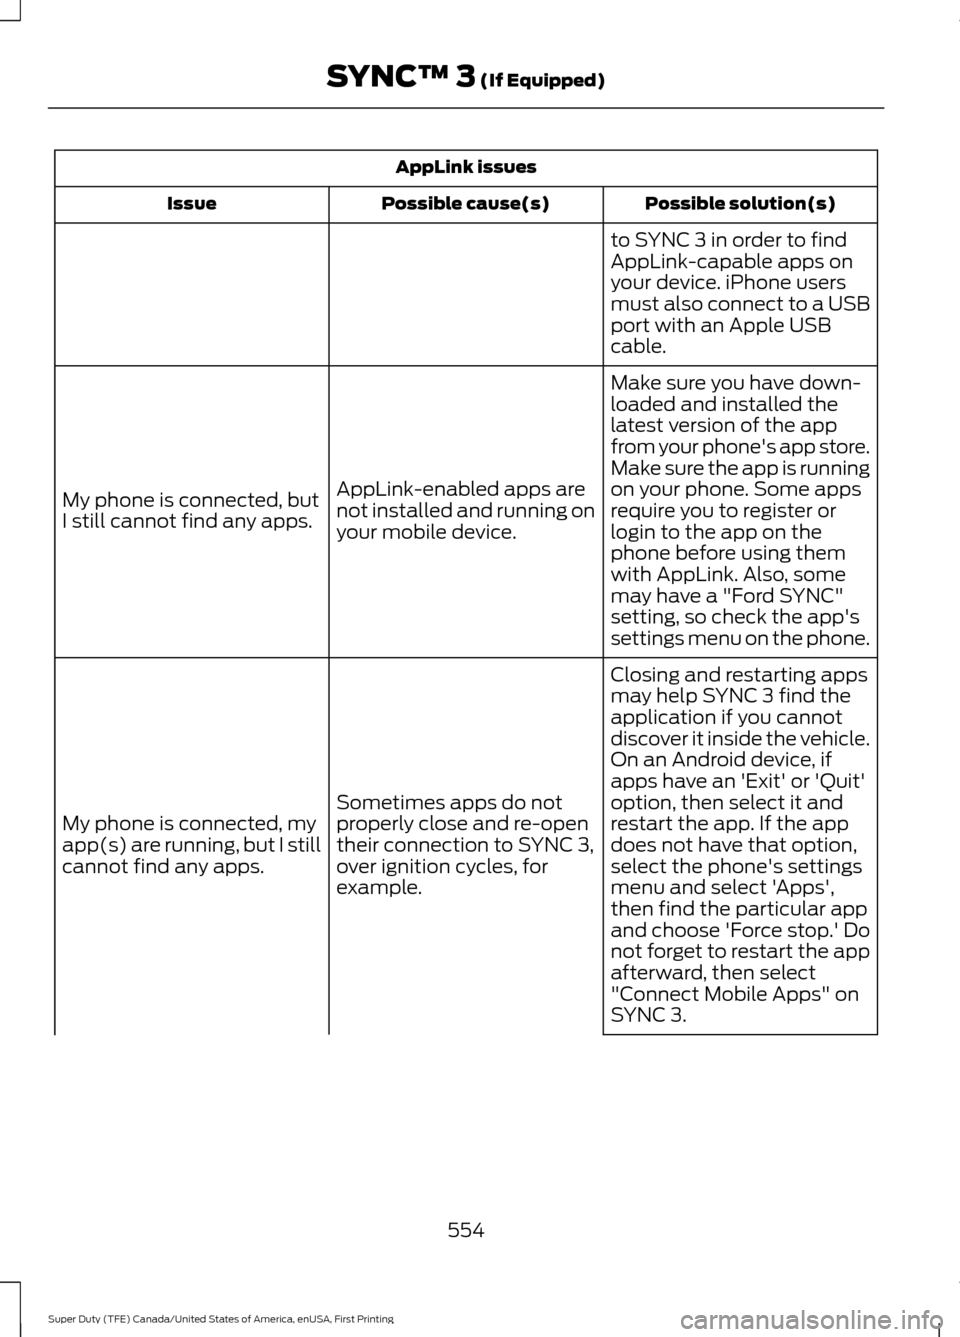
AppLink issues
Possible solution(s)
Possible cause(s)
Issue
to SYNC 3 in order to find
AppLink-capable apps on
your device. iPhone users
must also connect to a USB
port with an Apple USB
cable.
Make sure you have down-
loaded and installed the
latest version of the app
from your phone's app store.
Make sure the app is running
on your phone. Some apps
AppLink-enabled apps are
not installed and running on
your mobile device.
My phone is connected, but
I still cannot find any apps.
require you to register or
login to the app on the
phone before using them
with AppLink. Also, some
may have a "Ford SYNC"
setting, so check the app's
settings menu on the phone.
Closing and restarting apps
may help SYNC 3 find the
application if you cannot
discover it inside the vehicle.
On an Android device, if
apps have an 'Exit' or 'Quit'
Sometimes apps do not
properly close and re-open
their connection to SYNC 3,
over ignition cycles, for
example.
My phone is connected, my
app(s) are running, but I still
cannot find any apps. option, then select it and
restart the app. If the app
does not have that option,
select the phone's settings
menu and select 'Apps',
then find the particular app
and choose 'Force stop.' Do
not forget to restart the app
afterward, then select
"Connect Mobile Apps" on
SYNC 3.
554
Super Duty (TFE) Canada/United States of America, enUSA, First Printing SYNC™ 3 (If Equipped)
Page 633 of 636
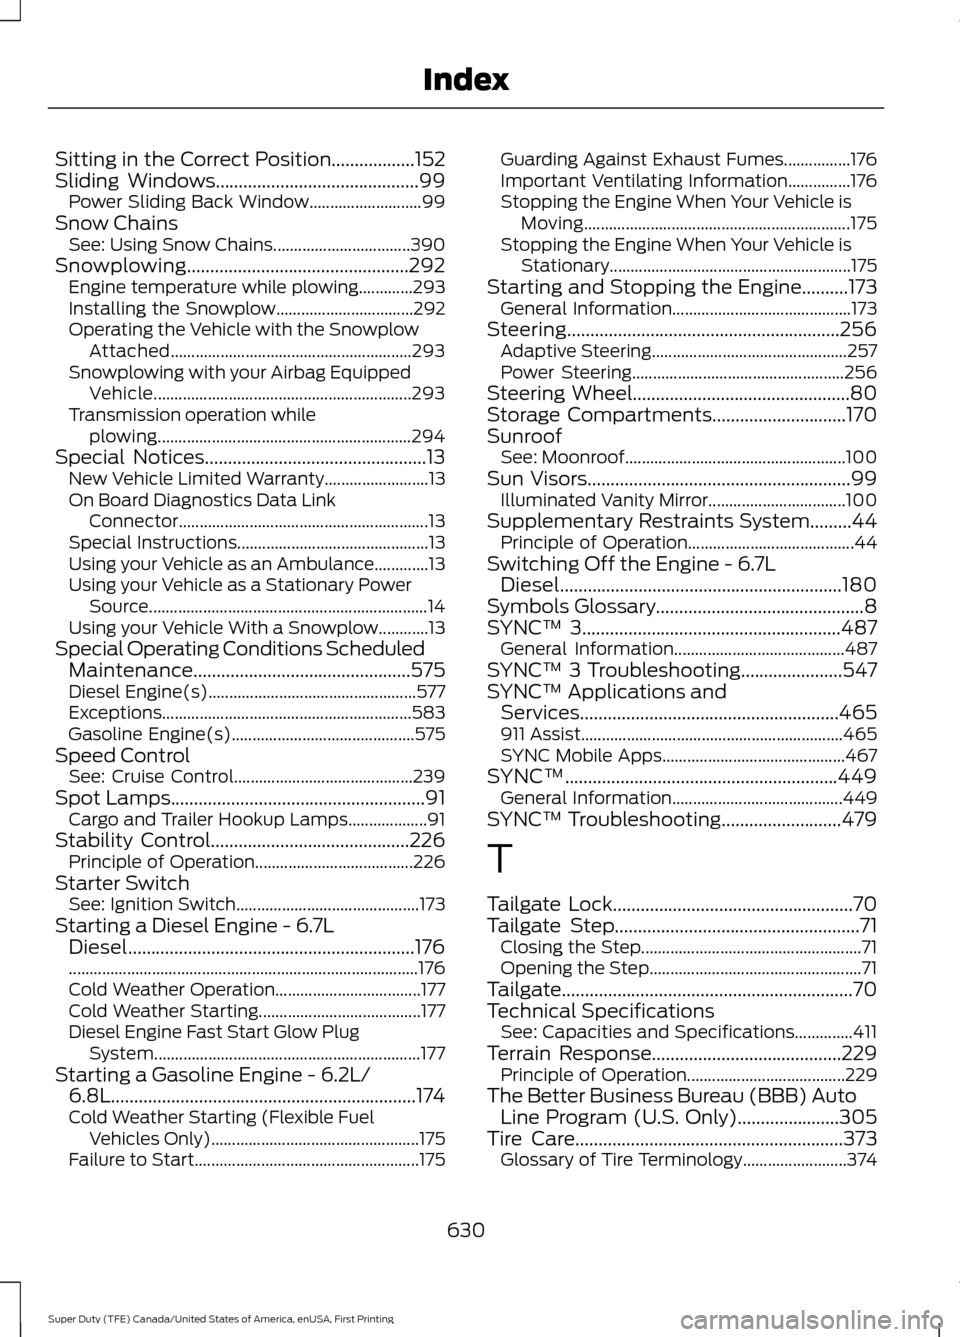
Sitting in the Correct Position..................152
Sliding Windows............................................99 Power Sliding Back Window........................... 99
Snow Chains See: Using Snow Chains................................. 390
Snowplowing
................................................292
Engine temperature while plowing.............293
Installing the Snowplow................................. 292
Operating the Vehicle with the Snowplow Attached.......................................................... 293
Snowplowing with your Airbag Equipped Vehicle.............................................................. 293
Transmission operation while plowing............................................................. 294
Special Notices
................................................13
New Vehicle Limited Warranty......................... 13
On Board Diagnostics Data Link Connector............................................................ 13
Special Instructions.............................................. 13
Using your Vehicle as an Ambulance.............13
Using your Vehicle as a Stationary Power Source................................................................... 14
Using your Vehicle With a Snowplow............13
Special Operating Conditions Scheduled Maintenance...............................................575
Diesel Engine(s).................................................. 577
Exceptions............................................................ 583
Gasoline Engine(s)............................................ 575
Speed Control See: Cruise Control........................................... 239
Spot Lamps
.......................................................91
Cargo and Trailer Hookup Lamps...................91
Stability Control
...........................................226
Principle of Operation...................................... 226
Starter Switch See: Ignition Switch............................................ 173
Starting a Diesel Engine - 6.7L Diesel..............................................................176
........................................................................\
............ 176
Cold Weather Operation................................... 177
Cold Weather Starting....................................... 177
Diesel Engine Fast Start Glow Plug System................................................................ 177
Starting a Gasoline Engine - 6.2L/ 6.8L..................................................................174
Cold Weather Starting (Flexible Fuel Vehicles Only).................................................. 175
Failure to Start...................................................... 175Guarding Against Exhaust Fumes................176
Important Ventilating Information...............176
Stopping the Engine When Your Vehicle is
Moving................................................................ 175
Stopping the Engine When Your Vehicle is Stationary.......................................................... 175
Starting and Stopping the Engine
..........173
General Information........................................... 173
Steering...........................................................256 Adaptive Steering............................................... 257
Power Steering................................................... 256
Steering Wheel
...............................................80
Storage Compartments.............................170
Sunroof See: Moonroof..................................................... 100
Sun Visors
.........................................................99
Illuminated Vanity Mirror................................. 100
Supplementary Restraints System.........44 Principle of Operation........................................ 44
Switching Off the Engine - 6.7L Diesel.............................................................180
Symbols Glossary.............................................8
SYNC™ 3........................................................487 General Information......................................... 487
SYNC™ 3 Troubleshooting......................547
SYNC™ Applications and Services........................................................465
911 Assist............................................................... 465
SYNC Mobile Apps............................................ 467
SYNC™...........................................................449 General Information......................................... 449
SYNC™ Troubleshooting
..........................479
T
Tailgate Lock....................................................70
Tailgate Step
.....................................................71
Closing the Step..................................................... 71
Opening the Step................................................... 71
Tailgate...............................................................70
Technical Specifications See: Capacities and Specifications..............411
Terrain Response
.........................................229
Principle of Operation...................................... 229
The Better Business Bureau (BBB) Auto Line Program (U.S. Only)......................305
Tire Care
..........................................................373
Glossary of Tire Terminology......................... 374
630
Super Duty (TFE) Canada/United States of America, enUSA, First Printing Index