2017 FORD SUPER DUTY stop start
[x] Cancel search: stop startPage 6 of 636
Starting and Stopping the
Engine
General Information.....................................173
Ignition Switch
................................................173
Keyless Starting.............................................174
Starting a Gasoline Engine - 6.2L/ 6.8L................................................................174
Starting a Diesel Engine - 6.7L Diesel.............................................................176
Diesel Particulate Filter..............................180
Switching Off the Engine - 6.7L Diesel............................................................180
Engine Idle Shutdown..................................181
Engine Block Heater.....................................181
Fuel and Refueling
Safety Precautions
......................................183
Fuel Quality - Gasoline...............................184
Fuel Quality - E85........................................184
Fuel Quality - Diesel....................................185
Running Out of Fuel....................................188
Selective Catalytic Reduction System - Diesel............................................................188
Refueling - Gasoline....................................192
Refueling - Diesel.........................................193
Fuel Consumption.......................................195
Emission Control System - Gasoline
......197
Emission Control System - Diesel.........199
Transmission
Automatic Transmission
..........................205
Power Take-Off
...........................................209
Four-Wheel Drive
Using Four-Wheel Drive.............................210
Rear Axle
Limited Slip Differential.............................219
Electronic Locking Differential................219 Brakes
General Information.....................................221
Hints on Driving With Anti-Lock
Brakes...........................................................222
Parking Brake.................................................222
Hill Start Assist
.............................................223
Traction Control
Principle of Operation................................225
Using Traction Control...............................225
Stability Control
Principle of Operation
................................226
Using Stability Control...............................227
Terrain Response
Principle of Operation
................................229
Using Hill Descent Control.......................229
Parking Aids
Principle of Operation.................................231
Rear Parking Aid
............................................231
Rear View Camera
.......................................232
360 Degree Camera...................................235
Cruise Control
Principle of Operation................................239
Using Cruise Control...................................239
Using Adaptive Cruise Control...............240
Driving Aids
Lane Keeping System.................................247
Blind Spot Information System.............249
Cross Traffic Alert
........................................254
Steering...........................................................256
Collision Warning System
........................258
Load Carrying
Load Limit
........................................................261
3
Super Duty (TFE) Canada/United States of America, enUSA, First Printing Table of Contents
Page 62 of 636

Car Finder
Press the button twice within
three seconds. A tone sounds
and the direction indicators will
flash. We recommend you use this method
to locate your vehicle, rather than using
the panic alarm.
Sounding the Panic Alarm Press the button to sound the
panic alarm. Press the button
again or switch the ignition on to
turn it off.
Note: The panic alarm only operates when
the ignition is off.
Remote Start (If Equipped) WARNING
To avoid exhaust fumes, do not use
remote start if your vehicle is parked
indoors or in areas that are not well
ventilated. Note:
Do not use remote start if your fuel
level is low. The remote start button is on the
transmitter.
This feature allows you to start your
vehicle from the outside. The transmitter
has an extended operating range.
You can configure vehicles with automatic
climate control to turn on the automatic
climate control when you remote start your
vehicle. See Automatic Climate Control
(page
146). A manual climate control
system runs at the setting you set it to
when you switched your vehicle off.
Many states and provinces restrict the use
of remote start. Check your local and state
or provincial laws for specific requirements
regarding remote start systems. The remote start system does not work if
any of the following occur:
•
The ignition is on.
• The anti-theft alarm triggers.
• You switch off the feature.
• The hood is open.
• The transmission is not in park (P).
• The battery voltage is below the
minimum operating voltage.
• The service engine soon light is on.
Remote Control Feedback
An LED on the remote control provides
status feedback of remote start or stop
commands. Status
LED
Remote start orextension
successful
Solid green
Remote stop
successful; vehicle off
Solid red
Remote start orstop failed
Blinking red
Waiting for statusupdate
Blinking green
Remote Starting Your Vehicle
Note: You must press each button within
three seconds of each other. 59
Super Duty (TFE) Canada/United States of America, enUSA, First Printing Keys and Remote ControlsE138623 E138624 E138625 E138626
Page 63 of 636

The label on your transmitter details the
starting procedure.
To remote start your vehicle:
1. Press the lock button.
2. Press the remote start button twice.
The exterior lamps flash twice.
The horn sounds if the system fails to start,
unless quiet start is on. Quiet start runs the
blower fan at a slower speed to reduce
noise. You can switch it on or off in the
information display. See General
Information (page 111).
Note: If you do not follow this sequence,
your vehicle does not start remotely, the
direction indicators do not flash twice and
the horn does not sound.
Note: If you remote start your vehicle with
an integrated keyhead transmitter, you must
switch on the ignition before driving your
vehicle. If you remote start your vehicle with
an intelligent access transmitter, you must
press the push button ignition switch on the
instrument panel once while applying the
brake pedal before driving your vehicle.
The power windows do not work during
remote start and the radio does not turn
on automatically.
The parking lamps remain on and your
vehicle runs for 5, 10 or 15 minutes
depending on the setting.
Extending the Engine Running Time
To extend the engine running time duration
of your vehicle during remote start, repeat
steps 1 and 2 while the engine is running.
If the duration is set to 10 minutes, the
duration extends by another 10 minutes.
For example, if your vehicle had been
running from the first remote start for 5
minutes, your vehicle continues to run now
for a total of 20 minutes. You can extend
the remote start up to a maximum of 35
minutes. Wait at least five seconds before remote
starting after the engine stops running.
Turning Your Vehicle Off After Remote
Starting Press the button once. The
parking lamps turn off.
You may have to be closer to the
vehicle than when starting due to ground
reflection and the added noise of the
running vehicle.
You can turn the remote start system on
or off using the information display. See
General Information
(page 111).
REPLACING A LOST KEY OR
REMOTE CONTROL
Replacement keys or remote controls can
be purchased from an authorized dealer.
Authorized dealers can program remote
controls for your vehicle. See
Passive
Anti-Theft System (page 74).
60
Super Duty (TFE) Canada/United States of America, enUSA, First Printing Keys and Remote ControlsE138625
Page 78 of 636
2.
Switch the ignition from off to on. Keep
the ignition on for at least 3 seconds,
but no more than 10 seconds.
3. Switch the ignition off and remove the
first coded key from the ignition.
4. After at least 3 seconds but within 10 seconds of switching the ignition off,
insert the second previously coded key
into the ignition.
5. Switch the ignition from off to on. Keep
the ignition on for at least 3 seconds,
but no more than 10 seconds.
6. Switch the ignition off and remove the
second previously programmed coded
key from the ignition.
7. After at least 3 seconds but within 10 seconds of switching the ignition off
and removing the previously
programmed coded key, insert the new
unprogrammed key into the ignition.
8. Switch the ignition from off to on. Keep
the ignition on for at least six seconds.
9. Remove the newly programmed coded
key from the ignition.
If you have successfully programmed the
new integrated keyhead transmitter, it will
start your vehicle and operate the remote
entry system.
If programming was unsuccessful, wait 10
seconds and repeat steps 1 through 9. If
you are still unsuccessful, take your vehicle
to your authorized dealer.
Programming a Spare Intelligent
Access Key
Note: You can program a maximum of six
keys to your vehicle. All six must be
intelligent access keys.
This procedure programs both the vehicle
immobilizer keycode and the remote
control to your vehicle. You must have two previously
programmed intelligent access keys inside
your vehicle and the new unprogrammed
intelligent access key readily accessible.
Contact an authorized dealer to have the
spare key programmed if two previously
programmed keys are not available.
Make sure that the ignition is switched off
before beginning this procedure. Make sure
that you close all the doors before
beginning and that they remain closed
throughout the procedure. Carry out all
steps within 30 seconds of starting the
sequence. Stop and wait for at least one
minute before starting again if you carry
out any steps out of sequence.
Read and understand the entire procedure
before you begin.
1. Remove the key blade from the
transmitter.
75
Super Duty (TFE) Canada/United States of America, enUSA, First Printing Security
Page 80 of 636
•
Movement inside your vehicle.
• Change in vehicle inclination, for
example, unwanted towing.
Lock your vehicle using the remote control
or the power door lock control with the
accompanying door open and then close
all doors.
Note: Do not choose full monitor mode if
movement within the vehicle is likely to
occur or when the vehicle is in transport.
Note: For correct operation of the interior
motion detection system, make sure all
windows are closed prior to arming the
system. This helps prevent accidental alarm
activation due to external influences and
make sure of correct interior motion
detection. Additionally, the interior motion
sensing system will not arm if any door is
ajar.
Arming the Alarm
The alarm is ready to arm when there is
not a key in the ignition. Lock your vehicle
to arm the alarm.
The direction indicators flash once after
you lock your vehicle. This indicates the
alarm is in the pre-armed mode. It fully
arms after 20 seconds.
Disarming the Alarm
Disarm the alarm by any of the following
actions:
• Press the power door unlock button
within the 20-second pre-armed mode.
• Unlock the doors with the remote
control or keyless entry keypad.
• Switch the ignition on or start your
vehicle.
• Use a key in the driver door lock
cylinder to unlock your vehicle, then
switch the ignition on within 12
seconds. Note:
Pressing the panic button on the
remote control stops the horn and direction
indicators, but will not disarm the system.
77
Super Duty (TFE) Canada/United States of America, enUSA, First Printing Security
Page 99 of 636
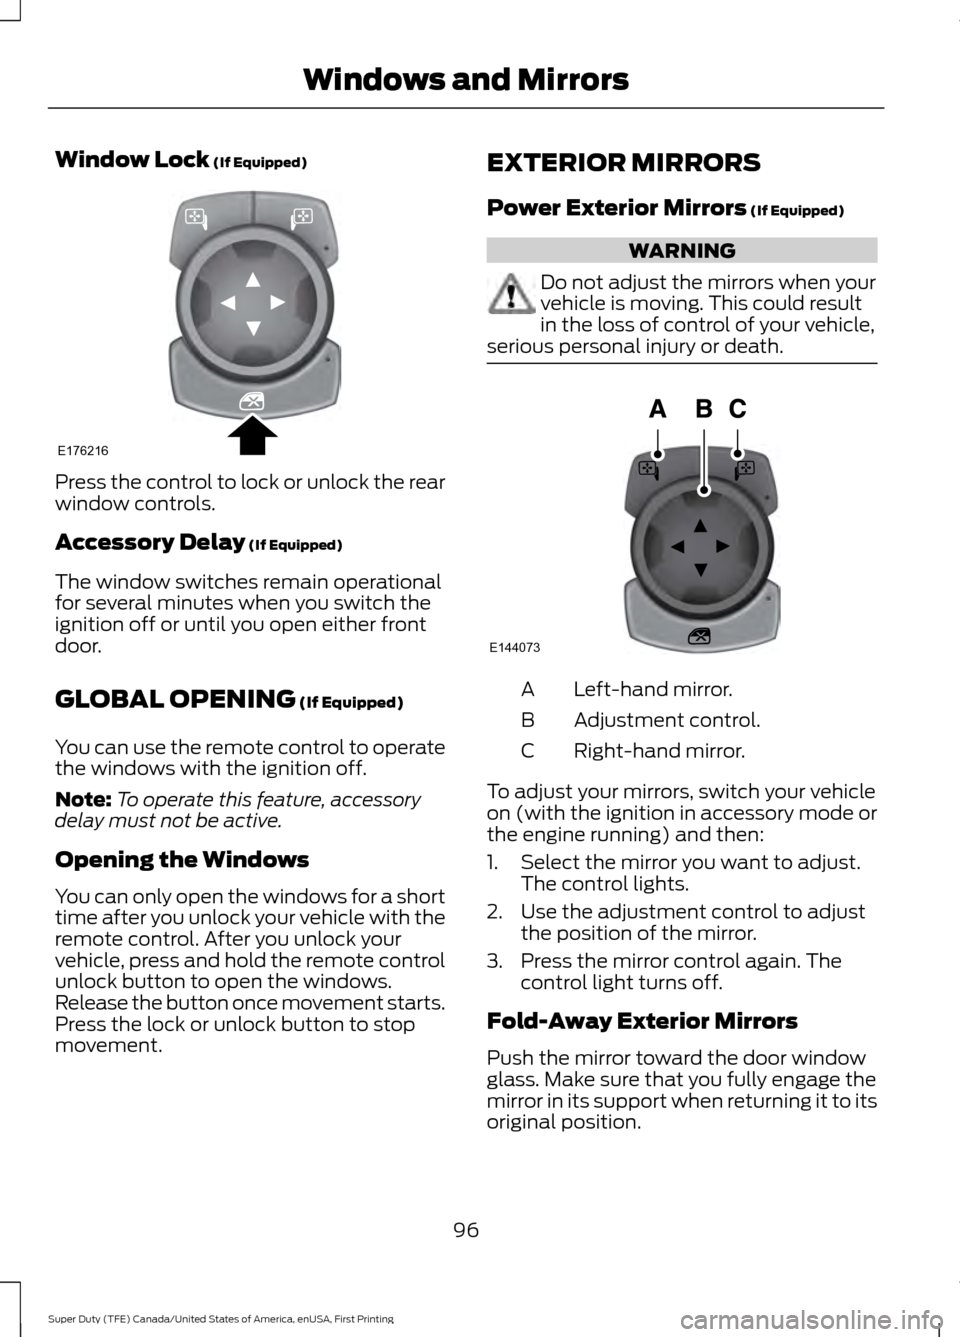
Window Lock (If Equipped)
Press the control to lock or unlock the rear
window controls.
Accessory Delay
(If Equipped)
The window switches remain operational
for several minutes when you switch the
ignition off or until you open either front
door.
GLOBAL OPENING
(If Equipped)
You can use the remote control to operate
the windows with the ignition off.
Note: To operate this feature, accessory
delay must not be active.
Opening the Windows
You can only open the windows for a short
time after you unlock your vehicle with the
remote control. After you unlock your
vehicle, press and hold the remote control
unlock button to open the windows.
Release the button once movement starts.
Press the lock or unlock button to stop
movement. EXTERIOR MIRRORS
Power Exterior Mirrors
(If Equipped) WARNING
Do not adjust the mirrors when your
vehicle is moving. This could result
in the loss of control of your vehicle,
serious personal injury or death. Left-hand mirror.
A
Adjustment control.
B
Right-hand mirror.
C
To adjust your mirrors, switch your vehicle
on (with the ignition in accessory mode or
the engine running) and then:
1. Select the mirror you want to adjust. The control lights.
2. Use the adjustment control to adjust the position of the mirror.
3. Press the mirror control again. The control light turns off.
Fold-Away Exterior Mirrors
Push the mirror toward the door window
glass. Make sure that you fully engage the
mirror in its support when returning it to its
original position.
96
Super Duty (TFE) Canada/United States of America, enUSA, First Printing Windows and MirrorsE176216 E144073
Page 108 of 636
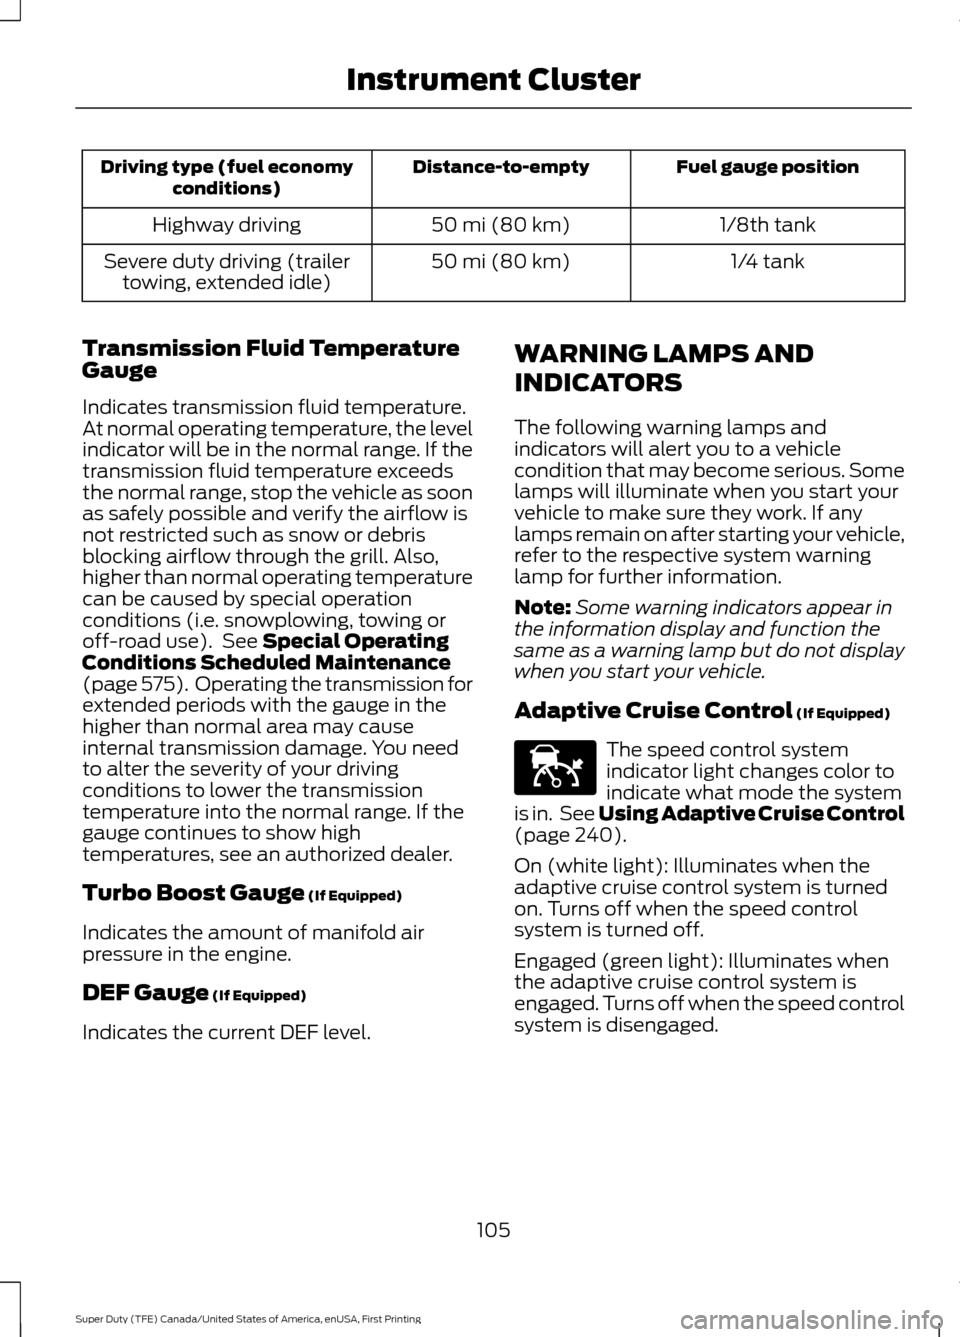
Fuel gauge position
Distance-to-empty
Driving type (fuel economy
conditions)
1/8th tank
50 mi (80 km)
Highway driving
1/4 tank
50 mi (80 km)
Severe duty driving (trailer
towing, extended idle)
Transmission Fluid Temperature
Gauge
Indicates transmission fluid temperature.
At normal operating temperature, the level
indicator will be in the normal range. If the
transmission fluid temperature exceeds
the normal range, stop the vehicle as soon
as safely possible and verify the airflow is
not restricted such as snow or debris
blocking airflow through the grill. Also,
higher than normal operating temperature
can be caused by special operation
conditions (i.e. snowplowing, towing or
off-road use). See Special Operating
Conditions Scheduled Maintenance
(page
575). Operating the transmission for
extended periods with the gauge in the
higher than normal area may cause
internal transmission damage. You need
to alter the severity of your driving
conditions to lower the transmission
temperature into the normal range. If the
gauge continues to show high
temperatures, see an authorized dealer.
Turbo Boost Gauge
(If Equipped)
Indicates the amount of manifold air
pressure in the engine.
DEF Gauge
(If Equipped)
Indicates the current DEF level. WARNING LAMPS AND
INDICATORS
The following warning lamps and
indicators will alert you to a vehicle
condition that may become serious. Some
lamps will illuminate when you start your
vehicle to make sure they work. If any
lamps remain on after starting your vehicle,
refer to the respective system warning
lamp for further information.
Note:
Some warning indicators appear in
the information display and function the
same as a warning lamp but do not display
when you start your vehicle.
Adaptive Cruise Control
(If Equipped) The speed control system
indicator light changes color to
indicate what mode the system
is in. See Using Adaptive Cruise Control
(page
240).
On (white light): Illuminates when the
adaptive cruise control system is turned
on. Turns off when the speed control
system is turned off.
Engaged (green light): Illuminates when
the adaptive cruise control system is
engaged. Turns off when the speed control
system is disengaged.
105
Super Duty (TFE) Canada/United States of America, enUSA, First Printing Instrument ClusterE144524
Page 110 of 636
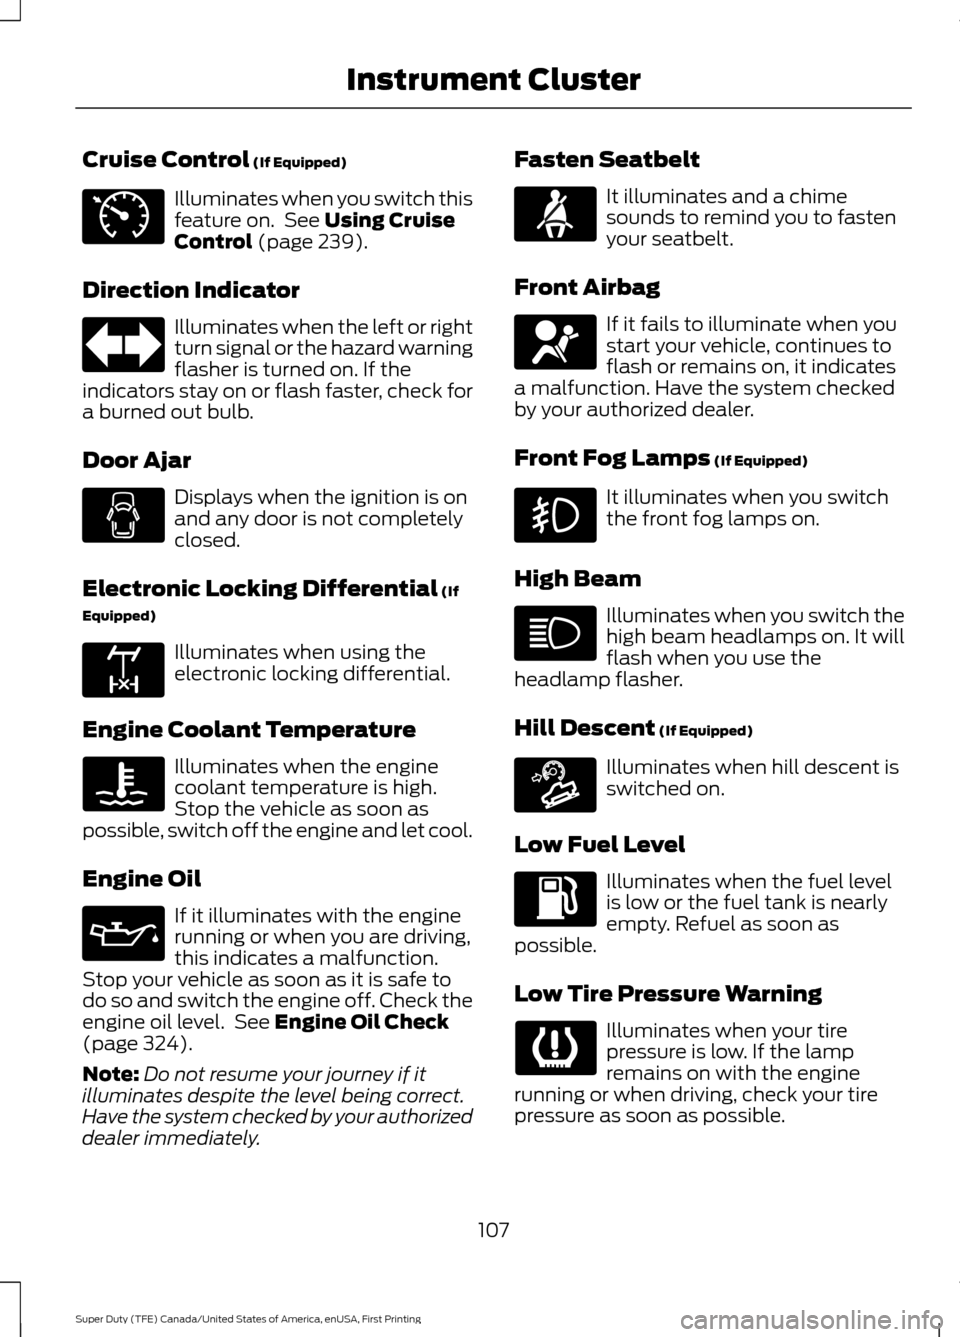
Cruise Control (If Equipped)
Illuminates when you switch this
feature on. See
Using Cruise
Control (page 239).
Direction Indicator Illuminates when the left or right
turn signal or the hazard warning
flasher is turned on. If the
indicators stay on or flash faster, check for
a burned out bulb.
Door Ajar Displays when the ignition is on
and any door is not completely
closed.
Electronic Locking Differential
(If
Equipped) Illuminates when using the
electronic locking differential.
Engine Coolant Temperature Illuminates when the engine
coolant temperature is high.
Stop the vehicle as soon as
possible, switch off the engine and let cool.
Engine Oil If it illuminates with the engine
running or when you are driving,
this indicates a malfunction.
Stop your vehicle as soon as it is safe to
do so and switch the engine off. Check the
engine oil level. See
Engine Oil Check
(page 324).
Note: Do not resume your journey if it
illuminates despite the level being correct.
Have the system checked by your authorized
dealer immediately. Fasten Seatbelt It illuminates and a chime
sounds to remind you to fasten
your seatbelt.
Front Airbag If it fails to illuminate when you
start your vehicle, continues to
flash or remains on, it indicates
a malfunction. Have the system checked
by your authorized dealer.
Front Fog Lamps
(If Equipped) It illuminates when you switch
the front fog lamps on.
High Beam Illuminates when you switch the
high beam headlamps on. It will
flash when you use the
headlamp flasher.
Hill Descent
(If Equipped) Illuminates when hill descent is
switched on.
Low Fuel Level Illuminates when the fuel level
is low or the fuel tank is nearly
empty. Refuel as soon as
possible.
Low Tire Pressure Warning Illuminates when your tire
pressure is low. If the lamp
remains on with the engine
running or when driving, check your tire
pressure as soon as possible.
107
Super Duty (TFE) Canada/United States of America, enUSA, First Printing Instrument ClusterE71340 E163170 E163171