2017 FORD SUPER DUTY instrument panel
[x] Cancel search: instrument panelPage 8 of 636
Changing the Engine Air Filter - 6.7L
Diesel...........................................................354
Changing the Engine-Mounted and Diesel Fuel Conditioner Module Fuel
Filters - 6.7L Diesel..................................356
Vehicle Care
General Information...................................360
Cleaning Products......................................360
Cleaning the Exterior
...................................361
Waxing
.............................................................362
Cleaning the Engine....................................362
Cleaning the Exhaust - 6.7L Diesel.......363
Cleaning the Windows and Wiper Blades..........................................................363
Cleaning the Interior
...................................364
Cleaning the Instrument Panel and Instrument Cluster Lens.......................364
Cleaning Leather Seats.............................365
Repairing Minor Paint Damage..............366
Cleaning the Wheels
..................................366
Vehicle Storage
.............................................367
Wheels and Tires
General Information
...................................370
Tire Care..........................................................373
Using Snow Chains....................................390
Tire Pressure Monitoring System..........390
Changing a Road Wheel
...........................398
Technical Specifications..........................409
Capacities and Specific- ations
Engine Specifications - 6.2L......................411
Engine Specifications - 6.8L.....................411
Engine Specifications - 6.7L Diesel
........412
Motorcraft Parts - 6.2L...............................413
Motorcraft Parts - 6.8L..............................414
Motorcraft Parts - 6.7L Diesel..................415
Vehicle Identification Number................416
Vehicle Certification Label........................417 Transmission Code Designation.............417
Capacities and Specifications - 6.2L.....418
Capacities and Specifications -
6.8L...............................................................422
Capacities and Specifications - 6.7L Diesel...........................................................428
Audio System
General Information...................................435
Audio Unit - Vehicles With: AM/FM/ CD.................................................................436
Audio Unit - Vehicles With: AM/FM/CD/ SYNC
............................................................437
Audio Unit - Vehicles With: AM/FM/CD/ Touchscreen Display
...............................441
Digital Radio
..................................................442
Satellite Radio
..............................................445
USB Port.........................................................448
Media Hub
.....................................................448
SYNC™
General Information
...................................449
Using Voice Recognition
............................451
Using SYNC™ With Your Phone
............453
SYNC™ Applications and Services......465
Using SYNC™ With Your Media Player...........................................................470
SYNC™ Troubleshooting.........................479
SYNC™ 3
General Information
...................................487
Home Screen
................................................498
Using Voice Recognition...........................499
Entertainment..............................................506
Climate.............................................................516
Phone
................................................................518
Navigation......................................................524
Apps..................................................................532
Settings...........................................................535
SYNC™ 3 Troubleshooting......................547
5
Super Duty (TFE) Canada/United States of America, enUSA, First Printing Table of Contents
Page 48 of 636
DRIVER AND PASSENGER
AIRBAGS
WARNINGS
Never place your arm over the airbag
module as a deploying airbag can
result in serious arm fractures or
other injuries. Airbags can kill or injure a child in a
child restraint. Never place a
rear-facing child restraint in front of
an active airbag. If you must use a
forward-facing child restraint in the front
seat, move the seat upon which the child
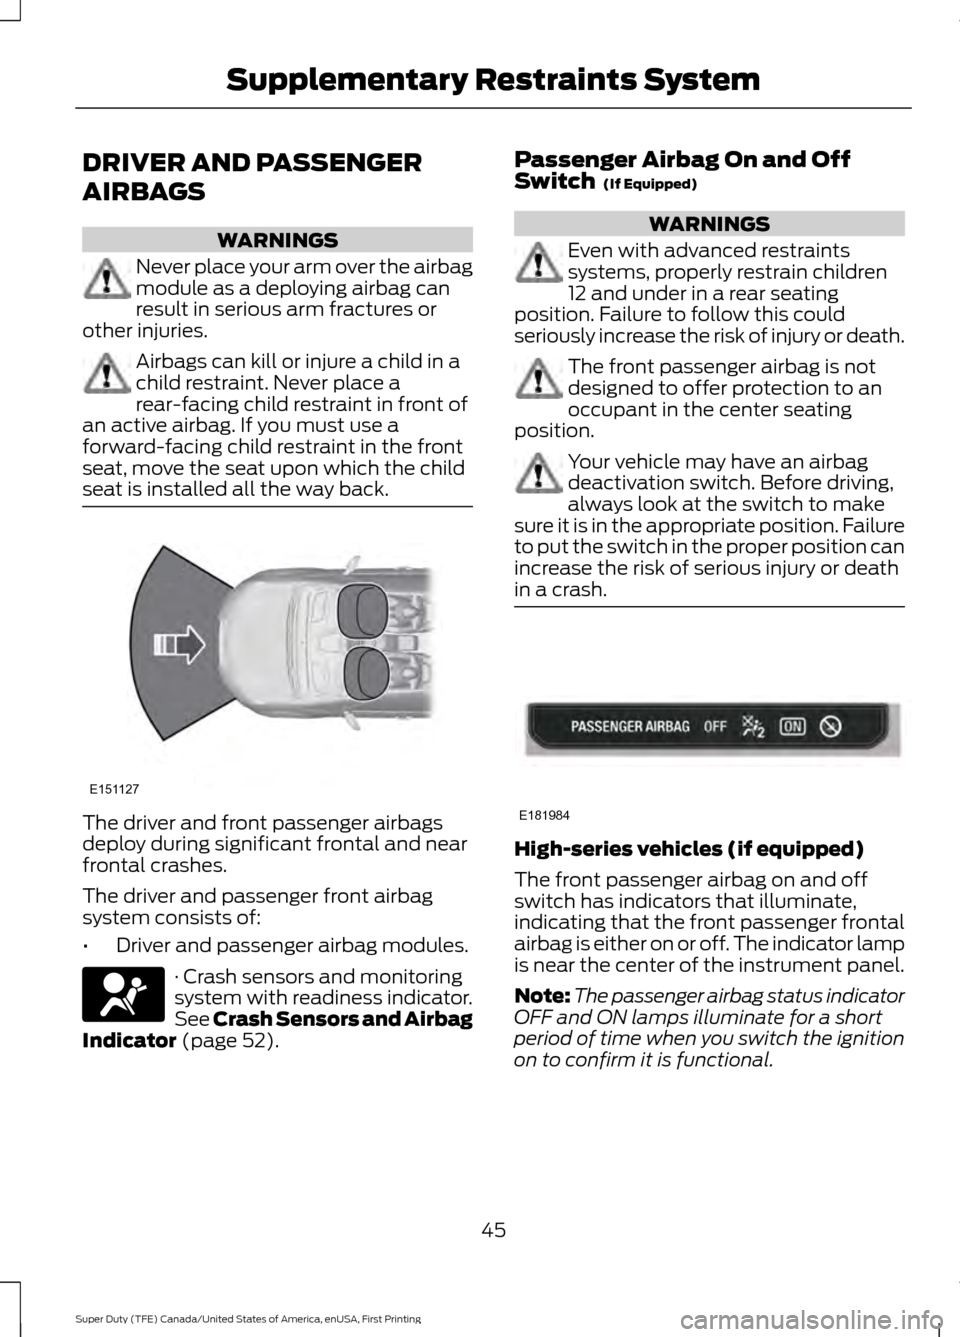
seat is installed all the way back. The driver and front passenger airbags
deploy during significant frontal and near
frontal crashes.
The driver and passenger front airbag
system consists of:
•
Driver and passenger airbag modules. · Crash sensors and monitoring
system with readiness indicator.
See Crash Sensors and Airbag
Indicator (page 52). Passenger Airbag On and Off
Switch
(If Equipped) WARNINGS
Even with advanced restraints
systems, properly restrain children
12 and under in a rear seating
position. Failure to follow this could
seriously increase the risk of injury or death. The front passenger airbag is not
designed to offer protection to an
occupant in the center seating
position. Your vehicle may have an airbag
deactivation switch. Before driving,
always look at the switch to make
sure it is in the appropriate position. Failure
to put the switch in the proper position can
increase the risk of serious injury or death
in a crash. High-series vehicles (if equipped)
The front passenger airbag on and off
switch has indicators that illuminate,
indicating that the front passenger frontal
airbag is either on or off. The indicator lamp
is near the center of the instrument panel.
Note:
The passenger airbag status indicator
OFF and ON lamps illuminate for a short
period of time when you switch the ignition
on to confirm it is functional.
45
Super Duty (TFE) Canada/United States of America, enUSA, First Printing Supplementary Restraints SystemE151127 E181984
Page 49 of 636
Passenger airbag
Passenger airbag status
indicator
Switch position
Disabled
OFF: Lit
Off
ON: Unlit Enabled
OFF: Unlit
On
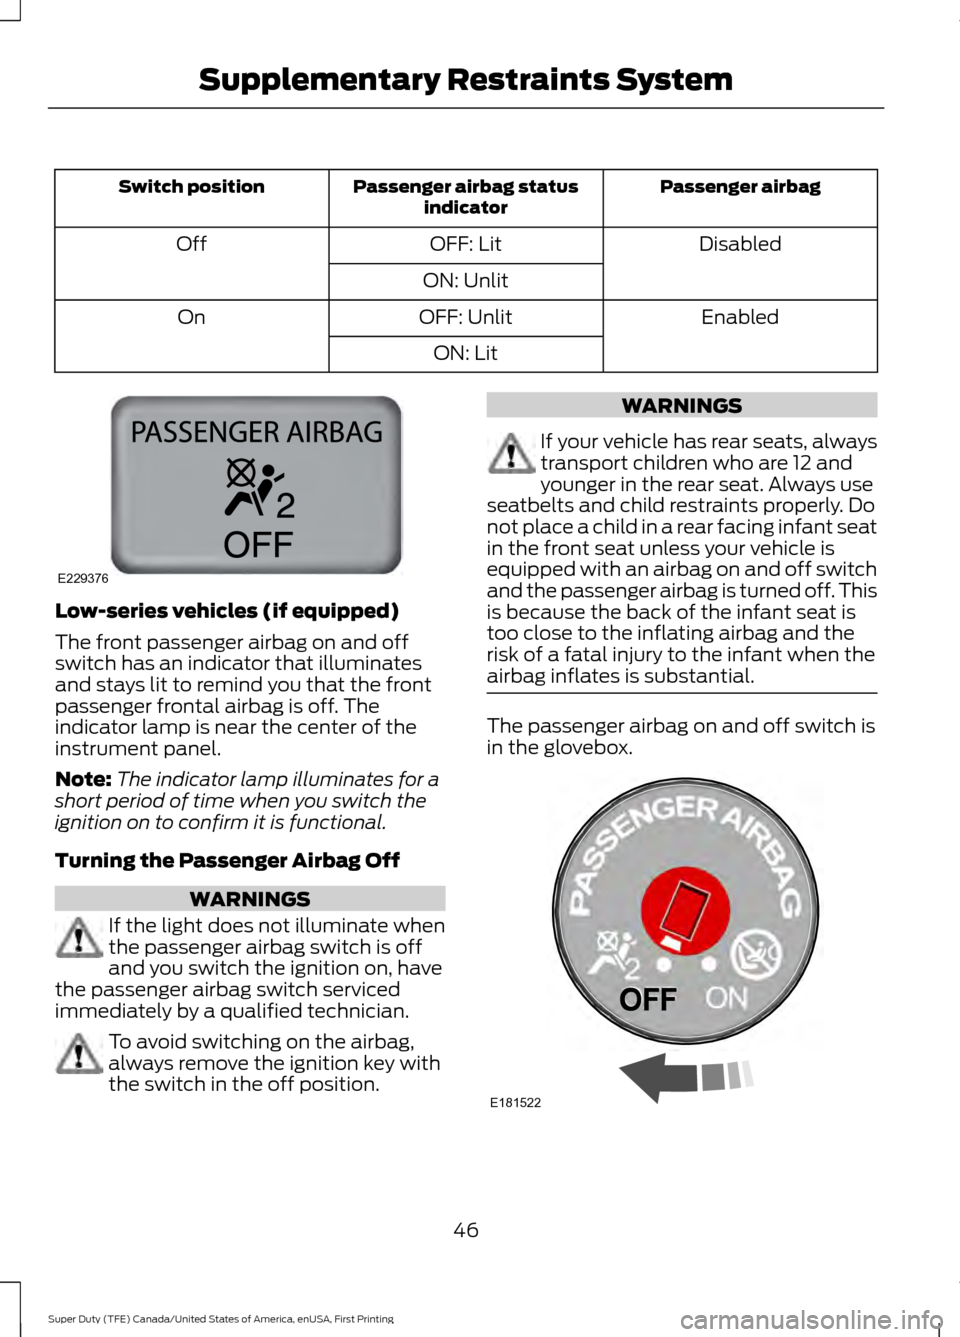
ON: LitLow-series vehicles (if equipped)
The front passenger airbag on and off
switch has an indicator that illuminates
and stays lit to remind you that the front
passenger frontal airbag is off. The
indicator lamp is near the center of the
instrument panel.
Note:
The indicator lamp illuminates for a
short period of time when you switch the
ignition on to confirm it is functional.
Turning the Passenger Airbag Off WARNINGS
If the light does not illuminate when
the passenger airbag switch is off
and you switch the ignition on, have
the passenger airbag switch serviced
immediately by a qualified technician. To avoid switching on the airbag,
always remove the ignition key with
the switch in the off position. WARNINGS
If your vehicle has rear seats, always
transport children who are 12 and
younger in the rear seat. Always use
seatbelts and child restraints properly. Do
not place a child in a rear facing infant seat
in the front seat unless your vehicle is
equipped with an airbag on and off switch
and the passenger airbag is turned off. This
is because the back of the infant seat is
too close to the inflating airbag and the
risk of a fatal injury to the infant when the
airbag inflates is substantial. The passenger airbag on and off switch is
in the glovebox.
46
Super Duty (TFE) Canada/United States of America, enUSA, First Printing Supplementary Restraints SystemE229376 E181522
Page 63 of 636

The label on your transmitter details the
starting procedure.
To remote start your vehicle:
1. Press the lock button.
2. Press the remote start button twice.
The exterior lamps flash twice.
The horn sounds if the system fails to start,
unless quiet start is on. Quiet start runs the
blower fan at a slower speed to reduce
noise. You can switch it on or off in the
information display. See General
Information (page 111).
Note: If you do not follow this sequence,
your vehicle does not start remotely, the
direction indicators do not flash twice and
the horn does not sound.
Note: If you remote start your vehicle with
an integrated keyhead transmitter, you must
switch on the ignition before driving your
vehicle. If you remote start your vehicle with
an intelligent access transmitter, you must
press the push button ignition switch on the
instrument panel once while applying the
brake pedal before driving your vehicle.
The power windows do not work during
remote start and the radio does not turn
on automatically.
The parking lamps remain on and your
vehicle runs for 5, 10 or 15 minutes
depending on the setting.
Extending the Engine Running Time
To extend the engine running time duration
of your vehicle during remote start, repeat
steps 1 and 2 while the engine is running.
If the duration is set to 10 minutes, the
duration extends by another 10 minutes.
For example, if your vehicle had been
running from the first remote start for 5
minutes, your vehicle continues to run now
for a total of 20 minutes. You can extend
the remote start up to a maximum of 35
minutes. Wait at least five seconds before remote
starting after the engine stops running.
Turning Your Vehicle Off After Remote
Starting Press the button once. The
parking lamps turn off.
You may have to be closer to the
vehicle than when starting due to ground
reflection and the added noise of the
running vehicle.
You can turn the remote start system on
or off using the information display. See
General Information
(page 111).
REPLACING A LOST KEY OR
REMOTE CONTROL
Replacement keys or remote controls can
be purchased from an authorized dealer.
Authorized dealers can program remote
controls for your vehicle. See
Passive
Anti-Theft System (page 74).
60
Super Duty (TFE) Canada/United States of America, enUSA, First Printing Keys and Remote ControlsE138625
Page 86 of 636
ADJUSTING THE PEDALS
WARNING
Never use the pedal adjustment
controls when your feet are on the
accelerator or brake pedal when the
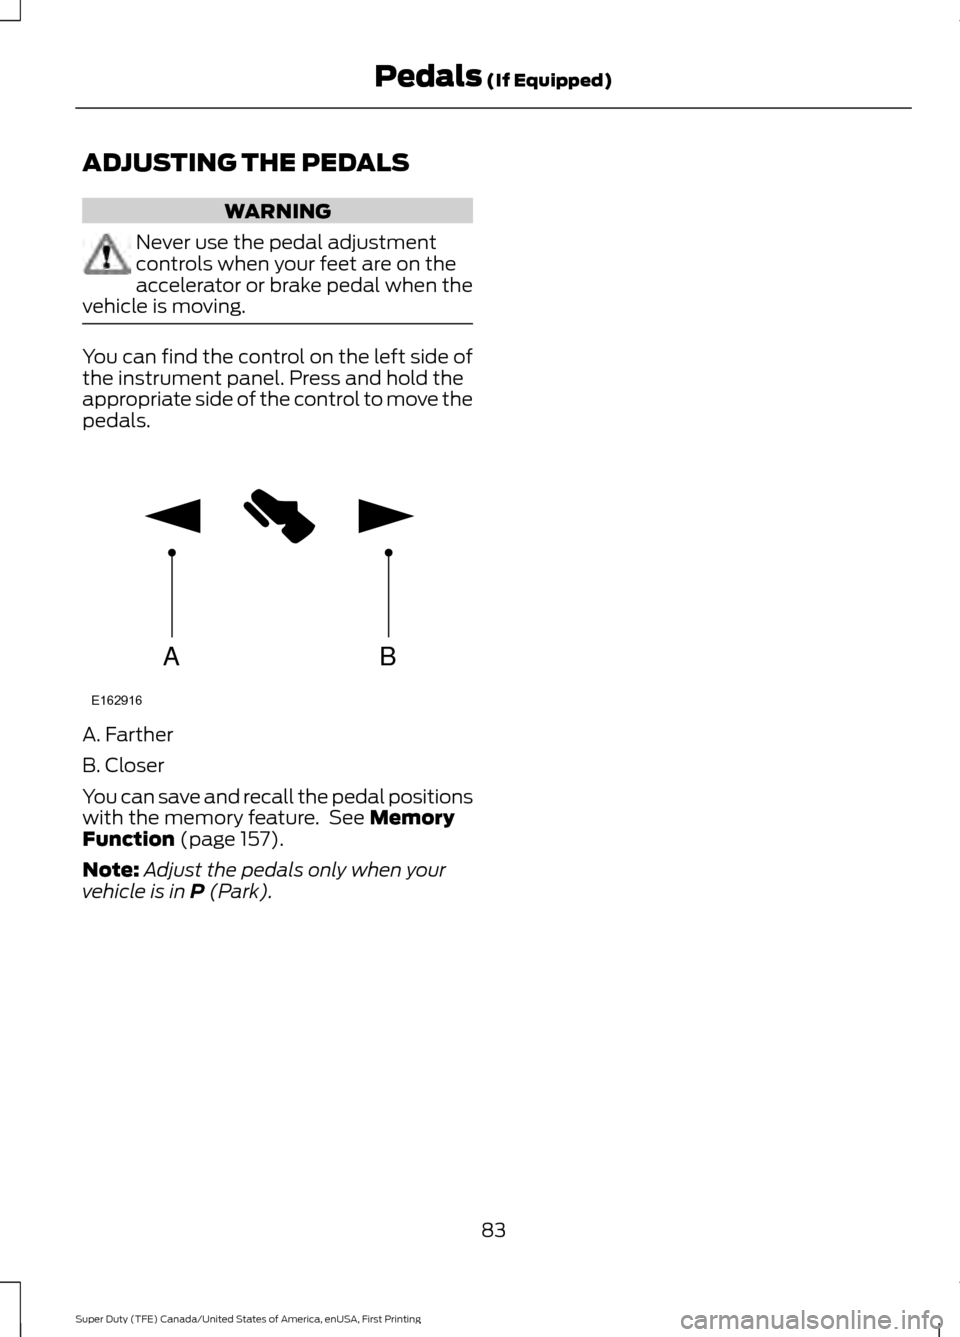
vehicle is moving. You can find the control on the left side of
the instrument panel. Press and hold the
appropriate side of the control to move the
pedals.
A. Farther
B. Closer
You can save and recall the pedal positions
with the memory feature. See Memory
Function (page 157).
Note: Adjust the pedals only when your
vehicle is in
P (Park).
83
Super Duty (TFE) Canada/United States of America, enUSA, First Printing Pedals
(If Equipped)AB
E162916
Page 89 of 636
GENERAL INFORMATION
Condensation in Lamp Assemblies
Exterior lamps have vents to
accommodate normal changes in air
pressure.
Condensation can be a natural by-product
of this design. When moist air enters the
lamp assembly through the vents, there is
a possibility that condensation can occur
when the temperature is cold. When
normal condensation occurs, a fine mist
can form on the interior of the lens. The
fine mist eventually clears and exits
through the vents during normal operation.
Clearing time may take as long as 48 hours
under dry weather conditions.
Examples of acceptable condensation are:
•
The presence of a fine mist (no streaks,
drip marks or large droplets).
• A fine mist covers less than 50% of the
lens.
Examples of unacceptable condensation
are:
• A water puddle inside the lamp.
• Streaks, drip marks or large droplets
present on the interior of the lens.
If you see any unacceptable condensation,
have your vehicle checked by an authorized
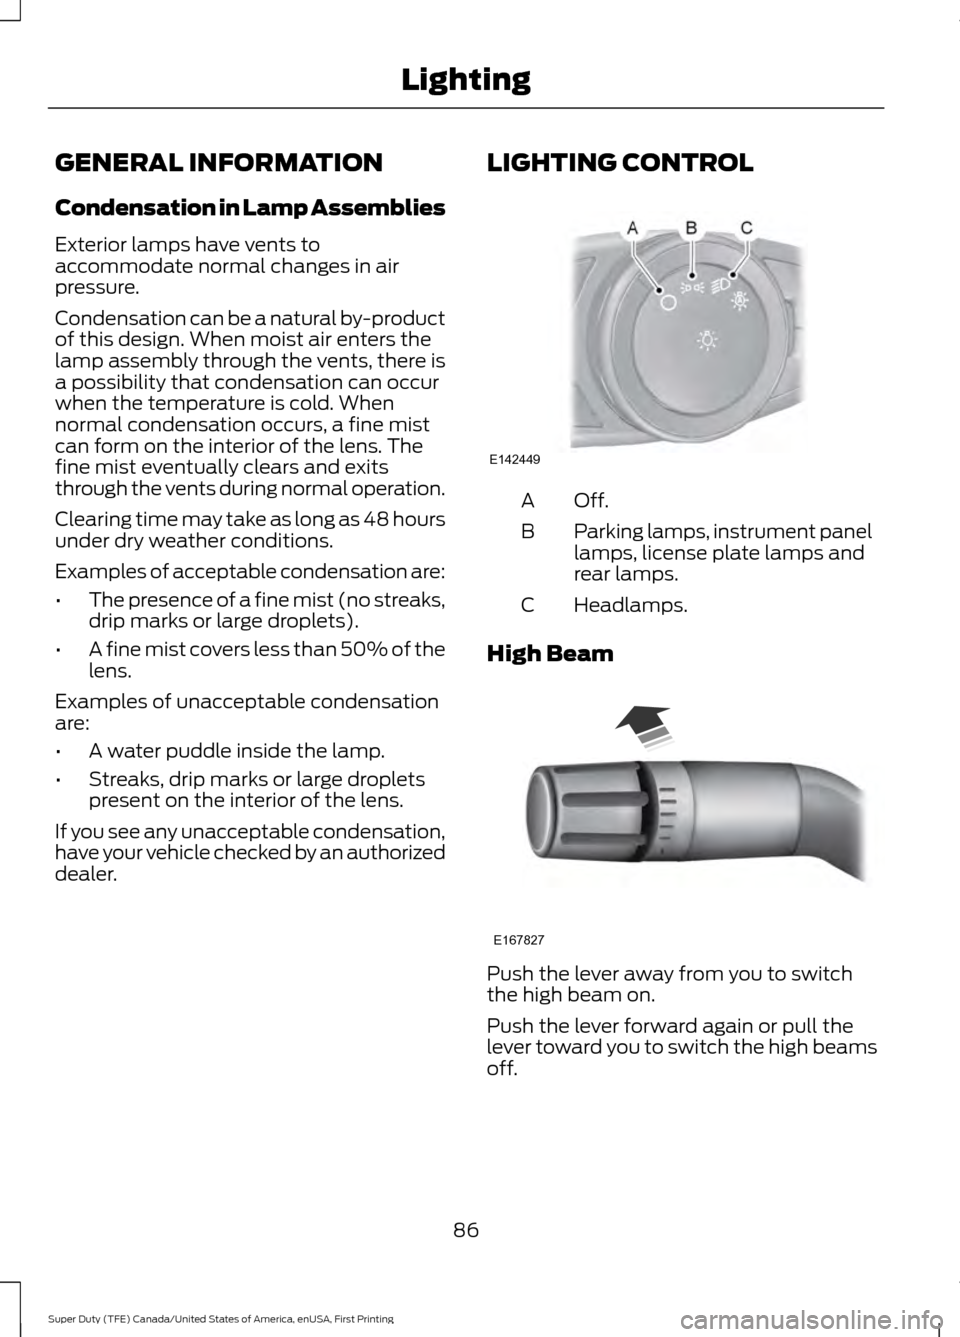
dealer. LIGHTING CONTROL Off.A
Parking lamps, instrument panel
lamps, license plate lamps and
rear lamps.
B
Headlamps.
C
High Beam Push the lever away from you to switch
the high beam on.
Push the lever forward again or pull the
lever toward you to switch the high beams
off.
86
Super Duty (TFE) Canada/United States of America, enUSA, First Printing LightingE142449 E167827
Page 101 of 636
To adjust your mirrors, make sure you
switch your vehicle on (with the ignition in
accessory mode or the engine running) and
then press the adjustment control to
position the mirrors.
Note:
Moving the mirrors 10 or more times
within one minute, or repeated folding,
unfolding and telescoping of the mirrors
while holding the control down during full
travel, may disable the system to protect
the motors from overheating. Wait
approximately three minutes with the
vehicle running, and up to 10 minutes with
the vehicle off, for the system to reset and
for function to return to normal.
Loose Mirror
If your power-folding mirrors are manually
folded, they may not work properly even
after you re-position them. You need to
reset them if:
• The mirrors vibrate when you drive.
• The mirrors feel loose.
• The mirrors do not stay in the folded or
unfolded position.
• One of the mirrors is not in its normal
driving position.
To reset the power-fold feature, use the
power-folding mirror control to fold and
unfold the mirrors. You may hear a loud
noise as you reset the power-folding
mirrors. This sound is normal. Repeat this
process as needed each time the mirrors
are manually folded.
Heated Exterior Mirrors (If Equipped)
See Heated Windows and Mirrors (page
150
).
Memory Mirrors
(If Equipped)
You can save and recall the mirror
positions through the memory function.
See
Memory Function (page 157). Direction Indicator Mirrors (If Equipped)
While the vehicle is running, the
forward-facing portion of the appropriate
mirror housing blinks when you switch on
the direction indicator.
Puddle Lamps
(If Equipped)
The lamps on the bottom part of the mirror
housing light when you use your
transmitter to unlock the doors or when
you open a door.
Clearance Lamps
(If Equipped)
The lower, outer part of the mirror housings
light when you switch the headlamps or
parking lamps on.
Spot Lamps
(If Equipped)
The area lights are on the forward-facing
portion of the mirror housing. You can
switch them on and off by using the
controls located on the instrument panel.
See
Lighting (page 86).
Trailer Towing Camera System
(If
Equipped)
See
Rear View Camera (page 232).
Blind Spot Information System
(If
Equipped)
See
Blind Spot Information System
(page 249).
INTERIOR MIRROR WARNING
Do not adjust the mirror when your
vehicle is moving.
98
Super Duty (TFE) Canada/United States of America, enUSA, First Printing Windows and Mirrors
Page 148 of 636
MANUAL CLIMATE CONTROL
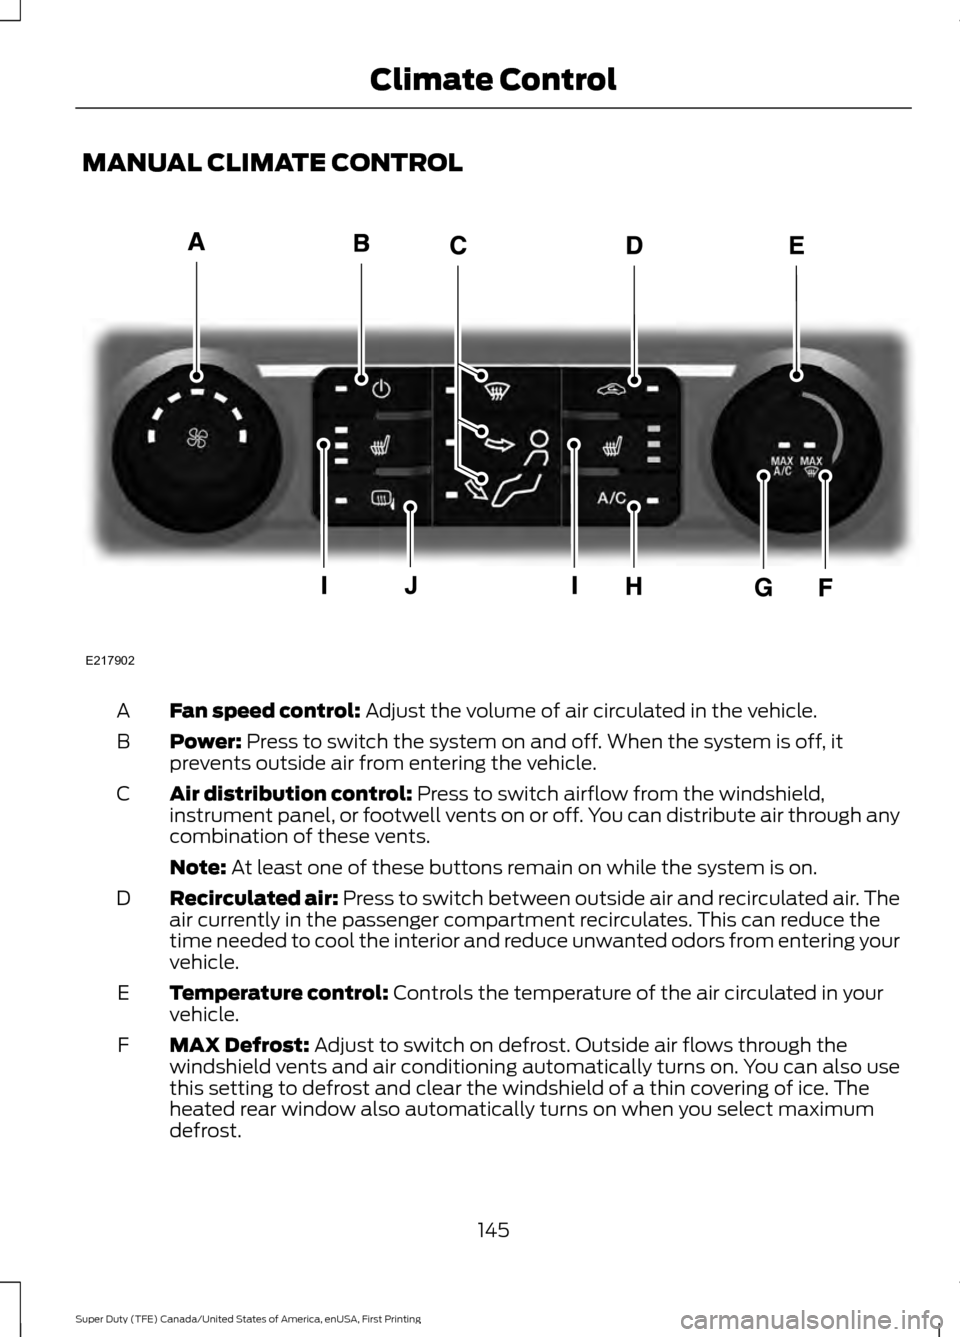
Fan speed control: Adjust the volume of air circulated in the vehicle.
A
Power:
Press to switch the system on and off. When the system is off, it
prevents outside air from entering the vehicle.
B
Air distribution control:
Press to switch airflow from the windshield,
instrument panel, or footwell vents on or off. You can distribute air through any
combination of these vents.
C
Note:
At least one of these buttons remain on while the system is on.
Recirculated air:
Press to switch between outside air and recirculated air. The
air currently in the passenger compartment recirculates. This can reduce the
time needed to cool the interior and reduce unwanted odors from entering your
vehicle.
D
Temperature control:
Controls the temperature of the air circulated in your
vehicle.
E
MAX Defrost:
Adjust to switch on defrost. Outside air flows through the
windshield vents and air conditioning automatically turns on. You can also use
this setting to defrost and clear the windshield of a thin covering of ice. The
heated rear window also automatically turns on when you select maximum
defrost.
F
145
Super Duty (TFE) Canada/United States of America, enUSA, First Printing Climate ControlE217902