2017 FORD SUPER DUTY flat tire
[x] Cancel search: flat tirePage 41 of 636
Seatbelt Locking Modes
WARNINGS
After any vehicle crash, the seatbelt
system at all passenger seating
positions must be checked by an
authorized dealer to verify that the
automatic locking retractor feature for
child seats is still functioning properly. In
addition, all seatbelts should be checked
for proper function. The belt and retractor must be
replaced if the seatbelt assembly
automatic locking retractor feature
or any other seatbelt function is not
operating properly when checked by an
authorized dealer. Failure to replace the
belt and retractor assembly could increase
the risk of injury in crashes. All safety restraints in the vehicle are
combination lap and shoulder belts. The
driver seatbelt has the first type of locking
mode, and the front outboard passenger
and rear seat seatbelts have both types of
locking modes described as follows:
Vehicle Sensitive Mode
This is the normal retractor mode, which
allows free shoulder belt length
adjustment to your movements and
locking in response to vehicle movement.
For example, if the driver brakes suddenly,
turns a corner sharply, or the vehicle
receives an impact of about 5 mph
(8 km/h) or more, the combination
seatbelts will lock to help reduce forward
movement of the driver and passengers.
In addition, the retractor is designed to lock
if the webbing is pulled out too quickly. If
this occurs, let the belt retract slightly and
pull webbing out again in a slow and
controlled manner. Automatic Locking Mode
In this mode, the shoulder belt is
automatically pre-locked. The belt will still
retract to remove any slack in the shoulder
belt. The automatic locking mode is not
available on the driver seatbelt.
When to Use the Automatic Locking
Mode
Use this mode any time you install a child
safety seat in a front outboard passenger
seating position in a Regular Cab,
SuperCab, SuperCrew or any rear seating
position of a SuperCab or SuperCrew. The
optional front seat's center seatbelt has a
cinch mechanism. Children 12 years old
and under should be properly restrained in
a rear seat whenever possible. See
Child
Safety (page 17).
How to Use the Automatic Locking
Mode
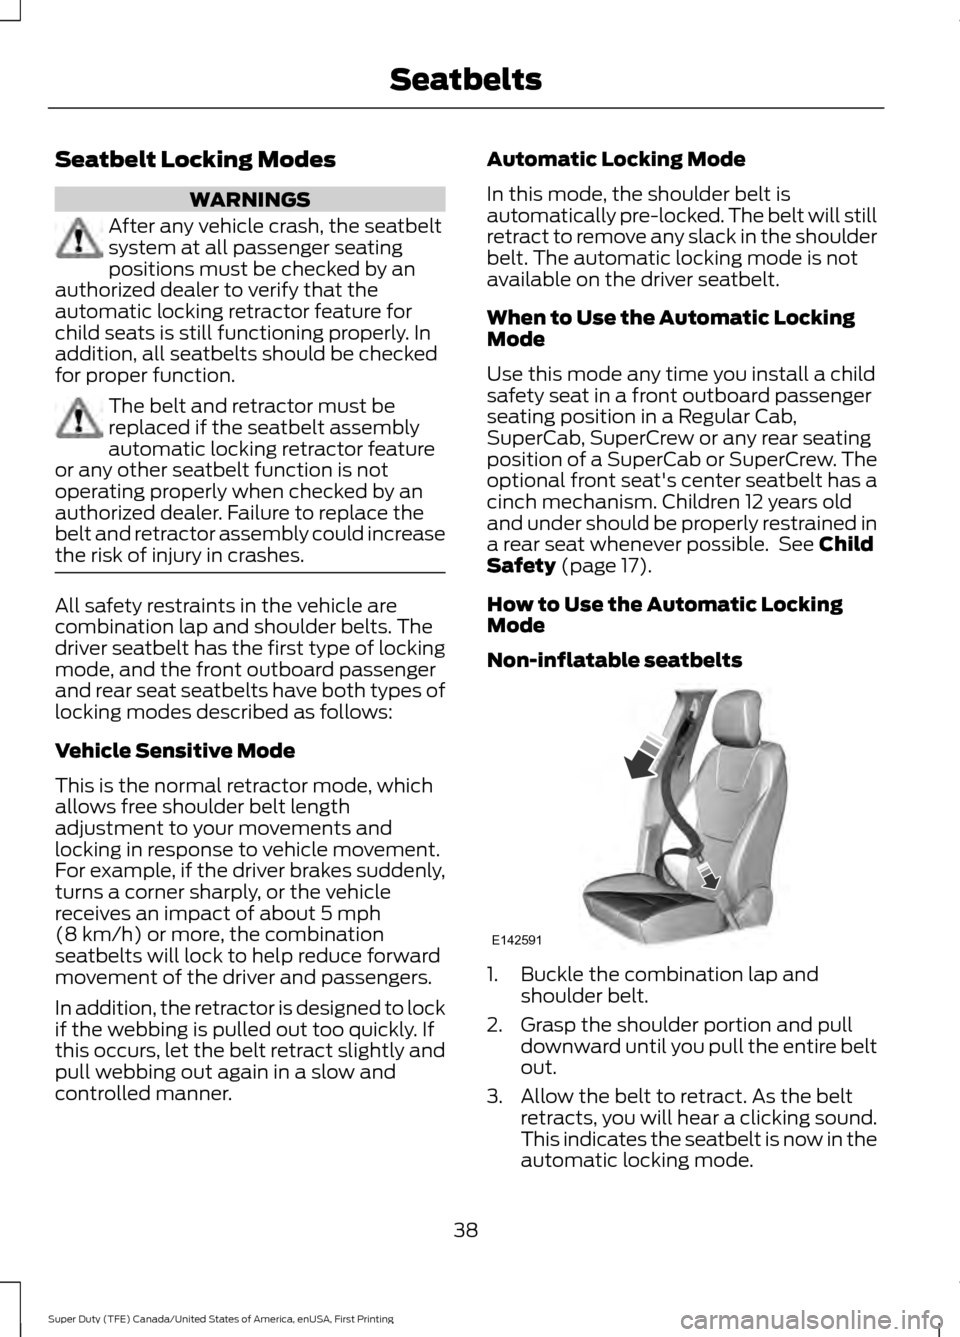
Non-inflatable seatbelts 1. Buckle the combination lap and
shoulder belt.
2. Grasp the shoulder portion and pull downward until you pull the entire belt
out.
3. Allow the belt to retract. As the belt retracts, you will hear a clicking sound.
This indicates the seatbelt is now in the
automatic locking mode.
38
Super Duty (TFE) Canada/United States of America, enUSA, First Printing SeatbeltsE142591
Page 42 of 636
Rear outboard inflatable seatbelts
(second row only
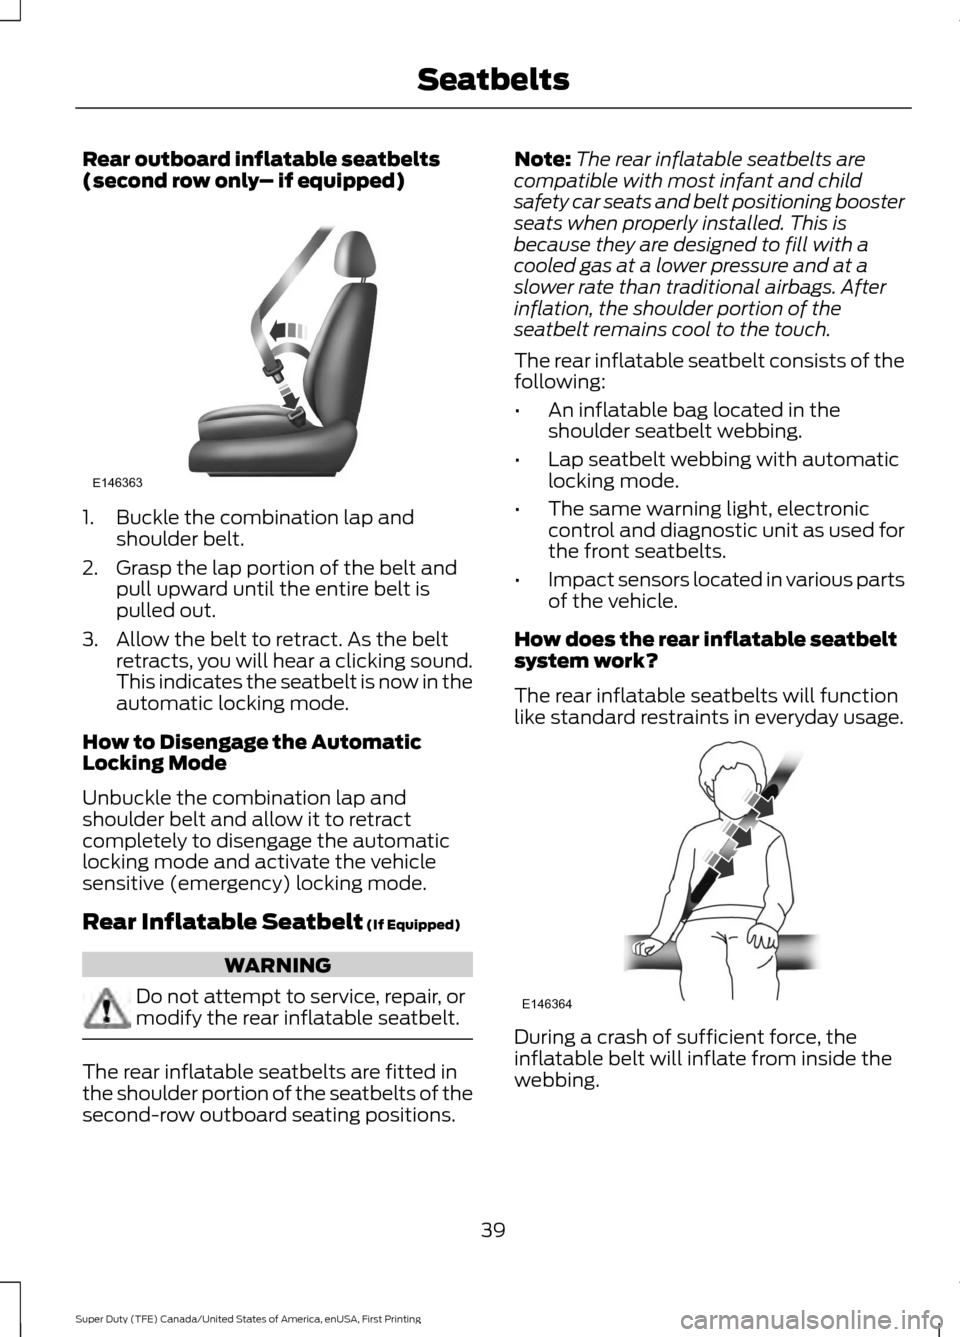
– if equipped)1. Buckle the combination lap and
shoulder belt.
2. Grasp the lap portion of the belt and pull upward until the entire belt is
pulled out.
3. Allow the belt to retract. As the belt retracts, you will hear a clicking sound.
This indicates the seatbelt is now in the
automatic locking mode.
How to Disengage the Automatic
Locking Mode
Unbuckle the combination lap and
shoulder belt and allow it to retract
completely to disengage the automatic
locking mode and activate the vehicle
sensitive (emergency) locking mode.
Rear Inflatable Seatbelt (If Equipped) WARNING
Do not attempt to service, repair, or
modify the rear inflatable seatbelt.
The rear inflatable seatbelts are fitted in
the shoulder portion of the seatbelts of the
second-row outboard seating positions. Note:
The rear inflatable seatbelts are
compatible with most infant and child
safety car seats and belt positioning booster
seats when properly installed. This is
because they are designed to fill with a
cooled gas at a lower pressure and at a
slower rate than traditional airbags. After
inflation, the shoulder portion of the
seatbelt remains cool to the touch.
The rear inflatable seatbelt consists of the
following:
• An inflatable bag located in the
shoulder seatbelt webbing.
• Lap seatbelt webbing with automatic
locking mode.
• The same warning light, electronic
control and diagnostic unit as used for
the front seatbelts.
• Impact sensors located in various parts
of the vehicle.
How does the rear inflatable seatbelt
system work?
The rear inflatable seatbelts will function
like standard restraints in everyday usage. During a crash of sufficient force, the
inflatable belt will inflate from inside the
webbing.
39
Super Duty (TFE) Canada/United States of America, enUSA, First Printing SeatbeltsE146363 E146364
Page 260 of 636
If the power steering system breaks down
(or if the engine is turned off), you can
steer the vehicle manually, but it takes
more effort.
If the steering wanders or pulls, check for:
•
an improperly inflated tire
• uneven tire wear
• loose or worn suspension components
• loose or worn steering components
• improper vehicle alignment
If any steering components are serviced or
replaced, install new fasteners (many are
coated with thread adhesive or have
prevailing torque features which may not
be re-used). Never re-use a bolt or nut.
Torque fasteners to specifications.
A high crown in the road or high crosswinds
may also make the steering seem to
wander or pull.
Adaptive Steering (If Equipped) WARNING
The adaptive steering system has
diagnostic checks that continuously
monitor the system. If a fault is
detected a message displays in the
information display. Stop your vehicle as
soon as it is safe to do so. This warning
message may clear if the fault is no longer
present. If an adaptive steering system
warning message appears each time you
start your vehicle, have the system
checked as soon as possible. The adaptive steering system continually
changes the steering ratio with changes to
vehicle speed, optimizing the steering
response in all conditions. The system also
changes when you switch on the
transmission tow/haul feature. When you
select the tow/haul button, the adaptive
steering system reduces vehicle sensitivity
to steering inputs at higher vehicle speeds,
while maintaining the ease of parking and
maneuverability at low speeds.
Note:
The adaptive steering system is
designed with a locking device. With the
lock engaged, the adaptive steering system
remains mechanically locked at a fixed
steering ratio. You may also notice a click
when you switch the vehicle on or after you
switch it off, as the lock disengages or
engages.
Note: If your vehicle loses electrical power
or detects a fault when you are driving, the
system automatically shuts down and you
retain normal steering function with a fixed
steering ratio. During this time it is possible
that the steering wheel may not be straight
when the vehicle is driving straight ahead.
In addition, the driver may notice that the
steering wheel angle required to steer the
vehicle may be different.
Note: During parking maneuvers, the
adaptive steering system balances the driver
work load for various steering wheel inputs
and vehicle loading conditions. Under
extreme operating conditions the system
locking device may engage. This strategy
prevents overheating and permanent
damage to the adaptive steering system.
Typical steering and driving maneuvers
allow the system to cool and return to
normal operation.
257
Super Duty (TFE) Canada/United States of America, enUSA, First Printing Driving Aids
Page 273 of 636
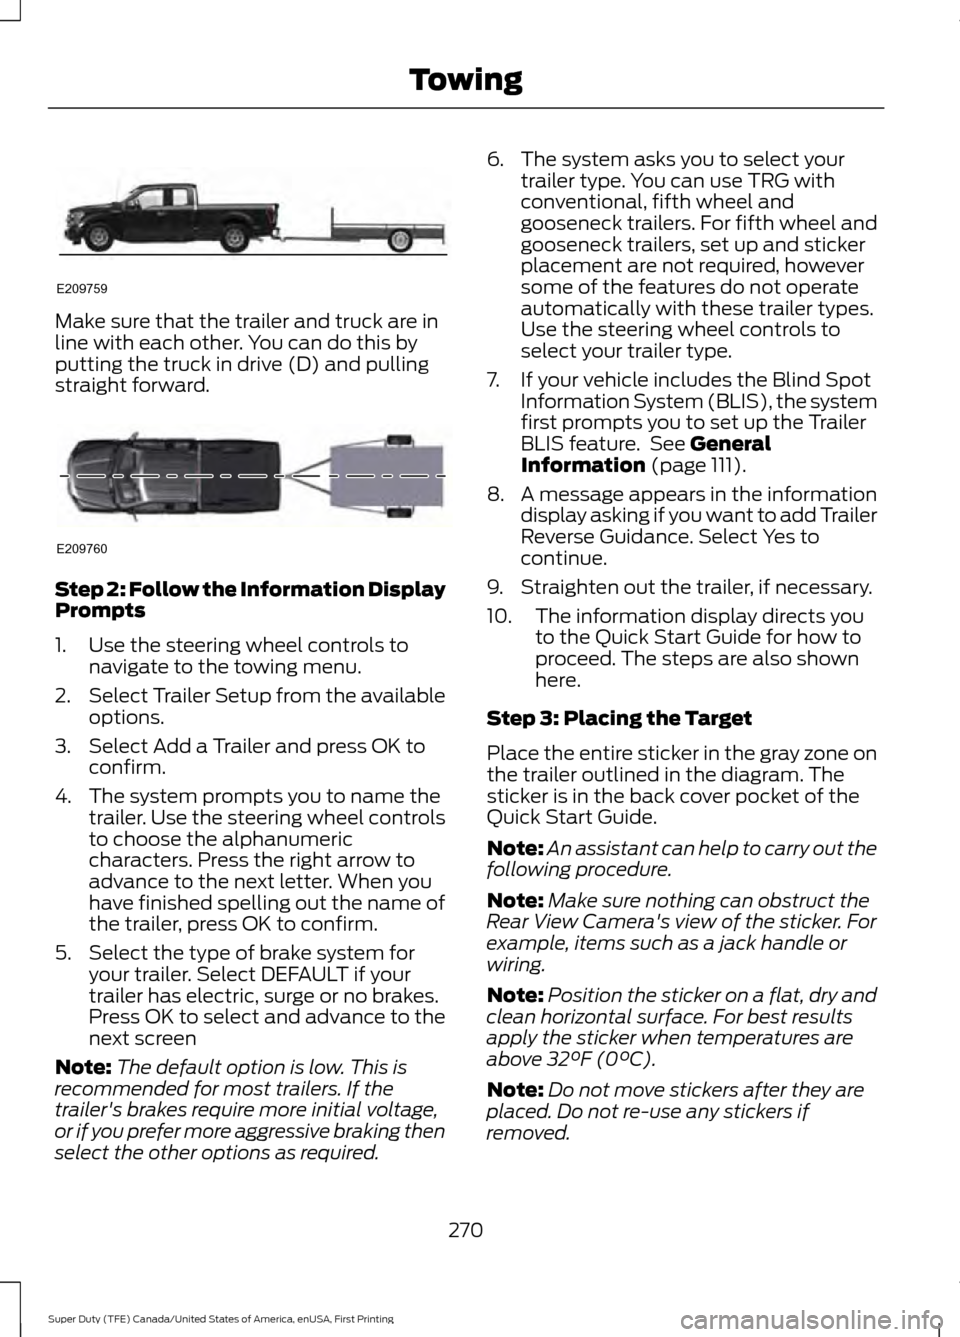
Make sure that the trailer and truck are in
line with each other. You can do this by
putting the truck in drive (D) and pulling
straight forward.
Step 2: Follow the Information Display
Prompts
1. Use the steering wheel controls to
navigate to the towing menu.
2. Select Trailer Setup from the available
options.
3. Select Add a Trailer and press OK to confirm.
4. The system prompts you to name the trailer. Use the steering wheel controls
to choose the alphanumeric
characters. Press the right arrow to
advance to the next letter. When you
have finished spelling out the name of
the trailer, press OK to confirm.
5. Select the type of brake system for your trailer. Select DEFAULT if your
trailer has electric, surge or no brakes.
Press OK to select and advance to the
next screen
Note: The default option is low. This is
recommended for most trailers. If the
trailer's brakes require more initial voltage,
or if you prefer more aggressive braking then
select the other options as required. 6. The system asks you to select your
trailer type. You can use TRG with
conventional, fifth wheel and
gooseneck trailers. For fifth wheel and
gooseneck trailers, set up and sticker
placement are not required, however
some of the features do not operate
automatically with these trailer types.
Use the steering wheel controls to
select your trailer type.
7. If your vehicle includes the Blind Spot Information System (BLIS), the system
first prompts you to set up the Trailer
BLIS feature. See General
Information (page 111).
8. A message appears in the information display asking if you want to add Trailer
Reverse Guidance. Select Yes to
continue.
9. Straighten out the trailer, if necessary.
10. The information display directs you to the Quick Start Guide for how to
proceed. The steps are also shown
here.
Step 3: Placing the Target
Place the entire sticker in the gray zone on
the trailer outlined in the diagram. The
sticker is in the back cover pocket of the
Quick Start Guide.
Note: An assistant can help to carry out the
following procedure.
Note: Make sure nothing can obstruct the
Rear View Camera's view of the sticker. For
example, items such as a jack handle or
wiring.
Note: Position the sticker on a flat, dry and
clean horizontal surface. For best results
apply the sticker when temperatures are
above
32°F (0°C).
Note: Do not move stickers after they are
placed. Do not re-use any stickers if
removed.
270
Super Duty (TFE) Canada/United States of America, enUSA, First Printing TowingE209759 E209760
Page 293 of 636
BREAKING-IN
You need to break in new tires for
approximately 300 mi (480 km). During
this time, your vehicle may exhibit some
unusual driving characteristics.
Avoid driving too fast during the first
1,000 mi (1,600 km)
. Vary your speed
frequently and change up through the
gears early. Do not labor the engine.
Drive your new vehicle at least
1,000 mi
(1,600 km) before towing a trailer. Make
sure you use the specified engine oil. See
Capacities and Specifications
(page
418).
Do not add friction modifier compounds
or special break-in oils during the first few
thousand miles (kilometers) of operation.
These additives may prevent piston ring
seating.
ECONOMICAL DRIVING
Your fuel economy is affected by several
things, such as how you drive, the
conditions you drive under, and how you
maintain your vehicle.
You may improve your fuel economy by
keeping these things in mind:
• Accelerate and slow down in a smooth,
moderate fashion.
• Drive at steady speeds without
stopping.
• Anticipate stops; slowing down may
eliminate the need to stop.
• Combine errands and minimize
stop-and-go driving.
• Close the windows for high-speed
driving.
• Drive at reasonable speeds (traveling
at 55 mph [88 km/h] uses 15% less
fuel than traveling at 65 mph [105
km/h]). •
Keep the tires properly inflated and use
only the recommended size.
• Use the recommended engine oil.
• Perform all regularly scheduled
maintenance.
Avoid these actions; they reduce your fuel
economy:
• Sudden accelerations or hard
accelerations.
• Revving the engine before turning it off.
• Idle for periods longer than one minute.
• Warm up your vehicle on cold
mornings.
• Use the air conditioner or front
defroster.
• Use the speed control in hilly terrain.
• Rest your foot on the brake pedal while
driving.
• Drive a heavily loaded vehicle or tow a
trailer.
• Carry unnecessary weight
(approximately 1 mpg [0.4 km/L] is
lost for every 400 lb [180 kilogram] of
weight carried).
• Driving with the wheels out of
alignment.
Conditions
• Heavily loading a vehicle or towing a
trailer may reduce fuel economy at any
speed.
• Adding certain accessories to your
vehicle (for example bug deflectors,
rollbars, light bars, running boards, ski
racks or luggage racks) may reduce
fuel economy.
• To maximize the fuel economy, drive
with the tonneau cover installed (if
equipped).
• Using fuel blended with alcohol may
lower fuel economy.
290
Super Duty (TFE) Canada/United States of America, enUSA, First Printing Driving Hints
Page 296 of 636
•
Front wheel toe may require
re-adjustment to prevent premature
uneven tire wear. Specifications are in
the Ford Workshop Manual.
• Headlight aim may require
re-adjustment.
• The tire air pressures recommended
for general driving are on the vehicle ’s
Safety Certification Label. The
maximum cold inflation pressure for
the tire and associated load rating is
on the tire sidewall. Tire air pressure
may require re-adjustment within these
pressure limits to accommodate the
additional weight of the snowplow
installation.
• Federal and some local regulations
require additional exterior lamps for
snowplow-equipped vehicles. Consult
your authorized dealer for additional
information.
Operating the Vehicle with the
Snowplow Attached
Note: Do not use your vehicle for snow
removal until you have driven at least
500 mi (800 km).
Ford recommends vehicle speed does not
exceed
45 mph (72 km/h) when
snowplowing.
The attached snowplow blade restricts
airflow to the radiator, and may cause the
engine to run at a higher temperature:
Attention to engine temperature is
especially important when outside
temperatures are above freezing. Angle
the blade to maximize airflow to the
radiator and monitor engine temperature
to determine whether a left or right angle
provides the best performance.
Follow the severe duty schedule in your
Scheduled Maintenance information for
engine oil and transmission fluid change
intervals. Snowplowing with your Airbag
Equipped Vehicle WARNINGS
Do not attempt to service, repair, or
modify the airbag supplemental
restraint system (SRS) or its fuses.
Contact an authorized dealer. Additional equipment for example
snowplow equipment may affect the
performance of the airbag sensors
increasing the risk of injury. Please refer to
the Body Builders Layout Book for
instructions about the appropriate
installation of additional equipment. All occupants of the vehicle,
including the driver, should always
properly wear their seatbelt, even
when provided with an airbag
supplemental restraint system (SRS). Your vehicle is equipped with a driver and
passenger airbag supplemental restraint
system. The supplemental restraint system
will activate in certain frontal and offset
frontal collisions when the vehicle sustains
sufficient frontal deceleration.
Careless or high speed driving while
plowing snow that results in sufficient
vehicle decelerations can deploy the
airbags. Such driving also increases the risk
of accidents.
Never remove or defeat the tripping
mechanisms designed into the snow
removal equipment by its manufacturer.
Doing so may cause damage to the vehicle
and the snow removal equipment as well
as possible airbag deployment.
Engine temperature while plowing
When driving with a plow, your engine may
run at a higher temperature than normal
because the attached snowplow blade will
restrict airflow to the radiator.
293
Super Duty (TFE) Canada/United States of America, enUSA, First Printing Driving Hints
Page 298 of 636
ROADSIDE ASSISTANCE
Vehicles Sold in the United States:
Getting Roadside Assistance
To fully assist you should you have a
vehicle concern, Ford Motor Company
offers a complimentary roadside
assistance program. This program is
separate from the New Vehicle Limited
Warranty. The service is available:
•
24 hours a day, seven days a week.
• For the coverage period listed on the
Roadside Assistance Card included in
your Owner's Manual portfolio.
Roadside Assistance covers:
• A flat tire change with a good spare, if
provided with the vehicle (except
vehicles supplied with a tire inflation
kit).
• Battery jump start.
• Lock-out assistance (key replacement
cost is the customer's responsibility).
• Fuel delivery — independent service
contractors, if not prohibited by state,
local or municipal law, shall deliver up
to 2 gal (7.6 L) of gasoline or 5 gal
(18.9 L) of diesel fuel to a disabled
vehicle. Roadside Assistance limits fuel
delivery service to two no-charge
occurrences within a 12-month period.
• Winch out — available within
100 ft
(30.5 m) of a paved or county
maintained road, no recoveries.
• Towing — independent service
contractors, if not prohibited by state,
local or municipal law, shall tow Ford
eligible vehicles to an authorized dealer
within
35 mi (56 km) of the
disablement location or to the nearest authorized dealer. If a member
requests a tow to an authorized dealer
that is more than
35 mi (56 km) from
the disablement location, the member
shall be responsible for any mileage
costs in excess of
35 mi (56 km).
Roadside Assistance includes up to $200
for a towed trailer if the disabled eligible
vehicle requires service at the nearest
authorized dealer. If the towing vehicle is
operational but the trailer is not, then the
trailer does not qualify for any roadside
services.
Vehicles Sold in the United States:
Using Roadside Assistance
Complete the roadside assistance
identification card and place it in your
wallet for quick reference. This card is in
the owner's information portfolio in the
glove compartment.
United States Ford vehicle customers who
require Roadside Assistance, call
1-800-241-3673.
If you need to arrange roadside assistance
for yourself, Ford Motor Company
reimburses a reasonable amount for
towing to the nearest dealership within
35 mi (56 km)
. To obtain reimbursement
information, United States Ford vehicle
customers call 1-800-241-3673.
Customers need to submit their original
receipts.
Vehicles Sold in Canada: Getting
Roadside Assistance
To fully assist you should you have a
vehicle concern, Ford Motor Company of
Canada, Limited offers a complimentary
roadside assistance program. This program
is eligible within Canada or the continental
United States.
295
Super Duty (TFE) Canada/United States of America, enUSA, First Printing Roadside Emergencies
Page 371 of 636
Engine
•
Change the engine oil and filter prior to
storage because used engine oil
contains contaminates which may
cause engine damage.
• Start the engine every 15 days for a
minimum of 15 minutes. Run at fast idle
with the climate controls set to defrost
until the engine reaches normal
operating temperature.
• With your foot on the brake, shift
through all the gears while the engine
is running.
• We recommend that you change the
engine oil before you use your vehicle
again.
Fuel system
• Fill the fuel tank with high-quality fuel
until the first automatic shutoff of the
fuel pump nozzle.
Cooling system
• Protect against freezing temperatures.
• When removing your vehicle from
storage, check coolant fluid level.
Confirm that there are no cooling
system leaks and that fluid is at the
recommended level.
Battery
• Check and recharge as necessary. Keep
connections clean.
• If storing your vehicle for more than 30
days without recharging the battery,
we recommend that you disconnect
the battery cables to maintain battery
charge for quick starting.
Note: It is necessary to reset memory
features if battery cables are disconnected. Brakes
•
Make sure the brakes and parking brake
release fully.
Tires
• Maintain recommended air pressure.
Miscellaneous
• Make sure all linkages, cables, levers
and pins under your vehicle are covered
with grease to prevent rust.
• Move vehicles at least 25 ft (7.5 m)
every 15 days to lubricate working parts
and prevent corrosion.
Removing Vehicle From Storage
When your vehicle is ready to come out of
storage, do the following:
• Wash your vehicle to remove any dirt
or grease film build-up on window
surfaces.
• Check windshield wipers for any
deterioration.
• Check under the hood for any foreign
material that may have collected
during storage such as mice or squirrel
nests.
• Check the exhaust for any foreign
material that may have collected
during storage.
• Check tire pressures and set tire
inflation per the Tire Label.
• Check brake pedal operation. Drive
your vehicle
15 ft (4.5 m) back and
forth to remove rust build-up.
• Check fluid levels (including coolant,
oil and gas) to make sure there are no
leaks, and fluids are at recommended
levels.
• If you remove the battery, clean the
battery cable ends and check for
damage.
368
Super Duty (TFE) Canada/United States of America, enUSA, First Printing Vehicle Care