2017 FORD FLEX AUX
[x] Cancel search: AUXPage 344 of 496

If you do not cancel the call, and SYNC
makes a successful call, a pre-recorded
message plays for the 911 operator, and
then the occupant(s) in your vehicle is able
to talk with the operator. Be prepared to
provide your name, phone number and
location immediately, because not all 911
systems are capable of receiving this
information electronically.
911 Assist May Not Work If
•
Your cellular phone or 911 Assist
hardware sustains damage in a crash.
• The vehicle's battery or the SYNC
system has no power.
• The phone(s) thrown from your vehicle
are the ones paired and connected to
the system.
911 Assist Privacy Notice
When you turn on 911 Assist, it may
disclose to emergency services that your
vehicle has been in a crash involving the
deployment of an airbag or activation of
the fuel pump shut-off. Certain versions or
updates to 911 Assist may also be capable
of electronically or verbally disclosing to
911 operators your vehicle location or other
details about your vehicle or crash to assist
911 operators to provide the most
appropriate emergency services. If you do
not want to disclose this information, do
not turn the feature on.
SYNC™ APPLINK ™
SYNC Mobile Apps
Note: You must pair and connect your
smartphone to SYNC to access AppLink.
Note: iPhone users need to connect the
phone to the USB port in order to start the
application. Note:
The AppLink feature is not available
if your vehicle is equipped with the MyFord
Touch system.
Note: Depending on your display type, you
can access AppLink from the media menu,
the phone menu, or by using voice
commands. Once an app is running through
AppLink, you can control main features of
the app through voice commands and
steering wheel controls.
To Access Using the Phone Menu
Press the phone button to access the
SYNC phone menu on-screen. You can
then scroll to: Menu item
Press OK to access a list
of available applications.
Mobile Apps
Scroll through the list of
available applications and
press OK to select a
particular app. Once an
app is running through
SYNC, you can access an
app’s menu by pressing the
MENU
button to first
access the SYNC menu.
Scroll until the app name followed by
"Menu", is displayed (such as, sticher
Menu), then press
OK. From here, you can
access an application's features, such as
Thumbs up and Thumbs down.
For more information, please visit: Website
www.SYNCMyRide.com
To Access Using the Media Menu
Press the
AUX button on the center
console.
341
Flex (), enUSA, First Printing SYNC™
Page 346 of 496

To Connect Using Voice Commands
Plug the device into the USB port. See
USB Port (page 320).
Press the voice button and when prompted say:
Action and Description
Voice command
You can now play music by saying any of the appropriate
voice commands. See Media voice commands.
USB [1]
You do not need to say words that appear within square brackets. For example, for where
USB[1]appears, you can say USB or USB one.
To Connect Using the System Menu
Plug the device into the USB port. See
USB Port
(page 320). Press the
AUX button, then the Menu
button to enter the Media Menu.
You can then scroll to: Action and Description
Message
Press the
OK button.
SELECT SRC
Press the
OK button.
SYNC USB
Depending on how many digital media files are on your
connected device, the following message may appear in the
radio display.
Indexing\b
When indexing is complete, the screen returns to the Play menu. You can then
select one of the following:
PLAY ALL
ARTISTS
ALBUMS
GENRES
PLAYLISTS
TRACKS
EXPLORE USB
SIMILARMUSIC Exit the current menu.
RETURN
343
Flex (), enUSA, First Printing SYNC™E142599
Page 349 of 496

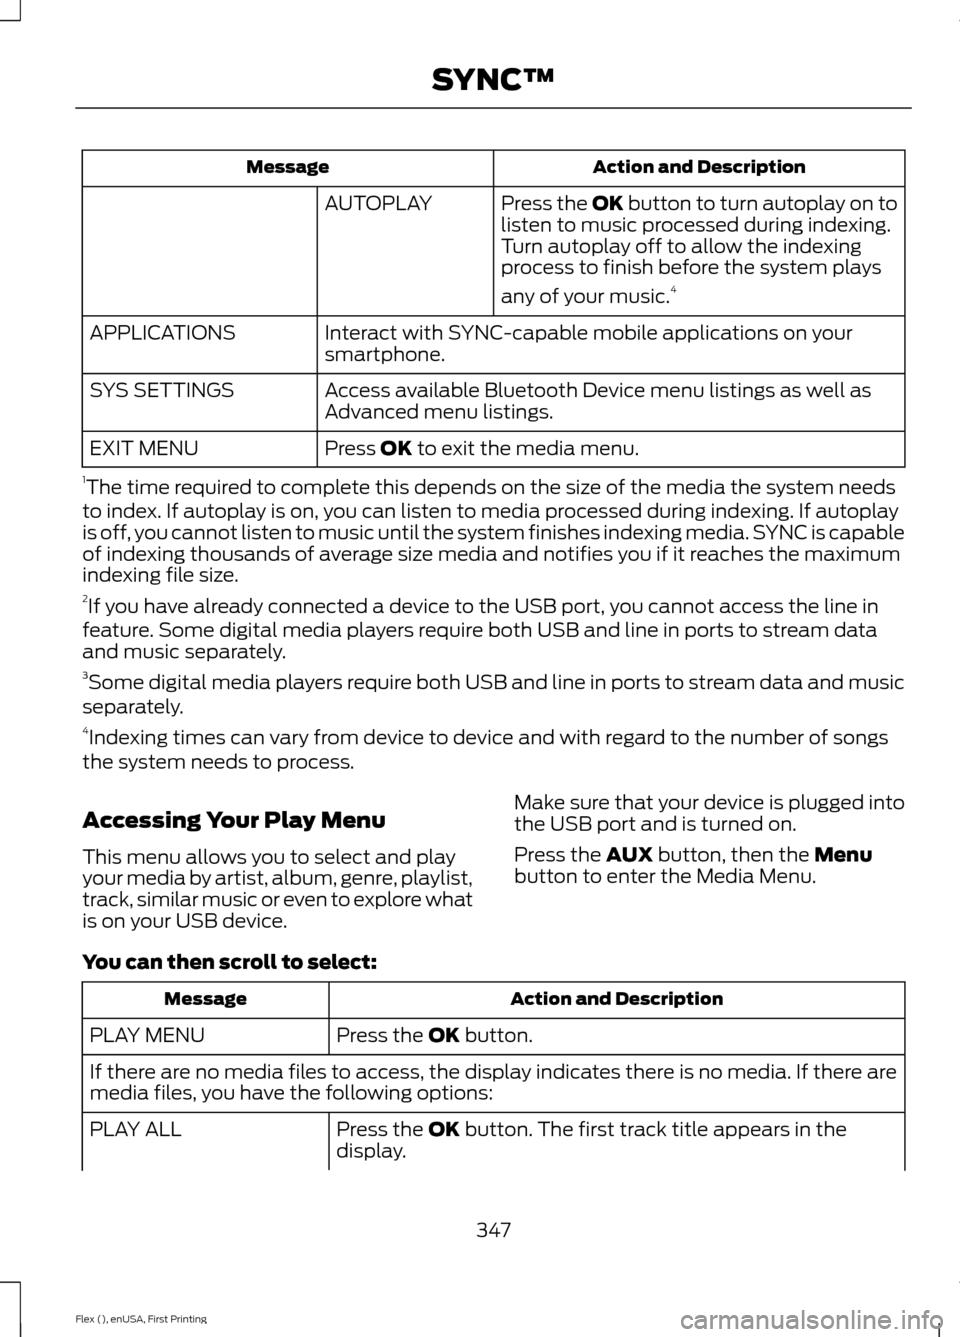
Press the AUX button, then the Menu
button to enter the Media Menu.
You can then scroll to: Action and Description
Message
Play your music by artist, album, genre,
playlists, tracks, similar music or to simply,
play all. You can also choose to Explore
USB to view the supported digital music
files on your playing device.
PLAY MENU
See Play Menu later in this section for more
information.
Select one of the following: Press the
OK button to access music
plugged into your USB port. You can also
plug in devices to charge them (if supported
by your device). Once connected, the
system indexes any readable media files. 1
SYNC USB
SELECT SRC
Press the
OK button. This is a phone-
dependent feature that allows you to
stream music playing on your Bluetooth-
enabled phone. If supported by your device,
you can press seek to play the previous or
next track.
SYNC BT
Press the
OK button to select and play
music from your portable music player over
your vehicle's speakers. 2
SYNC LINE IN
(If Equipped)
Choose to shuffle or repeat your music and select your Auto-
play settings. Once you turn these selections on, they remain
on until you turn them off. Press SEEK to play the previous or
next track.
3
MEDIA SETTIN
Press the
OK button to shuffle available
media files in the current playlist. To shuffle
all media tracks, you must select Play All
in the play menu and then select Shuffle.
SHUFFLE
Press the
OK button to repeat any song.
REPEAT
346
Flex (), enUSA, First Printing SYNC™
Page 350 of 496

Action and Description
Message
Press the OK button to turn autoplay on to
listen to music processed during indexing.
Turn autoplay off to allow the indexing
process to finish before the system plays
any of your music.4
AUTOPLAY
Interact with SYNC-capable mobile applications on your
smartphone.
APPLICATIONS
Access available Bluetooth Device menu listings as well as
Advanced menu listings.
SYS SETTINGS
Press OK to exit the media menu.
EXIT MENU
1 The time required to complete this depends on the size of the media the system needs
to index. If autoplay is on, you can listen to media processed during indexing. If autoplay
is off, you cannot listen to music until the system finishes indexing media. SYNC is capable
of indexing thousands of average size media and notifies you if it reaches the maximum
indexing file size.
2 If you have already connected a device to the USB port, you cannot access the line in
feature. Some digital media players require both USB and line in ports to stream data
and music separately.
3 Some digital media players require both USB and line in ports to stream data and music
separately.
4 Indexing times can vary from device to device and with regard to the number of songs
the system needs to process.
Accessing Your Play Menu
This menu allows you to select and play
your media by artist, album, genre, playlist,
track, similar music or even to explore what
is on your USB device. Make sure that your device is plugged into
the USB port and is turned on.
Press the
AUX button, then the Menu
button to enter the Media Menu.
You can then scroll to select: Action and Description
Message
Press the
OK button.
PLAY MENU
If there are no media files to access, the display indicates there is no media. If there are
media files, you have the following options:
Press the
OK button. The first track title appears in the
display.
PLAY ALL
347
Flex (), enUSA, First Printing SYNC™
Page 352 of 496

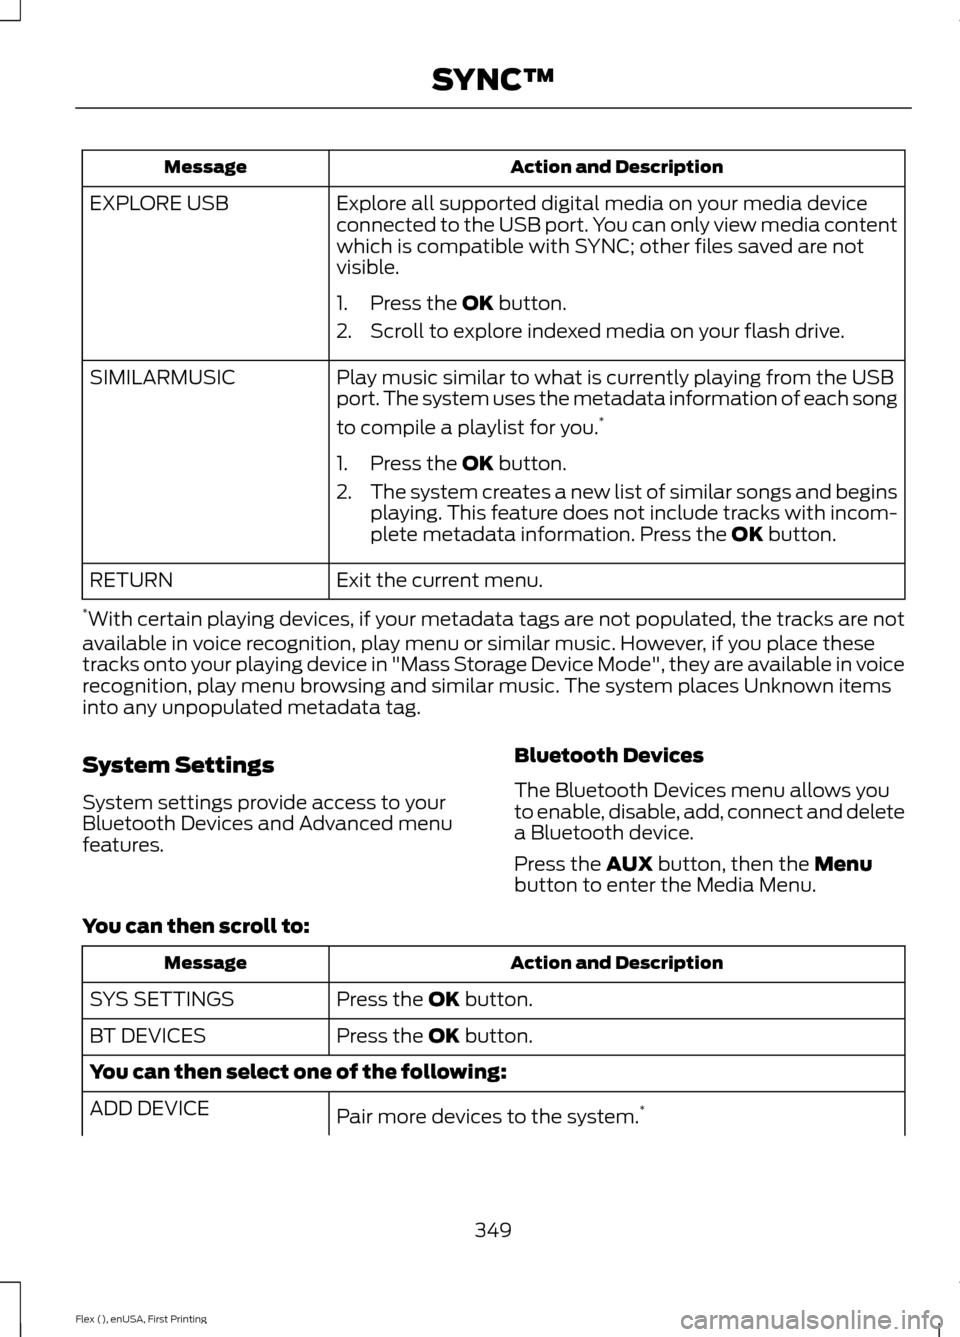
Action and Description
Message
Explore all supported digital media on your media device
connected to the USB port. You can only view media content
which is compatible with SYNC; other files saved are not
visible.
EXPLORE USB
1. Press the OK button.
2. Scroll to explore indexed media on your flash drive.
Play music similar to what is currently playing from the USB
port. The system uses the metadata information of each song
to compile a playlist for you. *
SIMILARMUSIC
1. Press the
OK button.
2. The system creates a new list of similar songs and begins
playing. This feature does not include tracks with incom-
plete metadata information. Press the
OK button.
Exit the current menu.
RETURN
* With certain playing devices, if your metadata tags are not populated, the tracks are not
available in voice recognition, play menu or similar music. However, if you place these
tracks onto your playing device in "Mass Storage Device Mode", they are available in voice
recognition, play menu browsing and similar music. The system places Unknown items
into any unpopulated metadata tag.
System Settings
System settings provide access to your
Bluetooth Devices and Advanced menu
features. Bluetooth Devices
The Bluetooth Devices menu allows you
to enable, disable, add, connect and delete
a Bluetooth device.
Press the
AUX button, then the Menu
button to enter the Media Menu.
You can then scroll to: Action and Description
Message
Press the
OK button.
SYS SETTINGS
Press the
OK button.
BT DEVICES
You can then select one of the following:
Pair more devices to the system. *
ADD DEVICE
349
Flex (), enUSA, First Printing SYNC™
Page 353 of 496

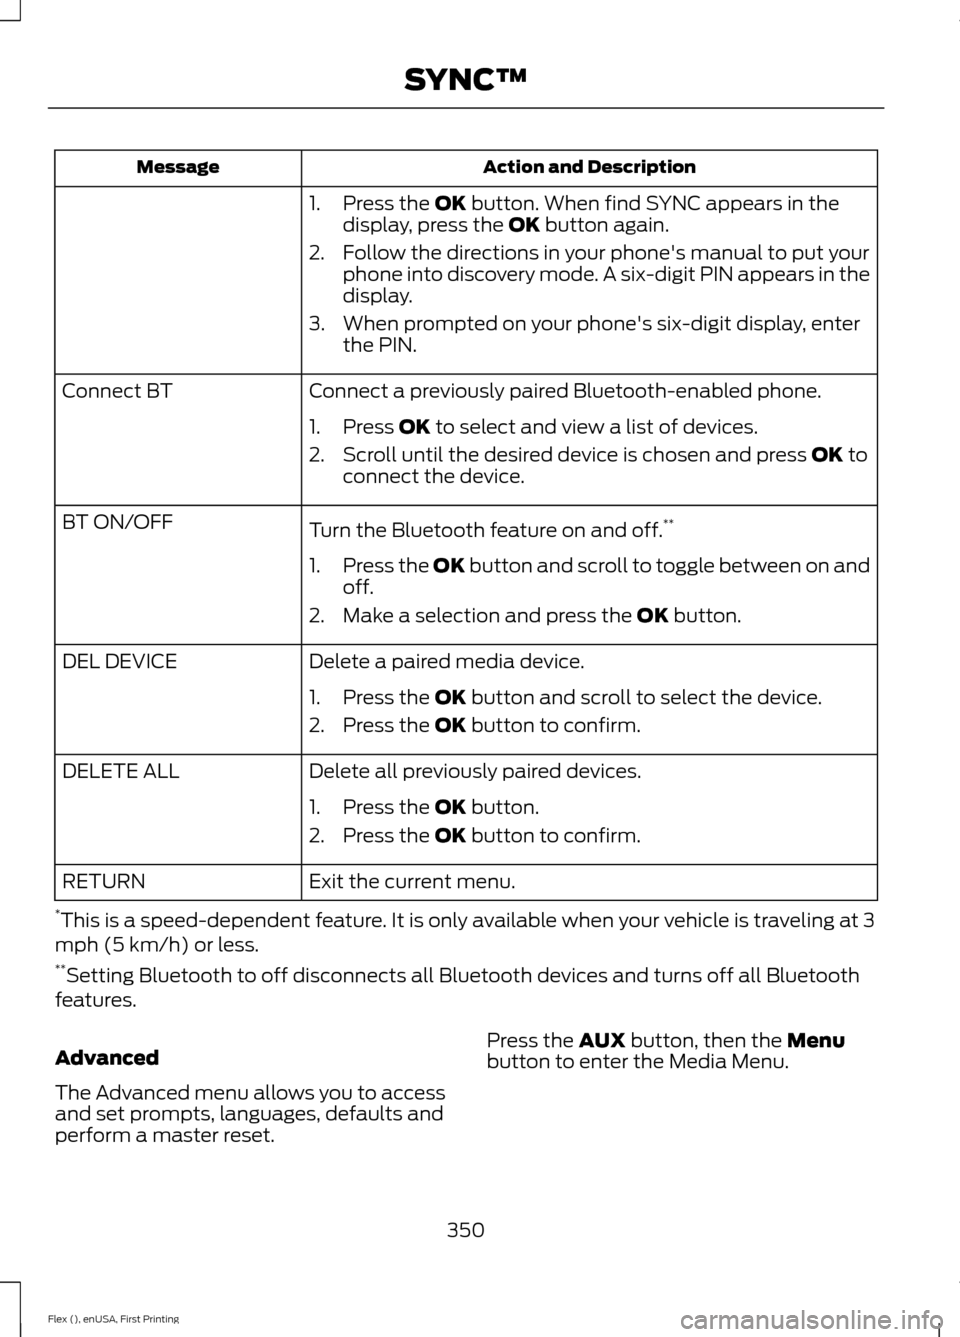
Action and Description
Message
1. Press the OK button. When find SYNC appears in the
display, press the OK button again.
2. Follow the directions in your phone's manual to put your phone into discovery mode. A six-digit PIN appears in the
display.
3. When prompted on your phone's six-digit display, enter the PIN.
Connect a previously paired Bluetooth-enabled phone.
Connect BT
1. Press
OK to select and view a list of devices.
2. Scroll until the desired device is chosen and press
OK to
connect the device.
Turn the Bluetooth feature on and off. **
BT ON/OFF
1.Press the OK button and scroll to toggle between on and
off.
2. Make a selection and press the
OK button.
Delete a paired media device.
DEL DEVICE
1. Press the
OK button and scroll to select the device.
2. Press the
OK button to confirm.
Delete all previously paired devices.
DELETE ALL
1. Press the
OK button.
2. Press the
OK button to confirm.
Exit the current menu.
RETURN
* This is a speed-dependent feature. It is only available when your vehicle is traveling at 3
mph (5 km/h) or less.
** Setting Bluetooth to off disconnects all Bluetooth devices and turns off all Bluetooth
features.
Advanced
The Advanced menu allows you to access
and set prompts, languages, defaults and
perform a master reset. Press the
AUX button, then the Menu
button to enter the Media Menu.
350
Flex (), enUSA, First Printing SYNC™
Page 487 of 496

Checking the Transmission Fluid
Level................................................................... 254
Autowipers........................................................79
Auxiliary Power Points................................145 110 Volt AC Power Point................................... 145
12 Volt DC Power Point..................................... 145
Locations............................................................... 145
AWD See: All-Wheel Drive......................................... 168
B
Battery See: Changing the 12V Battery..................... 256
Blind Spot Information System..............195
Switching the System Off and On...............196
System Errors....................................................... 196
System Limitations............................................ 196
Using the System............................................... 195
Bonnet Lock See: Opening and Closing the Hood..........244
Booster Seats..................................................28 Types of Booster Seats...................................... 29
Brake Fluid Check........................................255
Brakes................................................................175 General Information........................................... 175
Breaking-In......................................................217
Bulb Specification Chart...........................263
C
Cabin Air Filter................................................124
California Proposition 65..............................11
Capacities and Specifications - 3.5L Duratec.........................................................304
Alternative Engine Oil for Extremely Cold Climates........................................................... 307
Specifications..................................................... 304
Capacities and Specifications - 3.5L Ecoboost™.................................................308
Alternative Engine Oil for Extremely Cold Climates............................................................ 312
Specifications..................................................... 309
Capacities and Specifications................299
Cargo Nets
.....................................................203
Car Wash See: Cleaning the Exterior.............................. 266Center Console
..............................................147
Console Refrigerator and Freezer.................147
Second Row Center Console.......................... 147
Changing a Bulb..........................................260 Brake and Rear Lamps, Rear Direction
Indicator and Reversing Lamp.................262
Front Direction Indicator and Front Parking Lamp.................................................................. 261
Front Fog Lamp.................................................. 262
Headlamp.............................................................. 261
Headlamp Low Beam and Headlamp High Beam.................................................................. 261
LED Lamps........................................................... 263
License Plate Lamp.......................................... 263
Changing a Fuse...........................................242 Fuses....................................................................... 242
Changing a Road Wheel
...........................293
Dissimilar Spare Wheel and Tire Assembly
Information..................................................... 293
Tire Change Procedure.................................... 294
Changing the 12V Battery.........................256
Changing the Engine Air Filter................265
Changing the Wiper Blades
.....................258
Front Wiper Blades........................................... 258
Rear Window Wiper Blade............................. 259
Checking MyKey System Status..............60
Checking the Wiper Blades
.....................258
Child Restraint and Seatbelt Maintenance..................................................41
Child Restraint Positioning
.........................30
Child Safety.......................................................18
General Information............................................. 18
Child Safety Locks..........................................32 Left-Hand Side...................................................... 33
Right-Hand Side................................................... 33
Cleaning Leather Seats
.............................270
Cleaning Products.......................................266 Materials............................................................... 266
Cleaning the Engine
...................................268
Cleaning the Exterior..................................266 Exterior Chrome Parts...................................... 267
Exterior Plastic Parts......................................... 267
Stripes or Graphics............................................ 267
Underbody............................................................ 267
Under Hood.......................................................... 267
Cleaning the Instrument Panel and Instrument Cluster Lens........................269
Cleaning the Interior
...................................269
484
Flex (), enUSA, First Printing Index