2017 FORD F450 SUPER DUTY tire type
[x] Cancel search: tire typePage 41 of 642

Seatbelt Locking Modes
WARNINGS
After any vehicle crash, the seatbeltsystem at all passenger seatingpositions must be checked by anauthorized dealer to verify that theautomatic locking retractor feature forchild seats is still functioning properly. Inaddition, all seatbelts should be checkedfor proper function.
The belt and retractor must bereplaced if the seatbelt assemblyautomatic locking retractor featureor any other seatbelt function is notoperating properly when checked by anauthorized dealer. Failure to replace thebelt and retractor assembly could increasethe risk of injury in crashes.
All safety restraints in the vehicle arecombination lap and shoulder belts. Thedriver seatbelt has the first type of lockingmode, and the front outboard passengerand rear seat seatbelts have both types oflocking modes described as follows:
Vehicle Sensitive Mode
This is the normal retractor mode, whichallows free shoulder belt lengthadjustment to your movements andlocking in response to vehicle movement.For example, if the driver brakes suddenly,turns a corner sharply, or the vehiclereceives an impact of about 5 mph(8 km/h) or more, the combinationseatbelts will lock to help reduce forwardmovement of the driver and passengers.
In addition, the retractor is designed to lockif the webbing is pulled out too quickly. Ifthis occurs, let the belt retract slightly andpull webbing out again in a slow andcontrolled manner.
Automatic Locking Mode
In this mode, the shoulder belt isautomatically pre-locked. The belt will stillretract to remove any slack in the shoulderbelt. The automatic locking mode is notavailable on the driver seatbelt.
When to Use the Automatic LockingMode
Use this mode any time you install a childsafety seat in a front outboard passengerseating position in a Regular Cab,SuperCab, SuperCrew or any rear seatingposition of a SuperCab or SuperCrew. Theoptional front seat's center seatbelt has acinch mechanism. Children 12 years oldand under should be properly restrained ina rear seat whenever possible. See ChildSafety (page 17).
How to Use the Automatic LockingMode
Non-inflatable seatbelts
1. Buckle the combination lap andshoulder belt.
2. Grasp the shoulder portion and pulldownward until you pull the entire beltout.
3. Allow the belt to retract. As the beltretracts, you will hear a clicking sound.This indicates the seatbelt is now in theautomatic locking mode.
38
Super Duty (TFE) Canada/United States of America, enUSA, Edition date: 201710, Second Printing
SeatbeltsE142591
Page 116 of 642
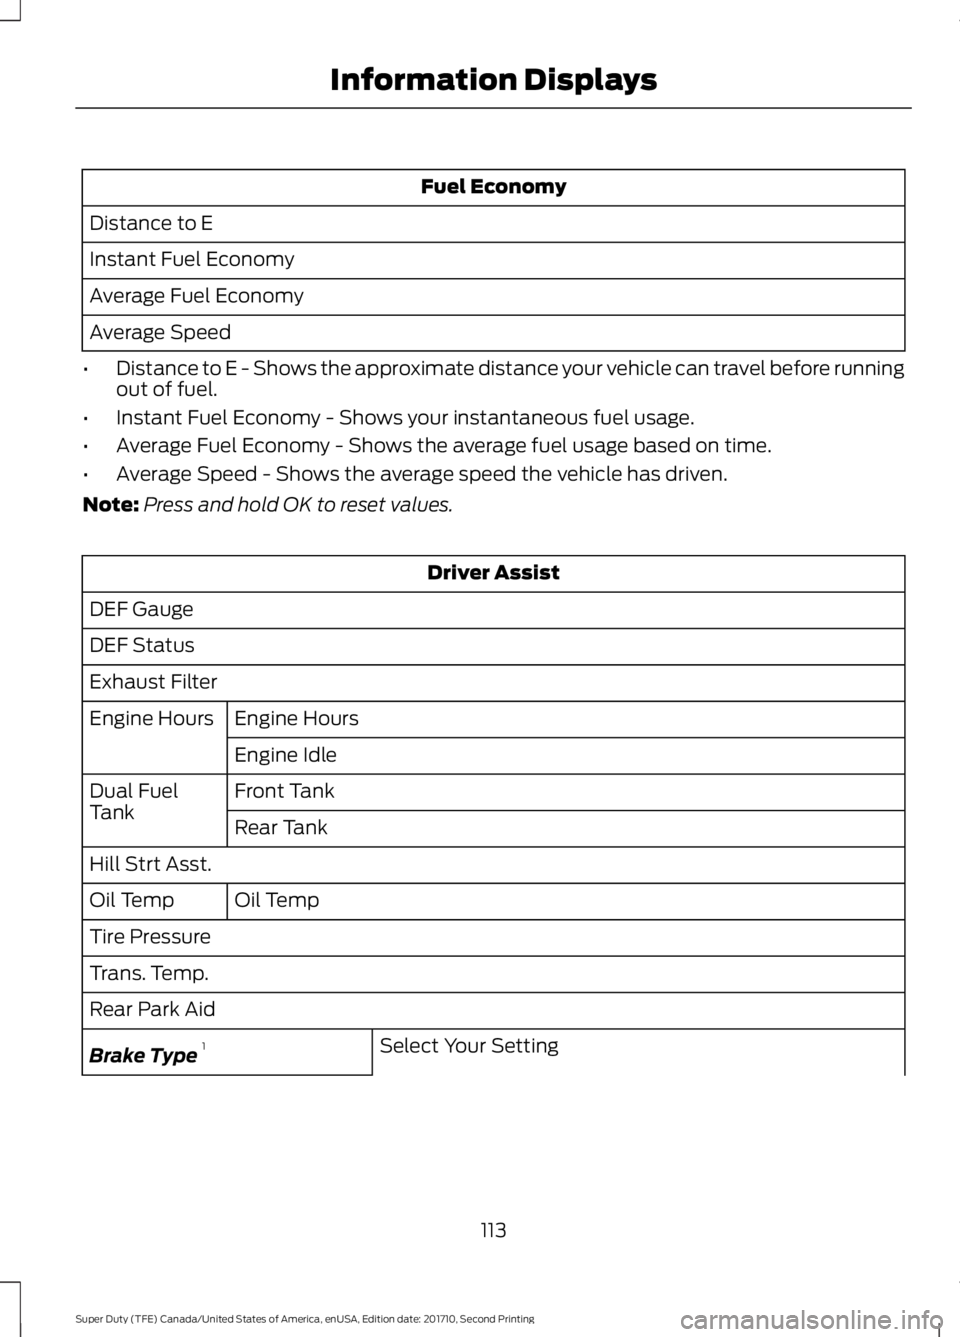
Fuel Economy
Distance to E
Instant Fuel Economy
Average Fuel Economy
Average Speed
•Distance to E - Shows the approximate distance your vehicle can travel before runningout of fuel.
•Instant Fuel Economy - Shows your instantaneous fuel usage.
•Average Fuel Economy - Shows the average fuel usage based on time.
•Average Speed - Shows the average speed the vehicle has driven.
Note:Press and hold OK to reset values.
Driver Assist
DEF Gauge
DEF Status
Exhaust Filter
Engine HoursEngine Hours
Engine Idle
Front TankDual FuelTankRear Tank
Hill Strt Asst.
Oil TempOil Temp
Tire Pressure
Trans. Temp.
Rear Park Aid
Select Your SettingBrake Type1
113
Super Duty (TFE) Canada/United States of America, enUSA, Edition date: 201710, Second Printing
Information Displays
Page 118 of 642
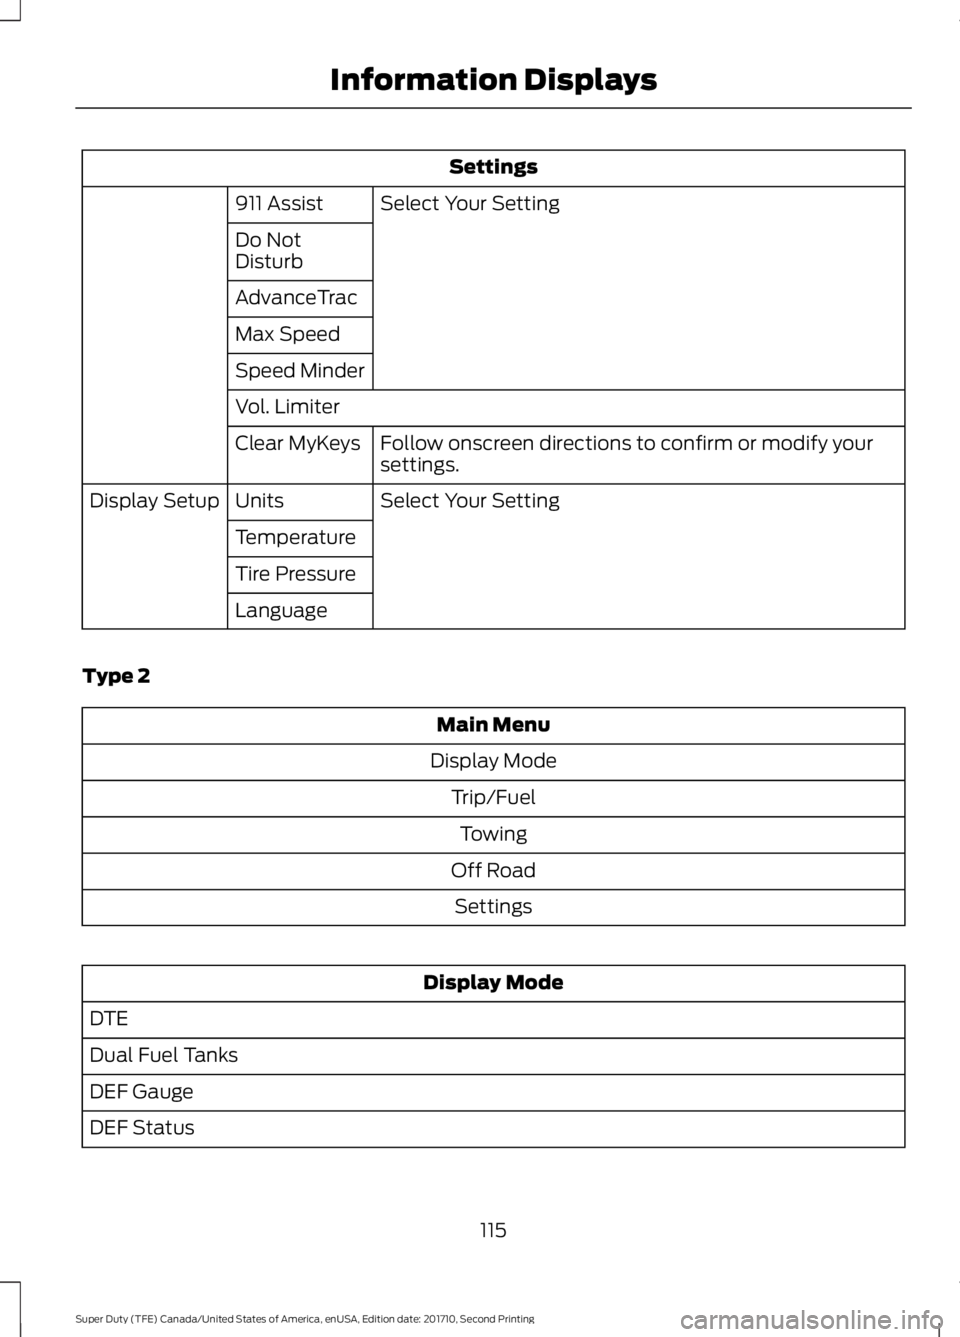
Settings
Select Your Setting911 Assist
Do NotDisturb
AdvanceTrac
Max Speed
Speed Minder
Vol. Limiter
Follow onscreen directions to confirm or modify yoursettings.Clear MyKeys
Select Your SettingUnitsDisplay Setup
Temperature
Tire Pressure
Language
Type 2
Main Menu
Display Mode
Trip/Fuel
Towing
Off Road
Settings
Display Mode
DTE
Dual Fuel Tanks
DEF Gauge
DEF Status
115
Super Duty (TFE) Canada/United States of America, enUSA, Edition date: 201710, Second Printing
Information Displays
Page 128 of 642
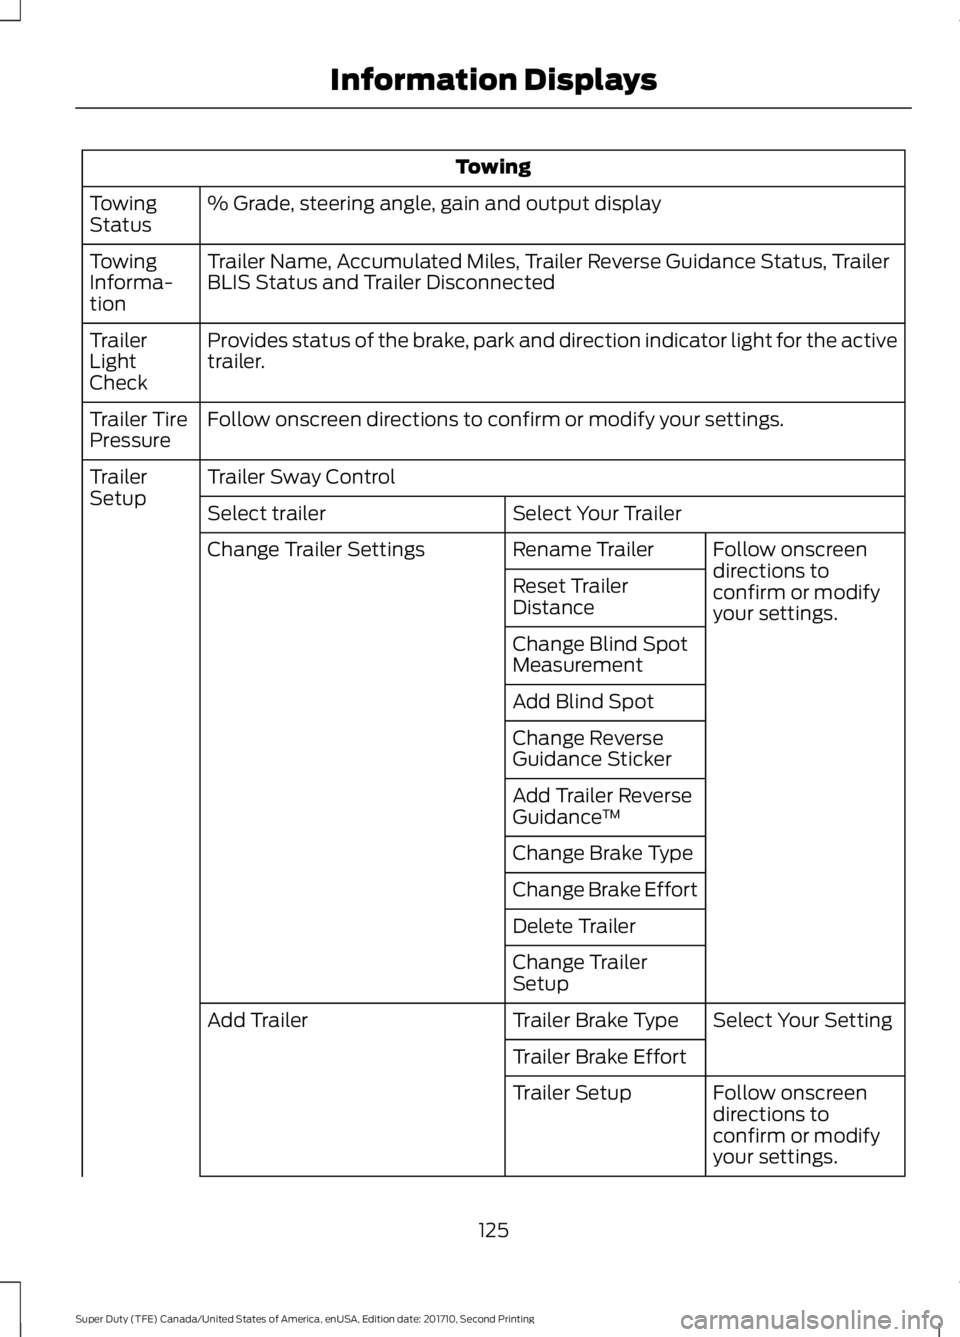
Towing
% Grade, steering angle, gain and output displayTowingStatus
Trailer Name, Accumulated Miles, Trailer Reverse Guidance Status, TrailerBLIS Status and Trailer DisconnectedTowingInforma-tion
Provides status of the brake, park and direction indicator light for the activetrailer.TrailerLightCheck
Follow onscreen directions to confirm or modify your settings.Trailer TirePressure
Trailer Sway ControlTrailerSetupSelect Your TrailerSelect trailer
Follow onscreendirections toconfirm or modifyyour settings.
Rename TrailerChange Trailer Settings
Reset TrailerDistance
Change Blind SpotMeasurement
Add Blind Spot
Change ReverseGuidance Sticker
Add Trailer ReverseGuidance™
Change Brake Type
Change Brake Effort
Delete Trailer
Change TrailerSetup
Select Your SettingTrailer Brake TypeAdd Trailer
Trailer Brake Effort
Follow onscreendirections toconfirm or modifyyour settings.
Trailer Setup
125
Super Duty (TFE) Canada/United States of America, enUSA, Edition date: 201710, Second Printing
Information Displays
Page 131 of 642
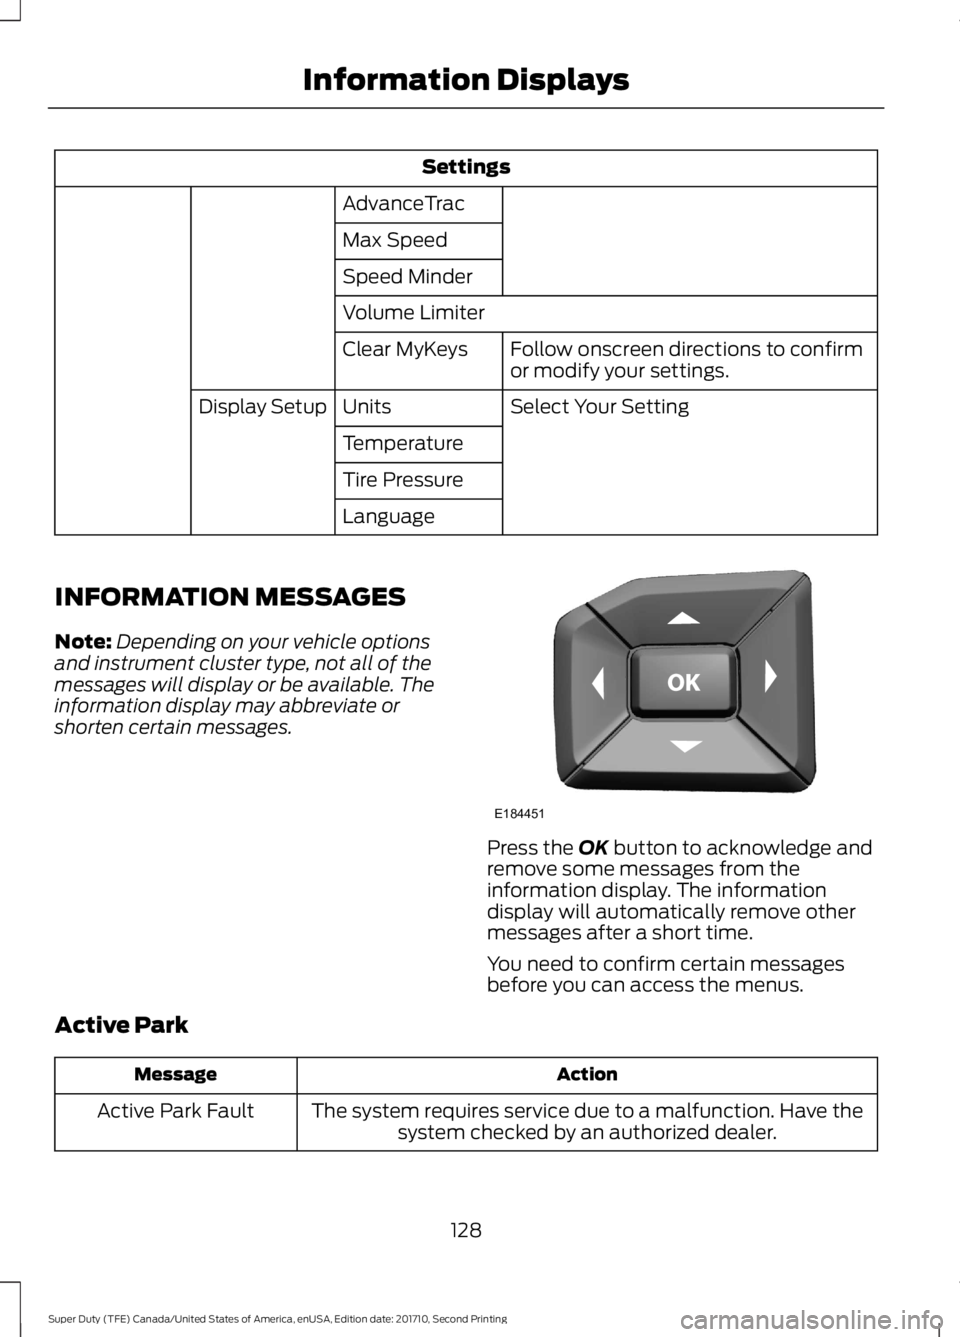
Settings
AdvanceTrac
Max Speed
Speed Minder
Volume Limiter
Follow onscreen directions to confirmor modify your settings.Clear MyKeys
Select Your SettingUnitsDisplay Setup
Temperature
Tire Pressure
Language
INFORMATION MESSAGES
Note:Depending on your vehicle optionsand instrument cluster type, not all of themessages will display or be available. Theinformation display may abbreviate orshorten certain messages.
Press the OK button to acknowledge andremove some messages from theinformation display. The informationdisplay will automatically remove othermessages after a short time.
You need to confirm certain messagesbefore you can access the menus.
Active Park
ActionMessage
The system requires service due to a malfunction. Have thesystem checked by an authorized dealer.Active Park Fault
128
Super Duty (TFE) Canada/United States of America, enUSA, Edition date: 201710, Second Printing
Information DisplaysE184451
Page 213 of 642

USING FOUR-WHEEL DRIVE
Note:For important information regardingthe safe operation of this type of vehicle,see General Information in the Wheels andTires chapter.
Note:Do not use 4H or 4L mode on dry,hard surfaced roads. Doing so can produceexcessive noise, increase tire wear and maydamage drive components. 4X4 mode isonly intended for consistently slippery orloose surfaces. Use of 4L mode on thesesurfaces may produce some noise (such asoccasional clunks), but will not damagedrive components.
Note:If 4X4 low is selected while thevehicle is moving above 3 mph (5 km/h),the 4WD system will not perform a shift.This is normal and should be no reason forconcern. Refer to Shifting to or from 4L (4X4Low) for proper operation.
Note:You can switch on and switch off theelectronic locking differential by pulling the4WD control (4WD vehicles) or turning theelectronic locking differential control (2WDvehicles). See Electronic LockingDifferential (page 219).
Manual Shift On Stop (MSOS)4WD system (If Equipped)
Note:The vehicle should not be driven in4X4 High or 4X4 Low modes with the hublocks set to FREE as this condition maydamage driveline system components.
The 4WD system is engaged or disengagedby rotating the control for both front wheelhub locks from the FREE or LOCK position,then manually engaging or disengaging thetransfer case with the floor-mountedshifter. For increased fuel economy in 2WD,rotate both hub locks to the FREE position.
Electronic Shift-On-the-Fly(ESOF) 4WD system (If Equipped)
Note:If 4X4 Low is selected while thevehicle is moving above 3 mph (5 km/h),the 4WD system will not perform a shift.This is normal and should be no reason forconcern. Refer to Shifting to or from 4L (4X4Low) for proper system operation.
Note:Auto-manual hub locks can bemanually overridden by rotating the hub lockcontrol from AUTO to LOCK.
210
Super Duty (TFE) Canada/United States of America, enUSA, Edition date: 201710, Second Printing
Four-Wheel Drive (If Equipped)LOC K
EERF
E163187 LOC K
OTUA
E163188
Page 218 of 642
Basic Operating Principles
•Drive slower in strong crosswinds whichcan affect the normal steeringcharacteristics of your vehicle.
•When driving your vehicle on surfacesmade slippery by loose sand, water,gravel, snow or ice proceed with care.
•Do not use 4H or 4L on dry, hardsurfaced roads. Doing so will produceexcessive noise, increase tire wear andmay damage drive components. 4H or4L modes are only intended forconsistently slippery or loose surfaces.
If Your Vehicle leaves the Road
If your vehicle leaves the road, reduce yourvehicle speed and avoid severe braking.When your vehicle speed has been reducedease your vehicle back onto the road. Donot turn the steering wheel sharply whilereturning your vehicle to the road.
It may be safer to stay on the shoulder ofthe road and slow down gradually beforereturning to the road. You may lose controlif you do not slow down or if you turn thesteering wheel too sharply or abruptly.
It may be less risky to strike small objects,such as freeway reflectors, with minordamage to your vehicle rather thanattempt a sudden return to the road whichcould cause your vehicle to slide sidewaysout of control or roll over. Remember, yoursafety and the safety of others should beyour primary concern.
Emergency Maneuvers
In an unavoidable emergency situationwhere a sudden sharp turn must be made,remember to avoid over-driving yourvehicle (i.e. turn the steering wheel only asrapidly and as far as required to avoid theemergency). Excessive steering can resultin loss of vehicle control. Apply smoothpressure to the accelerator pedal or brakepedal when changes in vehicle speed are
required. Avoid abrupt steering,acceleration and braking. This could resultin an increased risk of vehicle roll over, lossof vehicle control and personal injury. Useall available road surface to bring yourvehicle to a safe direction of travel.
In the event of an emergency stop, avoidskidding the tires and do not attempt anysharp steering wheel movements.
If your vehicle goes from one type ofsurface to another (i.e. from concrete togravel) there will be a change in the wayyour vehicle responds to a maneuver (i.e.steering, acceleration or braking).
Sand
When driving over sand, try to keep all fourwheels on the most solid area of the trail.Avoid reducing the tire pressures but shiftto a lower gear and drive steadily throughthe terrain. Apply the accelerator slowlyand avoid excessive wheel slip.
When driving at slow speeds in deep sandunder high outside temperatures, use a lowgear when possible. Low gear operationwill maximize the engine and transmissioncooling capability.
Avoid driving at excessive speeds, thiscauses vehicle momentum to work againstyou and your vehicle could become stuckto the point that assistance may berequired from another vehicle. Remember,you may be able to back out the way youcame if you proceed with caution.
Mud and Water
Mud
Be cautious of sudden changes in vehiclespeed or direction when you are driving inmud. Even four-wheel drive vehicles canlose traction in slick mud. If your vehicledoes slide, steer in the direction of the slideuntil you regain control of your vehicle.
215
Super Duty (TFE) Canada/United States of America, enUSA, Edition date: 201710, Second Printing
Four-Wheel Drive (If Equipped)
Page 273 of 642
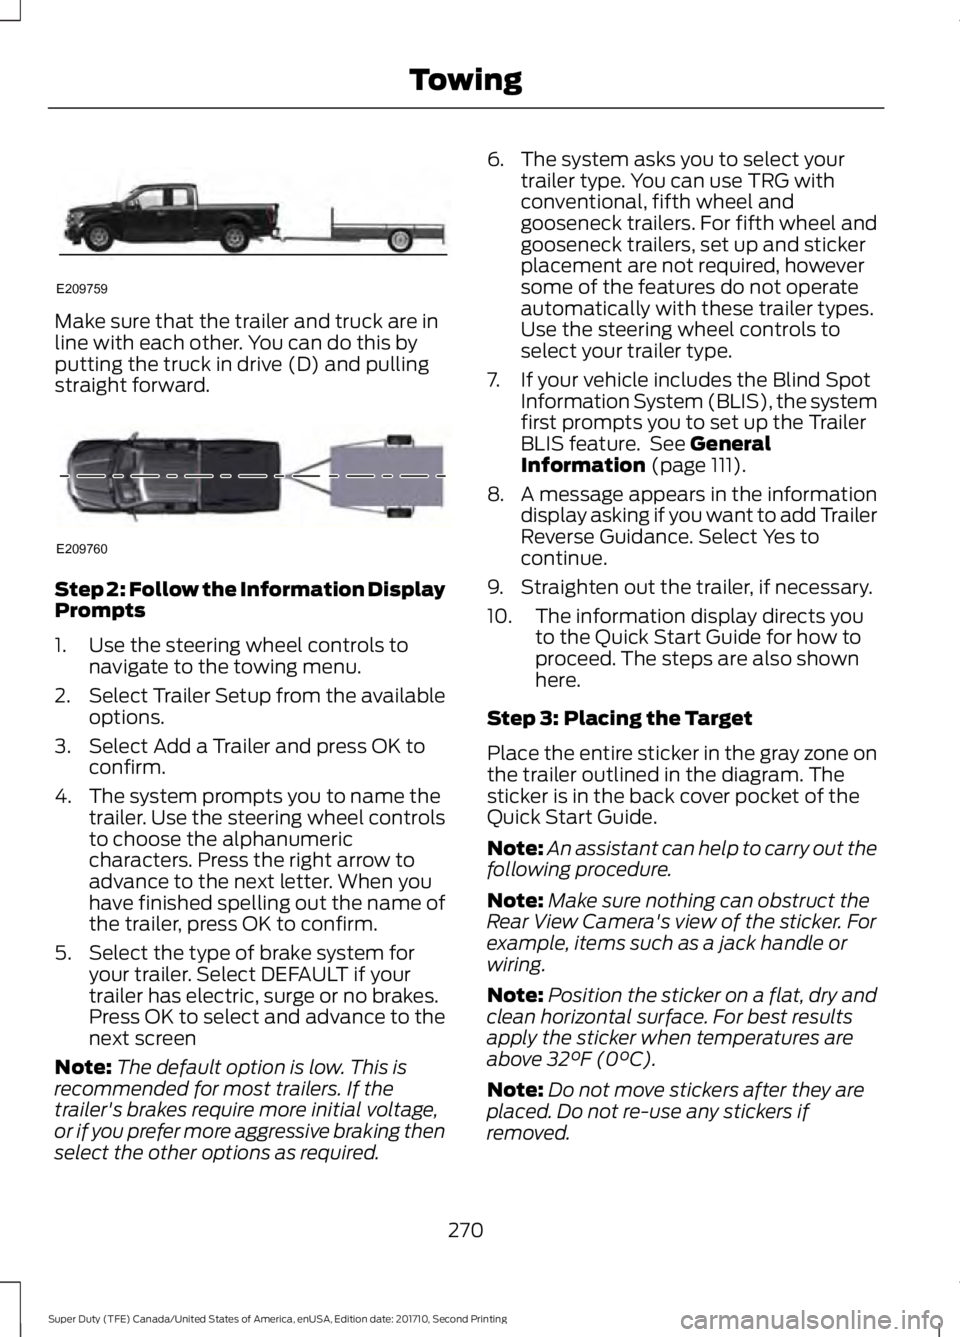
Make sure that the trailer and truck are inline with each other. You can do this byputting the truck in drive (D) and pullingstraight forward.
Step 2: Follow the Information DisplayPrompts
1. Use the steering wheel controls tonavigate to the towing menu.
2.Select Trailer Setup from the availableoptions.
3. Select Add a Trailer and press OK toconfirm.
4. The system prompts you to name thetrailer. Use the steering wheel controlsto choose the alphanumericcharacters. Press the right arrow toadvance to the next letter. When youhave finished spelling out the name ofthe trailer, press OK to confirm.
5. Select the type of brake system foryour trailer. Select DEFAULT if yourtrailer has electric, surge or no brakes.Press OK to select and advance to thenext screen
Note:The default option is low. This isrecommended for most trailers. If thetrailer's brakes require more initial voltage,or if you prefer more aggressive braking thenselect the other options as required.
6. The system asks you to select yourtrailer type. You can use TRG withconventional, fifth wheel andgooseneck trailers. For fifth wheel andgooseneck trailers, set up and stickerplacement are not required, howeversome of the features do not operateautomatically with these trailer types.Use the steering wheel controls toselect your trailer type.
7. If your vehicle includes the Blind SpotInformation System (BLIS), the systemfirst prompts you to set up the TrailerBLIS feature. See GeneralInformation (page 111).
8. A message appears in the informationdisplay asking if you want to add TrailerReverse Guidance. Select Yes tocontinue.
9. Straighten out the trailer, if necessary.
10. The information display directs youto the Quick Start Guide for how toproceed. The steps are also shownhere.
Step 3: Placing the Target
Place the entire sticker in the gray zone onthe trailer outlined in the diagram. Thesticker is in the back cover pocket of theQuick Start Guide.
Note:An assistant can help to carry out thefollowing procedure.
Note:Make sure nothing can obstruct theRear View Camera's view of the sticker. Forexample, items such as a jack handle orwiring.
Note:Position the sticker on a flat, dry andclean horizontal surface. For best resultsapply the sticker when temperatures areabove 32°F (0°C).
Note:Do not move stickers after they areplaced. Do not re-use any stickers ifremoved.
270
Super Duty (TFE) Canada/United States of America, enUSA, Edition date: 201710, Second Printing
TowingE209759 E209760