2017 FORD F450 SUPER DUTY tire type
[x] Cancel search: tire typePage 388 of 642
Note:Do not reduce tire pressureto change the ride characteristicsof the vehicle. If you do notmaintain the inflation pressure atthe levels specified by Ford, yourvehicle may experience a conditionknown as shimmy. Shimmy is asevere vibration and oscillation inthe steering wheel after the vehicletravels over a bump or dip in theroad that does not dampen out byitself. Shimmy may result fromsignificant under-inflation of thetires, improper tires (load range,size, or type), or vehiclemodifications such as lift-kits. Inthe event that your vehicleexperiences shimmy, you shouldslowly reduce speed by either liftingoff the accelerator pedal or lightlyapplying the brakes. The shimmywill cease as the vehicle speeddecreases.
Maximum Inflation Pressure isthe tire manufacturer's maximumpermissible pressure and thepressure at which the maximumload can be carried by the tire. Thispressure is normally higher thanthe manufacturer’s recommendedcold inflation pressure which canbe found on the SafetyCompliance Certification Label(affixed to either the door hingepillar, door-latch post, or the dooredge that meets the door-latchpost, next to the driver's seatingposition), or Tire Label located on
the B-pillar or the edge of thedriver's door. The cold inflationpressure should never be set lowerthan the recommended pressureon the Safety ComplianceCertification Label or Tire Label.
When weather temperaturechanges occur, tire inflationpressures also change. A 10°F(6°C) temperature drop cancause a corresponding drop of 1psi (7 kPa) in inflation pressure.Check your tire pressuresfrequently and adjust them to theproper pressure which can befound on the Safety ComplianceCertification Label or Tire Label.
To check the pressure in yourtire(s):
1. Make sure the tires are cool,meaning they are not hot fromdriving even a mile.
Note:If you are checking tirepressure when the tire is hot, (forexample, driven more than 1 mile[1.6 kilometers]), never bleed orreduce air pressure. The tires arehot from driving and it is normal forpressures to increase aboverecommended cold pressures. Ahot tire at or below recommendedcold inflation pressure could besignificantly under-inflated.
385
Super Duty (TFE) Canada/United States of America, enUSA, Edition date: 201710, Second Printing
Wheels and Tires
Page 389 of 642
Note:If you have to drive adistance to get air for your tire(s),check and record the tire pressurefirst and add the appropriate airpressure when you get to thepump. It is normal for tires to heatup and the air pressure inside to goup as you drive.
2. Remove the cap from the valveon one tire, then firmly press thetire gauge onto the valve andmeasure the pressure.
3. Add enough air to reach therecommended air pressure.
Note:If you overfill the tire, releaseair by pressing on the metal stemin the center of the valve. Thenrecheck the pressure with your tiregauge.
4. Replace the valve cap.
5. Repeat this procedure for eachtire, including the spare.
Note:Some spare tires operate ata higher inflation pressure than theother tires. For T type mini-sparetires, (see the Dissimilar sparewheel and tire assemblyinformation for a description. Storeand maintain at 60 psi (4.15 bar).For full-size and dissimilar sparetires, see the Dissimilar spare wheeland tire assembly information fora description. Store and maintainat the higher of the front and rearinflation pressure as shown on theSafety Compliance CertificationLabel or Tire Label.
6. Visually inspect the tires tomake sure there are no nails orother objects embedded thatcould poke a hole in the tire andcause an air leak.
7. Check the sidewalls to makesure there are no gouges, cuts orbulges.
Tire Inflation Information
WARNING
An inflated tire and rim canbe very dangerous ifimproperly used, serviced ormaintained. To reduce the risk ofserious injury, never attempt tore-inflate a tire which has been runflat or seriously under-inflatedwithout first removing the tire
from the wheel assembly forinspection. Do not attempt to addair to tires or replace tires orwheels without first takingprecautions to protect personsand property.
All tires with Steel Carcass Plies(if equipped):
This type of tire utilizes steel cordsin the sidewalls. As such, theycannot be treated like normal lighttruck tires. Tire service, includingadjusting tire pressure, must beperformed by personnel trained,supervised and equippedaccording to Federal OccupationalSafety and Health Administrationregulations. For example, during
386
Super Duty (TFE) Canada/United States of America, enUSA, Edition date: 201710, Second Printing
Wheels and Tires
Page 392 of 642
WARNINGS
You should replace yourspare tire when you replacethe road tires or after six years dueto aging even if it has not beenused.
U.S. DOT Tire IdentificationNumber
Both United States and CanadaFederal regulations require tiremanufacturers to placestandardized information on thesidewall of all tires. Thisinformation identifies anddescribes the fundamentalcharacteristics of the tire and alsoprovides a U.S. DOT TireIdentification Number for safetystandard certification and in caseof a recall.
This begins with the letters DOTand indicates that the tire meetsall federal standards. The nexttwo numbers or letters are theplant code designating where itwas manufactured, the next twoare the tire size code and the lastfour numbers represent the weekand year the tire was built. Forexample, the numbers 317 meanthe 31st week of 1997. After 2000the numbers go to four digits. Forexample, 2501 means the 25th
week of 2001. The numbers inbetween are identification codesused for traceability. Thisinformation is used to contactcustomers if a tire defect requiresa recall.
Tire ReplacementRequirements
Your vehicle is equipped with tiresdesigned to provide a safe rideand handling capability.
WARNINGS
Only use replacement tiresand wheels that are the samesize, load index, speed rating andtype (such as P-metric versusLT-metric or all-season versusall-terrain) as those originallyprovided by Ford. The
recommended tire and wheel sizemay be found on either the SafetyCompliance Certification Label(affixed to either the door hingepillar, door-latch post, or the dooredge that meets the door-latchpost, next to the driver’s seatingposition), or the Tire Label whichis located on the B-Pillar or edgeof the driver’s door. If thisinformation is not found on theselabels, then you should contactyour authorized dealer as soon aspossible. Use of any tire or wheelnot recommended by Ford canaffect the safety and performanceof your vehicle, which could resultin an increased risk of loss ofvehicle control, vehicle rollover,personal injury and death.
389
Super Duty (TFE) Canada/United States of America, enUSA, Edition date: 201710, Second Printing
Wheels and Tires
Page 405 of 642
The trailer tire pressure monitoring systemcan be reset through the menu in theinformation display. See GeneralInformation (page 111). Performing thetrailer setup process also resets the trailertire pressure monitoring system.
CHANGING A ROAD WHEEL
WARNINGS
The use of tire sealant may damageyour tire pressure monitoring systemand should only be used in roadsideemergencies. If you must use a sealant, theFord Tire Mobility Kit sealant should beused. The tire pressure monitoring systemsensor and valve stem on the wheel mustbe replaced by an authorized dealer afteruse of the sealant.
If the tire pressure monitor sensorbecomes damaged, it will no longerfunction. See Tire PressureMonitoring System (page 394).
Note:If your vehicle is equipped with thetire pressure monitoring system, theindicator light will illuminate when the sparetire is in use. To restore the full function ofthe monitoring system, all road wheelsequipped with tire pressure monitoringsensors must be mounted on the vehicle.
If you get a flat tire while driving, do notapply the brake heavily. Instead, graduallydecrease your speed. Hold the steeringwheel firmly and slowly move to a safeplace on the side of the road.
If your vehicle is equipped with the tirepressure monitoring system, have a flatserviced by an authorized dealer in orderto prevent damage to the system sensors.See Tire Pressure Monitoring System(page 394). Replace the spare tire with aroad tire as soon as possible. Duringrepairing or replacing of the flat tire, havethe authorized dealer inspect the systemsensor for damage.
Dissimilar Spare Wheel and TireAssembly Information
WARNING
Failure to follow these guidelinescould result in an increased risk ofloss of vehicle control, injury or death.
If you have a dissimilar spare wheel andtire, then it is intended for temporary useonly. This means that if you need to use it,you should replace it as soon as possiblewith a road wheel and tire assembly thatis the same size and type as the road tiresand wheels that were originally providedby Ford. If the dissimilar spare tire or wheelis damaged, it should be replaced ratherthan repaired.
A dissimilar spare wheel and tire assemblyis defined as a spare wheel and tireassembly that is different in brand, size orappearance from the road tires and wheelsand can be one of three types:
1.T-type mini-spare: This spare tirebegins with the letter T for tire size andmay have Temporary Use Only molded inthe sidewall.
2.Full-size dissimilar spare with labelon wheel: This spare tire has a label onthe wheel that states: THIS WHEEL ANDTIRE ASSEMBLY FOR TEMPORARY USEONLY
When driving with one of the dissimilarspare tires listed above, do not:
402
Super Duty (TFE) Canada/United States of America, enUSA, Edition date: 201710, Second Printing
Wheels and Tires
Page 534 of 642
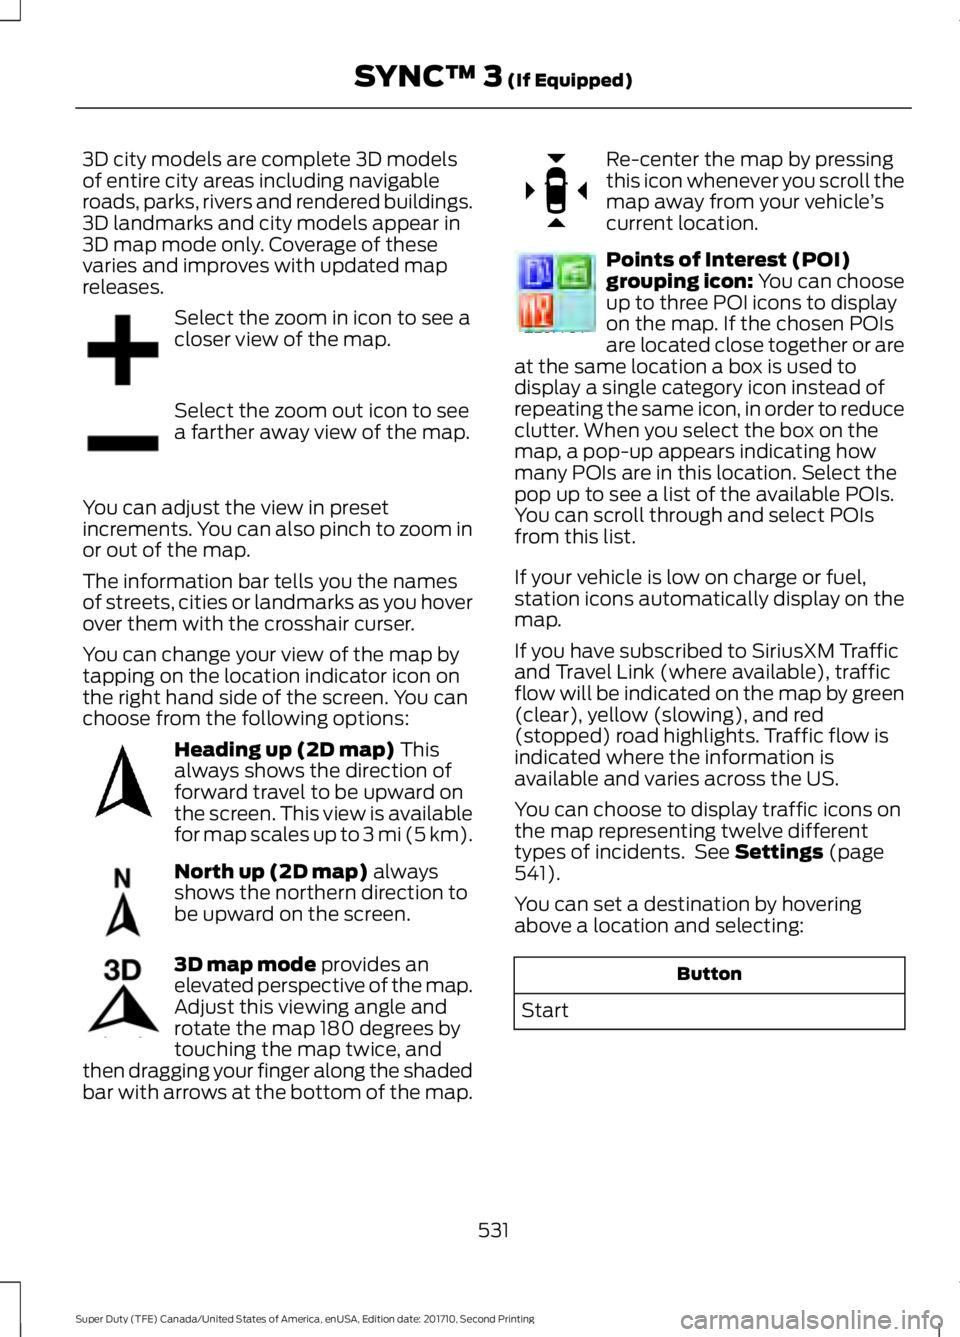
3D city models are complete 3D modelsof entire city areas including navigableroads, parks, rivers and rendered buildings.3D landmarks and city models appear in3D map mode only. Coverage of thesevaries and improves with updated mapreleases.
Select the zoom in icon to see acloser view of the map.
Select the zoom out icon to seea farther away view of the map.
You can adjust the view in presetincrements. You can also pinch to zoom inor out of the map.
The information bar tells you the namesof streets, cities or landmarks as you hoverover them with the crosshair curser.
You can change your view of the map bytapping on the location indicator icon onthe right hand side of the screen. You canchoose from the following options:
Heading up (2D map) Thisalways shows the direction offorward travel to be upward onthe screen. This view is availablefor map scales up to 3 mi (5 km).
North up (2D map) alwaysshows the northern direction tobe upward on the screen.
3D map mode provides anelevated perspective of the map.Adjust this viewing angle androtate the map 180 degrees bytouching the map twice, andthen dragging your finger along the shadedbar with arrows at the bottom of the map.
Re-center the map by pressingthis icon whenever you scroll themap away from your vehicle’scurrent location.
Points of Interest (POI)grouping icon: You can chooseup to three POI icons to displayon the map. If the chosen POIsare located close together or areat the same location a box is used todisplay a single category icon instead ofrepeating the same icon, in order to reduceclutter. When you select the box on themap, a pop-up appears indicating howmany POIs are in this location. Select thepop up to see a list of the available POIs.You can scroll through and select POIsfrom this list.
If your vehicle is low on charge or fuel,station icons automatically display on themap.
If you have subscribed to SiriusXM Trafficand Travel Link (where available), trafficflow will be indicated on the map by green(clear), yellow (slowing), and red(stopped) road highlights. Traffic flow isindicated where the information isavailable and varies across the US.
You can choose to display traffic icons onthe map representing twelve differenttypes of incidents. See Settings (page541).
You can set a destination by hoveringabove a location and selecting:
Button
Start
531
Super Duty (TFE) Canada/United States of America, enUSA, Edition date: 201710, Second Printing
SYNC™ 3 (If Equipped)E207752 E207753 E207750 E207749 E207748 E207751 E207754
Page 631 of 642
Automatic Transmission FluidCheck............................................................340Checking Automatic TransmissionFluid...................................................................340Autowipers.......................................................84Auxiliary Power Points...............................168110 Volt - 400 Watt Capacity AC PowerOutlet.................................................................16812 Volt DC Power Point.....................................168Locations...............................................................168Auxiliary Switches.......................................567For more information on the UpfitterInterface Module and the auxiliaryswitches, visit:................................................570Upfitter Interface Module...............................570
B
BatterySee: Changing the 12V Battery.....................346Bed Extender....................................................72Grocery mode........................................................73Tailgate mode........................................................72Bed Ramps....................................................265Installing the Ramp Holder............................267Stowing the Bed Ramp...................................266Using the Bed Ramp........................................265Blind Spot Information System.............249Blind Spot Information System with TrailerTow......................................................................251Switching the System Off and On...............253System Errors......................................................253Using the System..............................................250Bonnet LockSee: Opening and Closing the Hood...........322Booster Seats..................................................30Types of Booster Seats......................................30Brake Fluid Check........................................343Brakes................................................................221General Information...........................................221Breaking-In.....................................................292Bulb Specification Chart...........................353
C
Cabin Air Filter.................................................151California Proposition 65.............................12
Capacities and Specifications -6.2L.................................................................422Alternative Engine Oil for Extremely ColdClimates...........................................................426Specifications.....................................................423Capacities and Specifications - 6.7LDiesel.............................................................427Engine Oil Specifications................................433Specifications.....................................................429Capacities and Specifications -6.8L................................................................434Alternative Engine Oil for Extremely ColdClimates...........................................................439Specifications.....................................................435Capacities and Specifications.................415Car WashSee: Cleaning the Exterior..............................365Center Console..............................................170Changing a Bulb..........................................350Cargo Lamp and Central High MountedBrake Lamp Bulbs........................................353Fog Lamp Bulbs..................................................351Front Park and Direction Indicator LampBulbs.................................................................350Headlamp Bulbs.................................................351License Plate Lamp Bulb................................353Rear Lamps, Brake Lamps, Rear DirectionIndicator and Reversing LampBulbs..................................................................352Changing a Fuse..........................................320Fuses......................................................................320Changing a Road Wheel...........................402Dissimilar Spare Wheel and Tire AssemblyInformation.....................................................402Location of the Spare Tire and Tools........403Removing the Spare Tire (With Spare TireCarrier Only)...................................................404Tire Change Procedure...................................405Changing the 12V Battery.........................346Battery Management System......................348Changing the Coalescer FilterElement........................................................330Changing the Engine Air Filter - 6.2L/6.8L................................................................356Changing the Engine Air Filter - 6.7LDiesel.............................................................357Air Filter Restriction Gauge............................358
628
Super Duty (TFE) Canada/United States of America, enUSA, Edition date: 201710, Second Printing
Index