2017 FORD F450 SUPER DUTY buttons
[x] Cancel search: buttonsPage 288 of 642
Integrated Trailer Brake Controller
(If Equipped)
WARNINGS
The anti-lock brake system does notcontrol the trailer brakes.
Use the integrated trailer brakecontroller to properly adjust thetrailer brakes and check allconnections before towing a trailer. Failureto follow this instruction could result in theloss of control of your vehicle, personalinjury or death.
Note:The integrated Ford brake controlleris compatible with trailers equipped withelectric-actuated drum brakes andelectric-over hydraulic brake systems.
Note:The integrated Ford brake controllerdoes not control hydraulic surge-stylebrakes.
When used properly, the trailer brakecontroller assists in smooth and effectivetrailer braking by powering the trailer’selectric or electric-over-hydraulic brakeswith a proportional output based on thetowing vehicle’s brake pressure.
You can adjust the amount of initial trailerbrake output by selecting one of threesettings through the message center.
Ford has tested the trailer brake controllerto be compatible with several majorbrands of electric-over-hydraulic trailerbrakes. Contact an authorized dealer forinformation on which brands you can use.
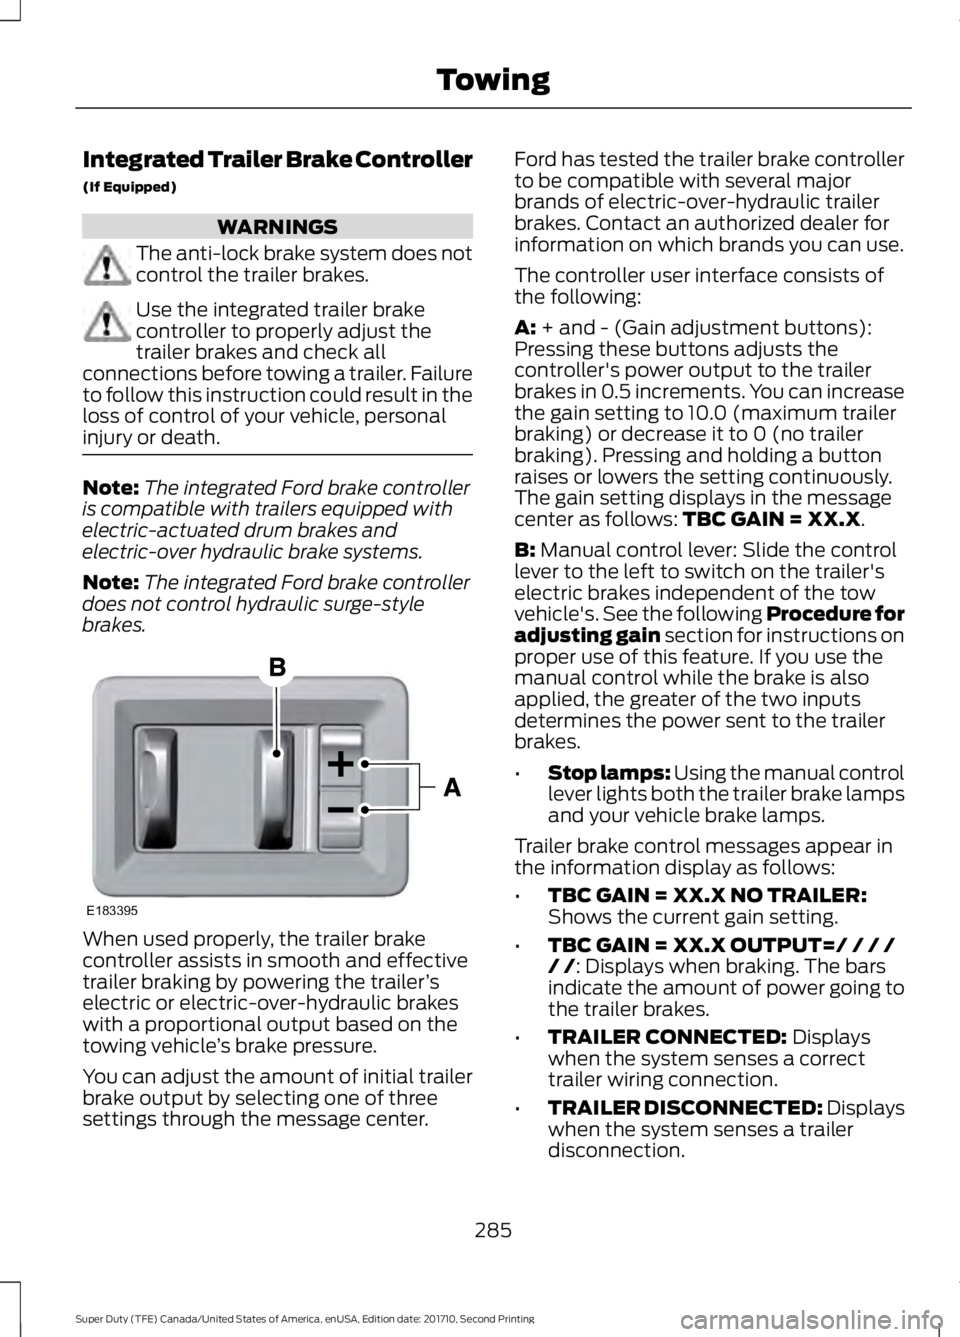
The controller user interface consists ofthe following:
A: + and - (Gain adjustment buttons):Pressing these buttons adjusts thecontroller's power output to the trailerbrakes in 0.5 increments. You can increasethe gain setting to 10.0 (maximum trailerbraking) or decrease it to 0 (no trailerbraking). Pressing and holding a buttonraises or lowers the setting continuously.The gain setting displays in the messagecenter as follows: TBC GAIN = XX.X.
B: Manual control lever: Slide the controllever to the left to switch on the trailer'selectric brakes independent of the towvehicle's. See the following Procedure foradjusting gain section for instructions onproper use of this feature. If you use themanual control while the brake is alsoapplied, the greater of the two inputsdetermines the power sent to the trailerbrakes.
•Stop lamps: Using the manual controllever lights both the trailer brake lampsand your vehicle brake lamps.
Trailer brake control messages appear inthe information display as follows:
•TBC GAIN = XX.X NO TRAILER:Shows the current gain setting.
•TBC GAIN = XX.X OUTPUT=/ / / // /: Displays when braking. The barsindicate the amount of power going tothe trailer brakes.
•TRAILER CONNECTED: Displayswhen the system senses a correcttrailer wiring connection.
•TRAILER DISCONNECTED: Displayswhen the system senses a trailerdisconnection.
285
Super Duty (TFE) Canada/United States of America, enUSA, Edition date: 201710, Second Printing
TowingE183395
Page 289 of 642
Procedure for Setting Trailer BrakeController Effort
Choose either the electric option for trailerswith electromagnetic drum brakes, or theelectric over hydraulic option for trailerswith these brake systems.
Trailer Brake Effort Setting
The trailer brake controller allows the userto customize how aggressively the trailerbrakes engage. The default value is the lowsetting and is the recommended settingfor most trailers. If your trailer's brakesrequire more initial voltage, or if you prefermore aggressive trailer braking, then selecteither the medium or the high setting.
Procedure for Setting Trailer BrakeController Mode
Choose the low, medium or high settingfor the required initial trailer brake output.
Procedure for Adjusting Gain
Note:Only perform this procedure in atraffic-free environment at speeds ofapproximately 20-25 mph (30-40 km/h).
The gain setting adjusts the trailer brakecontroller for the specific towing condition.You should change the setting as towingconditions change. Changes to towingconditions include trailer load, vehicle load,road conditions and weather.
The gain should be set to provide themaximum trailer braking assistance whilemaking sure the trailer wheels do not lockwhen using the brakes. Locked trailerwheels may lead to trailer instability.
1.Make sure the trailer brakes are in goodworking condition, functioning normallyand properly adjusted. See your trailerdealer if necessary.
2. Hook up the trailer and make theelectrical connections according to thetrailer manufacturer's instructions.
3. When you plug in a trailer with electricor electric-over-hydraulic brakes, aconfirmation message appears in theinformation display.
4. Use the gain adjustment (+ and -)buttons to increase or decrease thegain setting to the desired startingpoint. A gain setting of 6.0 is a goodstarting point for heavier loads.
5. In a traffic-free environment, tow thetrailer on a dry, level surface at a speedof 20-25 mph (30-40 km/h) andsqueeze the manual control levercompletely.
6. If the trailer wheels lock up, indicatedby squealing tires, reduce the gainsetting. If the trailer wheels turn freely,increase the gain setting. Repeat Steps5 and 6 until the gain setting is at apoint just below trailer wheel lock-up.If towing a heavier trailer, trailer wheellock-up may not be attainable evenwith the maximum gain setting of 10.
Information Display Warning Messages
Note:An authorized dealer can diagnosethe trailer brake controller to determineexactly which trailer fault has occurred.However, your Ford warranty does not coverthis diagnosis if the fault is with the trailer.
TRAILER BRAKE MODULE FAULT
Displays in response to faults sensed bythe trailer brake controller, accompaniedby a single tone. If this message appears,contact an authorized dealer as soon aspossible for diagnosis and repair. Thecontroller may still function, but withdegraded performance.
WIRING FAULT ON TRAILER
Displays when there is a short circuit onthe electric brake output wire.
286
Super Duty (TFE) Canada/United States of America, enUSA, Edition date: 201710, Second Printing
Towing
Page 447 of 642
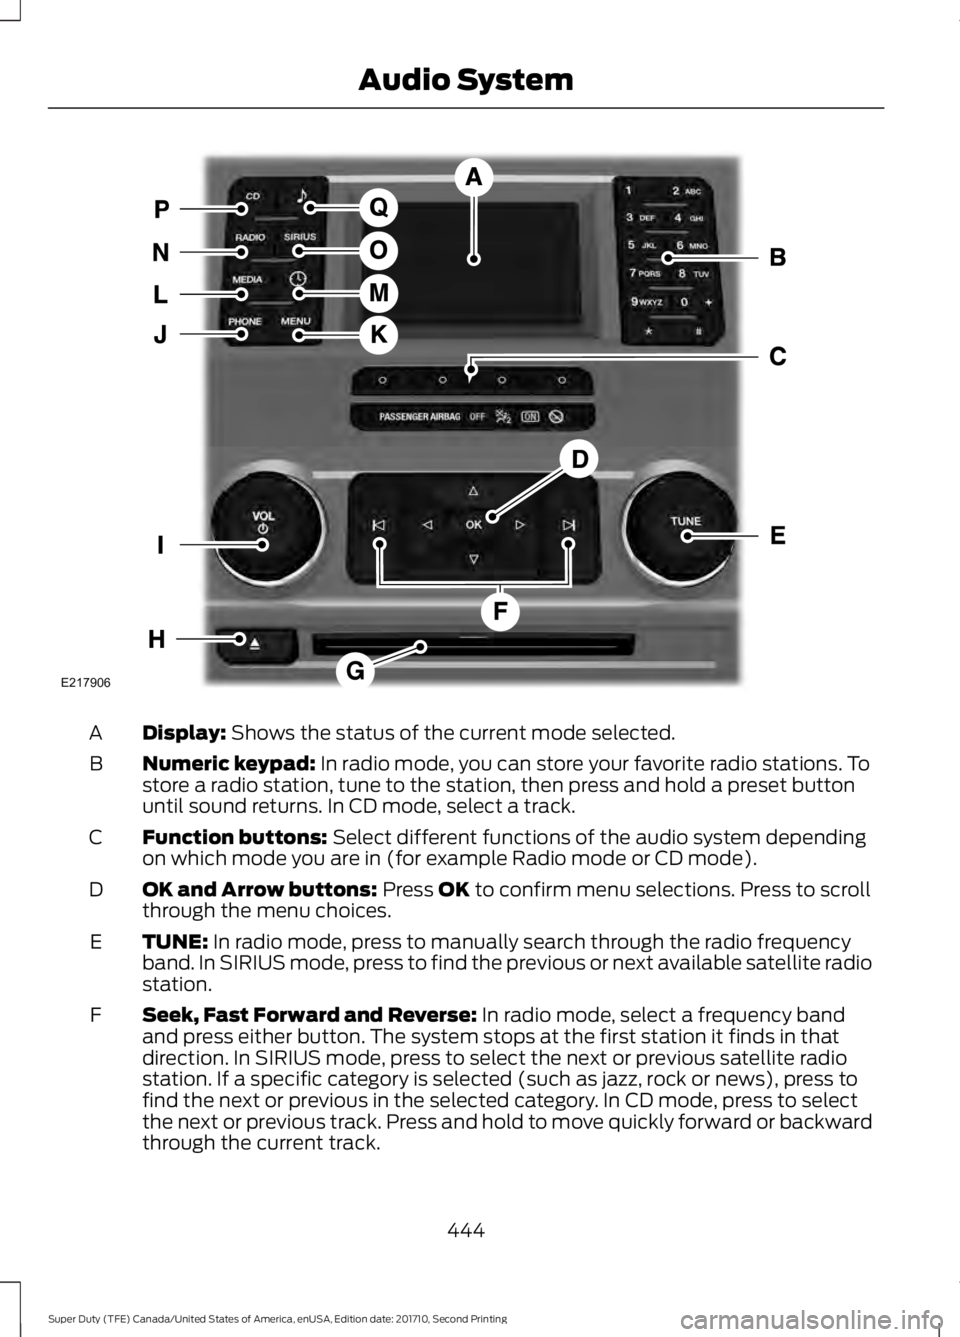
Display: Shows the status of the current mode selected.A
Numeric keypad: In radio mode, you can store your favorite radio stations. Tostore a radio station, tune to the station, then press and hold a preset buttonuntil sound returns. In CD mode, select a track.
B
Function buttons: Select different functions of the audio system dependingon which mode you are in (for example Radio mode or CD mode).C
OK and Arrow buttons: Press OK to confirm menu selections. Press to scrollthrough the menu choices.D
TUNE: In radio mode, press to manually search through the radio frequencyband. In SIRIUS mode, press to find the previous or next available satellite radiostation.
E
Seek, Fast Forward and Reverse: In radio mode, select a frequency bandand press either button. The system stops at the first station it finds in thatdirection. In SIRIUS mode, press to select the next or previous satellite radiostation. If a specific category is selected (such as jazz, rock or news), press tofind the next or previous in the selected category. In CD mode, press to selectthe next or previous track. Press and hold to move quickly forward or backwardthrough the current track.
F
444
Super Duty (TFE) Canada/United States of America, enUSA, Edition date: 201710, Second Printing
Audio SystemE217906
Page 448 of 642
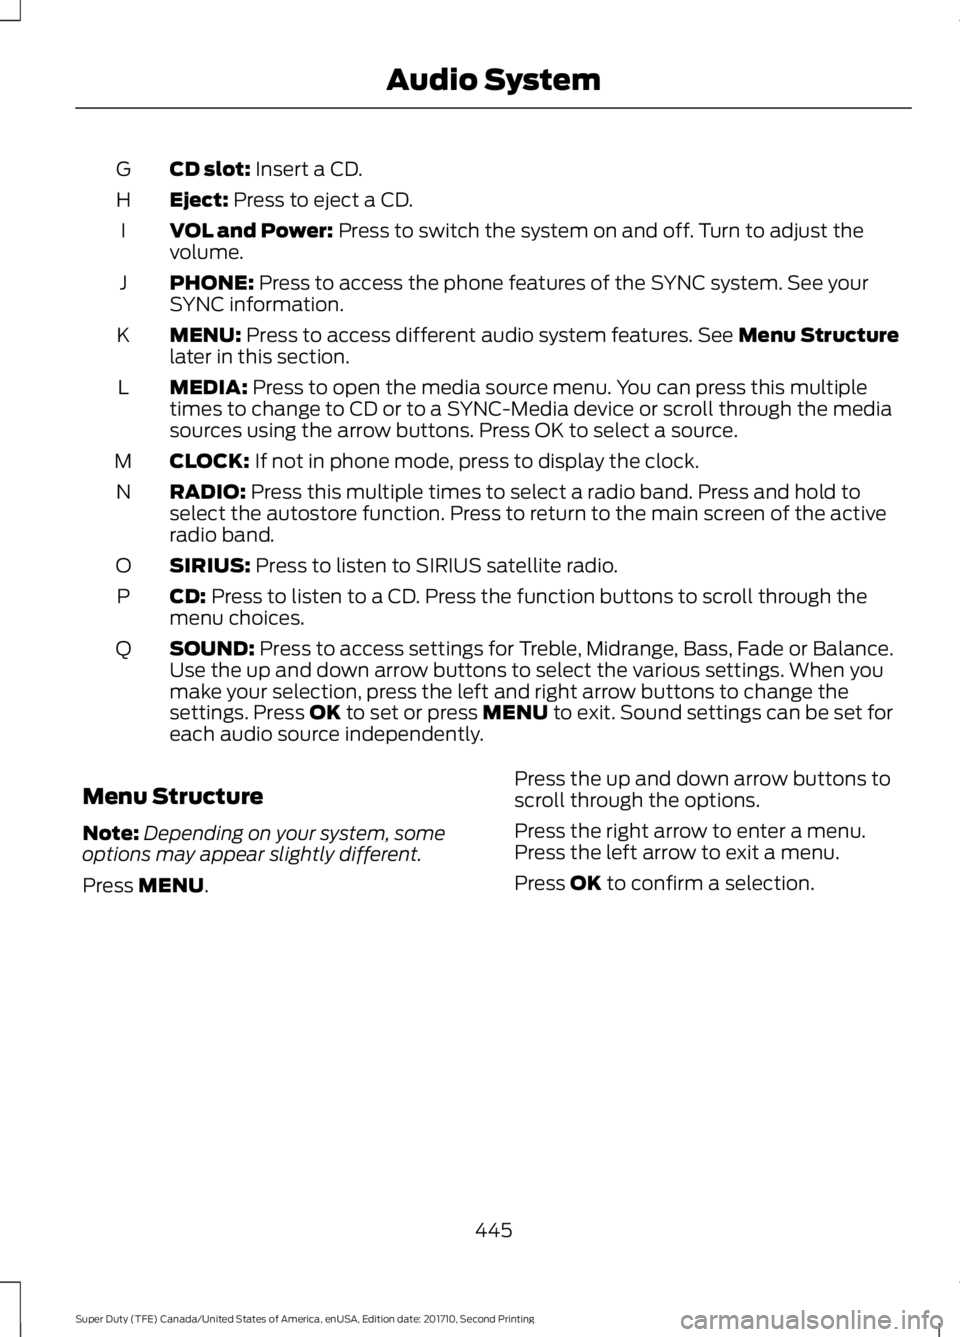
CD slot: Insert a CD.G
Eject: Press to eject a CD.H
VOL and Power: Press to switch the system on and off. Turn to adjust thevolume.I
PHONE: Press to access the phone features of the SYNC system. See yourSYNC information.J
MENU: Press to access different audio system features. See Menu Structurelater in this section.K
MEDIA: Press to open the media source menu. You can press this multipletimes to change to CD or to a SYNC-Media device or scroll through the mediasources using the arrow buttons. Press OK to select a source.
L
CLOCK: If not in phone mode, press to display the clock.M
RADIO: Press this multiple times to select a radio band. Press and hold toselect the autostore function. Press to return to the main screen of the activeradio band.
N
SIRIUS: Press to listen to SIRIUS satellite radio.O
CD: Press to listen to a CD. Press the function buttons to scroll through themenu choices.P
SOUND: Press to access settings for Treble, Midrange, Bass, Fade or Balance.Use the up and down arrow buttons to select the various settings. When youmake your selection, press the left and right arrow buttons to change thesettings. Press OK to set or press MENU to exit. Sound settings can be set foreach audio source independently.
Q
Menu Structure
Note:Depending on your system, someoptions may appear slightly different.
Press MENU.
Press the up and down arrow buttons toscroll through the options.
Press the right arrow to enter a menu.Press the left arrow to exit a menu.
Press OK to confirm a selection.
445
Super Duty (TFE) Canada/United States of America, enUSA, Edition date: 201710, Second Printing
Audio System
Page 451 of 642
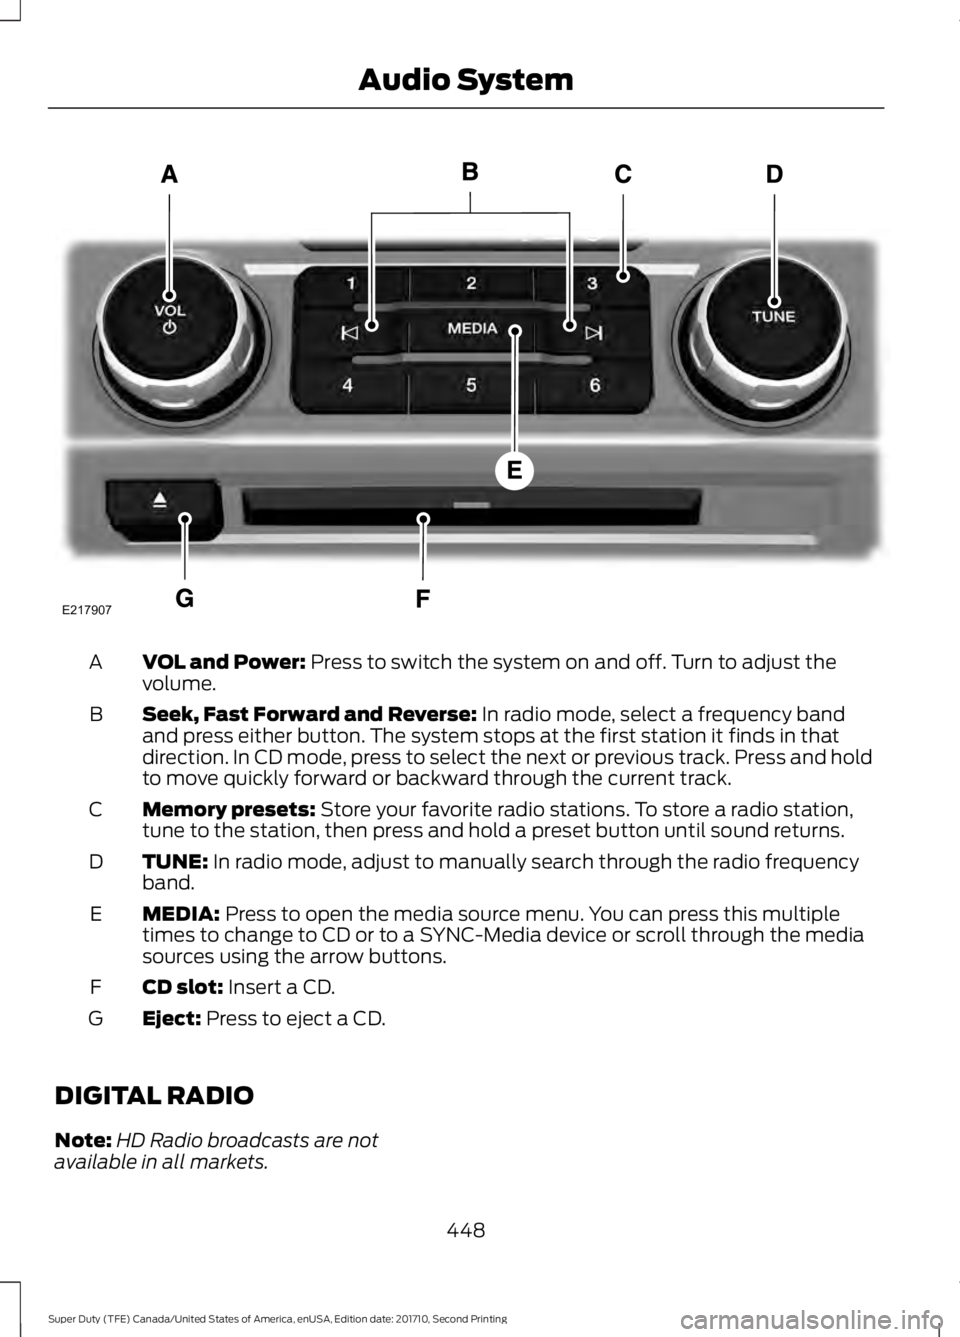
VOL and Power: Press to switch the system on and off. Turn to adjust thevolume.A
Seek, Fast Forward and Reverse: In radio mode, select a frequency bandand press either button. The system stops at the first station it finds in thatdirection. In CD mode, press to select the next or previous track. Press and holdto move quickly forward or backward through the current track.
B
Memory presets: Store your favorite radio stations. To store a radio station,tune to the station, then press and hold a preset button until sound returns.C
TUNE: In radio mode, adjust to manually search through the radio frequencyband.D
MEDIA: Press to open the media source menu. You can press this multipletimes to change to CD or to a SYNC-Media device or scroll through the mediasources using the arrow buttons.
E
CD slot: Insert a CD.F
Eject: Press to eject a CD.G
DIGITAL RADIO
Note:HD Radio broadcasts are notavailable in all markets.
448
Super Duty (TFE) Canada/United States of America, enUSA, Edition date: 201710, Second Printing
Audio SystemE217907
Page 462 of 642
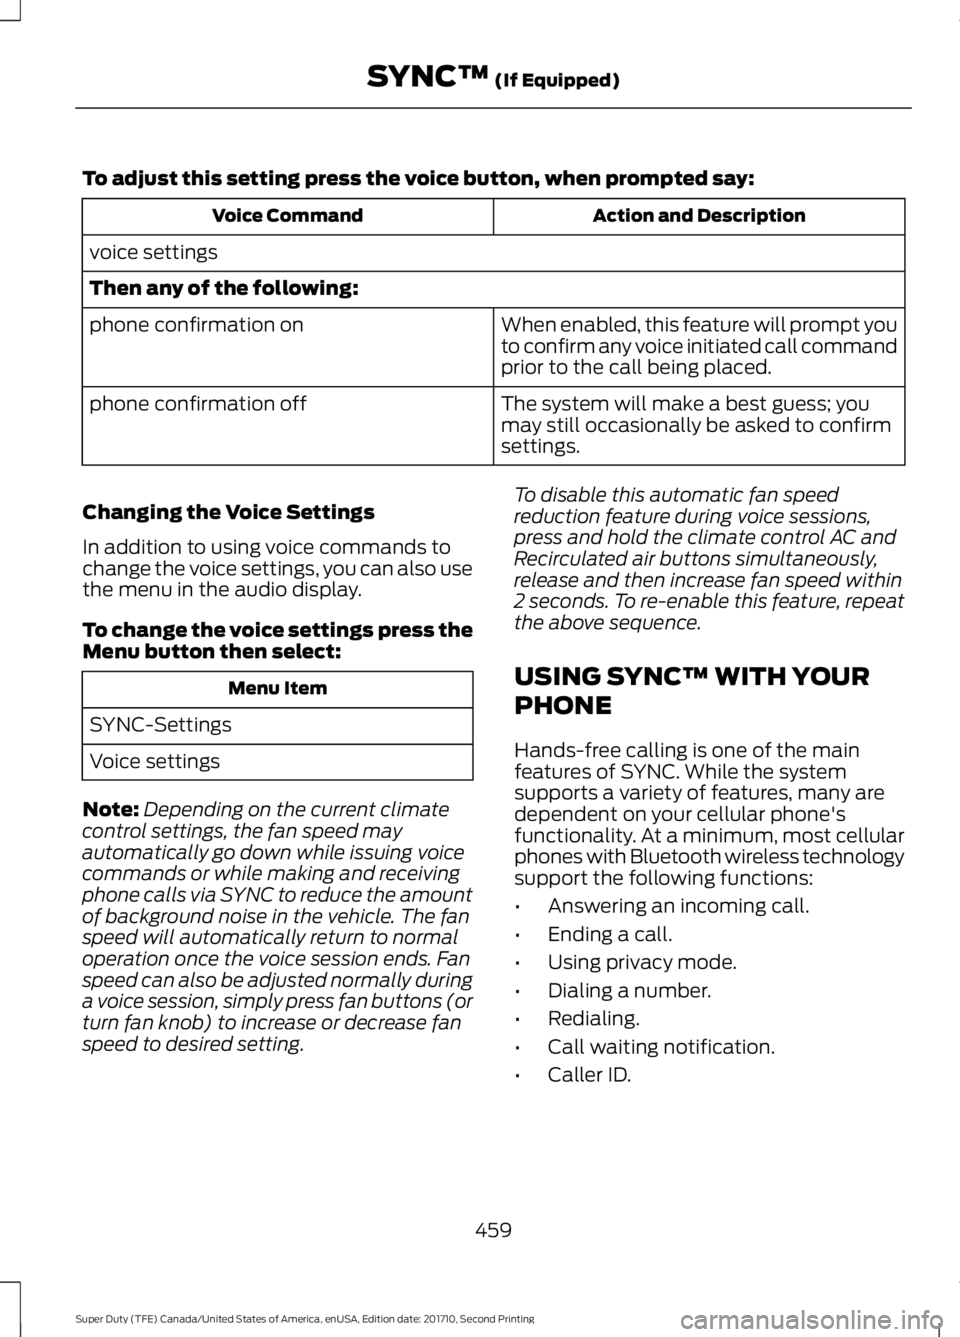
To adjust this setting press the voice button, when prompted say:
Action and DescriptionVoice Command
voice settings
Then any of the following:
When enabled, this feature will prompt youto confirm any voice initiated call commandprior to the call being placed.
phone confirmation on
The system will make a best guess; youmay still occasionally be asked to confirmsettings.
phone confirmation off
Changing the Voice Settings
In addition to using voice commands tochange the voice settings, you can also usethe menu in the audio display.
To change the voice settings press theMenu button then select:
Menu Item
SYNC-Settings
Voice settings
Note:Depending on the current climatecontrol settings, the fan speed mayautomatically go down while issuing voicecommands or while making and receivingphone calls via SYNC to reduce the amountof background noise in the vehicle. The fanspeed will automatically return to normaloperation once the voice session ends. Fanspeed can also be adjusted normally duringa voice session, simply press fan buttons (orturn fan knob) to increase or decrease fanspeed to desired setting.
To disable this automatic fan speedreduction feature during voice sessions,press and hold the climate control AC andRecirculated air buttons simultaneously,release and then increase fan speed within2 seconds. To re-enable this feature, repeatthe above sequence.
USING SYNC™ WITH YOUR
PHONE
Hands-free calling is one of the mainfeatures of SYNC. While the systemsupports a variety of features, many aredependent on your cellular phone'sfunctionality. At a minimum, most cellularphones with Bluetooth wireless technologysupport the following functions:
•Answering an incoming call.
•Ending a call.
•Using privacy mode.
•Dialing a number.
•Redialing.
•Call waiting notification.
•Caller ID.
459
Super Duty (TFE) Canada/United States of America, enUSA, Edition date: 201710, Second Printing
SYNC™ (If Equipped)
Page 470 of 642
Sending a Text Message
Note:You can only send a text message toone recipient at a time.
1. Select the send option when thedesired selection highlights in the audiodisplay.
2. Select the confirmation option whenthe contact appears.
3. Press the OK button again to confirmwhen the system asks if you want tosend the message. A pre-definedsignature appears on each textmessage.
Note:You can send text messages eitherby choosing a contact from the phonebookand selecting the text option from the audiodisplay or by replying to a received messagein the inbox.
Accessing Your Phone Settings
These are phone-dependent features. Yourphone settings allow you to access andadjust features such as your ring tone andtext message notification, modify yourphonebook, and set up automaticdownload.
1. Press the PHONE button.
2. Scroll until the phone settings optionappears, and then press the OK button.
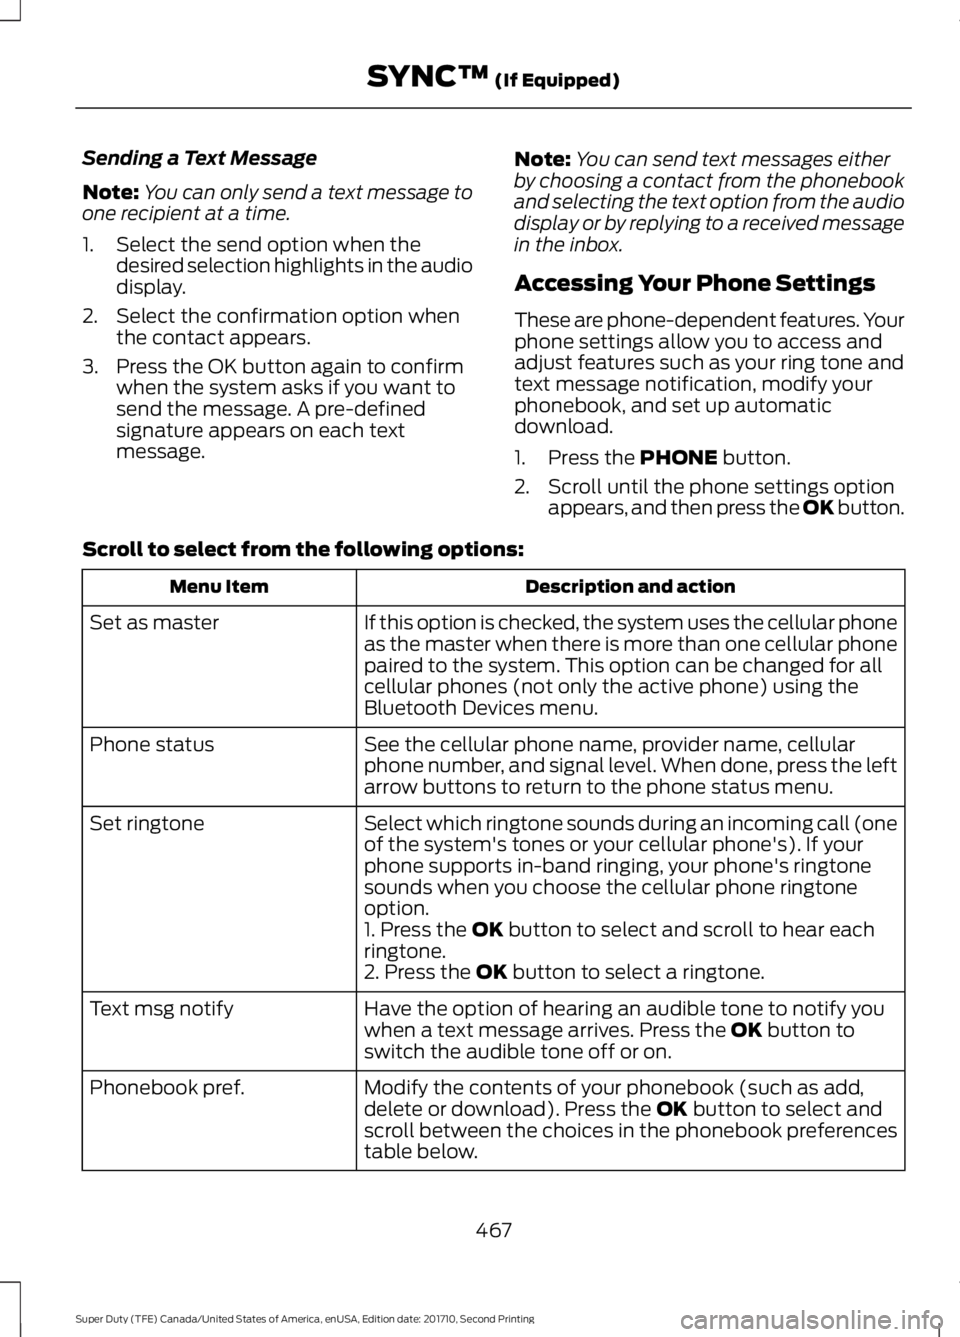
Scroll to select from the following options:
Description and actionMenu Item
If this option is checked, the system uses the cellular phoneas the master when there is more than one cellular phonepaired to the system. This option can be changed for allcellular phones (not only the active phone) using theBluetooth Devices menu.
Set as master
See the cellular phone name, provider name, cellularphone number, and signal level. When done, press the leftarrow buttons to return to the phone status menu.
Phone status
Select which ringtone sounds during an incoming call (oneof the system's tones or your cellular phone's). If yourphone supports in-band ringing, your phone's ringtonesounds when you choose the cellular phone ringtoneoption.
Set ringtone
1. Press the OK button to select and scroll to hear eachringtone.2. Press the OK button to select a ringtone.
Have the option of hearing an audible tone to notify youwhen a text message arrives. Press the OK button toswitch the audible tone off or on.
Text msg notify
Modify the contents of your phonebook (such as add,delete or download). Press the OK button to select andscroll between the choices in the phonebook preferencestable below.
Phonebook pref.
467
Super Duty (TFE) Canada/United States of America, enUSA, Edition date: 201710, Second Printing
SYNC™ (If Equipped)
Page 473 of 642
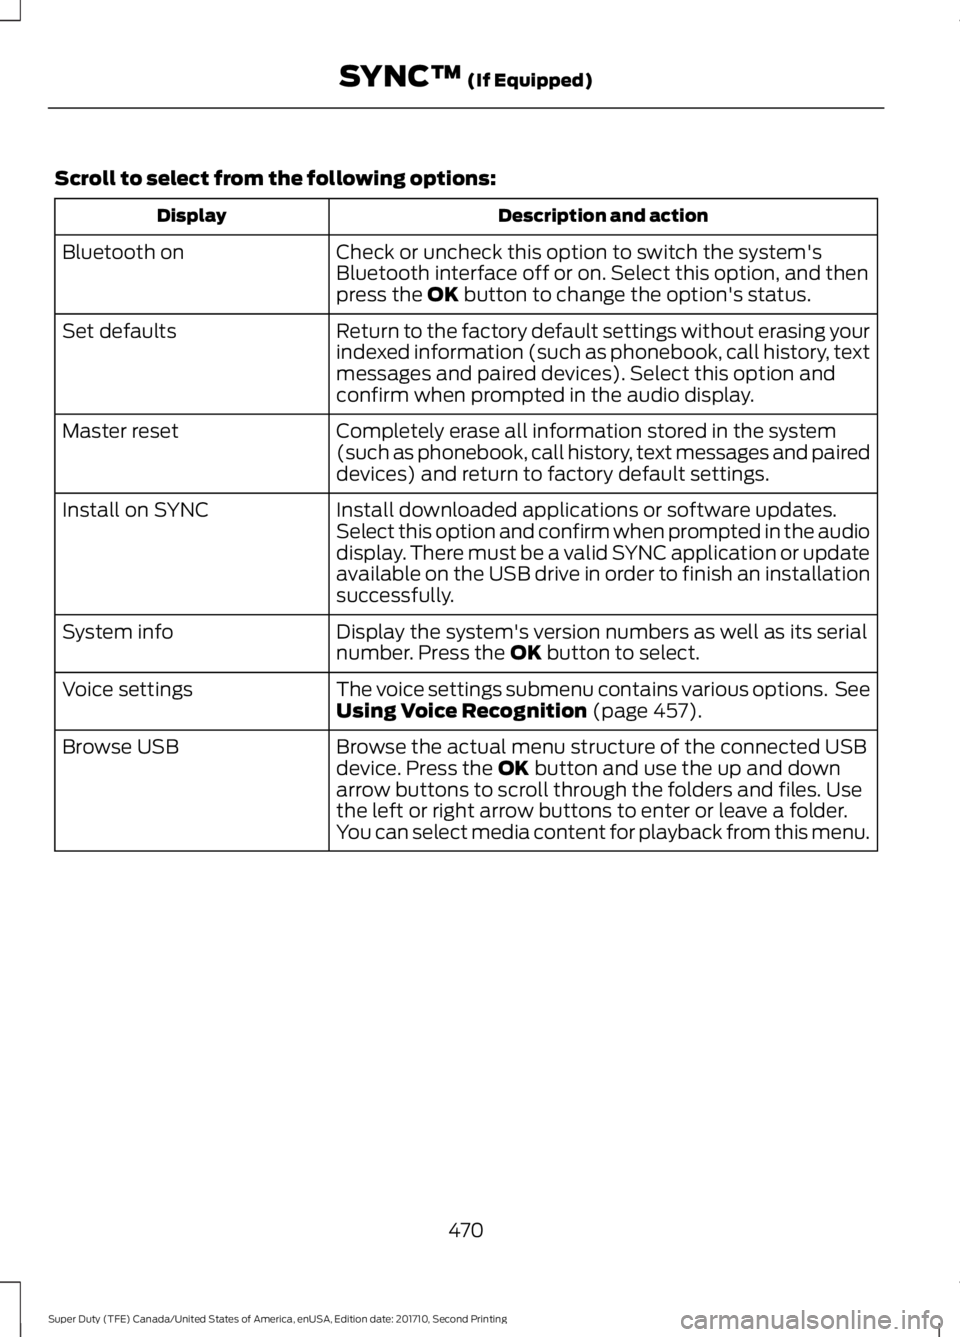
Scroll to select from the following options:
Description and actionDisplay
Check or uncheck this option to switch the system'sBluetooth interface off or on. Select this option, and thenpress the OK button to change the option's status.
Bluetooth on
Return to the factory default settings without erasing yourindexed information (such as phonebook, call history, textmessages and paired devices). Select this option andconfirm when prompted in the audio display.
Set defaults
Completely erase all information stored in the system(such as phonebook, call history, text messages and paireddevices) and return to factory default settings.
Master reset
Install downloaded applications or software updates.Select this option and confirm when prompted in the audiodisplay. There must be a valid SYNC application or updateavailable on the USB drive in order to finish an installationsuccessfully.
Install on SYNC
Display the system's version numbers as well as its serialnumber. Press the OK button to select.System info
The voice settings submenu contains various options. SeeUsing Voice Recognition (page 457).Voice settings
Browse the actual menu structure of the connected USBdevice. Press the OK button and use the up and downarrow buttons to scroll through the folders and files. Usethe left or right arrow buttons to enter or leave a folder.You can select media content for playback from this menu.
Browse USB
470
Super Duty (TFE) Canada/United States of America, enUSA, Edition date: 201710, Second Printing
SYNC™ (If Equipped)