2017 FORD EXPEDITION EL ESP
[x] Cancel search: ESPPage 295 of 500
TIRE PRESSURE MONITORING
SYSTEM
WARNING
The tire pressure monitoring systemis not a substitute for manuallychecking tire pressures. You shouldperiodically check tire pressures using apressure gauge. Failure to correctlymaintain tire pressures could increase therisk of tire failure, loss of control, vehiclerollover and personal injury.
Each tire, including the spare (ifprovided), should be checkedmonthly when cold and inflatedto the inflation pressure recommended bythe vehicle manufacturer on the vehicleplacard or tire inflation pressure label. (Ifyour vehicle has tires of a different sizethan the size indicated on the vehicleplacard or tire inflation pressure label, youshould determine the proper tire inflationpressure for those tires.)
As an added safety feature, your vehiclehas been equipped with a Tire PressureMonitoring System (TPMS) thatilluminates a low tire pressure telltalewhen one or more of your tires issignificantly under-inflated. Accordingly,when the low tire pressure telltaleilluminates, you should stop and checkyour tires as soon as possible, and inflatethem to the proper pressure. Driving on asignificantly under-inflated tire causes thetire to overheat and can lead to tire failure.Under-inflation also reduces fuel efficiencyand tire tread life, and may affect thevehicle’s handling and stopping ability.
Please note that the TPMS is not asubstitute for proper tire maintenance, andit is the driver’s responsibility to maintaincorrect tire pressure, even if under-inflationhas not reached the level to triggerillumination of the TPMS low tire pressuretelltale.
Your vehicle has also been equipped witha TPMS malfunction indicator to indicatewhen the system is not operating properly.The TPMS malfunction indicator iscombined with the low tire pressuretelltale. When the system detects amalfunction, the telltale will flash forapproximately one minute and then remaincontinuously illuminated. This sequencewill continue upon subsequent vehiclestart-ups as long as the malfunction exists.
When the malfunction indicator isilluminated, the system may not be ableto detect or signal low tire pressure asintended. TPMS malfunctions may occurfor a variety of reasons, including theinstallation of replacement or alternatetires or wheels on the vehicle that preventthe TPMS from functioning properly.Always check the TPMS malfunctiontelltale after replacing one or more tires orwheels on your vehicle to ensure that thereplacement or alternate tires and wheelsallow the TPMS to continue to functionproperly.
The tire pressure monitoring systemcomplies with part 15 of the FCC rules andwith RSS-210 of Industry Canada.Operation is subject to the following twoconditions: (1) This device may not causeharmful interference, and (2) This devicemust accept any interference received,including interference that may causeundesired operation.
292
Expedition (TB7) Canada/United States of America, enUSA, Edition date: 03/2016, First Printing
Wheels and Tires
Page 297 of 500

Customer action requiredPossible causeLow tire pressurewarning light
Make sure tires are at the proper pres-sure. See Inflating your tires in thischapter. After inflating your tires to themanufacturer’s recommended pressureas shown on the Tire Label (located onthe edge of driver’s door or the B-Pillar),the vehicle must be driven for at leasttwo minutes over 20 mph (32 km/h)before the light turns off.
Tire(s) under-inflatedSolid warning light
Repair the damaged road wheel and tireassembly and reinstall it on the vehicleto restore system function. For adescription on how the system functions,see When your temporary spare tireis installed in this section.
Spare tire in use
If the tires are properly inflated and thespare tire is not in use but the lightremains on, contact your authorizeddealer as soon as possible.
Tire pressure monitoringsystem malfunction
On vehicles with different front and reartire pressures, the system must beretrained following every tire rotation.See Tire Care (page 276).
Tire rotation withoutsensor training
Repair the damaged road wheel and tireassembly and reinstall it on the vehicleto restore system function. For adescription on how the system functions,see When your temporary spare tireis installed in this section.
Spare tire in useFlashing warninglight
If the tires are properly inflated and thespare tire is not in use but the lightremains on, contact your authorizeddealer as soon as possible.
Tire pressure monitoringsystem malfunction
294
Expedition (TB7) Canada/United States of America, enUSA, Edition date: 03/2016, First Printing
Wheels and Tires
Page 298 of 500
When Inflating Your Tires
When putting air into your tires (such as ata gas station or in your garage), the tirepressure monitoring system may notrespond immediately to the air added toyour tires.
It may take up to two minutes of drivingover 20 mph (32 km/h) for the light to turnoff after you have filled your tires to therecommended inflation pressure.
How Temperature Affects Your TirePressure
The tire pressure monitoring systemmonitors tire pressure in each pneumatictire. While driving in a normal manner, atypical passenger tire inflation pressuremay increase about 2 to 4 psi (14 to 28kPa) from a cold start situation. If thevehicle is stationary overnight with theoutside temperature significantly lowerthan the daytime temperature, the tirepressure may decrease about 3 psi (21kPa) for a drop of 30°F (17°C) in ambienttemperature. This lower pressure valuemay be detected by the tire pressuremonitoring system as being significantlylower than the recommended inflationpressure and activate the system warninglight for low tire pressure.
If the low tire pressure warning light is on,visually check each tire to verify that no tireis flat. If one or more tires are flat, repair asnecessary. Check the air pressure in theroad tires. If any tire is under-inflated,carefully drive the vehicle to the nearestlocation where air can be added to thetires. Inflate all the tires to therecommended inflation pressure.
Tire Pressure Monitoring System ResetProcedure
WARNING
To determine the requiredpressure(s) for your vehicle, see theSafety Compliance CertificationLabel (on the door hinge pillar, door-latchpost or the door edge that meets thedoor-latch post, next to the driver seat) orthe Tire Label on the B-Pillar or the edgeof the driver door.
Note:You need to perform the tire pressuremonitoring system reset procedure aftereach tire rotation on vehicles that requiredifferent recommended tire pressures in thefront tires as compared to the rear tires.
Overview
To provide the vehicle's load carryingcapability, some vehicles require differentrecommended tire pressures in the fronttires as compared to the rear tires. The tirepressure monitoring system equipped onthese vehicles is designed to illuminate thelow tire pressure warning light at twodifferent pressures; one for the front tiresand one for the rear tires.
Since tires need to be rotated to provideconsistent performance and maximum tirelife, the tire pressure monitoring systemneeds to know when the tires are rotatedto determine which set of tires are on thefront and which are on the rear. With thisinformation, the system can detect andproperly warn of low tire pressures.
System reset tips:
295
Expedition (TB7) Canada/United States of America, enUSA, Edition date: 03/2016, First Printing
Wheels and Tires
Page 303 of 500
Park on a level surface, activate the hazardflashers and set the parking brake. Then,place the transmission in park (P) and turnthe engine off.
Removing the Jack and Tools
Note:Pay close attention to the orientationof the bag, because it will have to bereinstalled after changing the tire.
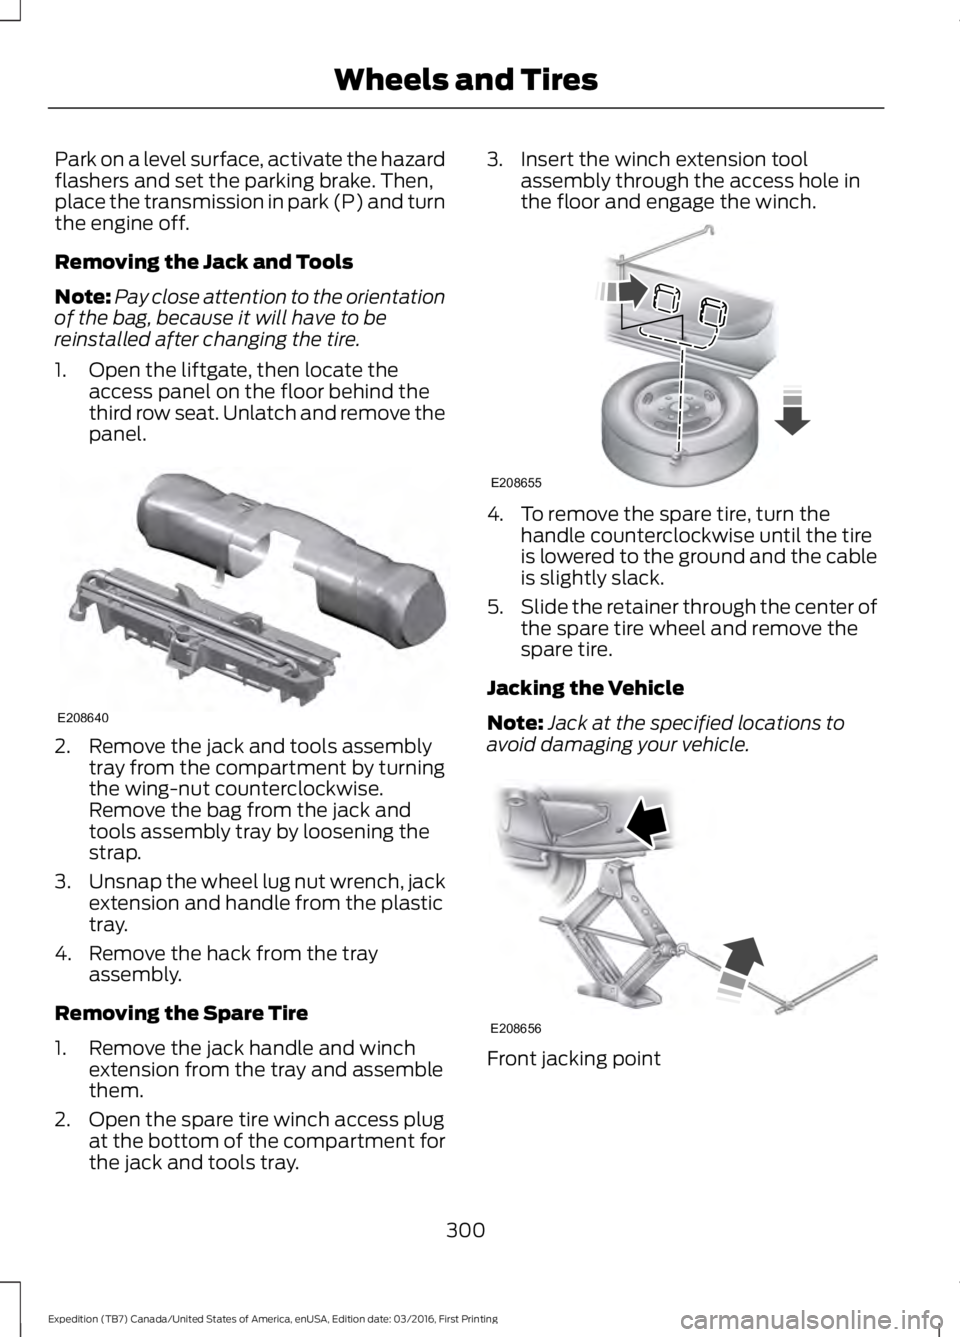
1. Open the liftgate, then locate theaccess panel on the floor behind thethird row seat. Unlatch and remove thepanel.
2. Remove the jack and tools assemblytray from the compartment by turningthe wing-nut counterclockwise.Remove the bag from the jack andtools assembly tray by loosening thestrap.
3.Unsnap the wheel lug nut wrench, jackextension and handle from the plastictray.
4. Remove the hack from the trayassembly.
Removing the Spare Tire
1. Remove the jack handle and winchextension from the tray and assemblethem.
2. Open the spare tire winch access plugat the bottom of the compartment forthe jack and tools tray.
3. Insert the winch extension toolassembly through the access hole inthe floor and engage the winch.
4. To remove the spare tire, turn thehandle counterclockwise until the tireis lowered to the ground and the cableis slightly slack.
5.Slide the retainer through the center ofthe spare tire wheel and remove thespare tire.
Jacking the Vehicle
Note:Jack at the specified locations toavoid damaging your vehicle.
Front jacking point
300
Expedition (TB7) Canada/United States of America, enUSA, Edition date: 03/2016, First Printing
Wheels and TiresE208640 E208655 E208656
Page 304 of 500
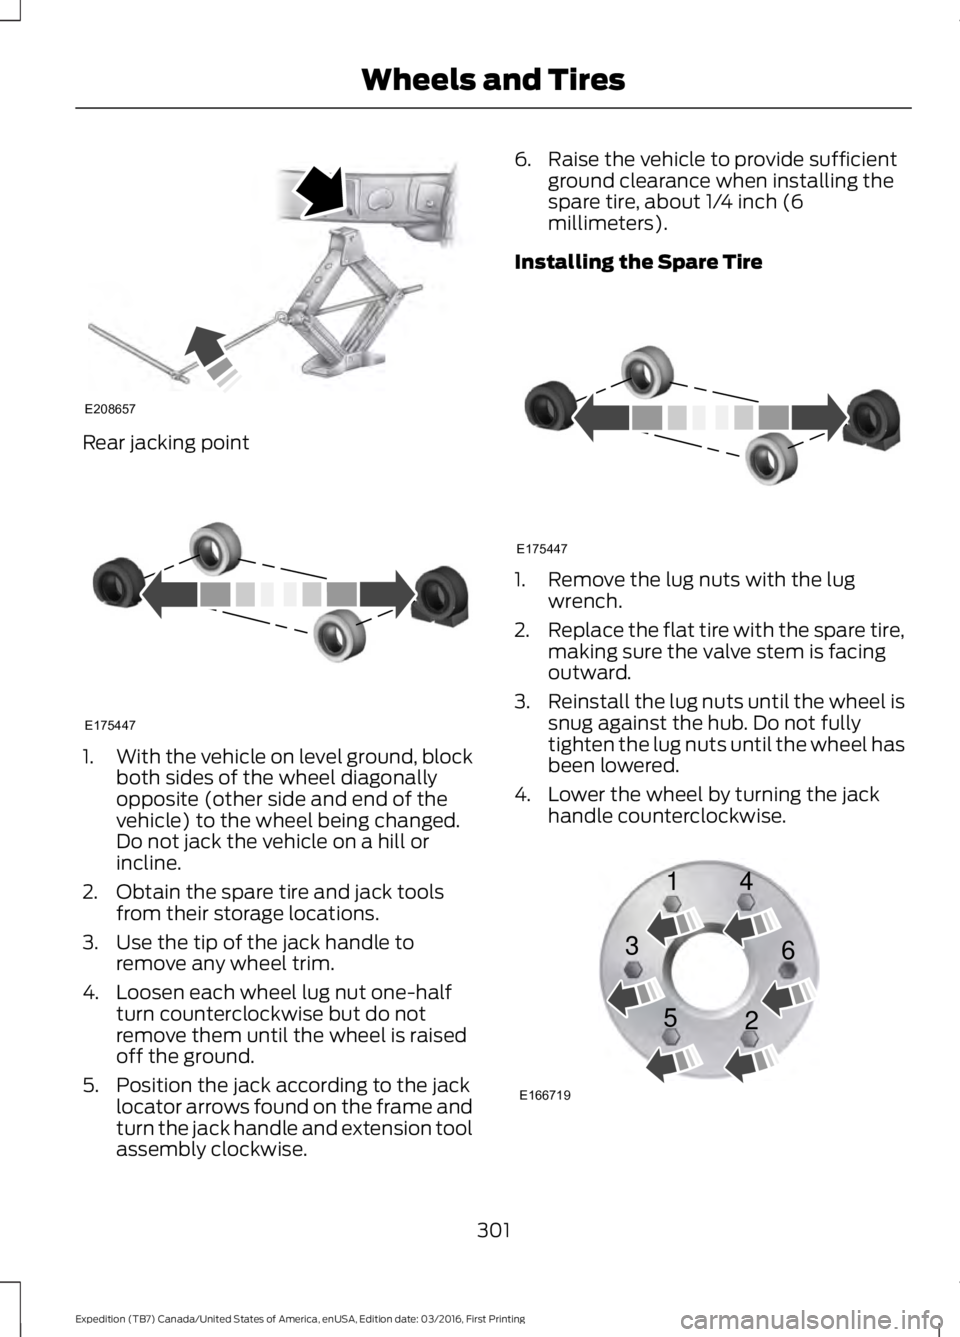
Rear jacking point
1.With the vehicle on level ground, blockboth sides of the wheel diagonallyopposite (other side and end of thevehicle) to the wheel being changed.Do not jack the vehicle on a hill orincline.
2. Obtain the spare tire and jack toolsfrom their storage locations.
3. Use the tip of the jack handle toremove any wheel trim.
4. Loosen each wheel lug nut one-halfturn counterclockwise but do notremove them until the wheel is raisedoff the ground.
5. Position the jack according to the jacklocator arrows found on the frame andturn the jack handle and extension toolassembly clockwise.
6. Raise the vehicle to provide sufficientground clearance when installing thespare tire, about 1/4 inch (6millimeters).
Installing the Spare Tire
1. Remove the lug nuts with the lugwrench.
2.Replace the flat tire with the spare tire,making sure the valve stem is facingoutward.
3.Reinstall the lug nuts until the wheel issnug against the hub. Do not fullytighten the lug nuts until the wheel hasbeen lowered.
4. Lower the wheel by turning the jackhandle counterclockwise.
301
Expedition (TB7) Canada/United States of America, enUSA, Edition date: 03/2016, First Printing
Wheels and TiresE208657 E175447 E175447 E166719
1
3
5 4
6
2
Page 305 of 500
5. Remove the jack and fully tighten thelug nuts in the order shown. SeeTechnical Specifications (page 302).
Stowing the Flat or Spare Tire
1.Lay the tire on the ground, near the rearof the vehicle, with the valve stem sidefacing up.
2. Slide the wheel partially under thevehicle and install the retainer throughthe wheel center. If equipped, you mayhave to remove the wheel center capprior to pushing the retainer throughthe center of the wheel. To remove thecenter cap, press it off with the jacktool from the inner side of the wheel.Pull on the cable to align thecomponents at the end of the cable.
3. Assemble the jack handle and winchextension, then insert the winchextension through the access holebehind the third row seat and engagethe winch.
4. Turn the jack handle clockwise untilthe tire is raised to its stowed positionunderneath the vehicle. The wrenchwill become harder to turn and thespare tire winch will rachet or slip whenthe tire is raised to maximum tightness.A clicking sound will be heard from thewinch indicating that the tire is properlystowed.
5. Disassembly the jack tool and winchextension and snap them back into thetool tray.
6. Reinstall the jack bag properly aroundthe jack and tool assembly tray, makingsure the strap is fastened.
7. Close the access hole with the rubberplug.
8. Reinstall the tray into the vehicle andsecure it with the wing nut.
TECHNICAL SPECIFICATIONS
Wheel Lug Nut Torque Specifications
WARNING
When you install a wheel, always remove any corrosion, dirt or foreign materialspresent on the mounting surfaces of the wheel or the surface of the wheel hub,brake drum or brake disc that contacts the wheel. Make sure to secure any fastenersthat attach the rotor to the hub so they do not interfere with the mounting surfaces ofthe wheel. Installing wheels without correct metal-to-metal contact at the wheel mountingsurfaces can cause the wheel nuts to loosen and the wheel to come off while your vehicleis in motion, resulting in loss of vehicle control, personal injury or death.
lb.ft (Nm)Bolt size
150 lb.ft (204 Nm)M14 x 1.5
*Torque specifications are for nut and bolt threads free of dirt and rust. Use only Fordrecommended replacement fasteners.
Retighten the lug nuts to the specified torque within 100 miles (160 kilometers) after anywheel disturbance (such as tire rotation, changing a flat tire, wheel removal).
302
Expedition (TB7) Canada/United States of America, enUSA, Edition date: 03/2016, First Printing
Wheels and Tires
Page 308 of 500
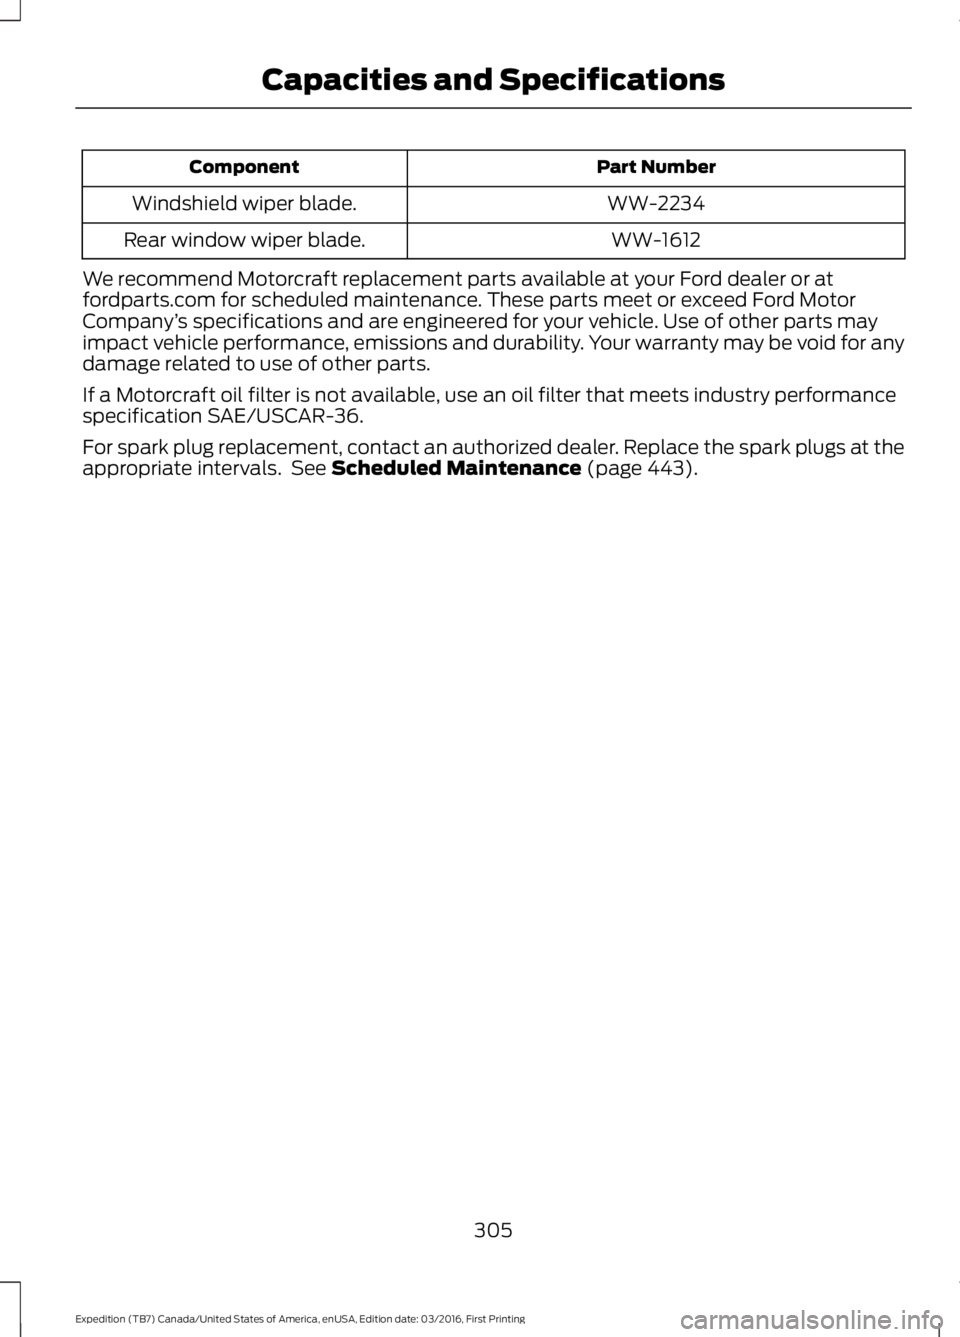
Part NumberComponent
WW-2234Windshield wiper blade.
WW-1612Rear window wiper blade.
We recommend Motorcraft replacement parts available at your Ford dealer or atfordparts.com for scheduled maintenance. These parts meet or exceed Ford MotorCompany’s specifications and are engineered for your vehicle. Use of other parts mayimpact vehicle performance, emissions and durability. Your warranty may be void for anydamage related to use of other parts.
If a Motorcraft oil filter is not available, use an oil filter that meets industry performancespecification SAE/USCAR-36.
For spark plug replacement, contact an authorized dealer. Replace the spark plugs at theappropriate intervals. See Scheduled Maintenance (page 443).
305
Expedition (TB7) Canada/United States of America, enUSA, Edition date: 03/2016, First Printing
Capacities and Specifications
Page 317 of 500
•MP3 and WMA folder mode representsa folder structure consisting of onelevel of folders. The CD player numbersall MP3 and WMA tracks on the disc(noted by the MP3 or WMA fileextension) and all folders containingMP3 and WMA files, from F001 (folder)T001 (track) to F253 T255.
•Creating discs with only one level offolders helps with navigation throughthe disc files.
If you are burning your own MP3 and WMAdiscs, it is important to understand howthe system reads the structures you create.While various files may be present (fileswith extensions other than MP3 andWMA), only files with the MP3 and WMAextension are played; other files areignored by the system. This enables you touse the same MP3 and WMA disc for avariety of tasks on your work computer,home computer and your in-vehiclesystem.
In track mode, the system displays andplays the structure as if it were only onelevel deep (all MP3 and WMA files play,regardless of being in a specific folder). Infolder mode, the system only plays theMP3 and WMA files in the current folder.
AUDIO UNIT - VEHICLES WITH:
AM/FM/CD/SYNC/SATELLITE
RADIO
WARNING
Driving while distracted can result inloss of vehicle control, crash andinjury. We strongly recommend thatyou use extreme caution when using anydevice that may take your focus off theroad. Your primary responsibility is the safeoperation of your vehicle. We recommendagainst the use of any hand-held devicewhile driving and encourage the use ofvoice-operated systems when possible.Make sure you are aware of all applicablelocal laws that may affect the use ofelectronic devices while driving.
Note:The touchscreen system controlsmost of the audio features. See your SYNCinformation.
314
Expedition (TB7) Canada/United States of America, enUSA, Edition date: 03/2016, First Printing
Audio System