2017 FORD EXPEDITION EL ESP
[x] Cancel search: ESPPage 170 of 500
3. Move the 4WD switch to the desiredmode.
The information display will display amessage indicating a 4X4 shift is inprogress. The information display will thendisplay the system mode selected.
If any of the above shift conditions are notmet, the shift will not occur and theinformation display will display informationguiding the driver through the proper rangeof shifting procedures.
If SHIFT DELAYED PULL FORWARD isdisplayed in the information display,transfer case gear tooth blockage ispresent. To alleviate this condition, placethe transmission in a forward gear, movethe vehicle forward approximately 5 ft(2 m), and shift the transmission back toneutral (N) to allow the transfer case tocomplete the range shift.
How Your Vehicle Differs FromOther Vehicles
WARNING
Vehicles with a higher center ofgravity such as utility and four-wheeldrive vehicles handle differently thanvehicles with a lower center of gravity.Utility and four-wheel drive vehicles arenot designed for cornering at speeds ashigh as passenger cars any more thanlow-slung sports cars are designed toperform satisfactorily under off-roadconditions. Avoid sharp turns, excessivespeed and abrupt maneuvers in thesevehicles. Failure to drive cautiously couldresult in an increased risk of loss of vehiclecontrol, vehicle rollover, personal injury anddeath.
Truck and utility vehicles can differ fromsome other vehicles. Your vehicle may behigher to allow it to travel over roughterrain without getting hung up ordamaging underbody components.
The differences that make your vehicle soversatile also make it handle differentlythan an ordinary passenger car.
Maintain steering wheel control at alltimes, especially in rough terrain. Sincesudden changes in terrain can result inabrupt steering wheel motion, make sureyou grip the steering wheel from theoutside. Do not grip the spokes.
Drive cautiously to avoid vehicle damagefrom concealed objects such as rocks andstumps.
You should either know the terrain orexamine maps of the area before driving.Map out your route before driving in thearea. To maintain steering and brakingcontrol of your vehicle, you must have allfour wheels on the ground and they mustbe rolling, not sliding or spinning.
Driving Off-Road With Truck andUtility Vehicles
Note:On some models, the initial shift fromtwo-wheel drive to four-wheel drive whileyour vehicle is moving can cause somemomentary clunk and ratcheting sounds.This is the front drivetrain coming up tospeed and the automatic locking hubsengaging and is not cause for concern.
Note:Your vehicle may be equipped witha front air dam that can become damaged(due to reduced ground clearance) whentaking your vehicle off-road. You mayremove this air dam by removing eight bolts.
Four-wheel drive vehicles are speciallyequipped for driving on sand, snow, mudand rough terrain and have operatingcharacteristics that are somewhatdifferent from conventional vehicles, bothon and off the road.
167
Expedition (TB7) Canada/United States of America, enUSA, Edition date: 03/2016, First Printing
Four-Wheel Drive (If Equipped)
Page 172 of 500
In the event of an emergency stop, avoidskidding the tires and do not attempt anysharp steering wheel movements.
If your vehicle goes from one type ofsurface to another (i.e. from concrete togravel) there will be a change in the wayyour vehicle responds to a maneuver (i.e.steering, acceleration or braking).
Sand
When driving over sand, try to keep all fourwheels on the most solid area of the trail.Avoid reducing the tire pressures but shiftto a lower gear and drive steadily throughthe terrain. Apply the accelerator slowlyand avoid excessive wheel slip.
Avoid driving at excessive speeds, thiscauses vehicle momentum to work againstyou and your vehicle could become stuckto the point that assistance may berequired from another vehicle. Remember,you may be able to back out the way youcame if you proceed with caution.
Mud and Water
Note:Driving through deep water maydamage the vehicle.
If you must drive through high water, driveslowly. Traction or brake capability maybe limited.
When driving through water, determine thedepth and avoid water higher than thebottom of the hubs. If the ignition systemgets wet, your vehicle may stall.
Once through water, always try the brakes.Wet brakes do not stop your vehicle aseffectively as dry brakes. Drying can beimproved by applying light pressure to thebrake pedal while moving slowly.
Be cautious of sudden changes in vehiclespeed or direction when you are driving inmud. Even 4WD vehicles can lose tractionin slick mud. As when you are driving oversand, apply the accelerator slowly andavoid spinning your wheels. If the vehicledoes slide, steer in the direction of the slideuntil you regain control of the vehicle.
If the transmission, transfer case or frontaxle are submerged in water, their fluidsshould be checked and changed, ifnecessary.
If the front or rear axle is submerged inwater, the axle lubricant should bereplaced.
After driving through mud, clean off residuestuck to rotating driveshafts and tires.Excess mud stuck on tires and rotatingdriveshafts causes an imbalance thatcould damage drive components.
“Tread Lightly” is an educational programdesigned to increase public awareness ofland-use regulations and responsibilitiesin our nations wilderness areas. Ford MotorCompany joins the U.S. Forest Service andthe Bureau of Land Management inencouraging you to help preserve ournational forest and other public and privatelands by “treading lightly”.
Driving on Hilly or Sloping Terrain
Note:Avoid driving crosswise or turning onsteep slopes or hills.
169
Expedition (TB7) Canada/United States of America, enUSA, Edition date: 03/2016, First Printing
Four-Wheel Drive (If Equipped)E143950
Page 177 of 500

PARKING BRAKE
WARNING
Always set the parking brake fullyand make sure the transmission isplaced in park (P). Failure to set theparking brake and engage park could resultin vehicle roll-away, property damage orbodily injury. Turn the ignition to the lockposition and remove the key whenever youleave your vehicle.
Apply the parking brake whenever yourvehicle is parked. Press the pedaldownward to set the parking brake. Thebrake warning lamp in the instrumentcluster will illuminate and remainsilluminated until the parking brake isreleased.
To release, pull the brake release leverlocated at the lower left side of theinstrument panel.
If you are parking your vehicle on a gradeor with a trailer, press and hold the brakepedal down, then set the parking brake.There may be a little vehicle movement asthe parking brake sets to hold the vehicle'sweight. This is normal and should be noreason for concern. If needed, press andhold the service brake pedal down, thentry reapplying the parking brake. Chock thewheels if required. If the parking brakecannot hold the weight of the vehicle, theparking brake may need to be serviced orthe vehicle may be overloaded.
HILL START ASSIST
WARNINGS
The system does not replace theparking brake. When you leave yourvehicle, always apply the parkingbrake and shift the transmission into park(P) (automatic transmission) or first gear(1) (manual transmission).
WARNINGS
You must remain in your vehicle onceyou have activated the system.
During all times, you are responsiblefor controlling your vehicle,supervising the system andintervening, if required.
If the engine is revved excessively, orif a malfunction is detected, thesystem will be deactivated.
The system makes it easier to pull awaywhen your vehicle is on a slope without theneed to use the parking brake.
When the system is active, your vehicle willremain stationary on the slope for two tothree seconds after you release the brakepedal. This allows you time to move yourfoot from the brake to the acceleratorpedal. The brakes release automaticallywhen the engine has sufficient torque toprevent your vehicle from rolling down thegrade. This is an advantage when pullingaway on a slope, for example from a carpark ramp, traffic lights or when reversinguphill into a parking space.
The system will activate automatically onany slope that will cause significant vehiclerollback. For vehicles with a manualtransmission, you can switch this featureoff using the information display. SeeInformation Displays (page 91). Thesystem will remain on or off depending onhow it was last set.
Note:There is no warning lamp to indicatethe system is either on or off.
Note:If your vehicle is equipped with AutoHold, Hill Start Assist will not be availablewhile Auto Hold is active.
174
Expedition (TB7) Canada/United States of America, enUSA, Edition date: 03/2016, First Printing
Brakes
Page 183 of 500
USING HILL DESCENT
CONTROL
Principle of Operation
WARNINGS
Hill descent control cannot controldescent in all surface conditions andcircumstances, such as ice orextremely steep grades. Hill descentcontrol is a driver assist system and cannotsubstitute for good judgment by the driver.Failure to do so may result in loss of vehiclecontrol, crash or serious injury.
Hill descent control does not providehill hold at 0 mph (0 km/h). Whenstopped, the parking brake must beapplied or the vehicle must be placed inpark (P) or it may roll away.
Hill descent control allows the driver to setand maintain vehicle speed whiledescending steep grades in various surfaceconditions.
Hill descent control can maintain vehiclespeeds on downhill grades between 3 mph(5 km/h) and 20 mph (32 km/h). Above20 mph (32 km/h), the system remainsarmed, but descent speed cannot be setor maintained.
Hill descent control requires a coolingdown interval after sustained use. Theamount of time that the feature canremain active before cooling varies withconditions. The system provides a warningin the message center and a chime soundswhen the system is about to disengage forcooling. At this time, manually apply thebrakes to maintain descent speed.
Using Hill Descent Control
Press and release the hilldescent button in the center ofthe terrain management control.The button illuminates and a chime soundswhen you switch this feature on.
To increase descent speed, press theaccelerator pedal until you reach thedesired speed. To decrease descentspeed, press the brake pedal until youreach the desired speed.
Whether accelerating or decelerating, onceyou reach the desired descent speed,remove your feet from the pedals and hilldescent control maintains the chosenvehicle speed.
Note:You may observe noise from the ABSpump motor during hill descent controloperation. This is a normal characteristic ofthe ABS and should be no reason forconcern.
180
Expedition (TB7) Canada/United States of America, enUSA, Edition date: 03/2016, First Printing
Terrain Response (If Equipped)
Page 184 of 500
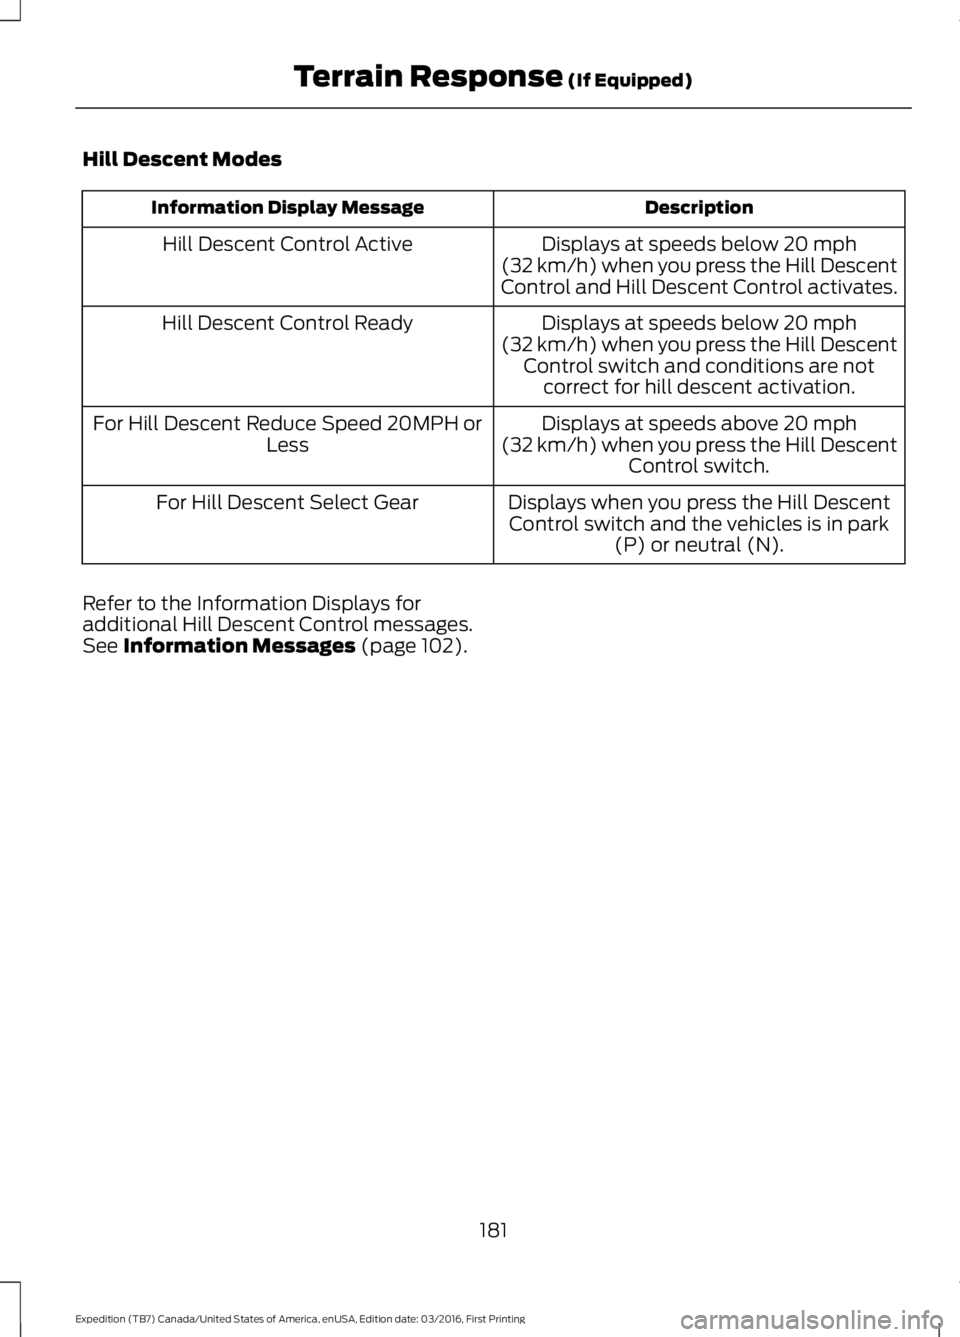
Hill Descent Modes
DescriptionInformation Display Message
Displays at speeds below 20 mph(32 km/h) when you press the Hill DescentControl and Hill Descent Control activates.
Hill Descent Control Active
Displays at speeds below 20 mph(32 km/h) when you press the Hill DescentControl switch and conditions are notcorrect for hill descent activation.
Hill Descent Control Ready
Displays at speeds above 20 mph(32 km/h) when you press the Hill DescentControl switch.
For Hill Descent Reduce Speed 20MPH orLess
Displays when you press the Hill DescentControl switch and the vehicles is in park(P) or neutral (N).
For Hill Descent Select Gear
Refer to the Information Displays foradditional Hill Descent Control messages.See Information Messages (page 102).
181
Expedition (TB7) Canada/United States of America, enUSA, Edition date: 03/2016, First Printing
Terrain Response (If Equipped)
Page 197 of 500
DRIVE CONTROL
Driver Select Suspension (If Equipped)
Driver select suspension delivers a uniquedriving experience through a suite ofsophisticated electronic vehicle systems.These systems continuously monitor yourdriving inputs and the road conditions tooptimize ride comfort, steering andhandling.
Driver select suspension consists of thefollowing systems:
•Continuously controlled dampingdynamically adjusts the shockabsorbers stiffness in real time tomatch the road surface and driverinputs. This system continuouslymonitors your vehicle’s motion (roll,pitch, bounce), suspension position,load, speed, road conditions, andsteering to adjust the suspensiondamping for optimal vehicle control.
•Electronically power-assisted steeringadjusts steering effort and feel basedon your vehicle speed and your inputs.
The configuration remains active untilmodified from the main menu on theinformation display. See GeneralInformation (page 91).
Modes:
•Comfort – Provides a more relaxeddriving experience, maximizing comfort.Your steering effort decreases and thesuspension movement is more fluid.Comfort mode is ideal when you desireenhanced traveling comfort.
•Normal – Delivers a balancedcombination of comfortable, controlledride and confident handling. This modeprovides an engaging drive experienceand a direct connection to the roadwithout sacrificing any of thecomposure demanded from yourvehicle.
•Sport – Provides a sportier drivingexperience. The suspension stiffens,with an emphasis on handling andcontrol. The engine responds moredirectly to your inputs. Sport mode isideal for use during more spiriteddriving.
SELF-LEVELING SUSPENSION
The self-leveling suspension system isdesigned to improve ride, handling andgeneral vehicle performance during:
•Certain road conditions
•Steering maneuvers
•Braking
•Acceleration
•Towing
This system keeps the rear of your vehicleat a constant level through a hydraulicpump inside each rear shock. Dependingon the payload or road surface conditionsit will take approximately 2 mi (3.2 km) forthe leveling to complete.
194
Expedition (TB7) Canada/United States of America, enUSA, Edition date: 03/2016, First Printing
Driving Aids
Page 198 of 500
If the loaded vehicle is not moved forapproximately 12 hours, the leveling systemmay bleed down to a lower height. Thiscan be especially apparent if a trailer is leftattached to the parked vehicle for longperiods of time. You must drive your vehiclein order to re-level the suspension.
If a self-equalizing hitch is used, yourvehicle should be driven approximately2 mi (3.2 km) with the trailer prior toadjusting (leveling) the hitch.
195
Expedition (TB7) Canada/United States of America, enUSA, Edition date: 03/2016, First Printing
Driving Aids
Page 207 of 500
RV & Trailer Towing Guide Online
http://www.fleet.ford.com/towing-guides/Website
TRAILER SWAY CONTROL
WARNING
Turning off trailer sway controlincreases the risk of loss of vehiclecontrol, serious injury or death. Forddoes not recommend disabling this featureexcept in situations where speed reductionmay be detrimental (such as hill climbing),the driver has significant trailer towingexperience, and can control trailer swayand maintain safe operation.
Note:This feature does not prevent trailersway, but reduces it once it begins.
Note:This feature cannot stop all trailersfrom swaying.
Note:In some cases, if vehicle speed is toohigh, the system may activate multipletimes, gradually reducing vehicle speed.
This feature applies your vehicle brakes atindividual wheels and, if necessary, reducesengine power. If the trailer begins to sway,the stability control light flashes and themessage TRAILER SWAY REDUCESPEED appears in the information display.The first thing to do is slow your vehicledown, then pull safely to the side of theroad and check for proper tongue load andtrailer load distribution. See LoadCarrying (page 196).
RECOMMENDED TOWING
WEIGHTS
Note:Do not exceed the trailerweight for your vehicleconfiguration listed in the chartbelow.
Note:Make sure to take intoconsideration trailer frontal area.Do not exceed 36.5 feet² (3.39meters²) if your vehicle is equippedwith the standard towing package,or 60 feet² (5.57 meters²) if yourvehicle is equipped with theoptional heavy duty package.
Note:Exceeding this limitationmay significantly reduce theperformance of your towingvehicle. Selecting a trailer with alow aerodynamic drag and roundedfront design helps optimizeperformance and fuel economy.
Note:For high altitude operation,reduce the gross combined weightby 2% per 1000 feet (300 meters)starting at the 1000 foot (300meter) elevation point.
204
Expedition (TB7) Canada/United States of America, enUSA, Edition date: 03/2016, First Printing
Towing