2017 FORD EXPEDITION EL battery
[x] Cancel search: batteryPage 224 of 500
ROADSIDE ASSISTANCE
Vehicles Sold in the United States:Getting Roadside Assistance
To fully assist you should you have avehicle concern, Ford Motor Companyoffers a complimentary roadsideassistance program. This program isseparate from the New Vehicle LimitedWarranty. The service is available:
•24 hours a day, seven days a week.
•For the coverage period listed on theRoadside Assistance Card included inyour Owner's Manual portfolio.
Roadside Assistance covers:
•A flat tire change with a good spare, ifprovided with the vehicle (exceptvehicles supplied with a tire inflationkit).
•Battery jump start.
•Lock-out assistance (key replacementcost is the customer's responsibility).
•Fuel delivery — independent servicecontractors, if not prohibited by state,local or municipal law, shall deliver upto 2 gal (7.6 L) of gasoline or 5 gal(18.9 L) of diesel fuel to a disabledvehicle. Roadside Assistance limits fueldelivery service to two no-chargeoccurrences within a 12-month period.
•Winch out — available within 100 ft(30.5 m) of a paved or countymaintained road, no recoveries.
•Towing — independent servicecontractors, if not prohibited by state,local or municipal law, shall tow Fordeligible vehicles to an authorized dealerwithin 35 mi (56 km) of thedisablement location or to the nearest
authorized dealer. If a memberrequests a tow to an authorized dealerthat is more than 35 mi (56 km) fromthe disablement location, the membershall be responsible for any mileagecosts in excess of 35 mi (56 km).
Roadside Assistance includes up to $200for a towed trailer if the disabled eligiblevehicle requires service at the nearestauthorized dealer. If the towing vehicle isoperational but the trailer is not, then thetrailer does not qualify for any roadsideservices.
Vehicles Sold in the United States:Using Roadside Assistance
Complete the roadside assistanceidentification card and place it in yourwallet for quick reference. This card is inthe owner's information portfolio in theglove compartment.
United States Ford vehicle customers whorequire Roadside Assistance, call1-800-241-3673.
If you need to arrange roadside assistancefor yourself, Ford Motor Companyreimburses a reasonable amount fortowing to the nearest dealership within35 mi (56 km). To obtain reimbursementinformation, United States Ford vehiclecustomers call 1-800-241-3673.Customers need to submit their originalreceipts.
Vehicles Sold in Canada: GettingRoadside Assistance
To fully assist you should you have avehicle concern, Ford Motor Company ofCanada, Limited offers a complimentaryroadside assistance program. This programis eligible within Canada or the continentalUnited States.
221
Expedition (TB7) Canada/United States of America, enUSA, Edition date: 03/2016, First Printing
Roadside Emergencies
Page 225 of 500
This program is separate from the NewVehicle Limited Warranty, but the coverageis concurrent with the powertrain coverageperiod of your vehicle.
Canadian customers who require roadsideassistance, call 1-800-665-2006.
Vehicles Sold in Canada: UsingRoadside Assistance
Complete the roadside assistanceidentification card and place it in yourwallet for quick reference.
In Canada, this card is found in theWarranty Guide in the glove compartmentof your vehicle.
Vehicles Sold in Canada: RoadsideAssistance Program Coverage
The service is available 24 hours a day,seven days a week.
Canadian roadside coverage and benefitsmay differ from the U.S. coverage.
For complete program coverage detailsyou may contact your dealer, you can callus in Canada at 1-800-665-2006, or visitour website at www.ford.ca.
HAZARD WARNING FLASHERS
Note:If used when the vehicle is notrunning, the battery will lose charge. Theremay be insufficient power to restart yourvehicle.
The hazard warning button islocated on the instrument panel.Use it when your vehicle iscreating a safety hazard for othermotorists.
•Press the button to turn on the hazardwarning function, and the front andrear direction indicators will flash.
•Press the button again to turn themoff.
FUEL SHUTOFF
WARNING
Failure to inspect and, if necessary,repair fuel leaks after a collision mayincrease the risk of fire and seriousinjury. Ford Motor Company recommendsthat the fuel system be inspected by anauthorized dealer after any collision.
In the event of a moderate to severecollision, this vehicle includes a fuel pumpshutoff feature that stops the flow of fuelto the engine. Not every impact will causea shutoff.
Should your vehicle shut off after acollision, you may restart your vehicle. Forvehicles equipped with a key system:
1. Switch off the ignition.
2. Switch on the ignition.
3. Repeat Steps 1 and 2 to re-enable thefuel pump.
For vehicles equipped with a push buttonstart system:
1. Press the START/STOP button toswitch off the ignition.
2. Press the brake pedal and press theSTART/STOP button to switch on theignition.
3.Remove your foot from the brake pedaland press the START/STOP buttonto switch off the ignition.
4. You can either attempt to start theengine by pressing the brake pedal andthe START/STOP button, or switchon the ignition only by pressing theSTART/STOP button withoutpressing the brake pedal. Both waysre-enable the fuel system.
222
Expedition (TB7) Canada/United States of America, enUSA, Edition date: 03/2016, First Printing
Roadside Emergencies
Page 226 of 500
Note:When you try to restart your vehicleafter a fuel shutoff, the vehicle makes surethat various systems are safe to restart.Once your vehicle determines that thesystems are safe, then the vehicle will allowyou to restart.
Note:In the event that your vehicle doesnot restart after your third attempt, contactan authorized dealer.
JUMP STARTING THE VEHICLE
WARNINGS
Batteries normally produce explosivegases which can cause personalinjury. Therefore, do not allowflames, sparks or lighted substances tocome near the battery. When working nearthe battery, always shield your face andprotect your eyes. Always provide correctventilation.
Keep batteries out of reach ofchildren. Batteries contain sulfuricacid. Avoid contact with skin, eyes orclothing. Shield your eyes when workingnear the battery to protect against possiblesplashing of acid solution. In case of acidcontact with skin or eyes, flushimmediately with water for a minimum of15 minutes and get prompt medicalattention. If acid is swallowed, call aphysician immediately.
Use only adequately sized cableswith insulated clamps.
Preparing Your Vehicle
Do not attempt to push-start yourautomatic transmission vehicle.
Note:Attempting to push-start a vehiclewith an automatic transmission may causetransmission damage.
Note:Use only a 12-volt supply to start yourvehicle.
Note:Do not disconnect the battery of thedisabled vehicle as this could damage thevehicle electrical system.
Park the booster vehicle close to the hoodof the disabled vehicle, making sure thetwo vehicles do not touch.
Connecting the Jumper Cables
WARNINGS
Do not attach the cables to fuel lines,engine rocker covers, the intakemanifold or electrical componentsas grounding points. Stay clear of movingparts. To avoid reverse polarityconnections, make sure that you correctlyidentify the positive (+) and negative (-)terminals on both the disabled and boostervehicles before connecting the cables.
Do not attach the end of the positivecable to the studs or L-shaped eyeletlocated above the positive (+)terminal of your vehicle’s battery. Highcurrent may flow through and causedamage to the fuses.
Do not connect the end of thesecond cable to the negative (-)terminal of the battery to be jumped.A spark may cause an explosion of thegases that surround the battery.
Note:In the illustration, the bottom vehiclerepresents the booster vehicle.
223
Expedition (TB7) Canada/United States of America, enUSA, Edition date: 03/2016, First Printing
Roadside Emergencies
Page 227 of 500
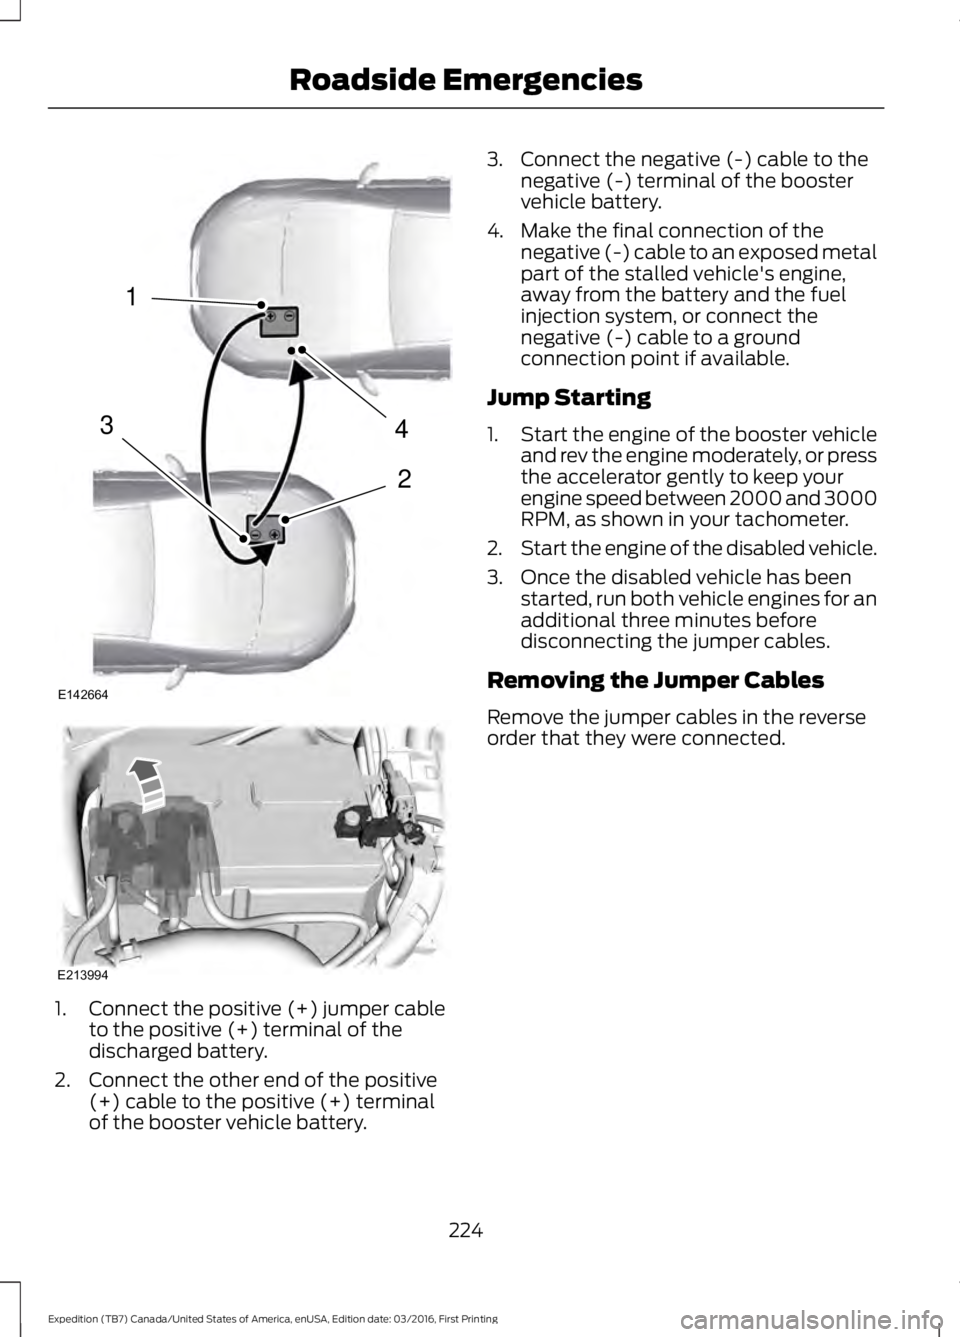
1.Connect the positive (+) jumper cableto the positive (+) terminal of thedischarged battery.
2. Connect the other end of the positive(+) cable to the positive (+) terminalof the booster vehicle battery.
3. Connect the negative (-) cable to thenegative (-) terminal of the boostervehicle battery.
4. Make the final connection of thenegative (-) cable to an exposed metalpart of the stalled vehicle's engine,away from the battery and the fuelinjection system, or connect thenegative (-) cable to a groundconnection point if available.
Jump Starting
1.Start the engine of the booster vehicleand rev the engine moderately, or pressthe accelerator gently to keep yourengine speed between 2000 and 3000RPM, as shown in your tachometer.
2.Start the engine of the disabled vehicle.
3. Once the disabled vehicle has beenstarted, run both vehicle engines for anadditional three minutes beforedisconnecting the jumper cables.
Removing the Jumper Cables
Remove the jumper cables in the reverseorder that they were connected.
224
Expedition (TB7) Canada/United States of America, enUSA, Edition date: 03/2016, First Printing
Roadside Emergencies4
2
1
3
E142664 E213994
Page 228 of 500
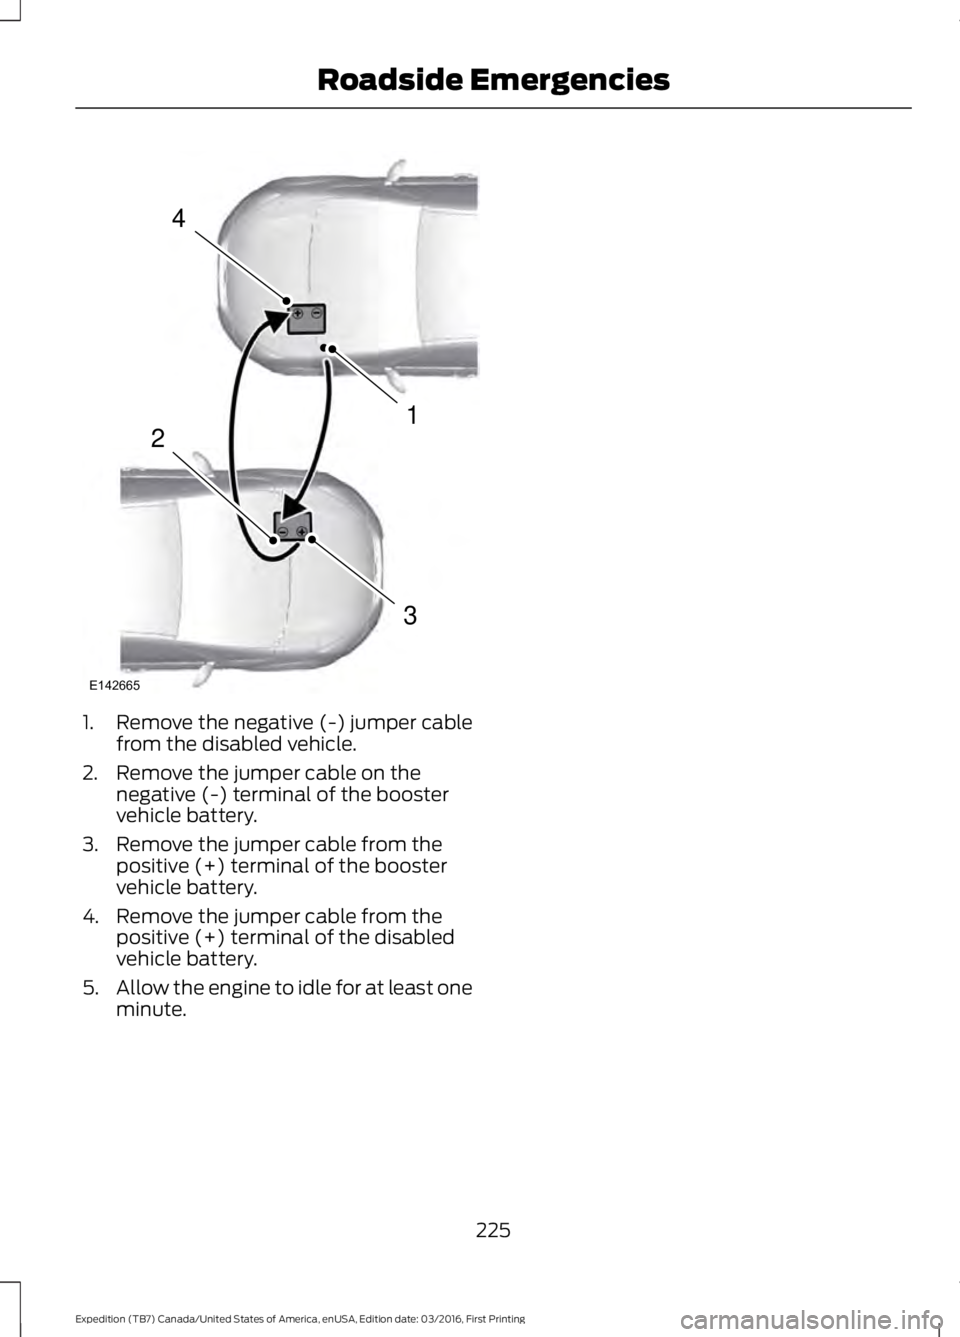
1. Remove the negative (-) jumper cablefrom the disabled vehicle.
2. Remove the jumper cable on thenegative (-) terminal of the boostervehicle battery.
3. Remove the jumper cable from thepositive (+) terminal of the boostervehicle battery.
4. Remove the jumper cable from thepositive (+) terminal of the disabledvehicle battery.
5.Allow the engine to idle for at least oneminute.
225
Expedition (TB7) Canada/United States of America, enUSA, Edition date: 03/2016, First Printing
Roadside Emergencies4
1
3
2
E142665
Page 236 of 500
FUSE SPECIFICATION CHART
Power Distribution Box
WARNINGS
Always disconnect the battery beforeservicing high current fuses.
To reduce risk of electrical shock,always replace the cover to thepower distribution box beforereconnecting the battery or refilling fluidreservoirs.
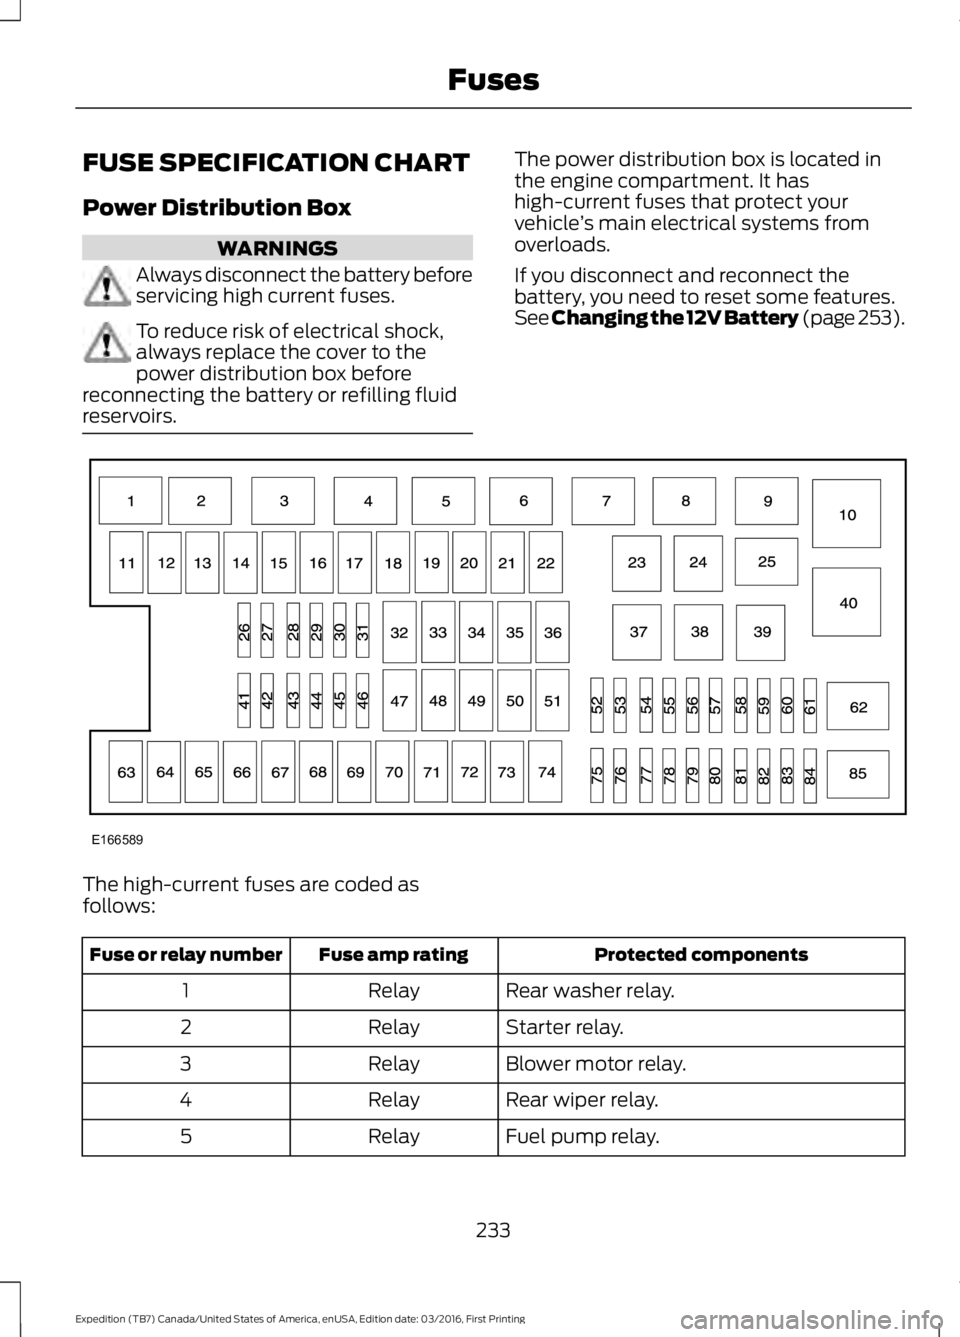
The power distribution box is located inthe engine compartment. It hashigh-current fuses that protect yourvehicle’s main electrical systems fromoverloads.
If you disconnect and reconnect thebattery, you need to reset some features.See Changing the 12V Battery (page 253).
The high-current fuses are coded asfollows:
Protected componentsFuse amp ratingFuse or relay number
Rear washer relay.Relay1
Starter relay.Relay2
Blower motor relay.Relay3
Rear wiper relay.Relay4
Fuel pump relay.Relay5
233
Expedition (TB7) Canada/United States of America, enUSA, Edition date: 03/2016, First Printing
FusesE166589
Page 246 of 500
GENERAL INFORMATION
Have your vehicle serviced regularly to helpmaintain its roadworthiness and resalevalue. There is a large network ofauthorized dealers that are there to helpyou with their professional servicingexpertise. We believe that their speciallytrained technicians are best qualified toservice your vehicle properly and expertly.They are supported by a wide range ofhighly specialized tools developedspecifically for servicing your vehicle.
If your vehicle requires professional service,an authorized dealer can provide thenecessary parts and service. Check yourwarranty information to find out whichparts and services are covered.
Use only recommended fuels, lubricants,fluids and service parts conforming tospecifications. Motorcraft® parts aredesigned and built to provide the bestperformance in your vehicle.
Precautions
•Do not work on a hot engine.
•Make sure that nothing gets caught inmoving parts.
•Do not work on a vehicle with theengine running in an enclosed space,unless you are sure you have enoughventilation.
•Keep all open flames and other burningmaterial (such as cigarettes) awayfrom the battery and all fuel relatedparts.
Working with the Engine Off
1.Set the parking brake and shift to park(P).
2. Switch off the engine.
3. Block the wheels.
Working with the Engine On
WARNING
To reduce the risk of vehicle damageand/or personal burn injuries, do notstart your engine with the air cleanerremoved and do not remove it while theengine is running.
1.Set the parking brake and shift to park(P).
2. Block the wheels.
OPENING AND CLOSING THE
HOOD
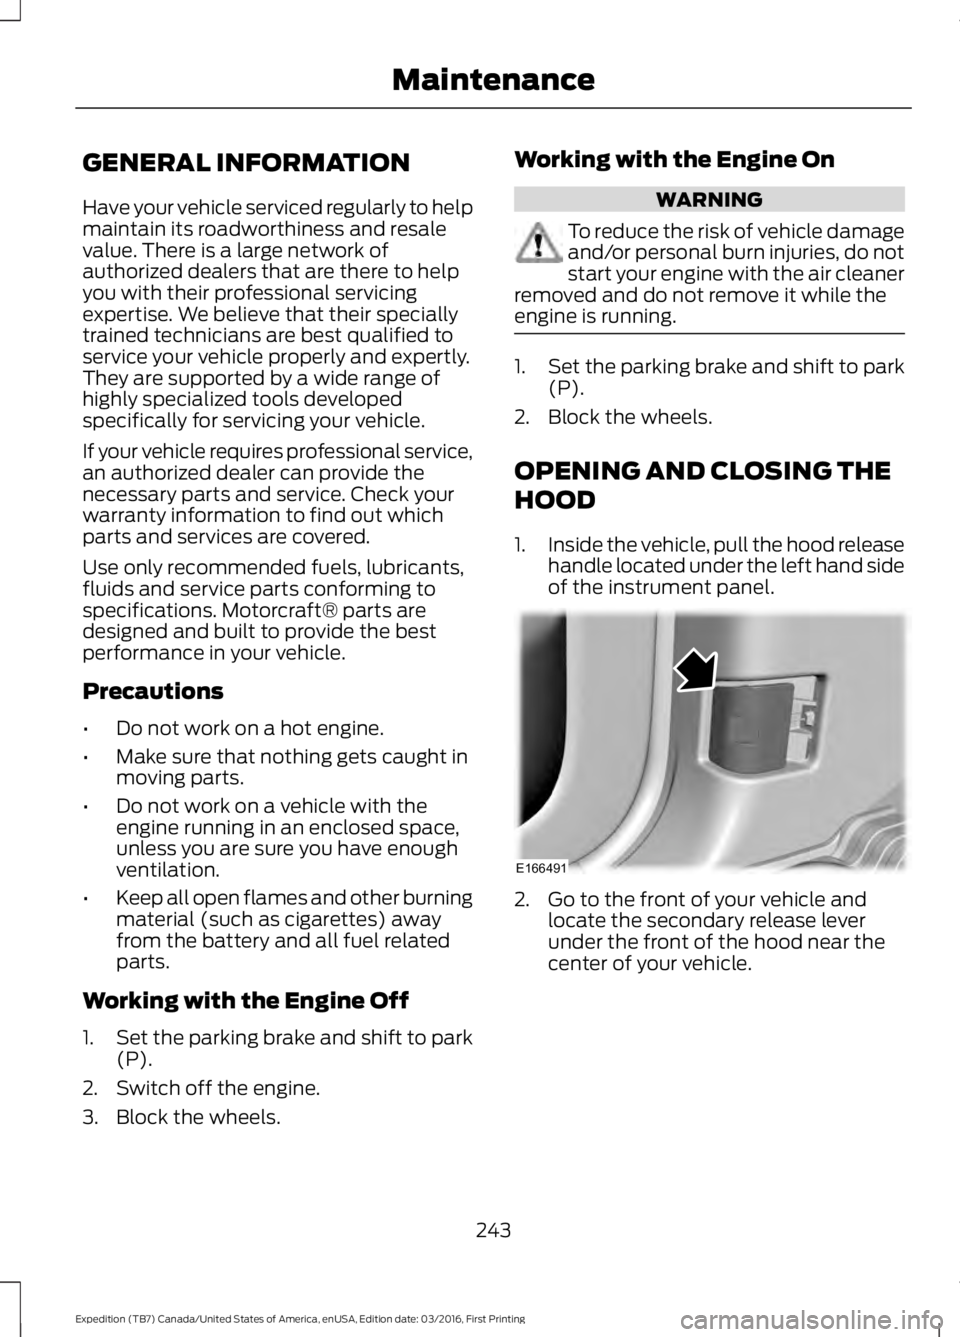
1.Inside the vehicle, pull the hood releasehandle located under the left hand sideof the instrument panel.
2. Go to the front of your vehicle andlocate the secondary release leverunder the front of the hood near thecenter of your vehicle.
243
Expedition (TB7) Canada/United States of America, enUSA, Edition date: 03/2016, First Printing
MaintenanceE166491
Page 247 of 500
3. Raise the hood until the lift cylindershold it open.
4. To close, lower the hood and makesure that it is closed properly and fullylatched.
UNDER HOOD OVERVIEW
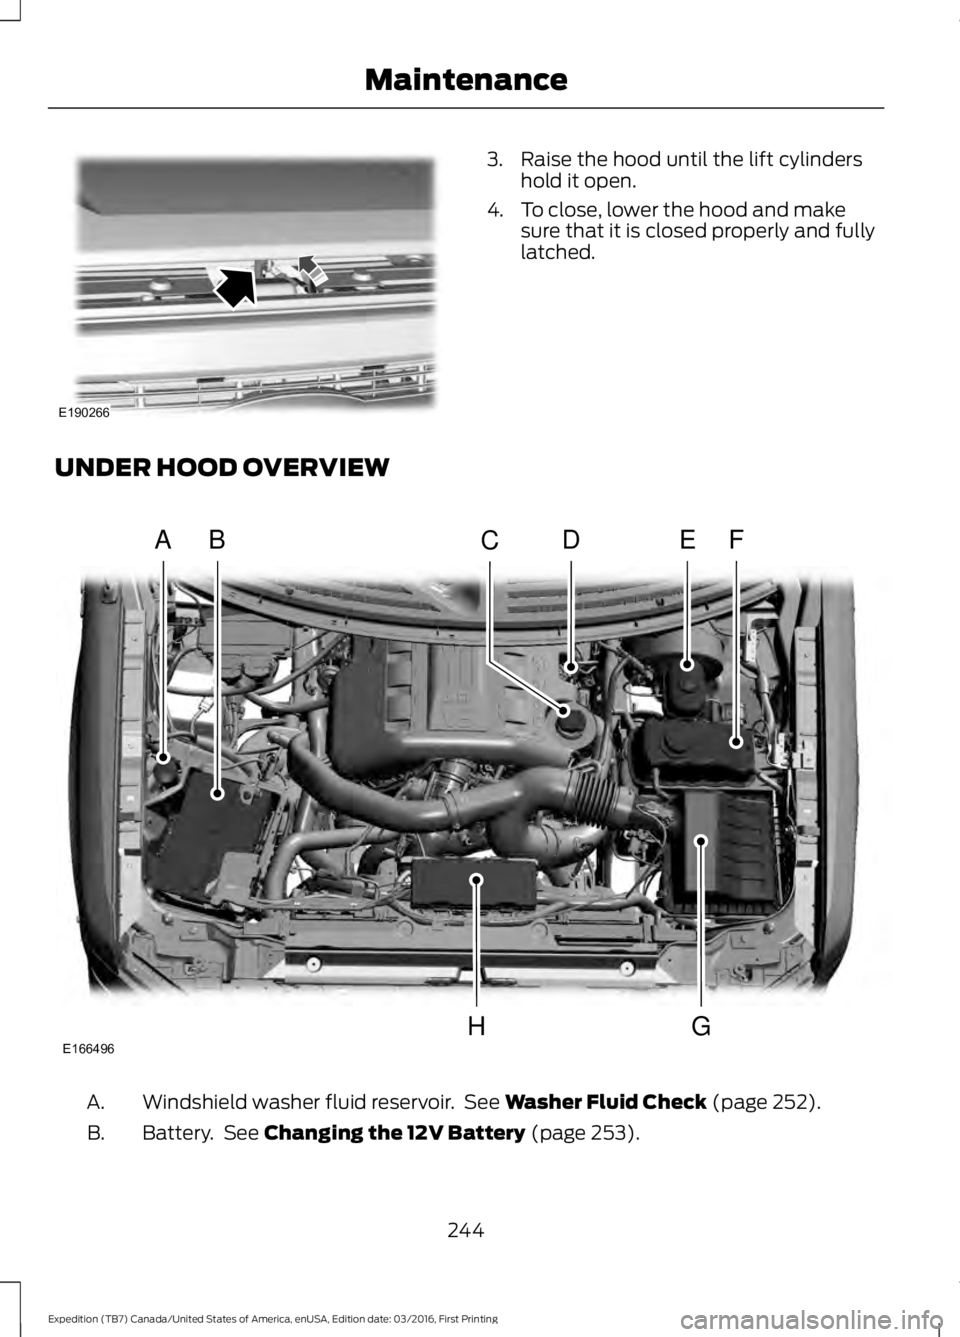
Windshield washer fluid reservoir. See Washer Fluid Check (page 252).A.
Battery. See Changing the 12V Battery (page 253).B.
244
Expedition (TB7) Canada/United States of America, enUSA, Edition date: 03/2016, First Printing
MaintenanceE190266 A
A
BDEFC
GHE166496