2017 FORD EXPEDITION EL ECU
[x] Cancel search: ECUPage 4 of 500

Introduction
About This Manual...........................................7
Symbols Glossary.............................................7
Data Recording..................................................9
California Proposition 65..............................11
Perchlorate.........................................................11
Ford Credit..........................................................11
Replacement PartsRecommendation.......................................12
Special Notices................................................12
Mobile CommunicationsEquipment.....................................................13
Export Unique Options..................................13
Environment
Protecting the Environment........................15
Child Safety
General Information.......................................16
Installing Child Restraints.............................17
Booster Seats..................................................24
Child Restraint Positioning.........................26
Child Safety Locks..........................................27
Seatbelts
Principle of Operation..................................29
Fastening the Seatbelts..............................30
Seatbelt Height Adjustment......................32
Seatbelt Warning Lamp and IndicatorChime.............................................................33
Seatbelt Reminder.........................................33
Child Restraint and SeatbeltMaintenance................................................35
Seatbelt Extension........................................35
Supplementary RestraintsSystem
Principle of Operation..................................36
Driver and Passenger Airbags....................37
Side Airbags.....................................................38
Safety Canopy™............................................39
Crash Sensors and Airbag Indicator.......40
Airbag Disposal................................................41
Keys and Remote Controls
Principle of Operation..................................42
General Information on RadioFrequencies..................................................42
Remote Control..............................................43
Replacing a Lost Key or RemoteControl...........................................................46
MyKey™
Principle of Operation...................................47
Creating a MyKey...........................................48
Clearing All MyKeys.......................................49
Checking MyKey System Status..............50
Using MyKey With Remote StartSystems..........................................................51
MyKey Troubleshooting................................51
Doors and Locks
Locking and Unlocking.................................52
Manual Liftgate...............................................54
Power Liftgate.................................................56
Keyless Entry...................................................58
Security
Passive Anti-Theft System..........................61
Anti-Theft Alarm............................................62
Power Running Boards
Using Power Running Boards....................63
Steering Wheel
Adjusting the Steering Wheel - VehiclesWith: Column Shift/Manual AdjustableSteering Column........................................65
Adjusting the Steering Wheel - VehiclesWith: Floor Shift/Manual AdjustableSteering Column........................................65
1
Expedition (TB7) Canada/United States of America, enUSA, Edition date: 03/2016, First Printing
Table of Contents
Page 16 of 500
On Board Diagnostics Data LinkConnector
WARNING
Use of wireless plug-in devices in theOBD Data Link Connector (DLC) mayallow unauthorized third parties togain access to vehicle systems and datawhich could impair the function of variousvehicle systems, including safety-relatedsystems. The DLC should only be used bya repair facility that operates in accordancewith Ford’s service and repair instructions.
Your vehicle has an OBD Data LinkConnector (DLC) that is used inconjunction with a diagnostic scan tool forvehicle diagnostics, repairs andreprogramming services. Installing anaftermarket device that uses the DLCduring normal driving for purposes such asremote insurance company monitoring,transmission of vehicle data to otherdevices or entities, or altering theperformance of the vehicle, may causeinterference with or even damage tovehicle systems. We do not recommendor endorse the use of aftermarket plug-indevices unless approved by Ford. Thevehicle Warranty will not cover damagecaused by an aftermarket plug-in device.
MOBILE COMMUNICATIONS
EQUIPMENT
WARNING
Driving while distracted can result inloss of vehicle control, crash andinjury. We strongly recommend thatyou use extreme caution when using anydevice that may take your focus off theroad. Your primary responsibility is the safeoperation of your vehicle. We recommendagainst the use of any hand-held devicewhile driving and encourage the use ofvoice-operated systems when possible.Make sure you are aware of all applicablelocal laws that may affect the use ofelectronic devices while driving.
Using mobile communications equipmentis becoming increasingly important in theconduct of business and personal affairs.However, you must not compromise yourown or others’ safety when using suchequipment. Mobile communications canenhance personal safety and security whenappropriately used, particularly inemergency situations. Safety must beparamount when using mobilecommunications equipment to avoidnegating these benefits. Mobilecommunication equipment includes, butis not limited to, cellular phones, pagers,portable email devices, text messagingdevices and portable two-way radios.
EXPORT UNIQUE OPTIONS
For your particular global region, yourvehicle may be equipped with features andoptions that are different from the featuresand options that are described in thisOwner’s Manual. A market uniquesupplement may be supplied thatcomplements this book. By referring to themarket unique supplement, if provided,you can properly identify those features,
13
Expedition (TB7) Canada/United States of America, enUSA, Edition date: 03/2016, First Printing
Introduction
Page 19 of 500
GENERAL INFORMATION
See the following sections for directionson how to properly use safety restraintsfor children.
WARNINGS
Always make sure your child issecured properly in a device that isappropriate for their height, age andweight. Child safety restraints must bebought separately from your vehicle.Failure to follow these instructions andguidelines may result in an increased riskof serious injury or death to your child.
All children are shaped differently.The National Highway Traffic SafetyAdministration and other safetyorganizations, base their recommendationsfor child restraints on probable child height,age and weight thresholds, or on theminimum requirements of the law. Werecommend that you check with a NHTSACertified Child Passenger Safety
WARNINGS
Technician (CPST) to make sure that youproperly install the child restraint in yourvehicle and that you consult yourpediatrician to make sure you have a childrestraint appropriate for your child. Tolocate a child restraint fitting station andCPST, contact NHTSA toll free at1-888-327-4236 or go towww.nhtsa.dot.gov. In Canada, contactTransport Canada toll free at1-800-333-0371 or go to www.tc.gc.ca tofind a Child Car Seat Clinic in your area.Failure to properly restrain children in childrestraints made especially for their height,age and weight, may result in an increasedrisk of serious injury or death to your child.
On hot days, the temperature insidethe vehicle can rise very quickly.Exposure of people or animals tothese high temperatures for even a shorttime can cause death or serious heatrelated injuries, including brain damage.Small children are particularly at risk.
16
Expedition (TB7) Canada/United States of America, enUSA, Edition date: 03/2016, First Printing
Child Safety
Page 21 of 500
Use a child safety seat (sometimes calledan infant carrier, convertible seat, ortoddler seat) for infants, toddlers, orchildren weighing 40 pounds (18kilograms) or less (generally age four oryounger).
Using Lap and Shoulder Belts
WARNINGS
Airbags can kill or injure a child in achild seat. Never place a rear-facingchild seat in front of an active airbag.If you must use a forward-facing child seatin the front seat, move the vehicle seatupon which the seat is installed all the wayback.
Airbags can kill or injure a child in achild seat. Children 12 and undershould be properly restrained in therear seat whenever possible.
Depending on where you secure achild restraint, and depending on thechild restraint design, you may blockaccess to certain seatbelt buckleassemblies and LATCH lower anchors,rendering those features potentiallyunusable. To avoid risk of injury, occupantsshould only use seating positions wherethey are able to be properly restrained.
When installing a child safety seat withcombination lap and shoulder belts:
•Use the correct seatbelt buckle for thatseating position.
•Insert the belt tongue into the properbuckle until you hear a snap and feel itlatch. Make sure the tongue is securelyfastened in the buckle.
•Keep the buckle release buttonpointing up and away from the safetyseat, with the tongue between the childseat and the release button, to preventaccidental unbuckling.
•Place the vehicle seat upon which thechild seat will be installed in the uprightposition.
•Put the seatbelt in the automaticlocking mode. This vehicle does notrequire the use of a locking clip.
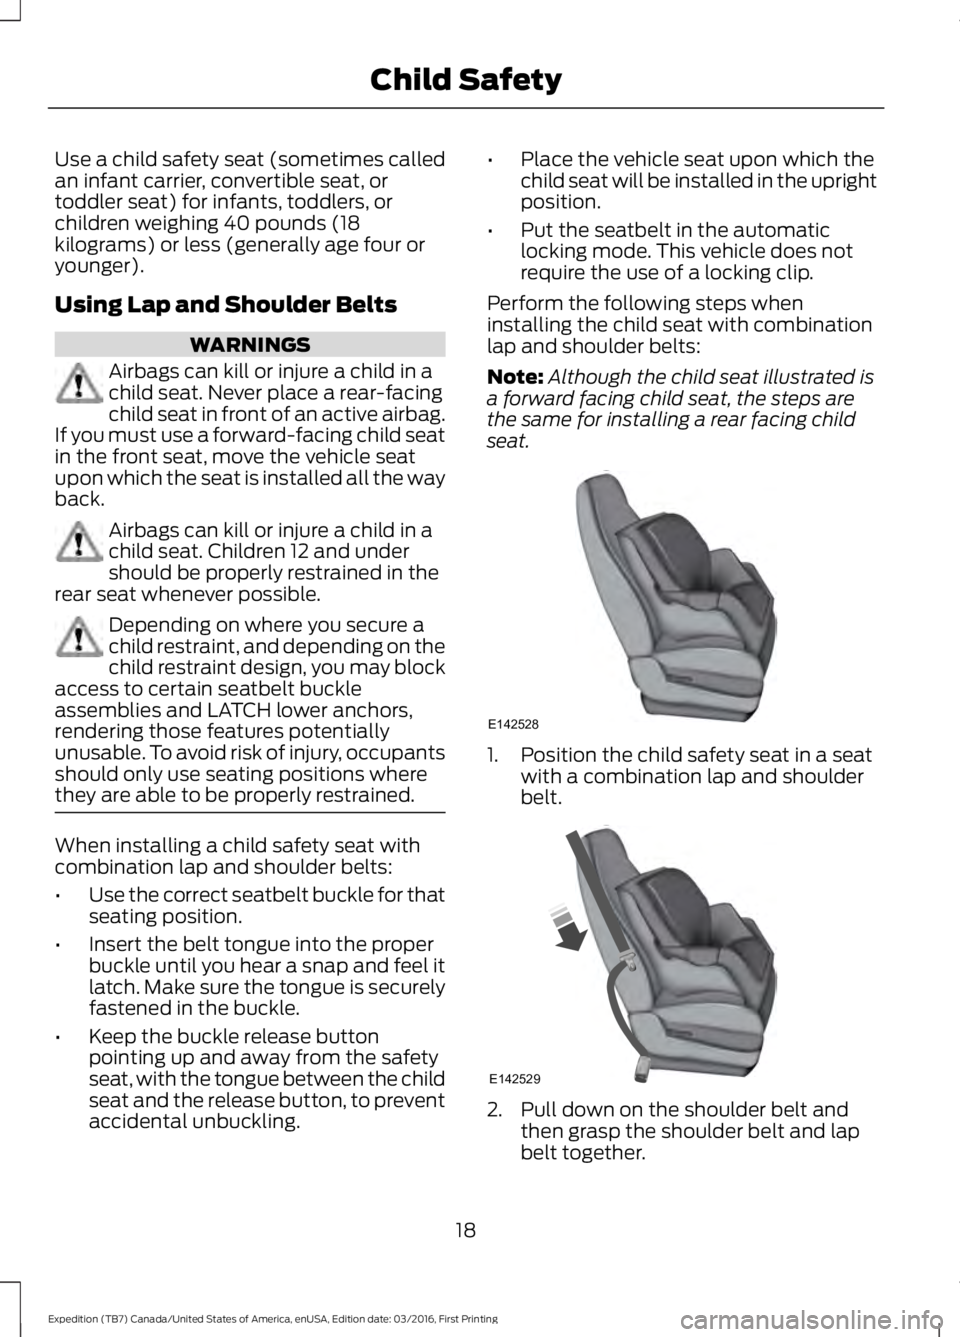
Perform the following steps wheninstalling the child seat with combinationlap and shoulder belts:
Note:Although the child seat illustrated isa forward facing child seat, the steps arethe same for installing a rear facing childseat.
1. Position the child safety seat in a seatwith a combination lap and shoulderbelt.
2. Pull down on the shoulder belt andthen grasp the shoulder belt and lapbelt together.
18
Expedition (TB7) Canada/United States of America, enUSA, Edition date: 03/2016, First Printing
Child SafetyE142528 E142529
Page 22 of 500
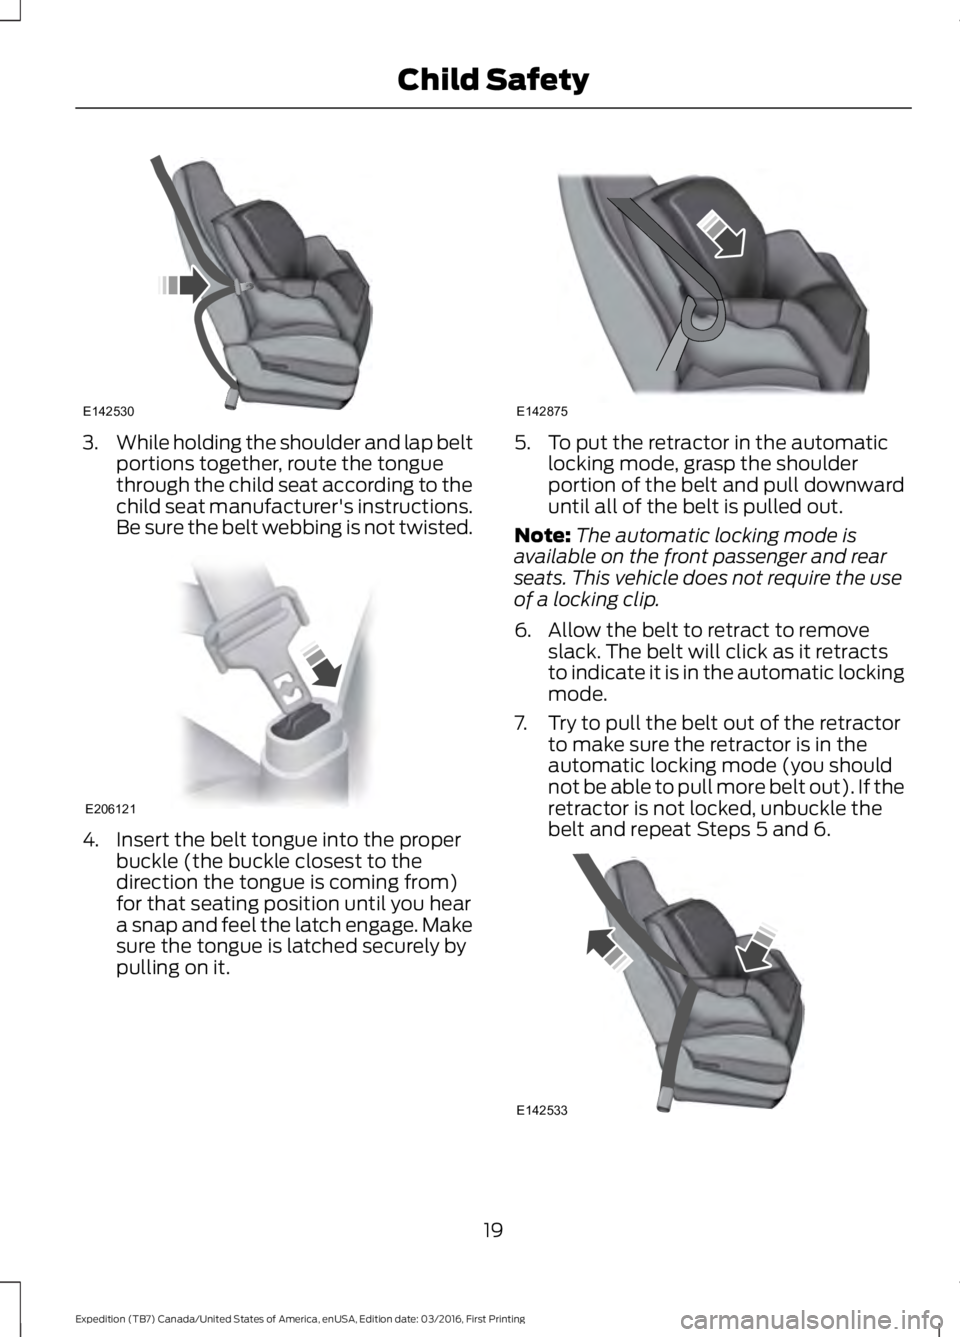
3.While holding the shoulder and lap beltportions together, route the tonguethrough the child seat according to thechild seat manufacturer's instructions.Be sure the belt webbing is not twisted.
4. Insert the belt tongue into the properbuckle (the buckle closest to thedirection the tongue is coming from)for that seating position until you heara snap and feel the latch engage. Makesure the tongue is latched securely bypulling on it.
5. To put the retractor in the automaticlocking mode, grasp the shoulderportion of the belt and pull downwarduntil all of the belt is pulled out.
Note:The automatic locking mode isavailable on the front passenger and rearseats. This vehicle does not require the useof a locking clip.
6. Allow the belt to retract to removeslack. The belt will click as it retractsto indicate it is in the automatic lockingmode.
7. Try to pull the belt out of the retractorto make sure the retractor is in theautomatic locking mode (you shouldnot be able to pull more belt out). If theretractor is not locked, unbuckle thebelt and repeat Steps 5 and 6.
19
Expedition (TB7) Canada/United States of America, enUSA, Edition date: 03/2016, First Printing
Child SafetyE142530 E206121 E142875 E142533
Page 23 of 500
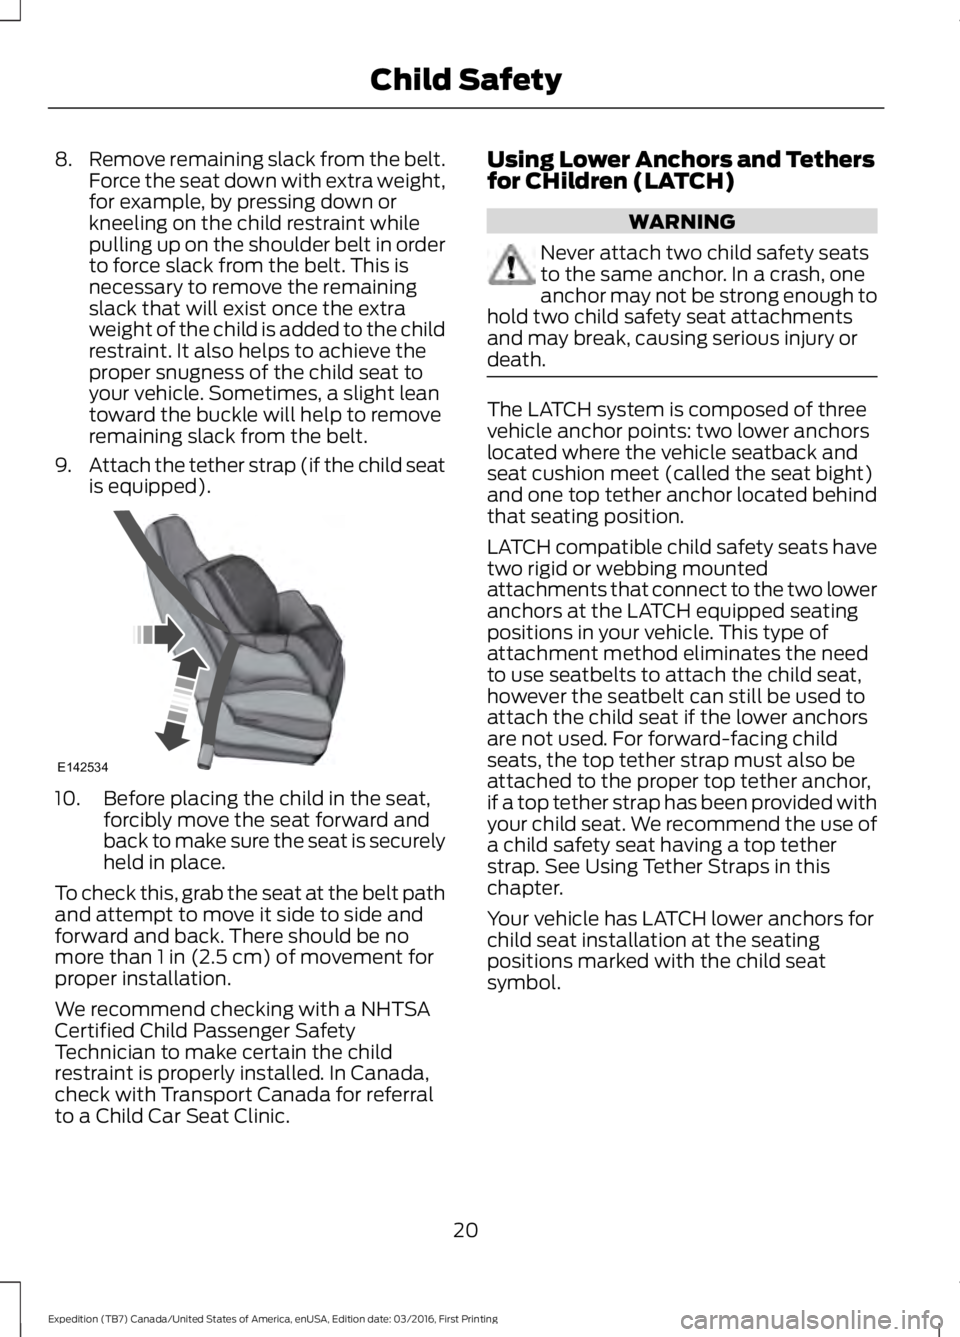
8.Remove remaining slack from the belt.Force the seat down with extra weight,for example, by pressing down orkneeling on the child restraint whilepulling up on the shoulder belt in orderto force slack from the belt. This isnecessary to remove the remainingslack that will exist once the extraweight of the child is added to the childrestraint. It also helps to achieve theproper snugness of the child seat toyour vehicle. Sometimes, a slight leantoward the buckle will help to removeremaining slack from the belt.
9.Attach the tether strap (if the child seatis equipped).
10. Before placing the child in the seat,forcibly move the seat forward andback to make sure the seat is securelyheld in place.
To check this, grab the seat at the belt pathand attempt to move it side to side andforward and back. There should be nomore than 1 in (2.5 cm) of movement forproper installation.
We recommend checking with a NHTSACertified Child Passenger SafetyTechnician to make certain the childrestraint is properly installed. In Canada,check with Transport Canada for referralto a Child Car Seat Clinic.
Using Lower Anchors and Tethersfor CHildren (LATCH)
WARNING
Never attach two child safety seatsto the same anchor. In a crash, oneanchor may not be strong enough tohold two child safety seat attachmentsand may break, causing serious injury ordeath.
The LATCH system is composed of threevehicle anchor points: two lower anchorslocated where the vehicle seatback andseat cushion meet (called the seat bight)and one top tether anchor located behindthat seating position.
LATCH compatible child safety seats havetwo rigid or webbing mountedattachments that connect to the two loweranchors at the LATCH equipped seatingpositions in your vehicle. This type ofattachment method eliminates the needto use seatbelts to attach the child seat,however the seatbelt can still be used toattach the child seat if the lower anchorsare not used. For forward-facing childseats, the top tether strap must also beattached to the proper top tether anchor,if a top tether strap has been provided withyour child seat. We recommend the use ofa child safety seat having a top tetherstrap. See Using Tether Straps in thischapter.
Your vehicle has LATCH lower anchors forchild seat installation at the seatingpositions marked with the child seatsymbol.
20
Expedition (TB7) Canada/United States of America, enUSA, Edition date: 03/2016, First Printing
Child SafetyE142534
Page 24 of 500
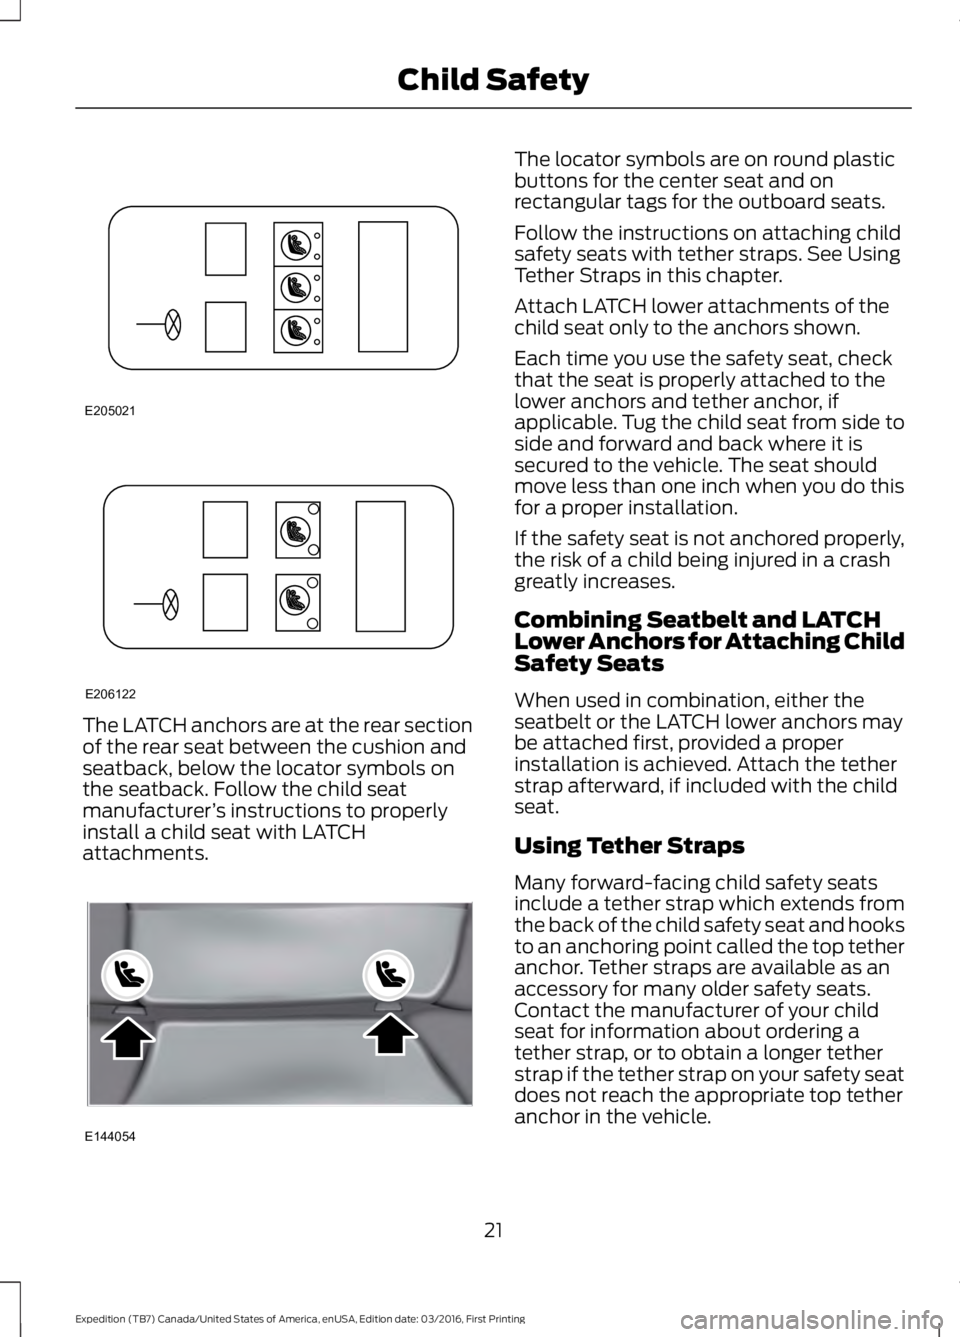
The LATCH anchors are at the rear sectionof the rear seat between the cushion andseatback, below the locator symbols onthe seatback. Follow the child seatmanufacturer’s instructions to properlyinstall a child seat with LATCHattachments.
The locator symbols are on round plasticbuttons for the center seat and onrectangular tags for the outboard seats.
Follow the instructions on attaching childsafety seats with tether straps. See UsingTether Straps in this chapter.
Attach LATCH lower attachments of thechild seat only to the anchors shown.
Each time you use the safety seat, checkthat the seat is properly attached to thelower anchors and tether anchor, ifapplicable. Tug the child seat from side toside and forward and back where it issecured to the vehicle. The seat shouldmove less than one inch when you do thisfor a proper installation.
If the safety seat is not anchored properly,the risk of a child being injured in a crashgreatly increases.
Combining Seatbelt and LATCHLower Anchors for Attaching ChildSafety Seats
When used in combination, either theseatbelt or the LATCH lower anchors maybe attached first, provided a properinstallation is achieved. Attach the tetherstrap afterward, if included with the childseat.
Using Tether Straps
Many forward-facing child safety seatsinclude a tether strap which extends fromthe back of the child safety seat and hooksto an anchoring point called the top tetheranchor. Tether straps are available as anaccessory for many older safety seats.Contact the manufacturer of your childseat for information about ordering atether strap, or to obtain a longer tetherstrap if the tether strap on your safety seatdoes not reach the appropriate top tetheranchor in the vehicle.
21
Expedition (TB7) Canada/United States of America, enUSA, Edition date: 03/2016, First Printing
Child SafetyE205021 E206122 E144054
Page 33 of 500
The safety belt pretensioners at the frontseating positions are designed to tightenthe safety belts when activated. In frontaland near-frontal crashes, the safety beltpretensioners may be activated alone or,if the crash is of sufficient severity, togetherwith the front airbags. In side crashes androllovers, the pretensioners will beactivated when the Safety Canopy isactivated.
FASTENING THE SEATBELTS
The front outboard and rear safetyrestraints in the vehicle are combinationlap and shoulder belts.
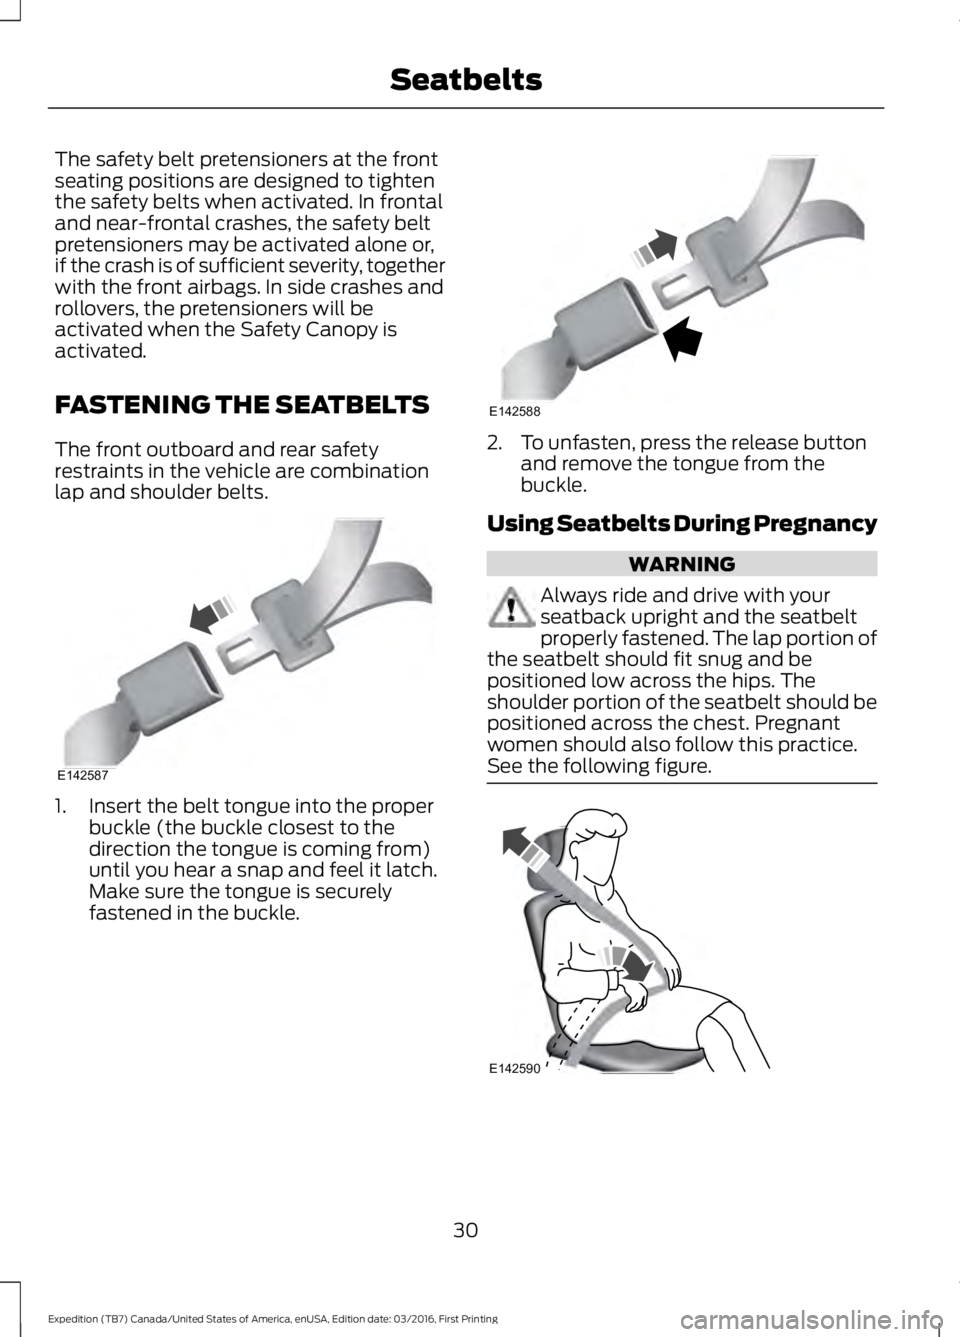
1. Insert the belt tongue into the properbuckle (the buckle closest to thedirection the tongue is coming from)until you hear a snap and feel it latch.Make sure the tongue is securelyfastened in the buckle.
2. To unfasten, press the release buttonand remove the tongue from thebuckle.
Using Seatbelts During Pregnancy
WARNING
Always ride and drive with yourseatback upright and the seatbeltproperly fastened. The lap portion ofthe seatbelt should fit snug and bepositioned low across the hips. Theshoulder portion of the seatbelt should bepositioned across the chest. Pregnantwomen should also follow this practice.See the following figure.
30
Expedition (TB7) Canada/United States of America, enUSA, Edition date: 03/2016, First Printing
SeatbeltsE142587 E142588 E142590