Page 201 of 300

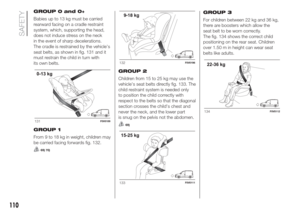
after disconnecting the battery
charger, reconnect the quick-release
negative terminal A to the dummy pole
B.
Versions without dummy pole
fig. 221
To recharge proceed as follows, paying
great care:
press button A to detach connector
B from battery status monitoring sensor
C (this is located on the negative pole
of the battery itself);
connect the positive cable (+) of the
battery charger to the battery positive
terminal (+);
connect the negative cable (–) of the
battery charger to the pin D of the
negative battery terminal (–);
turn on the charger;
when you have finished, turn the
charger off before disconnecting the
battery;
reconnect the connector B to the
sensor C of the battery.
146) 147)
WARNING
146)Battery fluid is poisonous and
corrosive: avoid contact with your skin and
eyes. The battery should be charged in a
well ventilated place, away from naked
flames or possible sources of sparks:
danger of explosion and fire.
147)Do not attempt to charge a frozen
battery: it must be thawed first, otherwise it
may explode. If freezing has occurred, the
battery should be checked by specialised
technicians to make sure that the internal
elements are not damaged and that the
body is not cracked, with the risk of leaking
poisonous and corrosive acid.
WINDSCREEN/REAR
WINDOW WIPER
(for versions/markets, where provided)
BLADES
Periodically clean the rubber part using
special products; PETRONAS
DURANCE SC 35 is
recommended.
Replace the blades if the rubber edge is
deformed or worn. In any case, it is
advisable to replace them
approximately once a year.
A few simple precautions can reduce
the possibility of damage to the blades:
if the temperature falls below zero,
make sure that ice has not frozen
the rubber against the glass. Use a
de-icing product to release it if required;
remove any snow from the glass: in
addition to protecting the blades, this
prevents effort on the motor and
overheating;
do not operate the windscreen and
rear window wipers on dry glass.
148)
Replacing the windscreen wiper
blades fig. 222
Proceed as follows:
lift up the windscreen wiper arm;
221F0V0380
197
Page 202 of 300

push retaining device A and, at the
same time, slide the blade from the arm
by pushing it in the direction shown in
the diagram.
Replacing the rear window wiper
blade fig. 223-fig. 224
(for versions/markets, where provided)
Wing door versions fig. 223
Proceed as follows:
press the retaining tag A and pull the
brush out making it slide in the
direction indicated by the arrow.
Swing door versions fig. 224
Proceed as follows:
press the retainer reversely operating
as shown, then remove the blade.SPRAY NOZZLES
If the jet is not coming out, firstly check
that there is fluid in the windscreen/rear
window reservoir (for versions/markets
where provided) (see “Checking levels”
in this section).
Then check that the nozzle holes are
not clogged; use a needle to unblock
them if necessary.Windscreen (washer)
The window washer nozzles are fixed.
The nozzle holders are located under
the bonnet (see fig. 225).
Rear window (washer)
The rear window washer jets are fixed.
The nozzle holder is located above
the rear window.
WARNING
148)Driving with worn windscreen wiper
blades is a serious hazard, because
visibility is reduced in bad weather
conditions.
222F0V0090
223F0V0250
224F0V0211
225F0V0091
198
SERVICING AND CARE
Page 203 of 300

WHEELS AND TYRES
Check the pressure of each tyre,
including the space-saver wheel,
approximately every two weeks and
before long journeys: the pressure
should be checked with the tyre rested
and cold.
It is normal for the pressure to increase
when the vehicle is used; for the correct
tyre inflation pressure, see “Wheels” in
the “Technical specifications” section.
Incorrect pressure causes abnormal
tyre wear fig. 226:
Anormal pressure: tread evenly worn;
Blow pressure: tread particularly worn
at the edges;
Chigh pressure: tread particularly worn
in the centre.The tyres must be replaced when the
tread is less than 1.6 mm thick. In
any case, follow the laws in force in the
country you are in.
IMPORTANT
As far as possible, avoid sharp
braking, screech starts and violent
shocks against pavements, potholes or
other hard obstacles. Driving for long
stretches over bumpy roads can
damage the tyres;
periodically check that the tyres
have no cuts in the side wall, abnormal
swelling or irregular tyre wear. Contact
a Fiat Dealership if required;
avoid overloading the vehicle when
travelling: this may cause serious
damage to the wheels and tyres;
if a tyre is punctured, stop
immediately and change it to avoid
damage to the tyre, the rim,
suspensions and steering system;
tyres age even if they are not used
much. Cracks in the tread and on
the side walls are a sign of ageing.
Have the tyres checked by specialised
personnel if they have been fitted for
longer than 6 years. Remember to
check the spare wheel very carefully;
in the case of replacement, always
fit new tyres, avoiding those of
unknown origin;
If a tyre is changed, also change the
inflation valve;
to allow even wear between the
front and rear tyres, it is advisable to
change them over every 10-15
thousand kilometres, keeping them on
the same side of the vehicle so as
not to reverse the direction of rotation.
149) 150) 151) 152)
WARNING
149)Remember that the road holding
qualities of your vehicle also depend on the
correct inflation pressure of the tyres.
150)If tyre pressure is too low, the tire may
overheat and be severely damaged as a
result.
151)Do not switch tyres from the
righthand side of the vehicle to the
lefthand side, and vice versa.
152)Never submit alloy rims to repainting
treatments requiring the use of
temperatures exceeding 150°C. The
mechanical properties of the wheels could
be impaired.
226F0V0161
199
Page 204 of 300

RUBBER HOSES
As far as the maintenance of the brake
system and fuel supply system rubber
hoses is concerned, follow the
"Scheduled Servicing Plan" in this
chapter carefully.
Ozone, high temperatures and
prolonged lack of fluid in the system
may cause hardening and cracking of
the hoses, with possible leaks. Careful
checking is therefore necessary.
PROLONGED
VEHICLE INACTIVITY
If the vehicle needs to be off the road
for longer than one month, the following
precautions must be taken:
park the vehicle indoors in a dry
and, if possible, well-ventilated place;
engage a gear and check that
the handbrake is not engaged;
disconnect the negative terminal
from the battery pole (see paragraph
“Vehicle inactivity” in the "Dashboard
and controls" chapter) and check
the charge conditions (see paragraph
“Battery” in the “Care and
maintenance” chapter);
clean and protect the painted parts
using protective wax;
clean and protect the shiny metal
parts using special compounds
available commercially;
sprinkle talcum powder on the
windscreen and rear window wiper
rubber blades and lift them off the
glass;
slightly open the windows;
cover the vehicle with a piece of
fabric or perforated plastic sheet. Do
not use compact plastic tarpaulins,
which prevent humidity from
evaporating from the surface of the
vehicle;
inflate tyres to +0.5 bar above the
standard specified pressure and check
it at intervals;
do not drain the engine cooling
system.
200
SERVICING AND CARE
Page 205 of 300

BODYWORK
PROTECTION AGAINST
ATMOSPHERIC AGENTS
The main causes of corrosion are the
following:
atmospheric pollution;
salty air and humidity (coastal areas,
or hot humid climates);
seasonal environmental conditions.
The abrasive action of wind-borne
atmospheric dust and sand, as well as
mud and gravel raised by other cars
is also not to be underestimated.
On your vehicle, Fiat has implemented
the best manufacturing technologies
to effectively protect the bodywork
against corrosion.
These include:
painting products and systems
which give the vehicle particular
resistance to corrosion and abrasion;
use of galvanised (or pretreated)
sheet metal, with high resistance to
corrosion;
spraying the underbody, engine
compartment, wheelhouse internal
parts and other parts with highly
protective wax products;
spraying of plastic parts, with a
protective function in the more exposed
points: underdoor, inner wing, edges,
etc.;
use of "open" boxed sections to
prevent condensation and pockets of
moisture from triggering rust inside.
VEHICLE EXTERIOR AND
UNDERBODY WARRANTY
Your vehicle is covered by warranty
against perforation due to corrosion of
any original element of the structure
or body.
For the general terms of this warranty,
refer to the Warranty Booklet.
ADVICE FOR
PRESERVING THE
BODYWORK
Paintwork
Paintwork does not only serve an
aesthetic purpose, but also protects the
underlying sheet metal.
Touch up abrasions and scratches
immediately to prevent rust formation.
Use only original paint products for
touch-ups (see “Bodywork paint
identification plate” in the “Technical
specifications” section).
Normal maintenance of paintwork
consists in washing the vehicle: the
frequency depends on the conditions
and environment where the vehicle
is used.
For example, it is advisable to wash the
vehicle more often in areas with high
levels of environmental pollution or on
roads spread with salt.To correctly wash the vehicle, proceed
as follows:
wash the bodywork using a low
pressure jet of water;
wipe a sponge with a slightly soapy
solution over the bodywork, frequently
rinsing the sponge;
rinse well with water and dry with a
jet of air or a chamois.
If you put the vehicle through a car
wash, follow these recommendations:
– remove the aerial from the roof so
it does not get damaged;
– water added to a soapy solution
should be used for washing;
– rinse thoroughly to avoid soap marks
staying on the bodywork or less visible
parts.
39)Dry the less visible parts with special
care, such as the door frames, bonnet
and the headlight frames, where water
may stagnate more easily. It is a good
idea to leave the vehicle outdoors
for a while after washing it to give water
time to evaporate.
Do not wash the vehicle after it has
been left in the sun or with the bonnet
hot: this may alter the shine of the
paintwork.
201
Page 206 of 300

Exterior plastic parts should be cleaned
in the same way as the rest of the
vehicle. Where possible, do not park
the vehicle under trees; the resinous
substances released by many species
give the paint a dull appearance and
increase the possibility of corrosion.
IMPORTANT Bird droppings should be
washed off immediately and thoroughly
as the acid they contain is particularly
aggressive.
7)
Windows
To clean glasses, use specific cleaning
products. Use clean cloths to avoid
scratching the glass or damaging the
transparency.
IMPORTANT Wipe the inside surface of
the rear window gently with a cloth in
the direction of the filaments to avoid
damaging the heater coils.
Engine compartment
At the end of each winter, thoroughly
wash the engine compartment, taking
care to avoid spraying the water jet
directly onto the electronic control units
and the relay/fuse box on the left side
of the engine compartment (driving
direction). Have this operation
performed at a specialised workshop.IMPORTANT The washing should take
place with the engine cold and the
ignition key in the STOP position. After
the washing operation, make sure
that the various protections (e.g. rubber
caps and guards) have not been
removed or damaged.
Headlights
IMPORTANT Never use aromatic
substances (e.g. petrol) or ketones (e.g.
acetone) for cleaning the plastic lenses
of the front headlights.
WARNING
39)Some car washes with old-style blades
and/or in a poor state of repair can
damage the paintwork, facilitating the
formation of lines that give the paint
a dull/misty appearance, especially on dark
colours. If this happens, lightly polish the
paintwork with appropriate products.
WARNING
7)Detergents cause water pollution. The
vehicle should be washed in areas
equipped for collecting and purifying the
liquid used in the washing process.
INTERIORS
Regularly check that water is not
trapped under the mats (due to water
dripping off shoes, umbrellas, etc.),
as this could cause oxidation of the
sheet metal.
153) 154)
SEATS AND FABRIC
PARTS
Remove dust with a soft brush or a
vacuum cleaner. It is advisable to use a
moist brush on velvet upholstery.
Rub the seats with a sponge moistened
with a solution of water and mild soap.
PLASTIC PARTS
It is advisable to clean interior parts with
a moist cloth and a solution of water
and non-abrasive mild soap. Use
specific products for cleaning plastic,
without solvents and specifically
designed to prevent damage to the
appearance and colour of the treated
parts, to remove grease and tough
stains.
IMPORTANT Do not use alcohol,
petrols or their derivatives to clean the
instrument panel glass.
202
SERVICING AND CARE
Page 207 of 300

LEATHER STEERING
WHEEL/GEAR
KNOB/HANDBRAKE
(for versions/markets, where provided)
These components must be cleaned
with mild soap and water only. Never
use alcohol or alcohol-based products.
Read the product label carefully before
using specific products for cleaning
the interiors: make sure the product
does not contain spirits or alcohol-
based substances.
If, when cleaning the windscreen with
special products, window cleaner
accidentally drips onto the leather of
the steering wheel/gear lever
knob/hand brake, wipe away
immediately and then wash the affected
area with mild soap and water.
IMPORTANT Be careful when using a
steering wheel locking device, to avoid
damaging the leather upholstery
through abrasion.
WARNING
153)Never use flammable products, such
as petroleum ether or modified petrol, to
clean the inside of the vehicle. The
electrostatic charges which are generated
by rubbing during the cleaning operation
may cause a fire.
154)Do not keep aerosol cans in the
vehicle: they might explode. Aerosol cans
must not be exposed to a temperature
exceeding 50°C. When the vehicle is
exposed to sunlight, the internal
temperature can greatly exceed this value.
203
Page 208 of 300
204
This page is intentionally left blank