2017 FIAT 500L LIVING roof
[x] Cancel search: roofPage 2 of 240
We really know your car because we invented, designed and built it: we really know every single detail.
At Fiat Service authorised workshopsyou can find technicians directly trained by us,
offering quality and professionalism for all service operations.
Fiat workshops are always close to you for the regular servicing operations, season checks
and practical recommendations by our experts.
With Original Parts distributed by MOPAR
®, you maintain the reliability, comfort
and performance features that you bought your new car for over time.
Always ask for Genuine Parts for the components used on our cars; we recommend them because
they come from our steady commitment in research and development of highly innovative technologies.
For all these reasons: rely on Genuine Parts, because they are the only ones designed
by FCA for your car.
SAFETY:
BRAKING SYSTEMENVIRONMENT: PARTICULATE FILTERS,
CLIMATE CONTROL MAINTENANCECOMFORT: SUSPENSION
AND WINDSCREEN WIPERS PERFORMANCE: SPARK PLUGS,
INJECTORS AND BATTERIESLINEACCESSORI
ROOF RACK BARS, WHEEL RIMS
WHY CHOOSING
GENUINE PARTS
This Owner Handbook is intended to show the vehicle's operating conditions.
For the enthusiast user who wants to have insights, curiosities and detailed information about the characteristics and functions
of the vehicle, Fiat gives the opportunity to consult a dedicated section which is available in electronic format.
ONLINE VEHICLE OWNER HANDBOOK
The following symbol is reported within the text of the Owner Handbook, next to the subjects for which details are provided.
Go to the www.mopar.eu/owner
website and access your personal area.
The “Maintenance and care” page includes all the information about your vehicle and the link to access eLUM, where you will find
all the details of the Owner Handbook.
Alternatively, to access this information, go to the Internet website at http://aftersales.fiat.com/elum/
.
The eLUMwebsite is free and will allow you, among many other things, to easily consult the on-board documents
of all the other vehicles of the Group.
Have a nice reading and happy motoring!
Cop 500L LUM GB.qxp_500 UM ITA 30/11/15 11:10 Pagina 2
Page 8 of 240
GETTING TO KNOW YOUR CAR
In-depth knowledge of your new vehicle
starts here.
The handbook that you are reading
simply and directly explains how it
is made and how it works.
That’s why we advise you to read it
seated comfortably on board, so that
you can see immediately what is
described here for yourself.DASHBOARD ................................. 7
THE FIAT CODE SYSTEM ............... 8
THE KEYS....................................... 8
IGNITION DEVICE ........................... 10
SEATS ............................................ 11
HEAD RESTRAINTS ........................ 13
STEERING WHEEL ......................... 14
REAR VIEW MIRRORS .................... 15
CLIMATE CONTROL SYSTEM ....... 16
EXTERIOR LIGHTS ......................... 19
WINDOW CLEANING ...................... 21
ROOF LIGHTS ................................ 23
FIXED GLASS ROOF ....................... 23
ELECTRIC SUN ROOF .................... 24
DOORS ........................................... 26
ELECTRIC WINDOWS .................... 28
LUGGAGE COMPARTMENT ........... 29
BONNET ......................................... 31
DUALDRIVE ELECTRIC POWER
STEERING ...................................... 32
VERSION WITH LPG SYSTEM ........ 33
VERSION WITH METHANE
SYSTEM (NATURAL POWER) ......... 36
6
GETTING TO KNOW YOUR CAR
Page 11 of 240
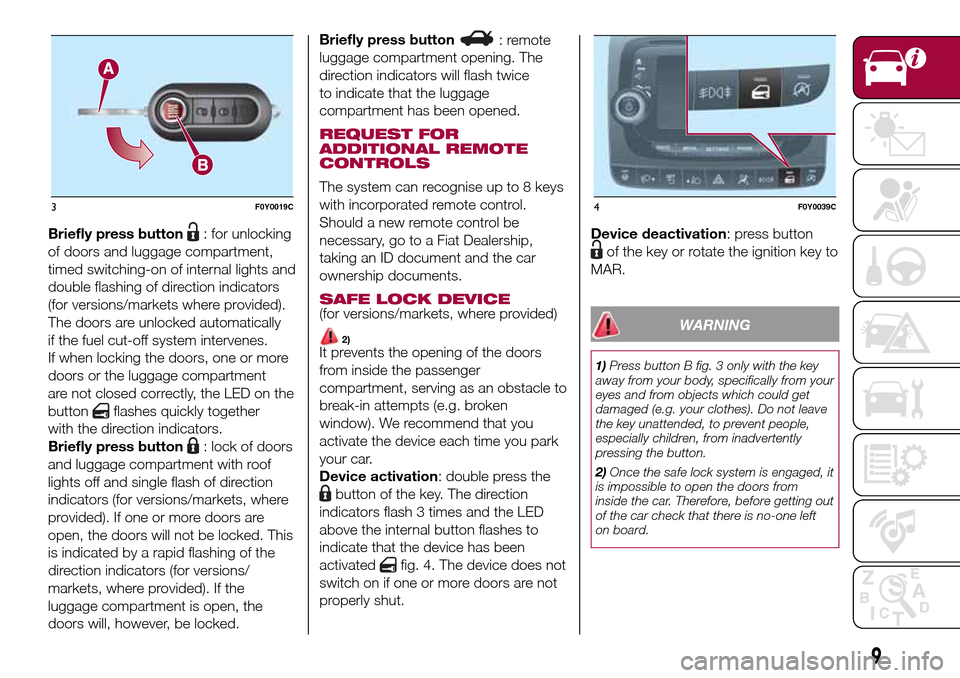
Briefly press button: for unlocking
of doors and luggage compartment,
timed switching-on of internal lights and
double flashing of direction indicators
(for versions/markets where provided).
The doors are unlocked automatically
if the fuel cut-off system intervenes.
If when locking the doors, one or more
doors or the luggage compartment
are not closed correctly, the LED on the
button
flashes quickly together
with the direction indicators.
Briefly press button
: lock of doors
and luggage compartment with roof
lights off and single flash of direction
indicators (for versions/markets, where
provided). If one or more doors are
open, the doors will not be locked. This
is indicated by a rapid flashing of the
direction indicators (for versions/
markets, where provided). If the
luggage compartment is open, the
doors will, however, be locked.Briefly press button
: remote
luggage compartment opening. The
direction indicators will flash twice
to indicate that the luggage
compartment has been opened.
REQUEST FOR
ADDITIONAL REMOTE
CONTROLS
The system can recognise up to 8 keys
with incorporated remote control.
Should a new remote control be
necessary, go to a Fiat Dealership,
taking an ID document and the car
ownership documents.
SAFE LOCK DEVICE(for versions/markets, where provided)
2)It prevents the opening of the doors
from inside the passenger
compartment, serving as an obstacle to
break-in attempts (e.g. broken
window). We recommend that you
activate the device each time you park
your car.
Device activation: double press the
button of the key. The direction
indicators flash 3 times and the LED
above the internal button flashes to
indicate that the device has been
activated
fig. 4. The device does not
switch on if one or more doors are not
properly shut.Device deactivation: press button
of the key or rotate the ignition key to
MAR.
WARNING
1)Press button B fig. 3 only with the key
away from your body, specifically from your
eyes and from objects which could get
damaged (e.g. your clothes). Do not leave
the key unattended, to prevent people,
especially children, from inadvertently
pressing the button.
2)Once the safe lock system is engaged, it
is impossible to open the doors from
inside the car. Therefore, before getting out
of the car check that there is no-one left
on board.
3F0Y0019C4F0Y0039C
9
Page 25 of 240
8)Do not activate the rain sensor while
washing the vehicle in an automatic
washing system.
9)If ice is found on the windscreen, make
sure that the device was disconnected
properly.
10)Do not use the rear window wiper to
remove layers of snow or ice. In such
conditions, the wiper may be subjected to
excessive stress and the motor cut-out
switch, which prevents operation for a few
seconds, may intervene. If operation is
not subsequently restored, contact a Fiat
Dealership.ROOF LIGHTS
FRONT ROOF LIGHT
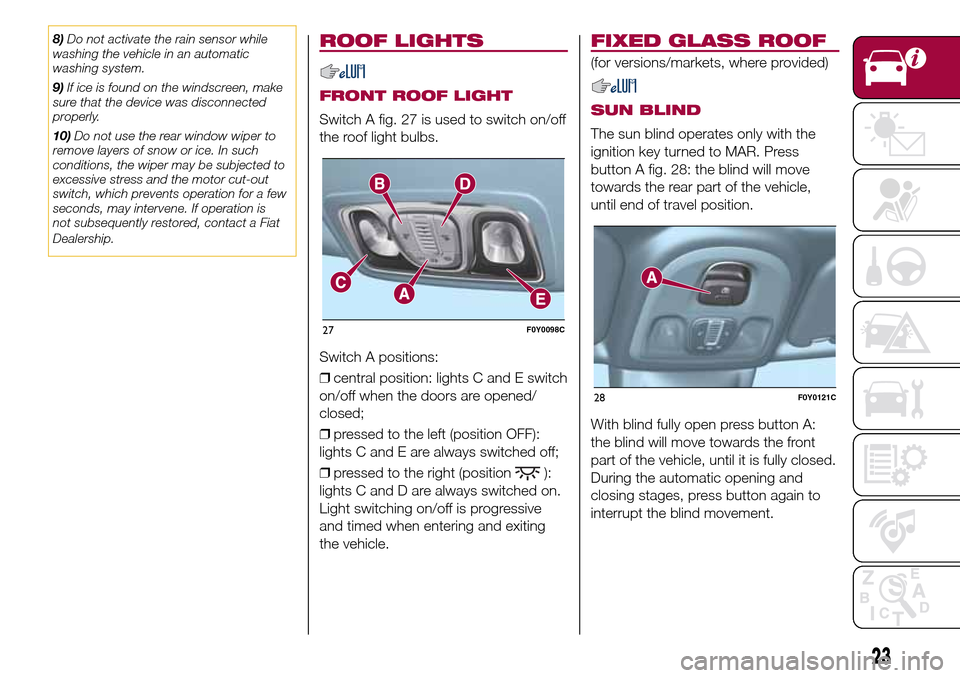
Switch A fig. 27 is used to switch on/off
the roof light bulbs.
Switch A positions:
❒central position: lights C and E switch
on/off when the doors are opened/
closed;
❒pressed to the left (position OFF):
lights C and E are always switched off;
❒pressed to the right (position
):
lights C and D are always switched on.
Light switching on/off is progressive
and timed when entering and exiting
the vehicle.
FIXED GLASS ROOF
(for versions/markets, where provided)
SUN BLIND
The sun blind operates only with the
ignition key turned to MAR. Press
button A fig. 28: the blind will move
towards the rear part of the vehicle,
until end of travel position.
With blind fully open press button A:
the blind will move towards the front
part of the vehicle, until it is fully closed.
During the automatic opening and
closing stages, press button again to
interrupt the blind movement.
27F0Y0098C
28F0Y0121C
23
Page 26 of 240
EMERGENCY OPERATION
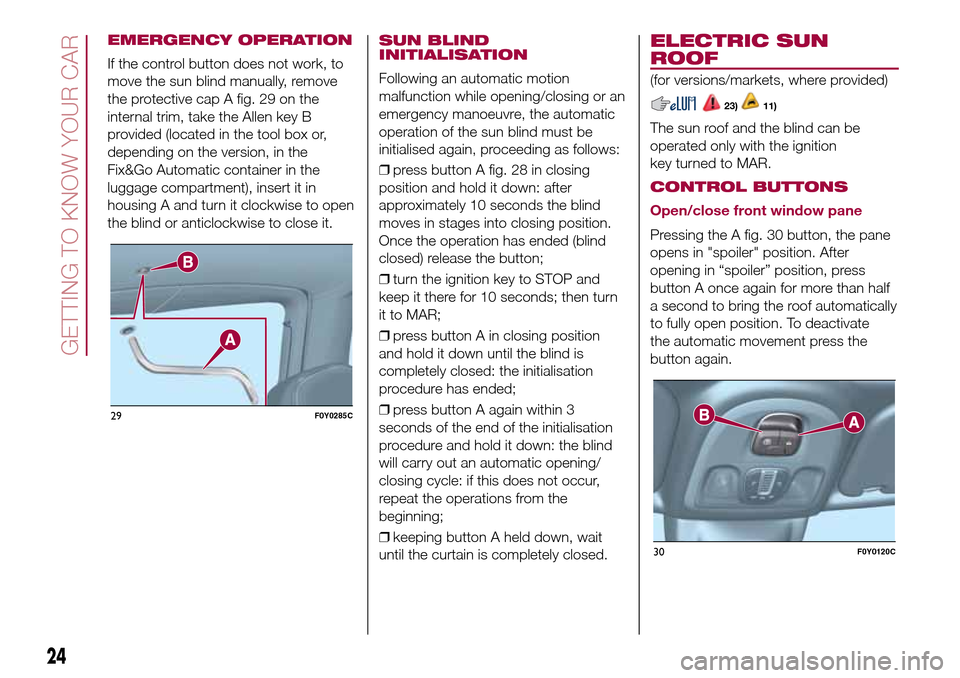
If the control button does not work, to
move the sun blind manually, remove
the protective cap A fig. 29 on the
internal trim, take the Allen key B
provided (located in the tool box or,
depending on the version, in the
Fix&Go Automatic container in the
luggage compartment), insert it in
housing A and turn it clockwise to open
the blind or anticlockwise to close it.
SUN BLIND
INITIALISATION
Following an automatic motion
malfunction while opening/closing or an
emergency manoeuvre, the automatic
operation of the sun blind must be
initialised again, proceeding as follows:
❒press button A fig. 28 in closing
position and hold it down: after
approximately 10 seconds the blind
moves in stages into closing position.
Once the operation has ended (blind
closed) release the button;
❒turn the ignition key to STOP and
keep it there for 10 seconds; then turn
it to MAR;
❒press button A in closing position
and hold it down until the blind is
completely closed: the initialisation
procedure has ended;
❒press button A again within 3
seconds of the end of the initialisation
procedure and hold it down: the blind
will carry out an automatic opening/
closing cycle: if this does not occur,
repeat the operations from the
beginning;
❒keeping button A held down, wait
until the curtain is completely closed.
ELECTRIC SUN
ROOF
(for versions/markets, where provided)
23)11)
The sun roof and the blind can be
operated only with the ignition
key turned to MAR.
CONTROL BUTTONS
Open/close front window pane
Pressing the A fig. 30 button, the pane
opens in "spoiler" position. After
opening in “spoiler” position, press
button A once again for more than half
a second to bring the roof automatically
to fully open position. To deactivate
the automatic movement press the
button again.
29F0Y0285C
30F0Y0120C
24
GETTING TO KNOW YOUR CAR
Page 27 of 240
From the fully open position press
button A: the front glass pane will move
into the "spoiler" position. In this
condition, pressing the button again for
more than half a second, the roof will
automatically move the fully closed
position. To deactivate the automatic
movement press the button again.
Sun blind movement
Pressing the B fig. 30 button: the blind
will move towards the rear part of the
vehicle, until it is fully open. With blind
fully open press button B: the blind
will move towards the front part of the
vehicle, until it is fully closed. During the
blind automatic opening and closing
stages, press the button again to
interrupt the blind movement.
EMERGENCY OPERATION
In the case of control buttons operation
failure, the sun blind and the sun roof
can be moved manually, proceeding as
described below:
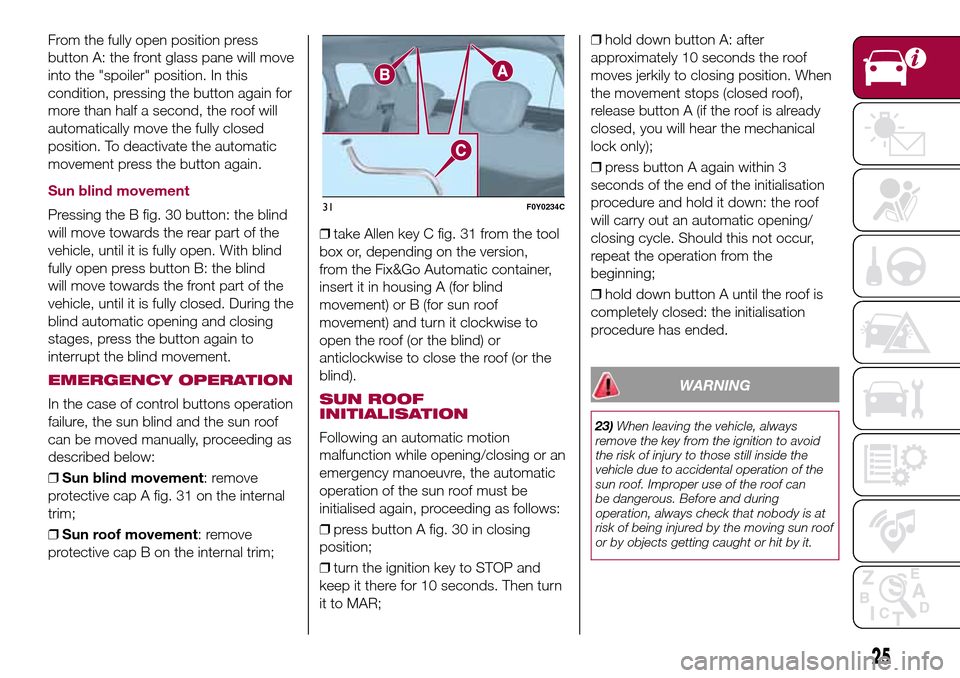
❒Sun blind movement: remove
protective cap A fig. 31 on the internal
trim;
❒Sun roof movement: remove
protective cap B on the internal trim;❒take Allen key C fig. 31 from the tool
box or, depending on the version,
from the Fix&Go Automatic container,
insert it in housing A (for blind
movement) or B (for sun roof
movement) and turn it clockwise to
open the roof (or the blind) or
anticlockwise to close the roof (or the
blind).SUN ROOF
INITIALISATION
Following an automatic motion
malfunction while opening/closing or an
emergency manoeuvre, the automatic
operation of the sun roof must be
initialised again, proceeding as follows:
❒press button A fig. 30 in closing
position;
❒turn the ignition key to STOP and
keep it there for 10 seconds. Then turn
it to MAR;❒hold down button A: after
approximately 10 seconds the roof
moves jerkily to closing position. When
the movement stops (closed roof),
release button A (if the roof is already
closed, you will hear the mechanical
lock only);
❒press button A again within 3
seconds of the end of the initialisation
procedure and hold it down: the roof
will carry out an automatic opening/
closing cycle. Should this not occur,
repeat the operation from the
beginning;
❒hold down button A until the roof is
completely closed: the initialisation
procedure has ended.
WARNING
23)When leaving the vehicle, always
remove the key from the ignition to avoid
the risk of injury to those still inside the
vehicle due to accidental operation of the
sun roof. Improper use of the roof can
be dangerous. Before and during
operation, always check that nobody is at
risk of being injured by the moving sun roof
or by objects getting caught or hit by it.
31F0Y0234C
25
Page 28 of 240
WARNING
11)Do not open the sun roof if a
transverse roof rack is fitted. Do not open
the sun roof if there is snow or ice on it:
you may damage it.
DOORS
DOOR CENTRAL
LOCKING/UNLOCKING
Door locking from the outside
With doors closed, press thebutton
on the remote control or turn the metal
insert (located inside the key) in the
driver side door lock. Door locking is
carried out with all doors shut,
irrespective of the luggage
compartment open/closed status.
Door unlocking from the outside
Press thebutton on the remote
control or turn the metal insert (located
inside the key) in the driver side door
lock.
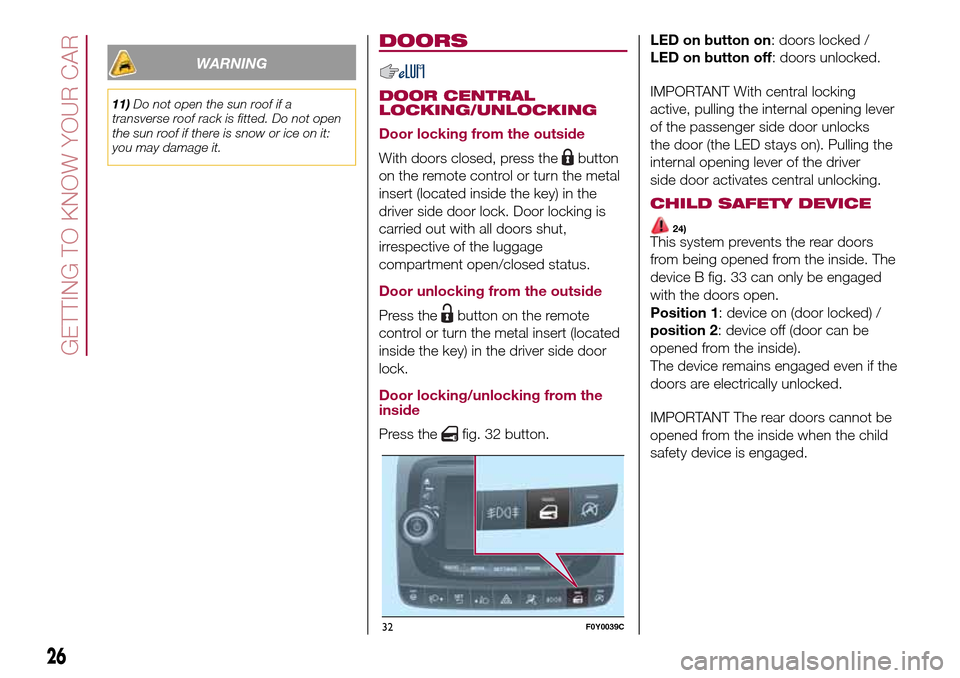
Door locking/unlocking from the
inside
Press thefig. 32 button.LED on button on: doors locked /
LED on button off: doors unlocked.
IMPORTANT With central locking
active, pulling the internal opening lever
of the passenger side door unlocks
the door (the LED stays on). Pulling the
internal opening lever of the driver
side door activates central unlocking.
CHILD SAFETY DEVICE
24)This system prevents the rear doors
from being opened from the inside. The
device B fig. 33 can only be engaged
with the doors open.
Position 1: device on (door locked) /
position 2: device off (door can be
opened from the inside).
The device remains engaged even if the
doors are electrically unlocked.
IMPORTANT The rear doors cannot be
opened from the inside when the child
safety device is engaged.
32F0Y0039C
26
GETTING TO KNOW YOUR CAR
Page 33 of 240
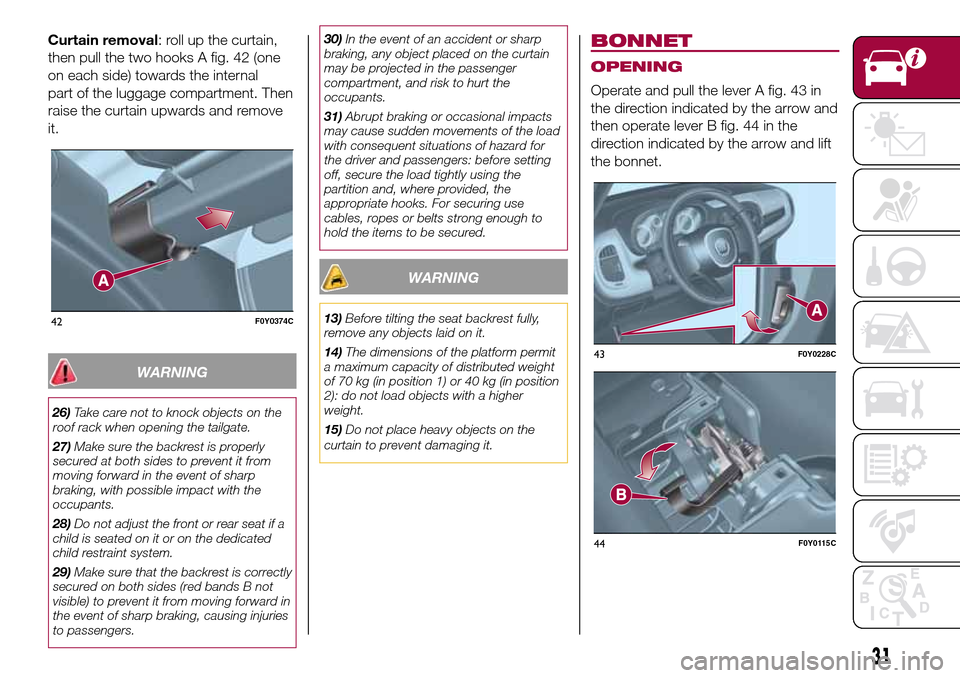
Curtain removal: roll up the curtain,
then pull the two hooks A fig. 42 (one
on each side) towards the internal
part of the luggage compartment. Then
raise the curtain upwards and remove
it.
WARNING
26)Take care not to knock objects on the
roof rack when opening the tailgate.
27)Make sure the backrest is properly
secured at both sides to prevent it from
moving forward in the event of sharp
braking, with possible impact with the
occupants.
28)Do not adjust the front or rear seat if a
child is seated on it or on the dedicated
child restraint system.
29)Make sure that the backrest is correctly
secured on both sides (red bands B not
visible) to prevent it from moving forward in
the event of sharp braking, causing injuries
to passengers.30)In the event of an accident or sharp
braking, any object placed on the curtain
may be projected in the passenger
compartment, and risk to hurt the
occupants.
31)Abrupt braking or occasional impacts
may cause sudden movements of the load
with consequent situations of hazard for
the driver and passengers: before setting
off, secure the load tightly using the
partition and, where provided, the
appropriate hooks. For securing use
cables, ropes or belts strong enough to
hold the items to be secured.
WARNING
13)Before tilting the seat backrest fully,
remove any objects laid on it.
14)The dimensions of the platform permit
a maximum capacity of distributed weight
of 70 kg (in position 1) or 40 kg (in position
2): do not load objects with a higher
weight.
15)Do not place heavy objects on the
curtain to prevent damaging it.
BONNET
OPENING
Operate and pull the lever A fig. 43 in
the direction indicated by the arrow and
then operate lever B fig. 44 in the
direction indicated by the arrow and lift
the bonnet.
42F0Y0374C
43F0Y0228C
44F0Y0115C
31