2017 FIAT 500L LIVING seat adjustment
[x] Cancel search: seat adjustmentPage 13 of 240
SEATS
7) 9)2) 3)
FRONT SEATS
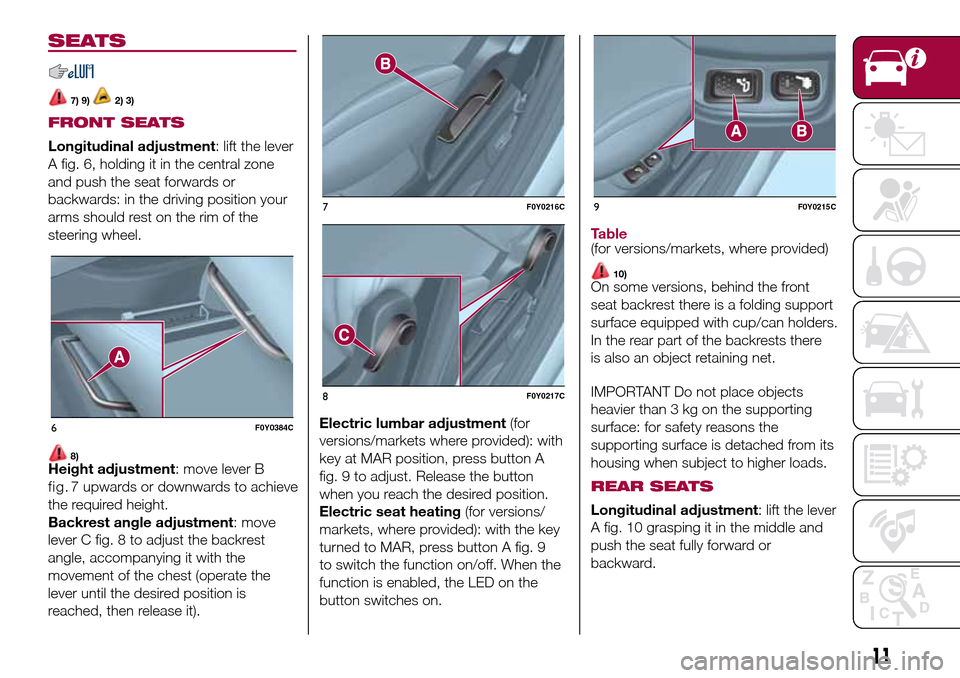
Longitudinal adjustment: lift the lever
A fig. 6, holding it in the central zone
and push the seat forwards or
backwards: in the driving position your
arms should rest on the rim of the
steering wheel.
8)Height adjustment: move lever B
the required height.
Backrest angle adjustment: move
lever C fig. 8 to adjust the backrest
angle, accompanying it with the
movement of the chest (operate the
lever until the desired position is
reached, then release it).Electric lumbar adjustment(for
versions/markets where provided): with
key at MAR position, press button A
fig. 9 to adjust. Release the button
when you reach the desired position.
Electric seat heating(for versions/
markets, where provided): with the key
turned to MAR, press button A fig. 9
to switch the function on/off. When the
function is enabled, the LED on the
button switches on.
Table(for versions/markets, where provided)
10)On some versions, behind the front
seat backrest there is a folding support
surface equipped with cup/can holders.
In the rear part of the backrests there
is also an object retaining net.
IMPORTANT Do not place objects
heavier than 3 kg on the supporting
surface: for safety reasons the
supporting surface is detached from its
housing when subject to higher loads.
REAR SEATS
Longitudinal adjustment: lift the lever
A fig. 10 grasping it in the middle and
push the seat fully forward or
backward.
6F0Y0384C
7F0Y0216C
8F0Y0217C
9F0Y0215C
11
fig. 7upwards or downwards to achieve
Page 14 of 240
THIRD-ROW REAR SEATS(500L LIVING versions)
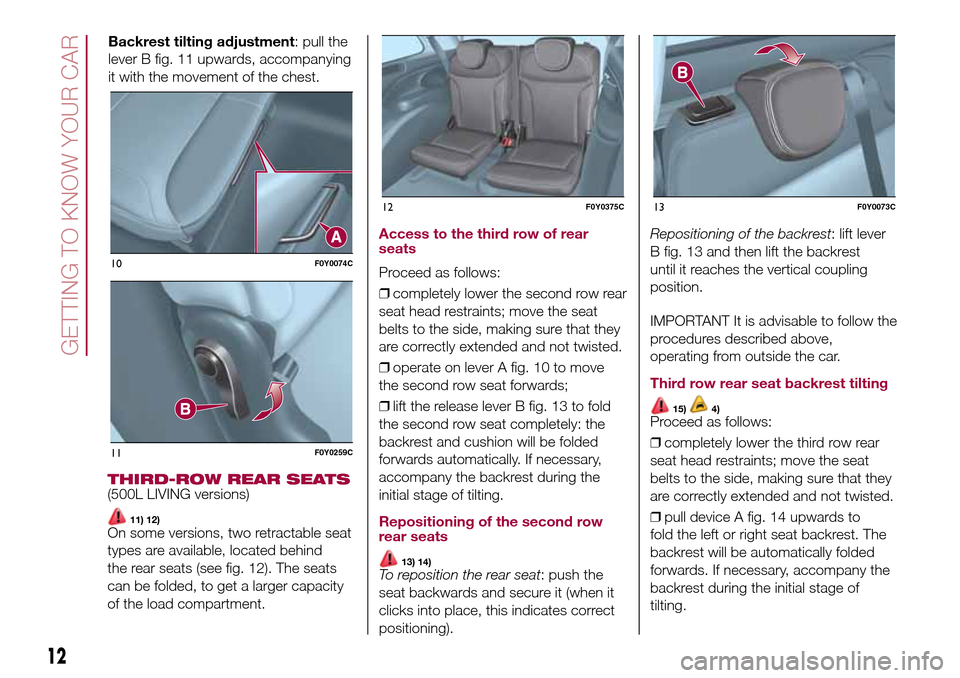
11) 12)On some versions, two retractable seat
types are available, located behind
the rear seats (see fig. 12). The seats
can be folded, to get a larger capacity
of the load compartment.
Access to the third row of rear
seats
Proceed as follows:
❒completely lower the second row rear
seat head restraints; move the seat
belts to the side, making sure that they
are correctly extended and not twisted.
❒operate on lever A fig. 10 to move
the second row seat forwards;
❒lift the release lever B fig. 13 to fold
the second row seat completely: the
backrest and cushion will be folded
forwards automatically. If necessary,
accompany the backrest during the
initial stage of tilting.
Repositioning of the second row
rear seats
13) 14)To reposition the rear seat: push the
seat backwards and secure it (when it
clicks into place, this indicates correct
positioning).Repositioning of the backrest: lift lever
B fig. 13 and then lift the backrest
until it reaches the vertical coupling
position.
IMPORTANT It is advisable to follow the
procedures described above,
operating from outside the car.
Third row rear seat backrest tilting
15)4)Proceed as follows:
❒completely lower the third row rear
seat head restraints; move the seat
belts to the side, making sure that they
are correctly extended and not twisted.
❒pull device A fig. 14 upwards to
fold the left or right seat backrest. The
backrest will be automatically folded
forwards. If necessary, accompany the
backrest during the initial stage of
tilting.
10F0Y0074C
11F0Y0259C
12F0Y0375C13F0Y0073C
12
GETTING TO KNOW YOUR CAR
Backrest tilting adjustment: pull the
lever B fig. 11 upwards, accompanying
it with the movement of the chest.
Page 15 of 240
WARNING
7)Any adjustment must be performed with
the vehicle at a standstill.
8)After releasing the adjustment lever,
always check that the seat is locked on the
guides by trying to move it back and forth.
If the seat is not locked into place, it may
unexpectedly slide and cause the driver to
lose control of the vehicle.
9)Do not move the front passenger seat
table if a child is seated on the same or
sitting in the suitable child restraint system.
10)Do not travel with the supporting
surface open: always make sure it is
correctly closed.
11)Before setting off, make sure that the
seats are locked correctly to their
anchoring devices.
12)During repositioning of the second row
rear seats, sit correctly on the third row
rear seats, making sure that your feet do
not exceed the red strip located on the
floor.13)If there are any passengers sitting on
the third row seats, the second row rear
seat must be correctly anchored to the
floor and the backrest must be in vertical
position.
14)Make sure that the backrest is correctly
secured on both sides to prevent it from
moving forward in the event of sharp
braking, causing injuries to passengers. A
metallic click is heard when locking is
correct.
15)Do not move the front passenger seat
table if a child is seated on the same or
sitting in the suitable child restraint system.WARNING
2)The fabric upholstery for the seats has
been designed to withstand long-term
wear deriving from normal use of the
vehicle. Nevertheless, some precautions
are required. Avoid prolonged and/or
excessive rubbing involving clothing
accessories such as metal buckles,
bosses, Velcro strips and the like, which,
by applying a high pressure on the fabric in
a limited area, could cause it to break,
thereby damaging the upholstery.
3)Before tilting the front passenger seat
table fully, remove any objects laid on it.
4)Before tilting the seat backrest fully,
remove any objects laid on it.
HEAD RESTRAINTS
ADJUSTMENTS
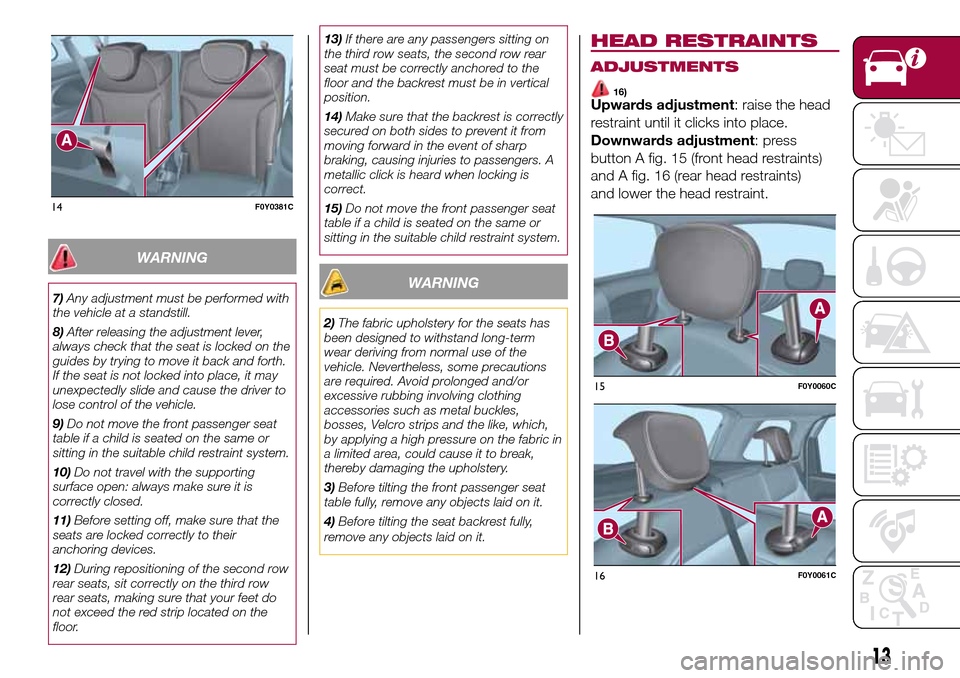
16)Upwards adjustment: raise the head
restraint until it clicks into place.
Downwards adjustment: press
button A fig. 15 (front head restraints)
and A fig. 16 (rear head restraints)
and lower the head restraint.
14F0Y0381C
15F0Y0060C
16F0Y0061C
13
Page 16 of 240
REMOVAL
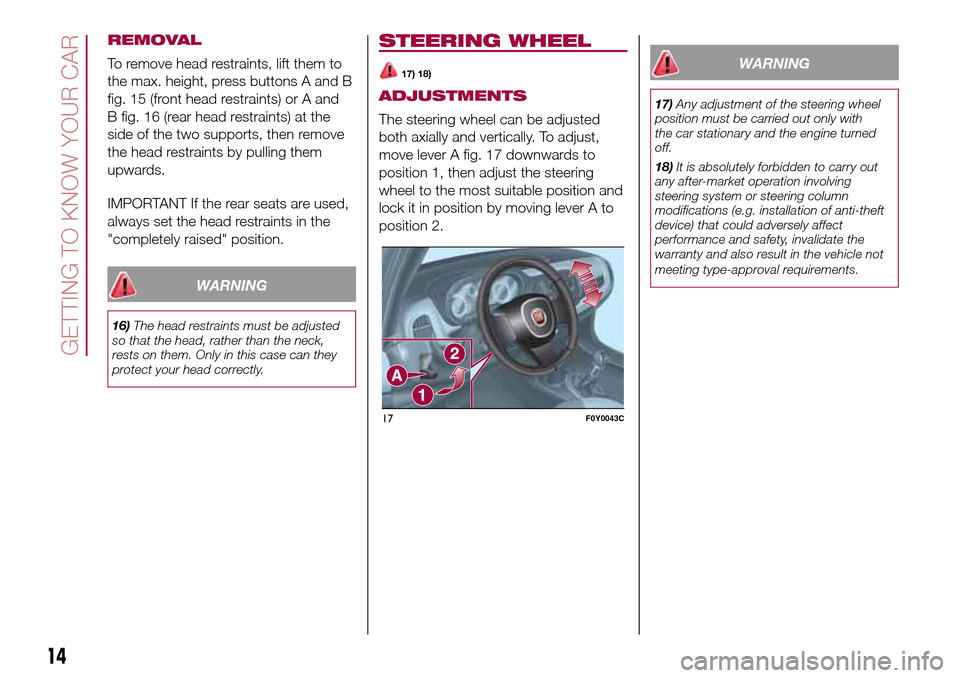
To remove head restraints, lift them to
the max. height, press buttons A and B
fig. 15 (front head restraints) or A and
B fig. 16 (rear head restraints) at the
side of the two supports, then remove
the head restraints by pulling them
upwards.
IMPORTANT If the rear seats are used,
always set the head restraints in the
"completely raised" position.
WARNING
16)The head restraints must be adjusted
so that the head, rather than the neck,
rests on them. Only in this case can they
protect your head correctly.
STEERING WHEEL
17) 18)
ADJUSTMENTS
The steering wheel can be adjusted
both axially and vertically. To adjust,
move lever A fig. 17 downwards to
position 1, then adjust the steering
wheel to the most suitable position and
lock it in position by moving lever A to
position 2.
WARNING
17)Any adjustment of the steering wheel
position must be carried out only with
the car stationary and the engine turned
off.
18)It is absolutely forbidden to carry out
any after-market operation involving
steering system or steering column
modifications (e.g. installation of anti-theft
device) that could adversely affect
performance and safety, invalidate the
warranty and also result in the vehicle not
meeting type-approval requirements.
17F0Y0043C
14
GETTING TO KNOW YOUR CAR
Page 73 of 240
37)Sensor operation may also be
compromised by the presence of dust,
condensation, dirt or ice on the
windscreen, by traffic conditions (e.g.
vehicles that are driving not aligned with
yours, vehicles driving in a transverse
or opposite way on the same lane, bend
with a small radius of curvature), by road
surface conditions and by driving
conditions (e.g. off-road driving). Make sure
the windscreen is always clean. Use
specific detergents and clean cloths to
avoid scratching the windscreen. The
sensor operation may also be limited or
absent in some driving, traffic and road
surface conditions.
38)Projecting loads on the roof of the
vehicle may interfere with the correct
operation of the sensor. Before starting
make sure the load is correctly positioned,
in order not to cover the sensor operating
range.
39)If the windscreen must be replaced
due to scratches, chipping or breakage,
contact exclusively a Fiat Dealership.
Do not replace the windscreen on your
own, risk of malfunction! It is advisable to
replace the windscreen if it is damaged
in the area of the laser sensor.
40)Do not tamper with nor operate on the
laser sensor. Do not close the openings
in the aesthetic cover located under the
interior rear view mirror. In the event of
a sensor failure, contact a Fiat Dealership.
41)If you are driving on roads close to
trees with protruding branches it is
advisable to deactivate the system to
prevent the branches at the height of the
bonnet or the windscreen from interfering
with the system.42)Do not cover the operating range of the
sensor with stickers or other objects. Also
pay attention to other objects on the
bonnet (e.g. a layer of snow) and make
sure they do not interfere with the light
emitted by the laser.
43)If a trailer or a vehicle is towed, the
system must be deactivated with the
display Setup Menu.
44)If the system signals a pressure
decrease on a specific tyre, it is
recommended to check the pressure on all
four tyres.
45)iTPMS does not relieve the driver from
the obligation to check the tyre pressure
every month; it is not to be considered
a system to replace maintenance or a
safety system.
46)The iTPMS cannot indicate sudden tyre
pressure drops (for example when a tyre
bursts). In this case, stop the vehicle,
braking with caution and avoiding abrupt
steering.
47)The iTPMS only warns that the tyre
pressure is low: it is not able to inflate
them.
48)Insufficient tyre inflation increases fuel
consumption, reduces the tread duration
and may affect the capacity to drive safely.
49)Tyre pressure must be checked with
tyres cold. Should it become necessary for
whatever reason to check pressure with
warm tyres, do not reduce pressure even
though it is higher than the prescribed
value, but repeat the check when tyres are
cold.OCCUPANT
PROTECTION
SYSTEMS
The most important safety equipment
of the vehicle comprise the following
protection systems:
❒seat belts;
❒SBR (Seat Belt Reminder) system;
❒head restraints;
❒child restraint systems;
❒front airbags and side bags.
Read the information given the
following pages with the utmost care. It
is of fundamental importance that the
protection systems are used in the
correct way to guarantee the maximum
possible safety level for the driver and
the passengers.
For the description of the head restraint
adjustment see paragraph "Head
restraints" in chapter "Knowing your
vehicle".
71
Page 87 of 240
Main recommendations to carry
children safely
❒Install the child restraint systems on
the rear seat, which is the most
protected position in the event of an
impact.
❒Keep children in rearward facing child
restraint systems for as long as
possible, until 3–4 years old if possible.
❒Should a rearward facing child
restraint system be installed on the rear
seats, it is advisable to position it as
far forward as the position of the front
seat allows.
❒If the passenger's front airbag is
deactivated always check the
dedicated LED on the trim located on
the dashboard switches on, to make
sure that it has actually been
deactivated.
❒Carefully follow the instructions
supplied with the child restraint system
itself. Keep the instructions in the
vehicle along with the other documents
and this handbook. Do not use
second-hand child restraint systems
without instructions.
❒Only one child is to be strapped into
each restraint system; never carry
two children using one child restraint
system.
❒Always check that the seat belts do
not rest on the child’s neck.❒Always check that the seat belt is
well fastened by pulling on it.
❒While travelling, do not let the child sit
incorrectly or unfasten the belts.
❒Never allow a child to put the belt's
diagonal section under an arm or
behind their back.
❒Never carry children on your lap,
even newborns. No one can hold
a child in the case of an accident.
❒In the event of an accident, replace
the child restraint system with a new
one.
WARNING
75)SEVERE DANGER When a front
passenger airbag is fitted, do not install
rearward facing child restraint systems on
the front passenger seat. Deployment of
the airbag in an accident could cause fatal
injuries to the child regardless of the
severity of the collision. It is advisable to
always carry children in a child restraint
system on the rear seat, which is the most
protected position in the event of an
impact.
76)On the sun visor there is a label with
suitable symbols reminding the user that it
is compulsory to deactivate the airbag if
a rearward facing child restraint system is
fitted. Always comply with the instructions
on the passenger's side sun visor (see
the "Supplementary Restraint System
(SRS) - Airbag" paragraph).77)Should it be necessary to carry a child
on the passenger side front seat in a
rearward facing child restraint system, the
passenger side front airbag and side bag
must be deactivated through the display
main Menu (see the instructions in the
"Display" paragraph, "Knowing the
instrument panel" chapter), verifying
deactivation by checking whether the LED
has switched on in the trim located
on the dashboard. Move the passenger's
seat as far back as possible to avoid
contact between the child restraint system
and the dashboard.
78)Do not adjust the front or rear seat if a
child is seated on it or on the dedicated
child restraint system.
79)Incorrect fitting of the child restraint
system may result in an inefficient
protection system. In the event of an
accident the child restraint system may
become loose and the child may be
injured, even fatally. When fitting a restraint
system for newborns or children, strictly
comply with the instructions provided
by the Manufacturer.
80)When the child restraint system is not
used, secure it with the seat belt or with
the ISOFIX anchorages, or remove it from
the vehicle. Do not leave it unsecured
inside the passenger compartment. In this
way, in the case of sudden braking or an
accident, it will not cause injuries to the
occupants.
81)After installing a child restraint system,
do not move the seat: always remove
the child restraint system before making
any adjustment.
85
Page 96 of 240
WARNING
99)It is dangerous to run the engine in
enclosed areas. The engine burns oxygen
and releases carbon dioxide, carbon
monoxide and other toxic gases.
100)Remember that the brake servo and
power steering are not operational until the
engine has been started, therefore you
need to apply much more force than usual
to the brake pedal and steering wheel.
101)If the engine fails to start with a gear
engaged, the potentially dangerous
situation due to the fact that the gearbox is
automatically placed in neutral will be
signalled by an acoustic signal.
WARNING
51)Warning lightflashing for 60
seconds after starting or during prolonged
cranking of the engine indicates a fault
with the glow plug heating system. You
can use the vehicle as usual if the engine
starts but you should contact a Fiat
Dealership as soon as possible.
52)It is advisable not to demand maximum
performance from your vehicle (e.g.
excessive acceleration, long distances at
maximum rpm, excessively intense braking,
etc.) when it is first used.
53)When the engine is off, do not leave
the key turned to MAR to prevent
unnecessary electrical consumption from
draining the battery.54)Never jump start the engine by
pushing, towing or coasting downhill.
These actions could cause the fuel to flow
into the catalytic converter and damage
it beyond repair.
55)Revving up before stopping the engine
is useless, it causes unnecessary fuel
consumption and can damage the engine,
in particular engines equipped with
turbocharger.
HANDBRAKE
102) 103)
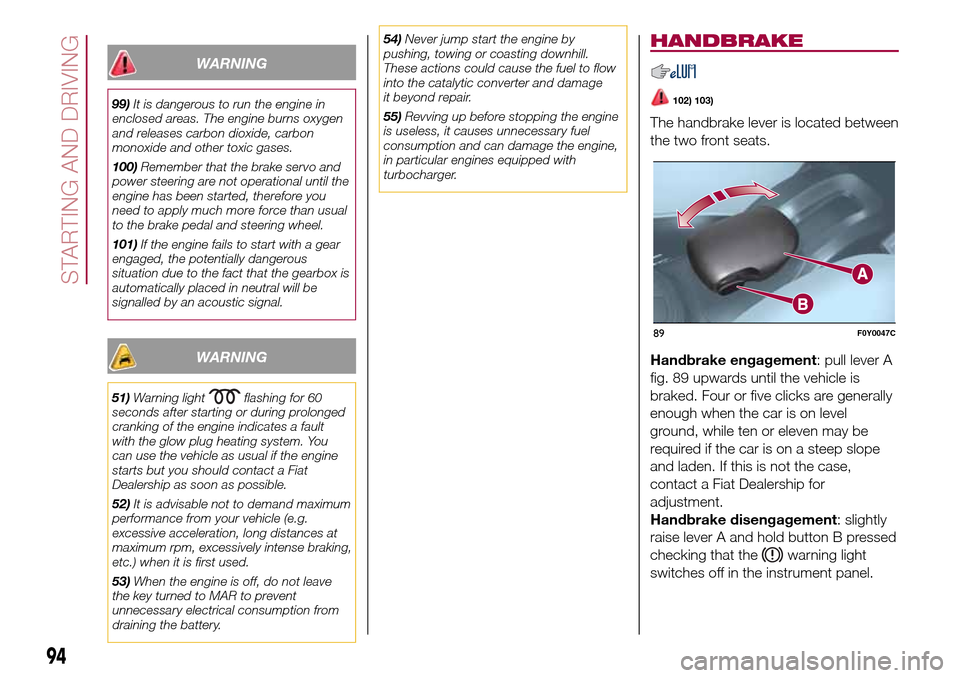
The handbrake lever is located between
the two front seats.
Handbrake engagement: pull lever A
fig. 89 upwards until the vehicle is
braked. Four or five clicks are generally
enough when the car is on level
ground, while ten or eleven may be
required if the car is on a steep slope
and laden. If this is not the case,
contact a Fiat Dealership for
adjustment.
Handbrake disengagement: slightly
raise lever A and hold button B pressed
checking that the
warning light
switches off in the instrument panel.
89F0Y0047C
94
STARTING AND DRIVING