2017 FIAT 500L LIVING key
[x] Cancel search: keyPage 93 of 240
88)SEVERE DANGER: when an active
passenger airbag is fitted, DO NOT install
rearward facing child restraint systems
on the front passenger seat. Deployment of
the airbag in an accident could cause fatal
injuries to the child regardless of the
severity of the impact. Therefore, always
deactivate the passenger side airbag when
a rearward facing child restraint system is
installed on the front passenger seat.
The front passenger seat must also be
positioned back as far as possible in order
to prevent the child restraint system from
coming into contact with the dashboard.
Immediately reactivate the passenger
airbag as soon as the child restraint system
has been removed.
89)When an active passenger airbag is
fitted, DO NOT install rear facing child
restraint systems on the front seat.
Deployment of the airbag in an accident
could cause fatal injuries to the child
regardless of the severity of the impact.
90)If the
warning light does not switch
on when the key is turned to MAR, or
stays on whilst driving, a fault may have
occurred in the restraint systems. In this
case the airbags or pretensioners may not
deploy in an impact or, in a lower number
of cases, they may be deployed
accidentally. Before proceeding, contact a
Fiat Dealership immediately to have the
system checked.
91)On some versions if the
warning
light does not switch on, thewarning
light switches on instead, deactivating
the explosive charges of the passenger
airbag.
92)If a side bag is present, do not cover
the front seat backrests with extra covers.93)Do not travel carrying objects in your
lap, in front of your chest or between your
lips (pipe, pencils, etc.). They could cause
severe injury if the airbag is deployed.
94)If the vehicle has been subject to theft,
attempted theft, vandalism, or flooding,
have the airbag system inspected at a Fiat
Dealership.
95)When the ignition key is inserted and
turned to MAR, airbags may be deployed if
another vehicle crashes into yours, even if
the engine is not running and the vehicle
is stationary. Therefore, even if the vehicle
is stationary, when an active front
passenger airbag is fitted, DO NOT install
rearward facing child restraint systems
on the front passenger seat. Deployment of
the airbag following an impact could cause
fatal injuries to the child. Therefore, always
deactivate the passenger side airbag
when a rearward facing child restraint
system is installed on the front passenger
seat. The front passenger seat must also
be positioned back as far as possible in
order to prevent the child restraint system
from coming into contact with the
dashboard. Immediately reactivate the
passenger airbag as soon as the child
restraint system has been removed. Also
remember that, if the key is turned to
STOP, none of the safety devices (airbags
or pretensioners) will be deployed in the
event of collision. Non-deployment in such
cases does not indicate a system
malfunction.96)The
LED indicates the passenger
side airbag protection status. If the LED is
off, passenger side protection is active:
to deactivate it, use the Setup Menu (in this
case the LED lights up). When the engine
is started (ignition key turned to MAR
position), the LED turns on for about 8
seconds, provided that at least 5 seconds
have elapsed from when it was switched
off. If not, contact a Fiat Dealership. If
the engine is switched off/on again in less
than 5 seconds the LED may remain off.
In this case, to check correct LED
operation, switch the engine off, wait for at
least 5 seconds and switch the engine
on again. The LED may light up with
various intensity levels depending on the
vehicle conditions. The intensity may also
vary during the same key cycle.
97)The airbag deployment threshold is
higher than that of the pretensioners. When
the impact is between the two deployment
thresholds, it is normal that pretensioners
only are engaged.
98)The airbag does not replace seat belts,
but increases their efficiency. Because
front airbags are not deployed for
low-speed crashes, side collisions,
rear-end shunts or rollovers, occupants are
protected, in addition to any side bags,
only by their seat belts, which must
therefore always be fastened.
91
Page 95 of 240
STARTING THE
ENGINE
99) 100)51) 52) 53) 54) 55)
Before starting the engine, adjust the
seat, the interior rear view mirrors,
the door mirrors and fasten the seat
belt correctly.
Never press the accelerator pedal for
starting the engine.
VERSIONS WITH MANUAL
GEARBOX
Petrol versions
Proceed as follows:
❒engage the handbrake and place the
gear lever in neutral.For 0.9 TwinAir
Turbo 105 HP versionsengage the
handbrake and place the gear lever
in neutral or fully press the clutch pedal
if a gear other than neutral is engaged;
❒for all versions (except 0.9
TwinAir Turbo 105 HP)fully depress
the clutch pedal, without pressing
the accelerator;
❒turn the ignition key to AVV and
release it as soon as the engine starts.
Diesel versions
Proceed as follows:
❒engage the handbrake, put the gear
lever into neutral and turn the ignition
key to MAR: the warning lights
andon the instrument panel
will turn on;
❒wait for the warning lights
and
to turn off and then fully depress
the clutch pedal without pressing the
accelerator;
❒turn the ignition key to AVV as soon
as warning light
switches off.
Release the ignition key as soon as the
engine starts.
IMPORTANT If the engine does not
start at the first attempt, return the
ignition key to STOP before repeating
the procedure. If, with the ignition
key at MAR, the warning lights
and
(only for petrol versions) stay on
in the instrument panel, the ignition key
must be brought back to STOP and
then to MAR again. If the
warning
light stays on, retry with the other
keys provided. Contact a Fiat
Dealership if you still cannot start the
engine.
VERSIONS WITH
DUALOGIC GEARBOX
101)Engine starting is allowed both with a
gear engaged and with the gearbox
in neutral (N).
However, the brake pedal must always
be pressed first if neutral is not
engaged. It is therefore advisable to
place the gear lever in neutral (N) before
starting the engine.
LPG AND NATURAL
POWER VERSIONS
The engine always starts up on petrol
independently of the mode previously
selected.
There must therefore always be an
adequate reserve of petrol in the tank to
protect the petrol pump and to
guarantee temporary switching from
methane or LPG to petrol operation, if
high performance is required.
STOPPING THE ENGINE
Turn the ignition key to STOP while the
engine is idling.
IMPORTANT After a demanding drive,
before turning the engine off you should
allow it to idle to allow the temperature
in the engine compartment to
decrease.
93
Page 96 of 240
WARNING
99)It is dangerous to run the engine in
enclosed areas. The engine burns oxygen
and releases carbon dioxide, carbon
monoxide and other toxic gases.
100)Remember that the brake servo and
power steering are not operational until the
engine has been started, therefore you
need to apply much more force than usual
to the brake pedal and steering wheel.
101)If the engine fails to start with a gear
engaged, the potentially dangerous
situation due to the fact that the gearbox is
automatically placed in neutral will be
signalled by an acoustic signal.
WARNING
51)Warning lightflashing for 60
seconds after starting or during prolonged
cranking of the engine indicates a fault
with the glow plug heating system. You
can use the vehicle as usual if the engine
starts but you should contact a Fiat
Dealership as soon as possible.
52)It is advisable not to demand maximum
performance from your vehicle (e.g.
excessive acceleration, long distances at
maximum rpm, excessively intense braking,
etc.) when it is first used.
53)When the engine is off, do not leave
the key turned to MAR to prevent
unnecessary electrical consumption from
draining the battery.54)Never jump start the engine by
pushing, towing or coasting downhill.
These actions could cause the fuel to flow
into the catalytic converter and damage
it beyond repair.
55)Revving up before stopping the engine
is useless, it causes unnecessary fuel
consumption and can damage the engine,
in particular engines equipped with
turbocharger.
HANDBRAKE
102) 103)
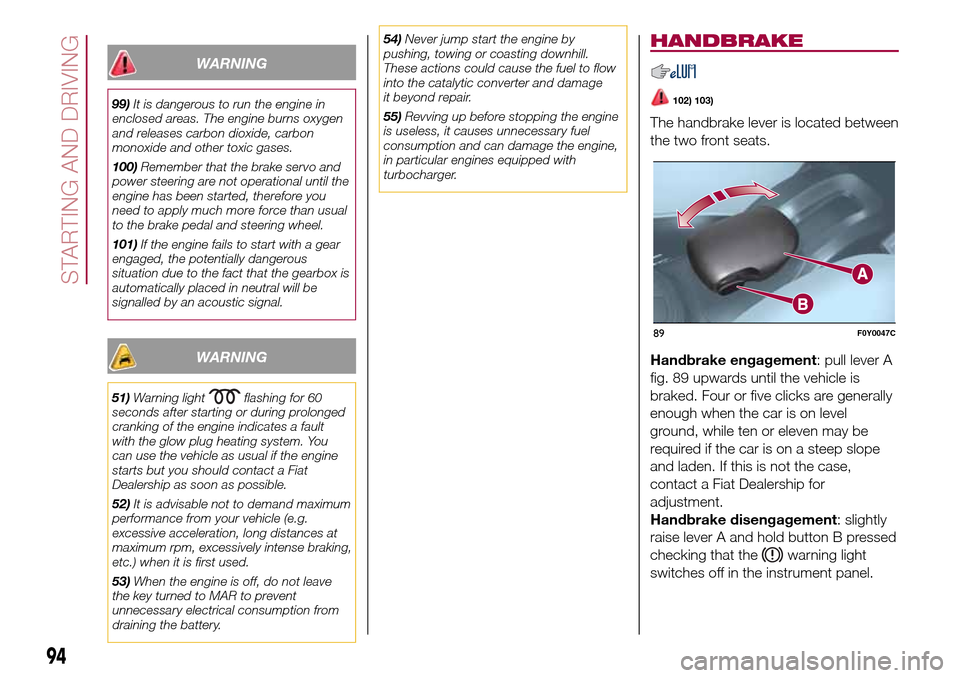
The handbrake lever is located between
the two front seats.
Handbrake engagement: pull lever A
fig. 89 upwards until the vehicle is
braked. Four or five clicks are generally
enough when the car is on level
ground, while ten or eleven may be
required if the car is on a steep slope
and laden. If this is not the case,
contact a Fiat Dealership for
adjustment.
Handbrake disengagement: slightly
raise lever A and hold button B pressed
checking that the
warning light
switches off in the instrument panel.
89F0Y0047C
94
STARTING AND DRIVING
Page 97 of 240
WARNING
102)Never leave children unattended in
the vehicle. Always remove the key from
the ignition device when leaving the vehicle
and take it with you.
103)For vehicles equipped with a front
armrest, lift it up to ensure that it does not
interfere with the action of the handbrake.
USING THE MANUAL
GEARBOX
104)56)
To engage the gears, press the clutch
pedal fully and put the gear lever into
the required position (the diagram
for gear engagement is shown on the
knob ).
Reverse engagement
For 0.9 TwinAir Turbo 105 HP and 1.4
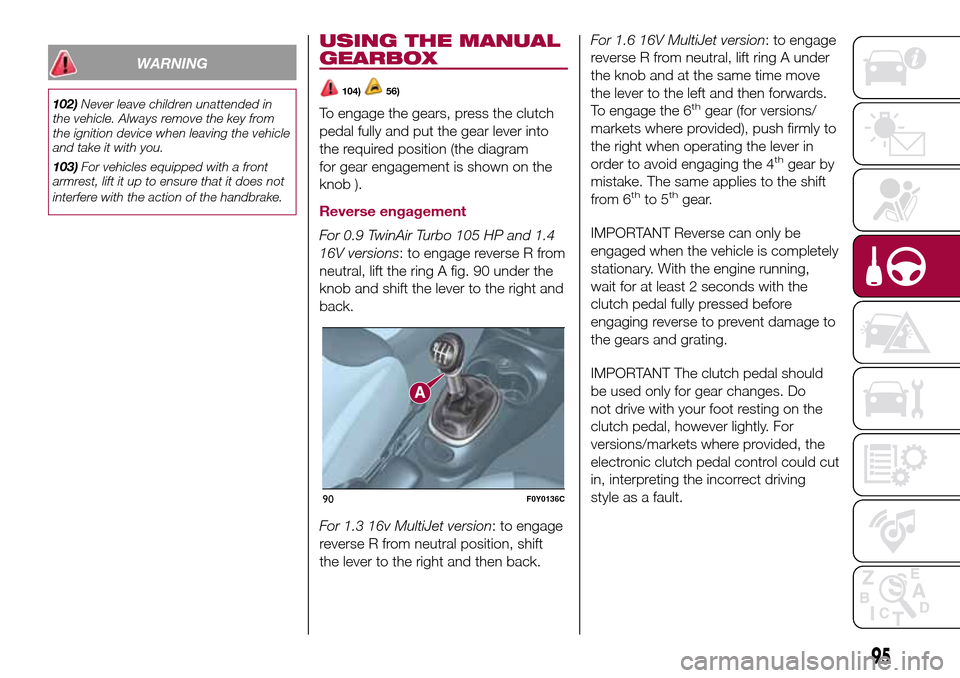
16V versions: to engage reverse R from
neutral, lift the ring A fig. 90 under the
knob and shift the lever to the right and
back.
For 1.3 16v MultiJet version: to engage
reverse R from neutral position, shift
the lever to the right and then back.For 1.6 16V MultiJet version: to engage
reverse R from neutral, lift ring A under
the knob and at the same time move
the lever to the left and then forwards.
To engage the 6
thgear (for versions/
markets where provided), push firmly to
the right when operating the lever in
order to avoid engaging the 4
thgear by
mistake. The same applies to the shift
from 6
thto 5thgear.
IMPORTANT Reverse can only be
engaged when the vehicle is completely
stationary. With the engine running,
wait for at least 2 seconds with the
clutch pedal fully pressed before
engaging reverse to prevent damage to
the gears and grating.
IMPORTANT The clutch pedal should
be used only for gear changes. Do
not drive with your foot resting on the
clutch pedal, however lightly. For
versions/markets where provided, the
electronic clutch pedal control could cut
in, interpreting the incorrect driving
style as a fault.
90F0Y0136C
95
Page 101 of 240
107)Before opening the bonnet, make
sure that the engine is off and that the
ignition key is in the STOP position. Always
refer to the plate inside the bonnet. We
recommend that you remove the key from
the ignition if other people remain in the
vehicle. Exit from the car only after having
removed the ignition key or having rotated
it to the STOP position. During refuelling,
make sure that the engine is off and that
the ignition key is in the STOP position.
WARNING
58)If climate comfort is to be favoured, the
Stop/Start system can be disabled, for a
continuous operation of the climate control
system.
CRUISE CONTROL
(constant speed
regulator)
(for versions/markets, where provided)
108) 109)
DESCRIPTION
This is an electronically controlled
driving assistance device that allows
the desired car speed to be maintained,
without having to press the accelerator
pedal.
This device can be used at a speed
above 30 km/h on long stretches of dry,
straight roads with few variations (e.g.
motorways).
The use of this device on extra-urban
roads with traffic is not therefore
recommended. Do not use the device
in town.
ACTIVATING THE DEVICE
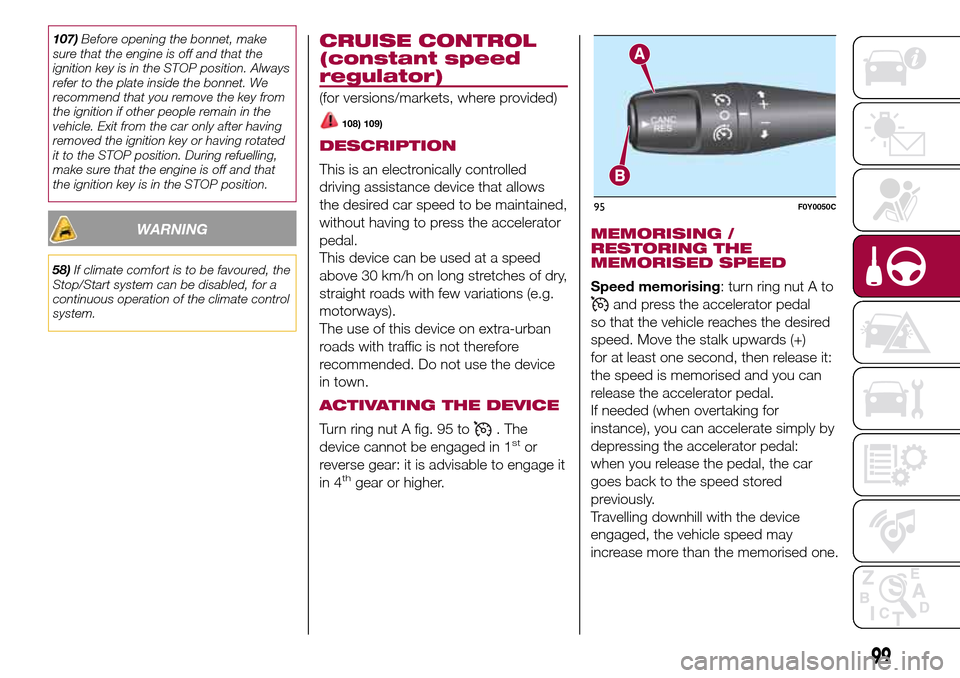
Turn ring nut A fig. 95 to. The
device cannot be engaged in 1stor
reverse gear: it is advisable to engage it
in 4
thgear or higher.
MEMORISING /
RESTORING THE
MEMORISED SPEED
Speed memorising: turn ring nut A to
and press the accelerator pedal
so that the vehicle reaches the desired
speed. Move the stalk upwards (+)
for at least one second, then release it:
the speed is memorised and you can
release the accelerator pedal.
If needed (when overtaking for
instance), you can accelerate simply by
depressing the accelerator pedal:
when you release the pedal, the car
goes back to the speed stored
previously.
Travelling downhill with the device
engaged, the vehicle speed may
increase more than the memorised one.
95F0Y0050C
99
Page 107 of 240
In addition to the electrical branches,
the car's electrical system can be
connected only to the supply cable for
an electric brake and to the cable for an
internal trailer light, though not more
than 15 W. To connect, use the preset
control unit with a battery cable with
cross-section no less than 2.5 mm
2.
IMPORTANT The use of auxiliary loads
other than external lights (electric brake,
winch, etc.) must occur with engine
running.
IMPORTANT To install a tow hook
contact a Fiat Dealership.
WARNING
112)The ABS with which the vehicle is
equipped will not control the braking
system of the trailer. Take particular care
when travelling on slippery roads.
113)Never modify the braking system of
the vehicle to control the trailer brake. The
trailer braking system must be fully
independent of the vehicle’s hydraulic
system.
114)After fitting, fixing screw holes must
be sealed to prevent an exhaust gas inlet.
REFUELLING THE
VEHICLE
115) 116) 117)61)
During refuelling, switch the engine off,
engage the handbrake, turn the ignition
key to STOP and do not smoke.
PETROL ENGINES
Use unleaded petrol only, with octane
number (RON) no lower than 95.
DIESEL ENGINES
Only use Diesel for motor vehicles (EN
590 specification).
When using or parking the car for a
long time in the mountains or cold
areas, it is advisable to refuel using
locally available diesel. In this case, it is
also advisable to keep the tank over
50% full.
REFUELLING
PROCEDURE
Diesel and petrol versions
Proceed as follows:
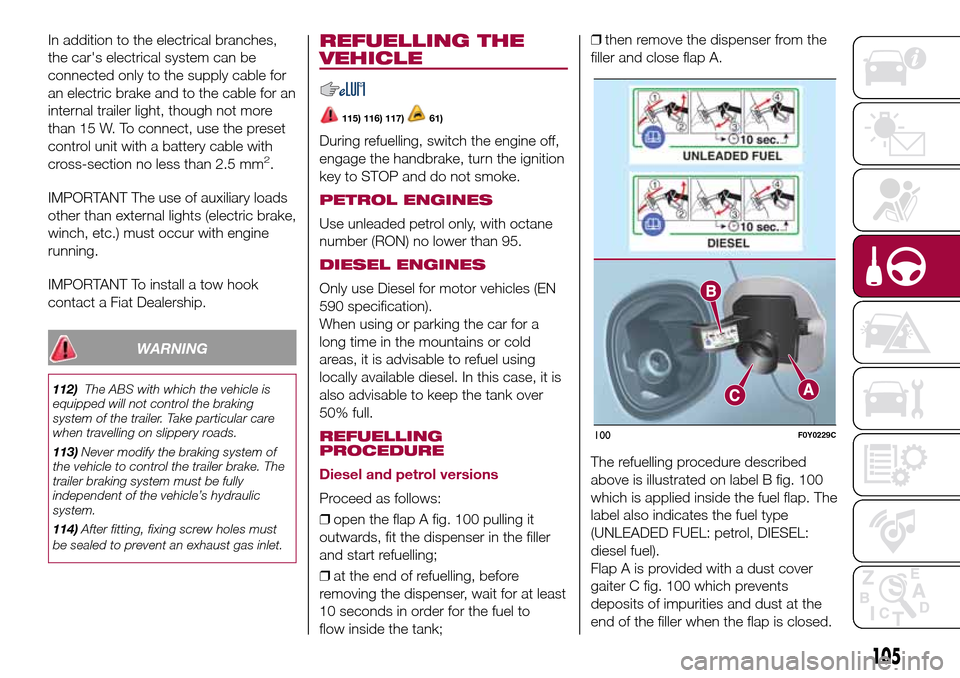
❒open the flap A fig. 100 pulling it
outwards, fit the dispenser in the filler
and start refuelling;
❒at the end of refuelling, before
removing the dispenser, wait for at least
10 seconds in order for the fuel to
flow inside the tank;❒then remove the dispenser from the
filler and close flap A.
The refuelling procedure described
above is illustrated on label B fig. 100
which is applied inside the fuel flap. The
label also indicates the fuel type
(UNLEADED FUEL: petrol, DIESEL:
diesel fuel).
Flap A is provided with a dust cover
gaiter C fig. 100 which prevents
deposits of impurities and dust at the
end of the filler when the flap is closed.
100F0Y0229C
105
Page 115 of 240
120)Vehicle handling is modified with the
space-saver wheel fitted. Avoid violent
acceleration and braking, abrupt steering
and fast cornering. The overall duration
of the space-saver wheel is about 3000
km, after which the relevant tyre must be
replaced with another one of the same
type. Never install a standard tyre on a rim
that is designed for use with a space-saver
wheel. Have the wheel repaired and refitted
as soon as possible. Using two or more
space-saver wheels at the same time
is forbidden. Do not grease the threads of
the stud bolts before fitting them: they
might slip out when driving.
121)The jack shall only be used for raising
the car model it has been supplied with.
Never use the jack for other purposes,
such as raising other car models. Never
use the jack for repair operations under the
vehicle. Incorrect positioning of the jack
may cause the vehicle to fall. Do not use
the jack for loads higher than the one
shown on its label. The space-saver wheel
cannot be fitted with snow chains. If a
front (drive) tyre is punctured and chains
are needed, use a standard wheel from the
rear axle and install the space-saver wheel
on the rear axle. This way, with two
standard front driving wheels, you can
install the snow chains on them.
122)Incorrect hub cap assembly may
cause it to come off when the vehicle is
moving. Never tamper with the inflation
valve. Never introduce tools of any kind
between rim and tyre. Check tyre and
space-saver wheel pressures regularly,
complying with the values given in the
"Technical specifications" chapter.123)At the end of the operation of
raising/locking the spare wheel, the ignition
key must be extracted, taking care not to
turn it in the wrong direction to facilitate the
extraction of the key itself, to prevent the
attachment device from being released and
the wheel assembly not being securely
retained.
WARNING
63)Contact a Fiat Dealership as soon as
possible to have the correct tightening
of the wheel stud bolts checked.
"Fix&Go Automatic"
kit
124) 125) 126) 127) 128) 129) 130) 131)
64)3)
DESCRIPTION
The "Fix&Go Automatic" kit is located in
the luggage compartment, inside a
dedicated container. Inside the
container there are also a screwdriver,
the tow ring and the funnel for
refuelling, in the event of an emergency.
To access the kit, open the tailgate,
remove the load platform and lift the
carpet.
LPG versions: a tool box secured to
the luggage compartment carpet with
dedicated fastenings contains the kit.
The kit includes:
❒a bottle A fig. 115 containing sealing
fluid and fitted with: filling tube B and
adhesive label C with the wording
“max. 80 km/h” to be placed in a
clearly visible position (e.g. on
the dashboard) after repairing the tyre;
❒a compressor D including a pressure
gauge and connections, found in the
compartment;
113
Page 122 of 240
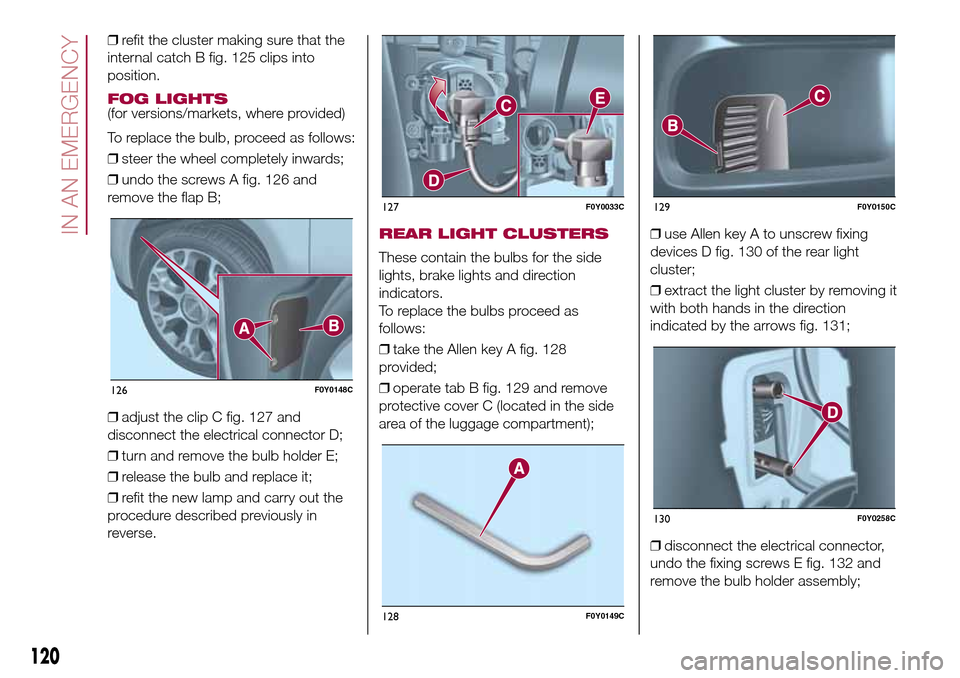
❒refit the cluster making sure that the
internal catch B fig. 125 clips into
position.
FOG LIGHTS(for versions/markets, where provided)
To replace the bulb, proceed as follows:
❒steer the wheel completely inwards;
❒undo the screws A fig. 126 and
remove the flap B;
❒adjust the clip C fig. 127 and
disconnect the electrical connector D;
❒turn and remove the bulb holder E;
❒release the bulb and replace it;
❒refit the new lamp and carry out the
procedure described previously in
reverse.
REAR LIGHT CLUSTERS
These contain the bulbs for the side
lights, brake lights and direction
indicators.
To replace the bulbs proceed as
follows:
❒take the Allen key A fig. 128
provided;
❒operate tab B fig. 129 and remove
protective cover C (located in the side
area of the luggage compartment);❒use Allen key A to unscrew fixing
devices D fig. 130 of the rear light
cluster;
❒extract the light cluster by removing it
with both hands in the direction
indicated by the arrows fig. 131;
❒disconnect the electrical connector,
undo the fixing screws E fig. 132 and
remove the bulb holder assembly;
126F0Y0148C
127F0Y0033C
128F0Y0149C
129F0Y0150C
130F0Y0258C
120
IN AN EMERGENCY