2017 FIAT 124 SPIDER light
[x] Cancel search: lightPage 79 of 300

ONBOARD
DIAGNOSTIC
SYSTEM — OBD II
Your vehicle is equipped with a
sophisticated Onboard Diagnostic
system called OBD II. This system
monitors the performance of the
emissions, engine, and automatic
transmission control systems. When
these systems are operating properly,
your vehicle will provide excellent
performance and fuel economy, as well
as engine emissions well within current
government regulations.
If any of these systems require service,
the OBD II system will turn on the
Malfunction Indicator Light (MIL). It will
also store diagnostic codes and other
information to assist your service
technician in making repairs. Although
your vehicle will usually be drivable and
not need towing, see your authorized
dealer for service as soon as possible.
Caution!
Prolonged driving with the MIL on could
cause further damage to the emission
control system. It could also affect fuel
economy and driveability. The vehicle must
be serviced before any emissions tests can
be performed.
If the MIL is flashing while the engine is
running, severe catalytic converter damage
and power loss will soon occur. Immediate
service is required.
Onboard Diagnostic
System (OBD II)
Cybersecurity
Your vehicle is required to have an
Onboard Diagnostic system (OBD II)
and a connection port to allow access
to information related to the
performance of your emissions
controls. Authorized service technicians
may need to access this information to
assist with the diagnosis and service of
your vehicle and emissions system.
Warning!
ONLY an authorized service technician
should connect equipment to the OBD II
connection port in order to diagnose or
service your vehicle.
If unauthorized equipment is connected
to the OBD II connection port, such as a
driver-behavior tracking device, it may:
Be possible that vehicle systems,
including safety related systems, could be
impaired or a loss of vehicle control could
occur that may result in an accident
involving serious injury or death.
Access, or allow others to access,
information stored in your vehicle systems,
including personal information.
For further information, refer to “Privacy
Practices” and “Uconnect
CyberSecurity” in “All About Uconnect
Access” in your Owner’s Manual Radio
Supplement and “Cybersecurity” in
“Multimedia”.
77
Page 81 of 300
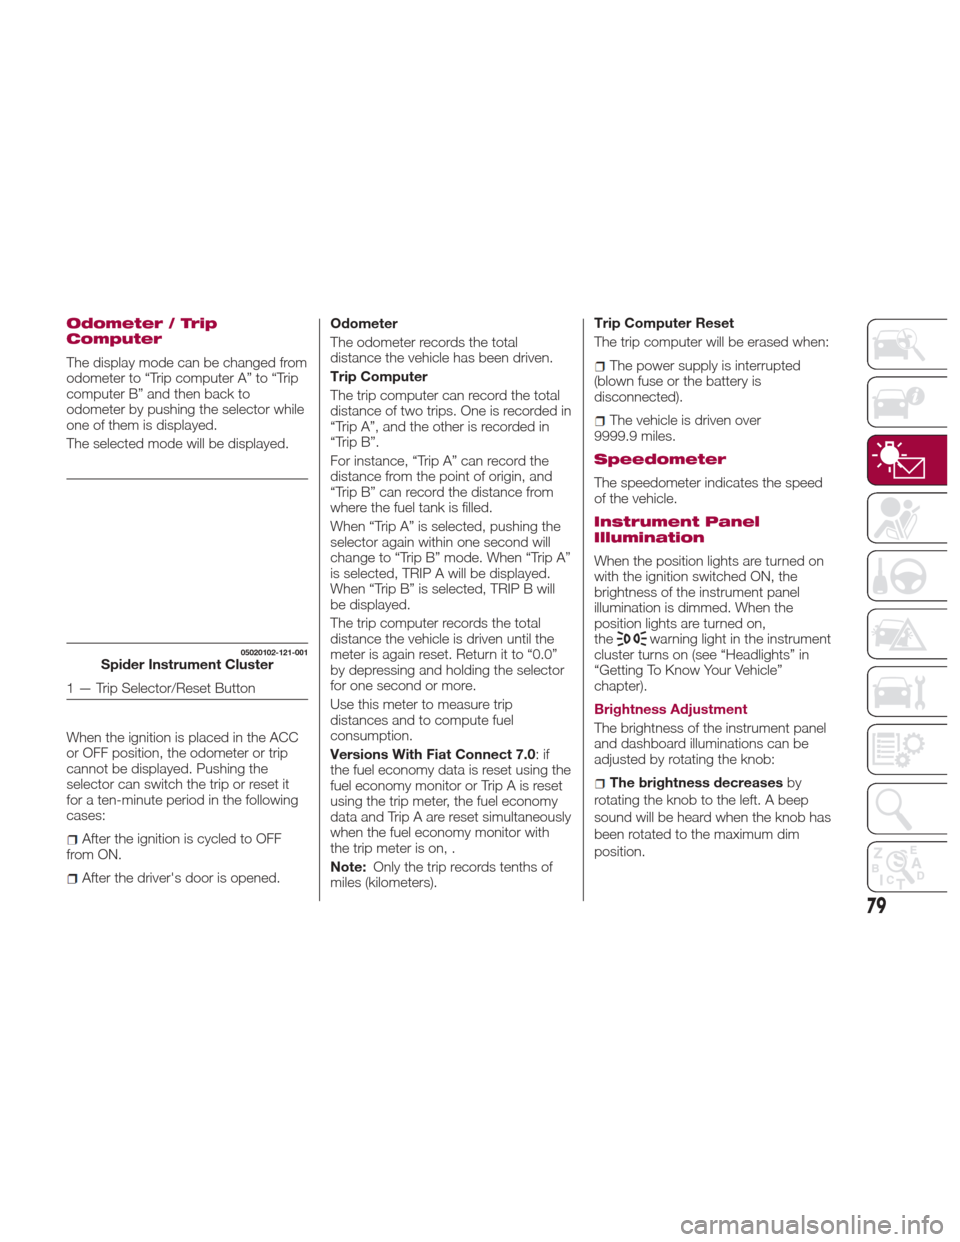
Odometer / Trip
Computer
The display mode can be changed from
odometer to “Trip computer A” to “Trip
computer B” and then back to
odometer by pushing the selector while
one of them is displayed.
The selected mode will be displayed.
When the ignition is placed in the ACC
or OFF position, the odometer or trip
cannot be displayed. Pushing the
selector can switch the trip or reset it
for a ten-minute period in the following
cases:
After the ignition is cycled to OFF
from ON.
After the driver's door is opened. Odometer
The odometer records the total
distance the vehicle has been driven.
Trip Computer
The trip computer can record the total
distance of two trips. One is recorded in
“Trip A”, and the other is recorded in
“Trip B”.
For instance, “Trip A” can record the
distance from the point of origin, and
“Trip B” can record the distance from
where the fuel tank is filled.
When “Trip A” is selected, pushing the
selector again within one second will
change to “Trip B” mode. When “Trip A”
is selected, TRIP A will be displayed.
When “Trip B” is selected, TRIP B will
be displayed.
The trip computer records the total
distance the vehicle is driven until the
meter is again reset. Return it to “0.0”
by depressing and holding the selector
for one second or more.
Use this meter to measure trip
distances and to compute fuel
consumption.
Versions With Fiat Connect 7.0
:if
the fuel economy data is reset using the
fuel economy monitor or Trip A is reset
using the trip meter, the fuel economy
data and Trip A are reset simultaneously
when the fuel economy monitor with
the trip meter is on, .
Note: Only the trip records tenths of
miles (kilometers). Trip Computer Reset
The trip computer will be erased when:
The power supply is interrupted
(blown fuse or the battery is
disconnected).
The vehicle is driven over
9999.9 miles.
Speedometer
The speedometer indicates the speed
of the vehicle.
Instrument Panel
Illumination
When the position lights are turned on
with the ignition switched ON, the
brightness of the instrument panel
illumination is dimmed. When the
position lights are turned on,
the
warning light in the instrument
cluster turns on (see “Headlights” in
“Getting To Know Your Vehicle”
chapter).
Brightness Adjustment
The brightness of the instrument panel
and dashboard illuminations can be
adjusted by rotating the knob:
The brightness decreases by
rotating the knob to the left. A beep
sound will be heard when the knob has
been rotated to the maximum dim
position.
05020102-121-001Spider Instrument Cluster
1 — Trip Selector/Reset Button
79
Page 82 of 300
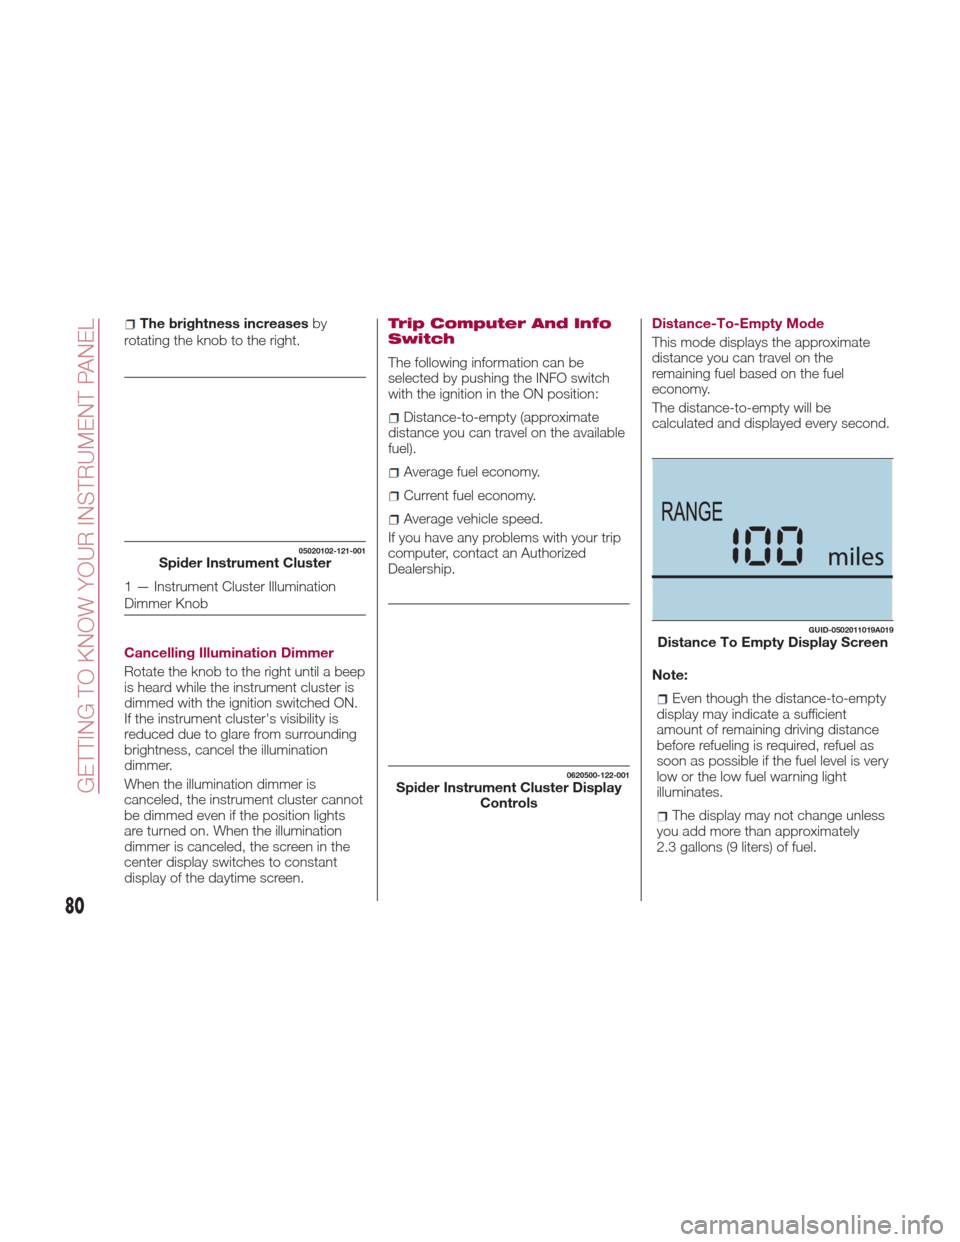
The brightness increasesby
rotating the knob to the right.
Cancelling Illumination Dimmer
Rotate the knob to the right until a beep
is heard while the instrument cluster is
dimmed with the ignition switched ON.
If the instrument cluster's visibility is
reduced due to glare from surrounding
brightness, cancel the illumination
dimmer.
When the illumination dimmer is
canceled, the instrument cluster cannot
be dimmed even if the position lights
are turned on. When the illumination
dimmer is canceled, the screen in the
center display switches to constant
display of the daytime screen.Trip Computer And Info
Switch
The following information can be
selected by pushing the INFO switch
with the ignition in the ON position:
Distance-to-empty (approximate
distance you can travel on the available
fuel).
Average fuel economy.
Current fuel economy.
Average vehicle speed.
If you have any problems with your trip
computer, contact an Authorized
Dealership. Distance-To-Empty Mode
This mode displays the approximate
distance you can travel on the
remaining fuel based on the fuel
economy.
The distance-to-empty will be
calculated and displayed every second.
Note:
Even though the distance-to-empty
display may indicate a sufficient
amount of remaining driving distance
before refueling is required, refuel as
soon as possible if the fuel level is very
low or the low fuel warning light
illuminates.
The display may not change unless
you add more than approximately
2.3 gallons (9 liters) of fuel.
05020102-121-001Spider Instrument Cluster
1 — Instrument Cluster Illumination
Dimmer Knob
0620500-122-001Spider Instrument Cluster Display Controls
GUID-0502011019A019Distance To Empty Display Screen
80
GETTING TO KNOW YOUR INSTRUMENT PANEL
Page 84 of 300
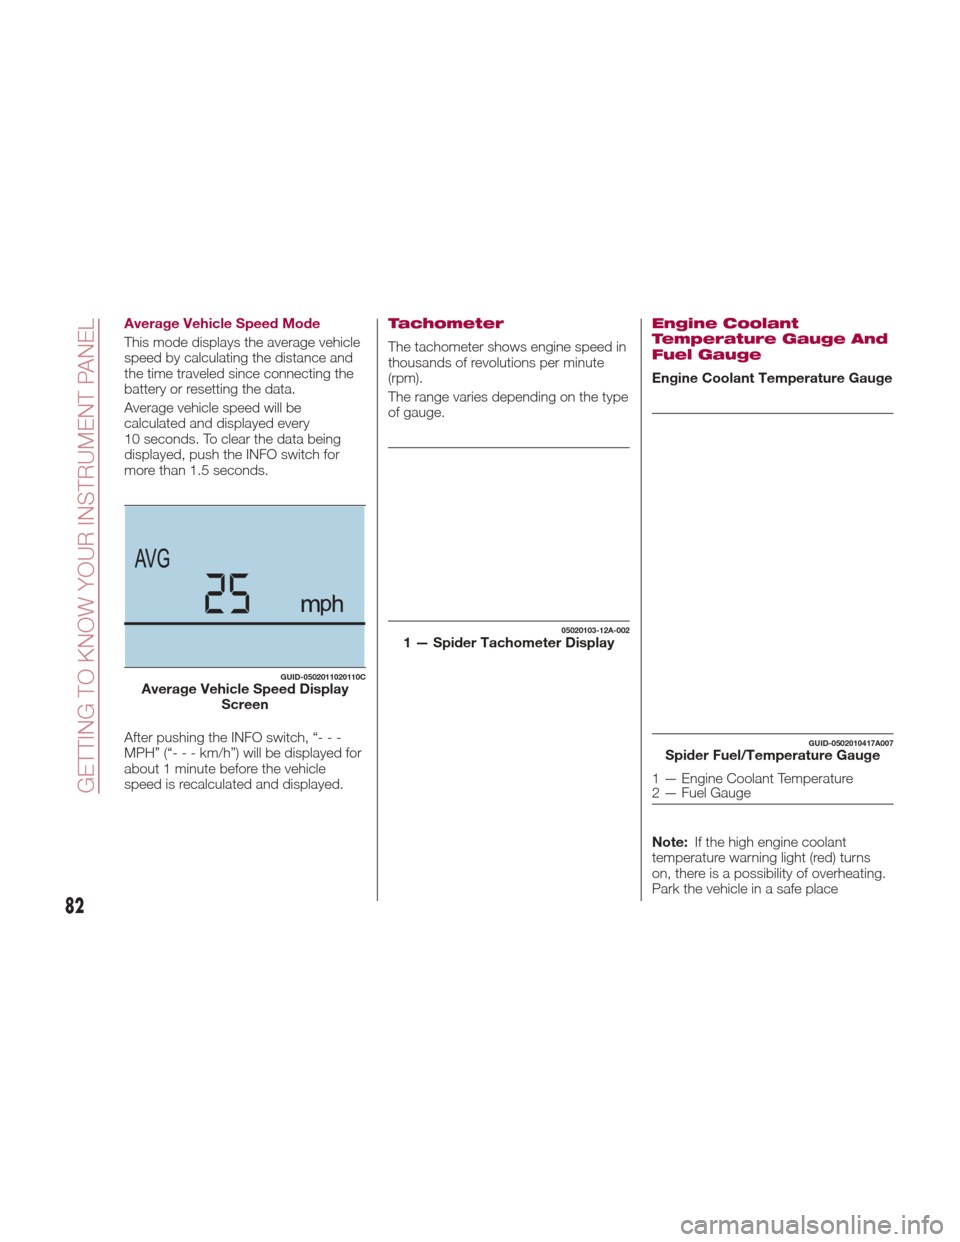
Average Vehicle Speed Mode
This mode displays the average vehicle
speed by calculating the distance and
the time traveled since connecting the
battery or resetting the data.
Average vehicle speed will be
calculated and displayed every
10 seconds. To clear the data being
displayed, push the INFO switch for
more than 1.5 seconds.
After pushing the INFO switch, “- - -
MPH” (“---km/h”)willbedisplayedfor
about 1 minute before the vehicle
speed is recalculated and displayed.Tachometer
The tachometer shows engine speed in
thousands of revolutions per minute
(rpm).
The range varies depending on the type
of gauge.
Engine Coolant
Temperature Gauge And
Fuel Gauge
Engine Coolant Temperature Gauge
Note:If the high engine coolant
temperature warning light (red) turns
on, there is a possibility of overheating.
Park the vehicle in a safe place
GUID-0502011020110CAverage Vehicle Speed Display Screen
05020103-12A-0021 — Spider Tachometer Display
GUID-0502010417A007Spider Fuel/Temperature Gauge
1 — Engine Coolant Temperature
2 — Fuel Gauge
82
GETTING TO KNOW YOUR INSTRUMENT PANEL
Page 85 of 300
immediately and take appropriate
measures. If the vehicle continues to be
driven, it could cause damage to the
engine.
Fuel Gauge
The fuel gauge 2 shows approximately
how much fuel is remaining in the tank
when the ignition is in the ON position.
We recommend keeping the tank over
1/4 full.
E= Empty
F= Full
If the low fuel warning light illuminates
or the fuel level is very low, refuel as
soon as possible.
Note:
After refueling, it may require some
time for the indicator to stabilize. In
addition, the indicator may deviate
while driving on a slope or curve since
the fuel moves in the tank.
The display indicating a quarter or
less remaining fuel has more segments
to show the remaining fuel level in
greater detail.
The direction of the arrow on the
fuel gauge indicates that the fuel door
lid is on the left side of the vehicle.
Outside Temperature
Display
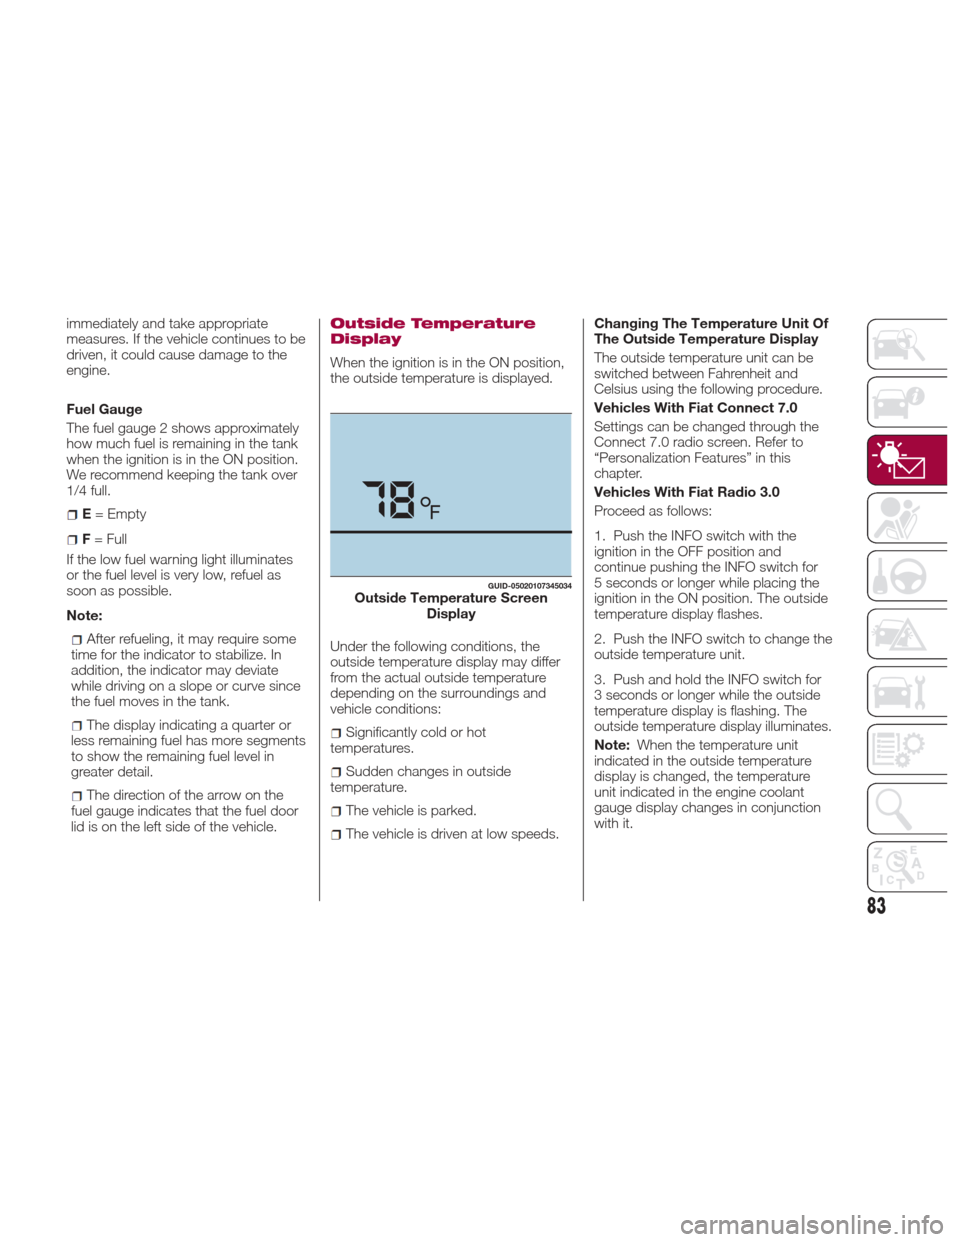
When the ignition is in the ON position,
the outside temperature is displayed.
Under the following conditions, the
outside temperature display may differ
from the actual outside temperature
depending on the surroundings and
vehicle conditions:
Significantly cold or hot
temperatures.
Sudden changes in outside
temperature.
The vehicle is parked.
The vehicle is driven at low speeds. Changing The Temperature Unit Of
The Outside Temperature Display
The outside temperature unit can be
switched between Fahrenheit and
Celsius using the following procedure.
Vehicles With Fiat Connect 7.0
Settings can be changed through the
Connect 7.0 radio screen. Refer to
“Personalization Features” in this
chapter.
Vehicles With Fiat Radio 3.0
Proceed as follows:
1. Push the INFO switch with the
ignition in the OFF position and
continue pushing the INFO switch for
5 seconds or longer while placing the
ignition in the ON position. The outside
temperature display flashes.
2. Push the INFO switch to change the
outside temperature unit.
3. Push and hold the INFO switch for
3 seconds or longer while the outside
temperature display is flashing. The
outside temperature display illuminates.
Note:
When the temperature unit
indicated in the outside temperature
display is changed, the temperature
unit indicated in the engine coolant
gauge display changes in conjunction
with it.
GUID-05020107345034Outside Temperature Screen Display
83
Page 87 of 300
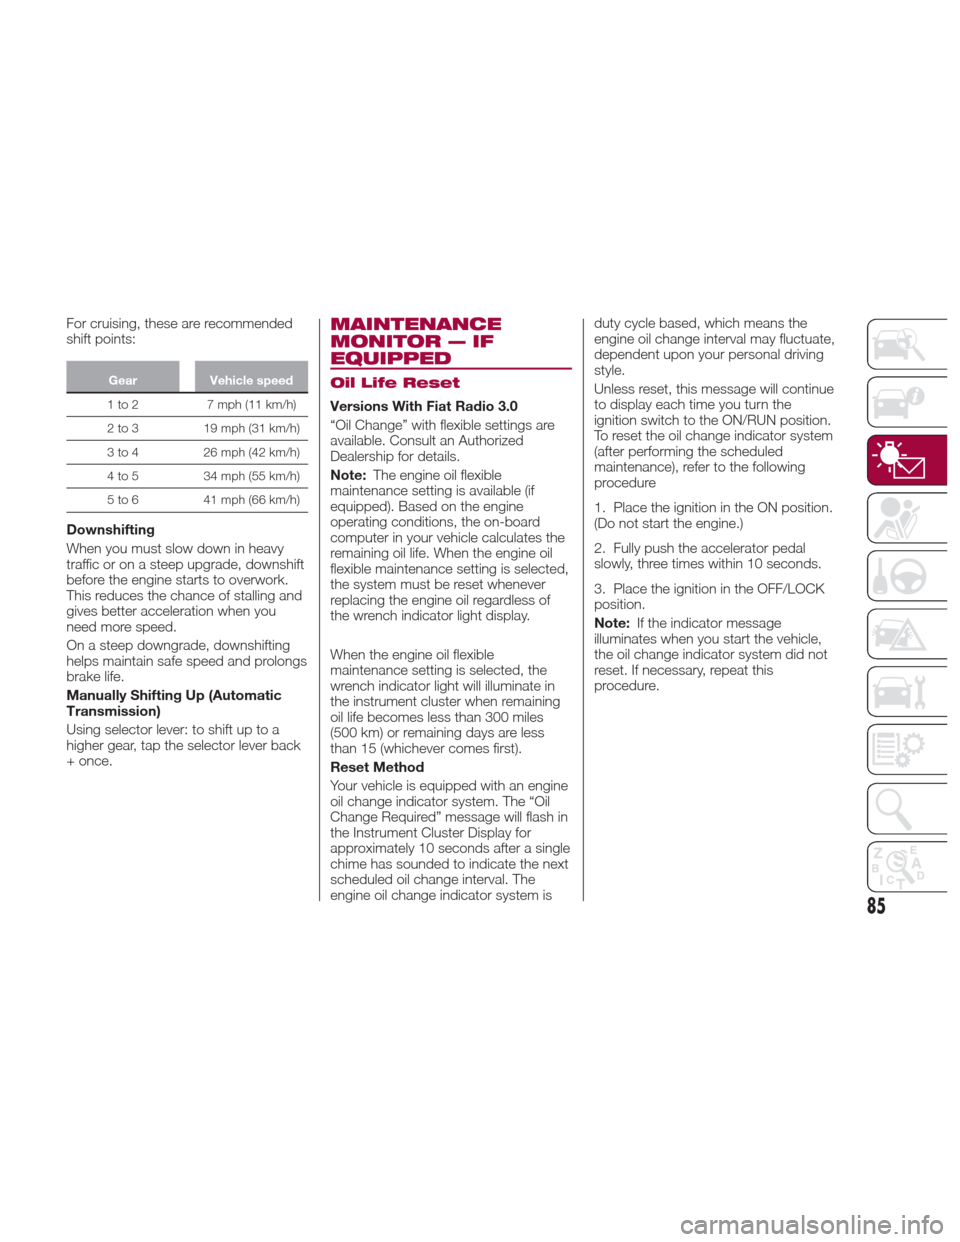
For cruising, these are recommended
shift points:
GearVehicle speed
1to2 7mph(11km/h)
2
to 3 19 mph (31 km/h)
3 to 4 26 mph (42 km/h)
4 to 5 34 mph (55 km/h)
5 to 6 41 mph (66 km/h)
Downshifting
When you must slow down in heavy
traffic or on a steep upgrade, downshift
before the engine starts to overwork.
This reduces the chance of stalling and
gives better acceleration when you
need more speed.
On a steep downgrade, downshifting
helps maintain safe speed and prolongs
brake life.
Manually Shifting Up (Automatic
Transmission)
Using selector lever: to shift up to a
higher gear, tap the selector lever back
+ once.
MAINTENANCE
MONITOR — IF
EQUIPPED
Oil Life Reset
Versions With Fiat Radio 3.0
“Oil Change” with flexible settings are
available. Consult an Authorized
Dealership for details.
Note:The engine oil flexible
maintenance setting is available (if
equipped). Based on the engine
operating conditions, the on-board
computer in your vehicle calculates the
remaining oil life. When the engine oil
flexible maintenance setting is selected,
the system must be reset whenever
replacing the engine oil regardless of
the wrench indicator light display.
When the engine oil flexible
maintenance setting is selected, the
wrench indicator light will illuminate in
the instrument cluster when remaining
oil life becomes less than 300 miles
(500 km) or remaining days are less
than 15 (whichever comes first).
Reset Method
Your vehicle is equipped with an engine
oil change indicator system. The “Oil
Change Required” message will flash in
the Instrument Cluster Display for
approximately 10 seconds after a single
chime has sounded to indicate the next
scheduled oil change interval. The
engine oil change indicator system is duty cycle based, which means the
engine oil change interval may fluctuate,
dependent upon your personal driving
style.
Unless reset, this message will continue
to display each time you turn the
ignition switch to the ON/RUN position.
To reset the oil change indicator system
(after performing the scheduled
maintenance), refer to the following
procedure
1. Place the ignition in the ON position.
(Do not start the engine.)
2. Fully push the accelerator pedal
slowly, three times within 10 seconds.
3. Place the ignition in the OFF/LOCK
position.
Note:
If the indicator message
illuminates when you start the vehicle,
the oil change indicator system did not
reset. If necessary, repeat this
procedure.
85
Page 88 of 300
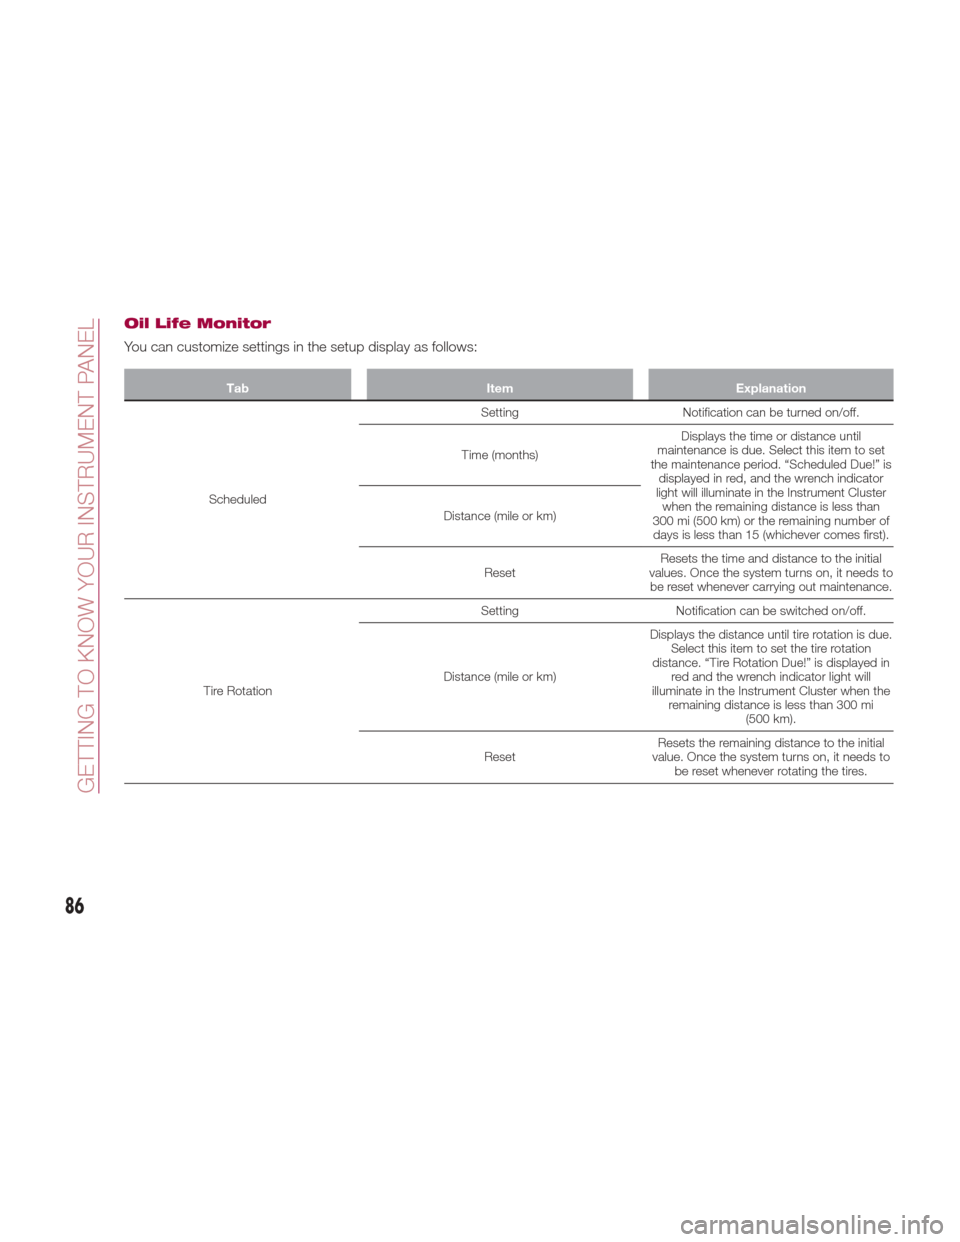
Oil Life Monitor
You can customize settings in the setup display as follows:
TabItemExplanation
Scheduled Setting
Notification can be turned on/off.
Time (months) Displays the time or distance until
maintenance is due. Select this item to set
the maintenance period. “Scheduled Due!” is displayed in red, and the wrench indicator
light will illuminate in the Instrument Cluster when the remaining distance is less than
300 mi (500 km) or the remaining number of days is less than 15 (whichever comes first).
Distance (mile or km)
Reset Resets the time and distance to the initial
values. Once the system turns on, it needs to be reset whenever carrying out maintenance.
Tire Rotation Setting
Notification can be switched on/off.
Distance (mile or km) Displays the distance until tire rotation is due.
Select this item to set the tire rotation
distance. “Tire Rotation Due!” is displayed in red and the wrench indicator light will
illuminate in the Instrument Cluster when the remaining distance is less than 300 mi (500 km).
Reset Resets the remaining distance to the initial
value. Once the system turns on, it needs to be reset whenever rotating the tires.
86
GETTING TO KNOW YOUR INSTRUMENT PANEL
Page 89 of 300
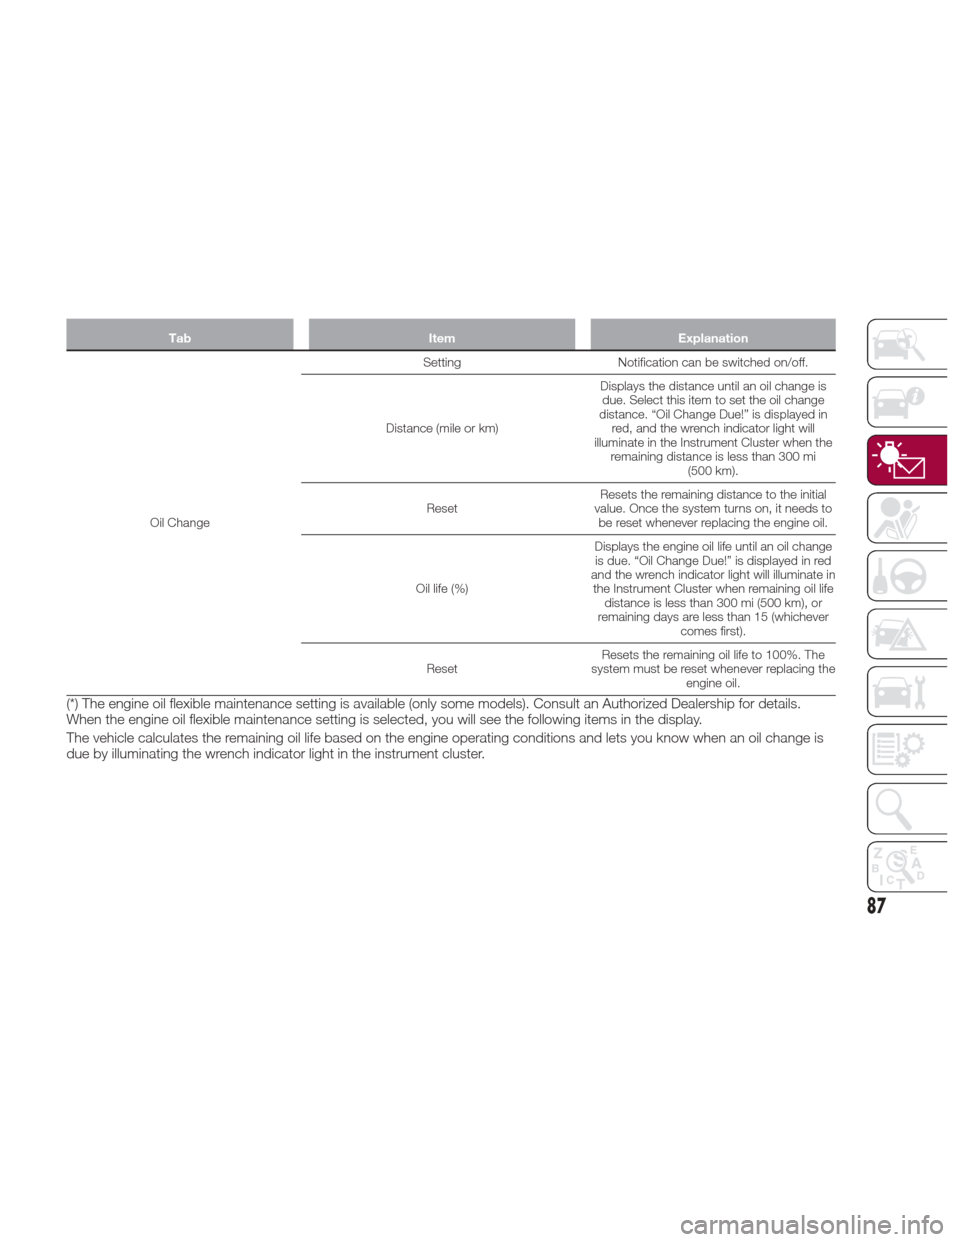
TabItemExplanation
Oil Change Setting
Notification can be switched on/off.
Distance (mile or km) Displays the distance until an oil change is
due. Select this item to set the oil change
distance. “Oil Change Due!” is displayed in red, and the wrench indicator light will
illuminate in the Instrument Cluster when the remaining distance is less than 300 mi (500 km).
Reset Resets the remaining distance to the initial
value. Once the system turns on, it needs to be reset whenever replacing the engine oil.
Oil life (%) Displays the engine oil life until an oil change
is due. “Oil Change Due!” is displayed in red
and the wrench indicator light will illuminate in the Instrument Cluster when remaining oil life distance is less than 300 mi (500 km), or
remaining days are less than 15 (whichever comes first).
Reset Resets the remaining oil life to 100%. The
system must be reset whenever replacing the engine oil.
(*) The engine oil flexible maintenance setting is available (only some models). Consult an Authorized Dealership for details.
When the engine oil flexible maintenance setting is selected, you will see the following items in the display.
The vehicle calculates the remaining oil life based on the engine operating conditions and lets you know when an oil change is
due by illuminating the wrench indicator light in the instrument cluster.
87