Page 277 of 584

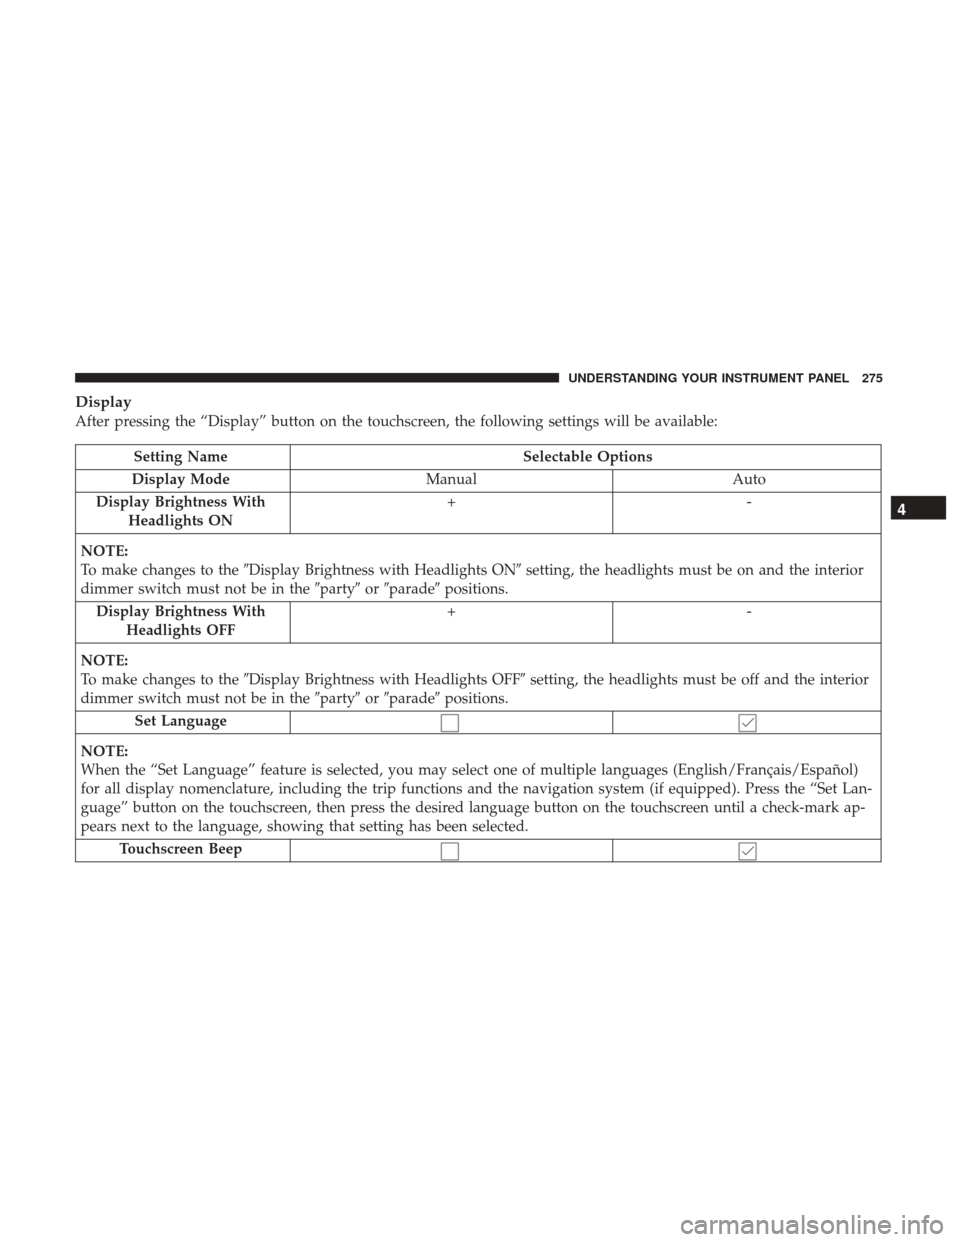
Display
After pressing the “Display” button on the touchscreen, the following settings will be available:
Setting NameSelectable Options
Display Mode Manual Auto
Display Brightness With Headlights ON +-
NOTE:
To make changes to the �Display Brightness with Headlights ON� setting, the headlights must be on and the interior
dimmer switch must not be in the �party�or�parade� positions.
Display Brightness With Headlights OFF +-
NOTE:
To make changes to the �Display Brightness with Headlights OFF� setting, the headlights must be off and the interior
dimmer switch must not be in the �party�or�parade� positions.
Set Language
NOTE:
When the “Set Language” feature is selected, you may select one of multiple languages (English/Français/Español)
for all display nomenclature, including the trip functions and the navigation system (if equipped). Press the “Set Lan-
guage” button on the touchscreen, then press the desired language button on the touchscreen until a check-mark ap-
pears next to the language, showing that setting has been selected. Touchscreen Beep
4
UNDERSTANDING YOUR INSTRUMENT PANEL 275
Page 278 of 584
Units
After pressing the “Units” button on the touchscreen you
may select each unit of measure independently displayed
in the Instrument Cluster Display, and navigation system
(if equipped). The following selectable units of measure are
listed below:
Setting NameSelectable Options
Units Custom
NOTE:
The “Custom” option allows you to set the “Speed” (MPH, or km/h), “Distance” (mi, or km), “Fuel Consumption”
[MPG (US), MPG (UK), L/100 km, or km/L], “Pressure” (psi, kPa, or bar), and “Temperature” (°C, or °F) units of
measure independently.
Voice
After pressing the “Voice” button on the touchscreen, the
following settings will be available:
Setting Name Selectable Options
Voice Response Length Brief Detailed
Show Command List AlwaysWith Help Never
276 UNDERSTANDING YOUR INSTRUMENT PANEL
Page 280 of 584

Safety/Assistance
After pressing the “Safety/Assistance” button on the
touchscreen the following settings will be available:
Setting NameSelectable Options
ParkView Backup Camera Delay — If Equipped On
Off
NOTE:
The “ParkView Backup Camera Delay” setting determines whether or not the screen will display the rear view image
with dynamic grid lines for up to 10 seconds after the vehicle is shifted out of REVERSE. This delay will be canceled
if the vehicle’s speed exceeds 8 mph (13 km/h), the transmission is shifted into PARK, or the ignition is switched to
the OFF position. ParkView Backup Camera Active Guide Lines — If Equipped
NOTE:
The “ParkView Backup Camera Active Guide Lines” feature overlays the Rear Backup Camera image with active, or
dynamic, grid lines to help illustrate the width of the vehicle and its project back up path, based on the steering
wheel position when the option is checked. A dashed center line overlay indicates the center of the vehicle to assist
with parking or aligning to a hitch/receiver.
278 UNDERSTANDING YOUR INSTRUMENT PANEL
Page 282 of 584

Setting NameSelectable Options
When the “Sound Only” option is selected a chime will sound alerting you of a possible collision with the vehicle in
front of you and more brake pressure is needed. When the “Sound and Brake” option is selected, it will apply the
brakes to slow your vehicle in case of potential forward collision and sound an audible chime to alert you. ParkSense — If Equipped OffSound Only Sound and Display
NOTE:
The “ParkSense” system setting will scan for objects behind the vehicle when the transmission gear selector is in RE-
VERSE and the vehicle speed is less than 7 mph (11 km/h), when enabled. It will provide an alert (audible and/or vi-
sual) to indicate the proximity to other objects. The system can be enabled with “Sound Only,” or “Sound and Display.”
Rear ParkSense Volume Low Medium High
Rear ParkSense Braking Assist — If Equipped
NOTE:
When the “Rear ParkSense Braking Assist” feature is selected, the park assist system will detect objects located be-
hind the vehicle and utilize autonomous braking to stop the vehicle. Lane Departure Warning (LDW) — If Equipped Early
Medium Late
NOTE:
The “Lane Depature Warning (LDW)” setting determines at what distance the LDW system will warn you, through
steering wheel feedback, of a possible lane departure.
280 UNDERSTANDING YOUR INSTRUMENT PANEL
Page 291 of 584

Audio
After pressing the “Audio” button on the touchscreen the
following settings will be available:
Setting NameAdjustable Options
Equalizer BassMidTreble
NOTE:
When in this display you may adjust the “Bass”, “Mid” and “Treble” settings. Adjust the settings with the “+” and
“–” setting buttons on the touchscreen or by selecting any point on the scale between the “+” and “–” buttons on the
touchscreen. Bass/Mid/Treble also allow you to simply slide your finger up or down to change the setting as well as
press directly on the desired setting. Balance/Fade Up Arrow
Button Down
Arrow
Button Left Arrow
Button Right
Arrow
Button Center “C”
Button
NOTE:
When in this display you may adjust the “Balance/Fade” of the audio by using the “Arrow” button on the touch-
screen to adjust the sound level from the front and rear or right and left side speakers. Press the “Center ‘C’ Button”
on the touchscreen to reset the balance and fade to the factory setting.
4
UNDERSTANDING YOUR INSTRUMENT PANEL 289
Page 295 of 584

System Information
After pressing the “System Information” button on the
touchscreen, the following settings will be available:
Setting NameSelectable Options
System Information System Software Information Screen
NOTE: When the “System Information” feature is selected, a “System Software Information” screen will appear, dis-
playing the system software version.
Customer Programmable Features — Uconnect 8.4
Personal Settings
Press the “Apps”button, then press the “Settings”
button on the touchscreen to display the menu setting
screen. In this mode the Uconnect system allows you to
access programmable features that may be equipped such
as Display, Units, Voice, Clock, Safety & Driving Assistance,
Lights, Doors & Locks, Auto-On Comfort, Engine Off
Options, Audio, Phone/Bluetooth, SiriusXM Setup, Restore
Settings, Clear Personal Data, and System Information.
NOTE:
• Only one touchscreen area may be selected at a time.
•
Depending on the vehicles options, feature settings may
vary.
When making a selection, press the button on the touch-
screen to enter the desired mode. Once in the desired
mode, press and release the preferred setting “option” until
a check-mark appears next to the setting, showing that
setting has been selected. Once the setting is complete,
either press the “Back” Arrow button on the touchscreen to
return to the previous menu, or press the “X” button on the
touchscreen to close out of the settings screen. Pressing the
“Up” or “Down” Arrow button on the right side of the
screen will allow you to toggle up or down through the
available settings.
4
UNDERSTANDING YOUR INSTRUMENT PANEL 293
Page 296 of 584
Display
After pressing the “Display” button on the touchscreen, the
following settings will be available:
Setting NameSelectable Options
Display Mode DayNight Auto
Display Brightness With Headlights ON +-
NOTE:
To make changes to the �Display Brightness with Headlights ON� setting, the headlights must be on and the interior
dimmer switch must not be in the �party�or�parade� positions.
Display Brightness With Headlights OFF +-
NOTE:
To make changes to the �Display Brightness with Headlights OFF� setting, the headlights must be off and the interior
dimmer switch must not be in the �party�or�parade� positions.
Set Theme
NOTE:
When the “Set Theme” feature is selected, you may select the theme for the display screen. To make your selection,
press the �Set Theme� button on the touchscreen, then select the desired theme option button until a check-mark ap-
pears showing that the setting has been selected.
294 UNDERSTANDING YOUR INSTRUMENT PANEL
Page 297 of 584

Setting NameSelectable Options
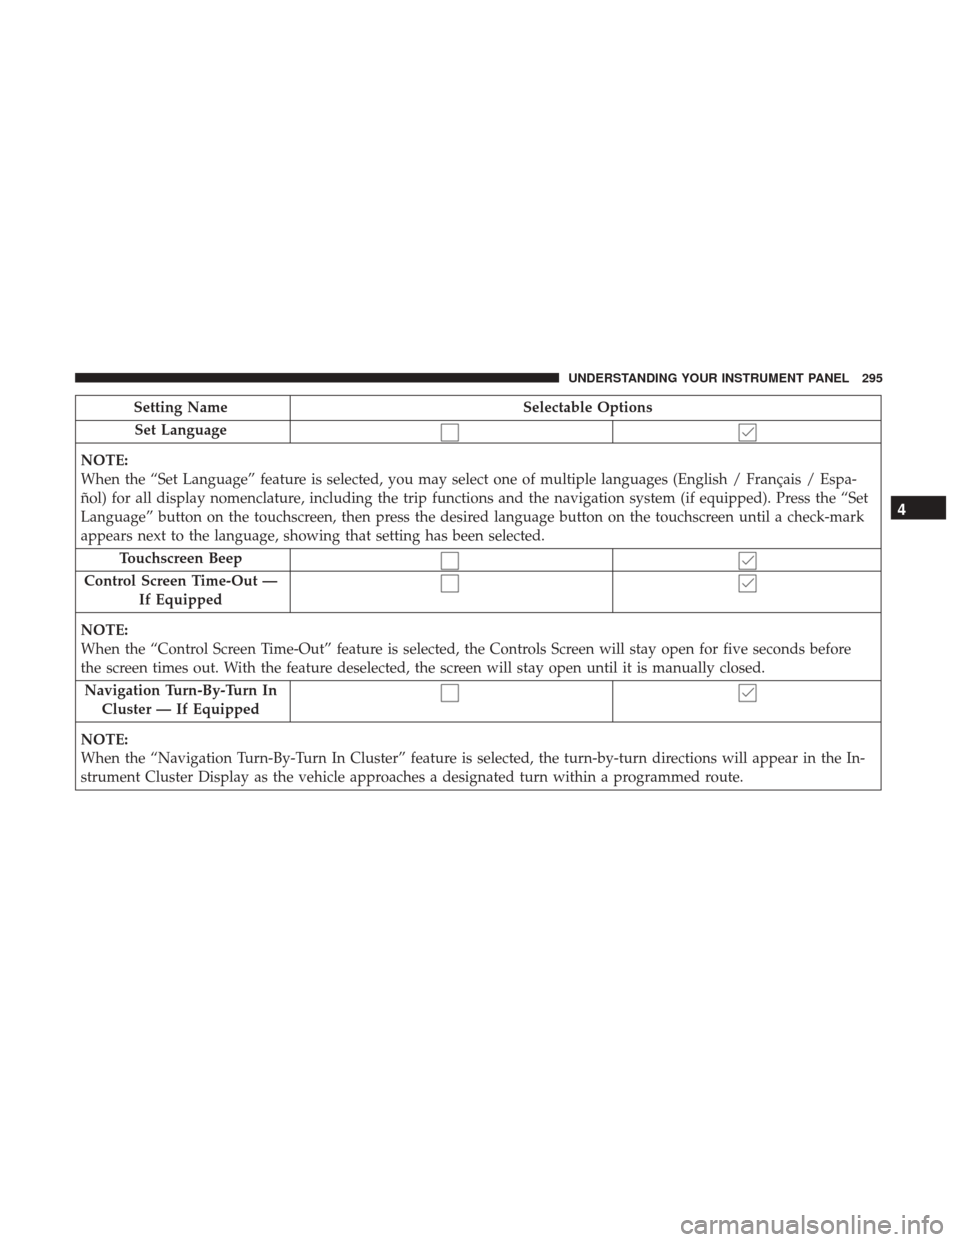
Set Language
NOTE:
When the “Set Language” feature is selected, you may select one of multiple languages (English / Français / Espa-
ñol) for all display nomenclature, including the trip functions and the navigation system (if equipped). Press the “Set
Language” button on the touchscreen, then press the desired language button on the touchscreen until a check-mark
appears next to the language, showing that setting has been selected. Touchscreen Beep
Control Screen Time-Out — If Equipped
NOTE:
When the “Control Screen Time-Out” feature is selected, the Controls Screen will stay open for five seconds before
the screen times out. With the feature deselected, the screen will stay open until it is manually closed. Navigation Turn-By-Turn In Cluster — If Equipped
NOTE:
When the “Navigation Turn-By-Turn In Cluster” feature is selected, the turn-by-turn directions will appear in the In-
strument Cluster Display as the vehicle approaches a designated turn within a programmed route.
4
UNDERSTANDING YOUR INSTRUMENT PANEL 295