Page 194 of 584

PARKVIEW REAR BACK UP CAMERA — IF
EQUIPPED
Your vehicle may be equipped with the ParkView Rear
Back Up Camera that allows you to see an on-screen image
of the rear surroundings of your vehicle whenever the gear
selector is put into REVERSE. The image will be displayed
on the Navigation/Multimedia radio display screen along
with a caution note to “check entire surroundings” across
the top of the screen. After five seconds this note will
disappear. The ParkView camera is located on the rear of
the vehicle above the rear License plate.
When the vehicle is shifted out of REVERSE (with camera
delay turned OFF), the rear camera mode is exited and the
navigation or audio screen appears again.When the vehicle is shifted out of REVERSE (with camera
delay turned ON), the rear view image with dynamic grid
lines will be displayed for up to 10 seconds after shifting
out of
�REVERSE� unless the forward vehicle speed ex-
ceeds 8 mph (13 km/h), the transmission is shifted into
�PARK� or the ignition is switched to the OFF position.
NOTE: The ParkView Rear Back Up Camera has program-
mable modes of operation that may be selected through the
Uconnect System. Refer to “Uconnect Settings” in “Under-
standing Your Instrument Panel” for further information.
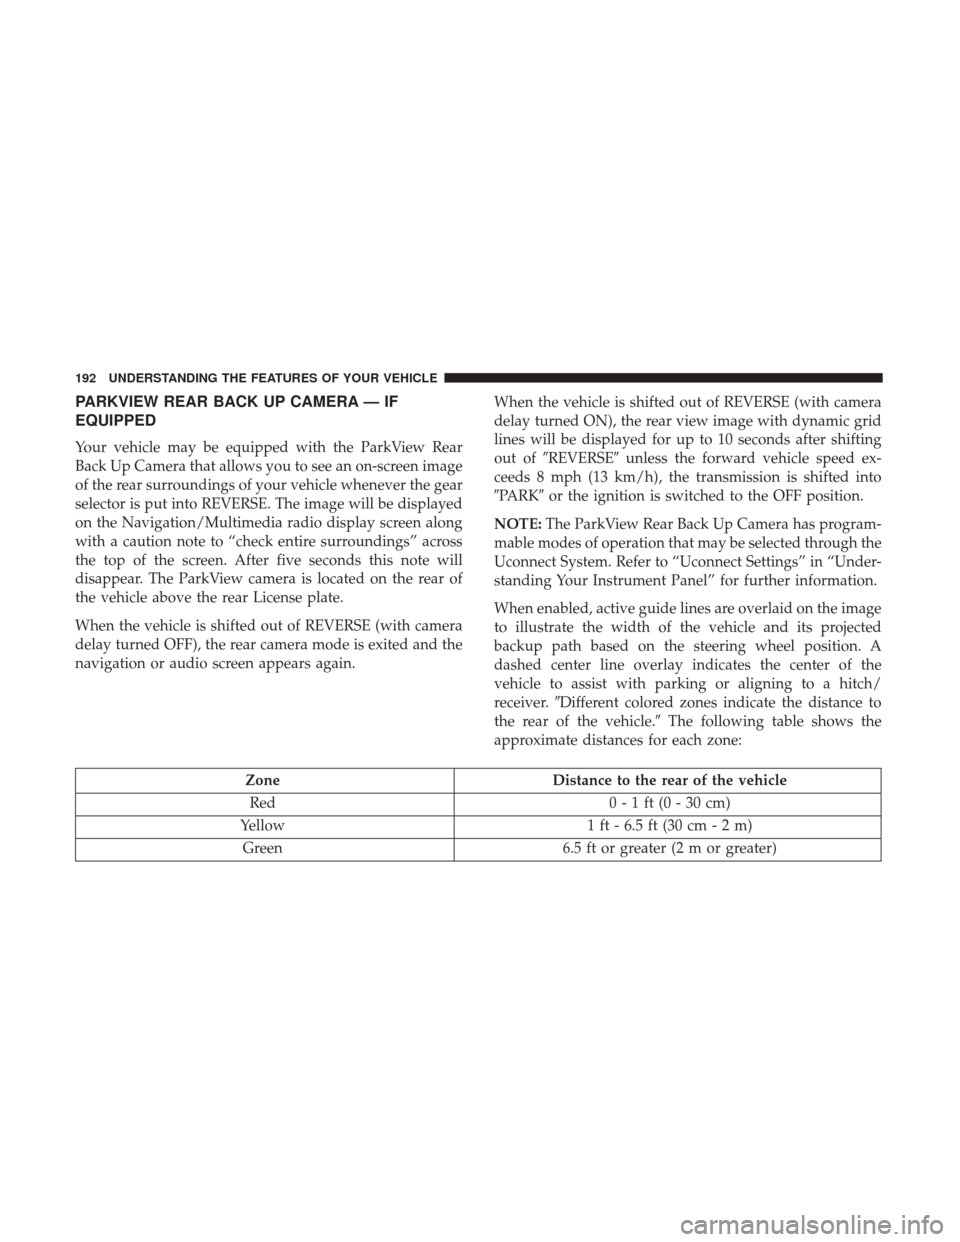
When enabled, active guide lines are overlaid on the image
to illustrate the width of the vehicle and its projected
backup path based on the steering wheel position. A
dashed center line overlay indicates the center of the
vehicle to assist with parking or aligning to a hitch/
receiver. �Different colored zones indicate the distance to
the rear of the vehicle.� The following table shows the
approximate distances for each zone:
Zone Distance to the rear of the vehicle
Red 0 - 1 ft (0 - 30 cm)
Yellow 1 ft - 6.5 ft (30 cm - 2 m)
Green 6.5 ft or greater (2 m or greater)
192 UNDERSTANDING THE FEATURES OF YOUR VEHICLE
Page 277 of 584

Display
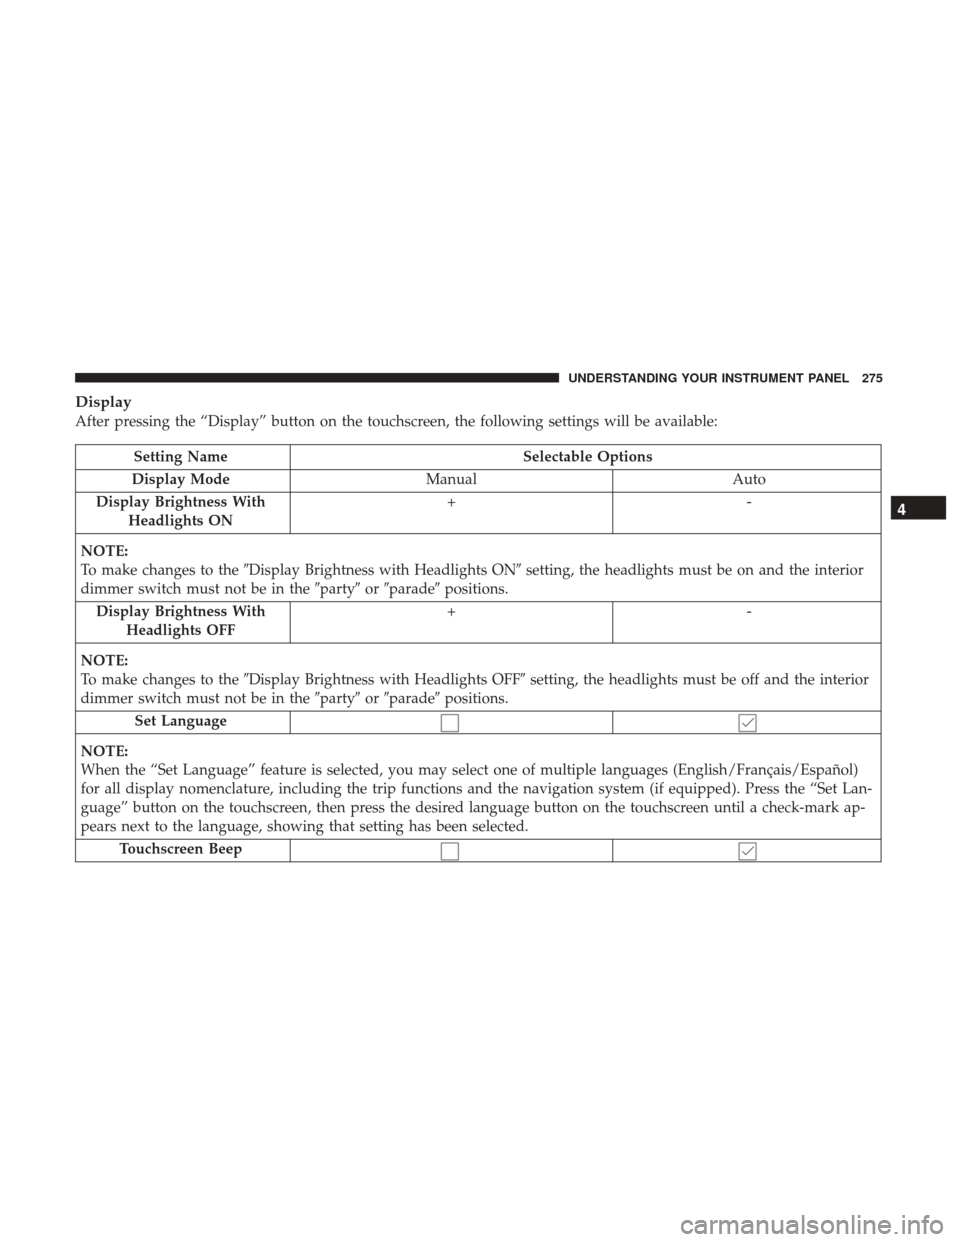
After pressing the “Display” button on the touchscreen, the following settings will be available:
Setting NameSelectable Options
Display Mode Manual Auto
Display Brightness With Headlights ON +-
NOTE:
To make changes to the �Display Brightness with Headlights ON� setting, the headlights must be on and the interior
dimmer switch must not be in the �party�or�parade� positions.
Display Brightness With Headlights OFF +-
NOTE:
To make changes to the �Display Brightness with Headlights OFF� setting, the headlights must be off and the interior
dimmer switch must not be in the �party�or�parade� positions.
Set Language
NOTE:
When the “Set Language” feature is selected, you may select one of multiple languages (English/Français/Español)
for all display nomenclature, including the trip functions and the navigation system (if equipped). Press the “Set Lan-
guage” button on the touchscreen, then press the desired language button on the touchscreen until a check-mark ap-
pears next to the language, showing that setting has been selected. Touchscreen Beep
4
UNDERSTANDING YOUR INSTRUMENT PANEL 275
Page 278 of 584
Units
After pressing the “Units” button on the touchscreen you
may select each unit of measure independently displayed
in the Instrument Cluster Display, and navigation system
(if equipped). The following selectable units of measure are
listed below:
Setting NameSelectable Options
Units Custom
NOTE:
The “Custom” option allows you to set the “Speed” (MPH, or km/h), “Distance” (mi, or km), “Fuel Consumption”
[MPG (US), MPG (UK), L/100 km, or km/L], “Pressure” (psi, kPa, or bar), and “Temperature” (°C, or °F) units of
measure independently.
Voice
After pressing the “Voice” button on the touchscreen, the
following settings will be available:
Setting Name Selectable Options
Voice Response Length Brief Detailed
Show Command List AlwaysWith Help Never
276 UNDERSTANDING YOUR INSTRUMENT PANEL
Page 297 of 584

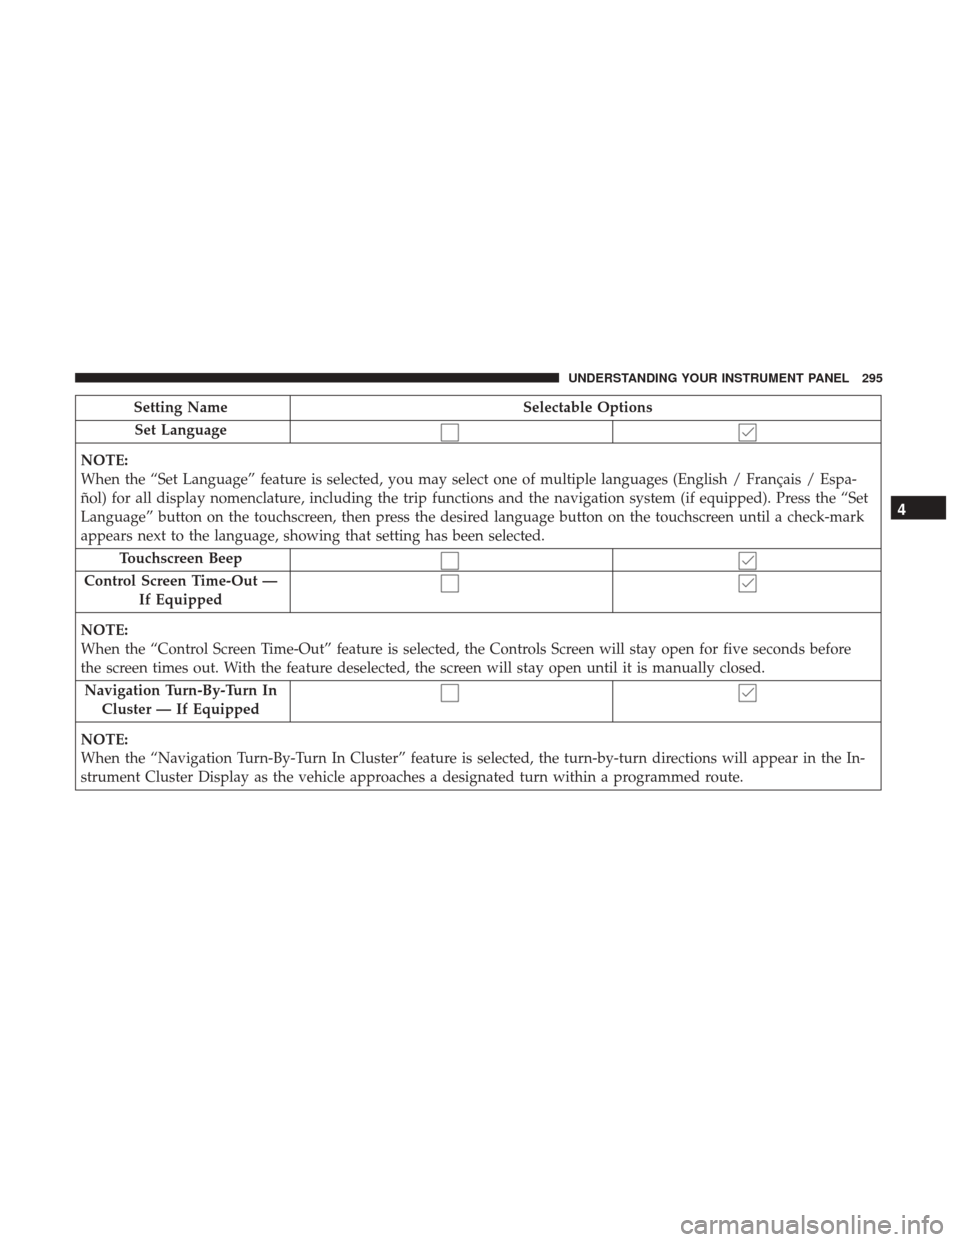
Setting NameSelectable Options
Set Language
NOTE:
When the “Set Language” feature is selected, you may select one of multiple languages (English / Français / Espa-
ñol) for all display nomenclature, including the trip functions and the navigation system (if equipped). Press the “Set
Language” button on the touchscreen, then press the desired language button on the touchscreen until a check-mark
appears next to the language, showing that setting has been selected. Touchscreen Beep
Control Screen Time-Out — If Equipped
NOTE:
When the “Control Screen Time-Out” feature is selected, the Controls Screen will stay open for five seconds before
the screen times out. With the feature deselected, the screen will stay open until it is manually closed. Navigation Turn-By-Turn In Cluster — If Equipped
NOTE:
When the “Navigation Turn-By-Turn In Cluster” feature is selected, the turn-by-turn directions will appear in the In-
strument Cluster Display as the vehicle approaches a designated turn within a programmed route.
4
UNDERSTANDING YOUR INSTRUMENT PANEL 295
Page 298 of 584
Units
After pressing the “Units” button on the touchscreen you
may select each unit of measure independently displayed
in the Instrument Cluster Display, and navigation system
(if equipped). The following selectable units of measure are
listed below:
Setting NameSelectable Options
Units Custom
NOTE:
The “Custom” option allows you to set the “Speed” (MPH, or km/h), “Distance” (mi, or km), “Fuel Consumption”
[MPG (US), MPG (UK), L/100 km, or km/L], “Pressure” (psi, kPa, or bar), and “Temperature” (°C, or °F) units of
measure independently.
Voice
After pressing the “Voice” button on the touchscreen, the
following settings will be available:
Setting Name Selectable Options
Voice Response Length Brief Detailed
Show Command List AlwaysWith Help Never
296 UNDERSTANDING YOUR INSTRUMENT PANEL
Page 357 of 584

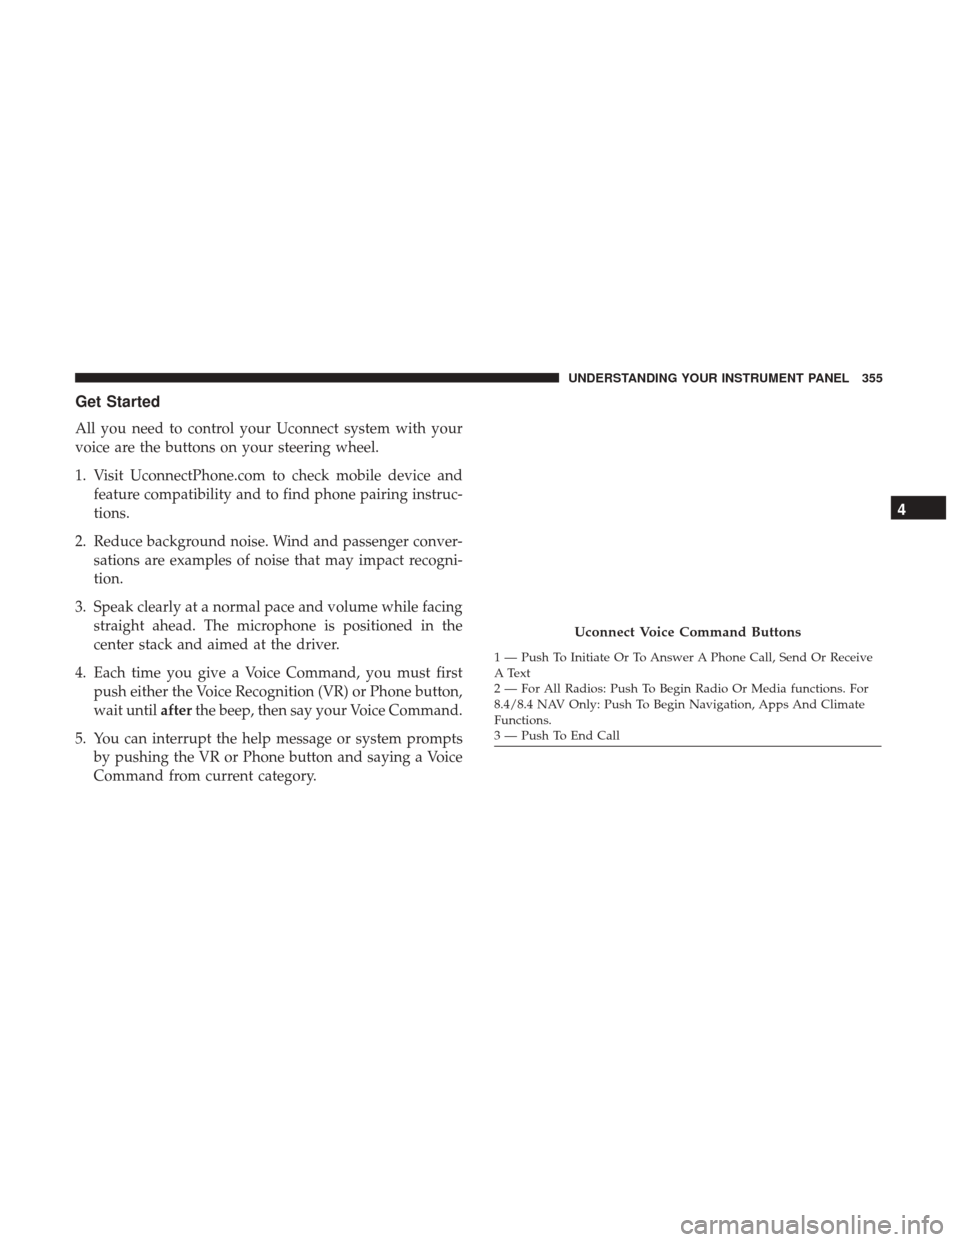
Get Started
All you need to control your Uconnect system with your
voice are the buttons on your steering wheel.
1. Visit UconnectPhone.com to check mobile device andfeature compatibility and to find phone pairing instruc-
tions.
2. Reduce background noise. Wind and passenger conver- sations are examples of noise that may impact recogni-
tion.
3. Speak clearly at a normal pace and volume while facing straight ahead. The microphone is positioned in the
center stack and aimed at the driver.
4. Each time you give a Voice Command, you must first push either the Voice Recognition (VR) or Phone button,
wait until afterthe beep, then say your Voice Command.
5. You can interrupt the help message or system prompts by pushing the VR or Phone button and saying a Voice
Command from current category.
Uconnect Voice Command Buttons
1 — Push To Initiate Or To Answer A Phone Call, Send Or Receive
A Text
2 — For All Radios: Push To Begin Radio Or Media functions. For
8.4/8.4 NAV Only: Push To Begin Navigation, Apps And Climate
Functions.
3 — Push To End Call
4
UNDERSTANDING YOUR INSTRUMENT PANEL 355
Page 364 of 584
Navigation (8.4 /8.4 NAV)
The Uconnect navigation feature helps you save time and
become more productive when you know exactly how to
get to where you want to go. (Navigation is optional on the
Uconnect 8.4 system. See your dealer to activate navigation
at any time.)
1. To enter a destination, push the VR button
. After the
beep, say:
• For the 8.4 Uconnect System, say: “Enter state.”
• For the 8.4 NAV Uconnect System, say: “Find address
800 Chrysler Drive Auburn Hills, Michigan.”
2. Then follow the system prompts.
TIP: To start a POI search, push the VR button
. After
the beep, say: “ Find nearestcoffee shop.”
Uconnect 8.4 NAV Navigation
362 UNDERSTANDING YOUR INSTRUMENT PANEL