Page 250 of 584

Tire Pressure Monitoring Indicator Light
Yellow TelltaleLight What It Means
Tire Pressure Monitoring Indicator Light
The warning light switches on and a message is displayed to indicate that the tire pressure is
lower than the recommended value and/or that slow pressure loss is occurring. In these cases,
optimal tire duration and fuel consumption may not be guaranteed.
Should one or more tires be in the condition mentioned above, the display will show the indica-
tions corresponding to each tire in sequence.
IMPORTANT: Do not continue driving with one or more
flat tires as handling may be compromised. Stop the
vehicle, avoiding sharp braking and steering. Repair im-
mediately using the dedicated tire repair kit and contact
your authorized dealership as soon as possible.
Each tire, including the spare (if provided), should be
checked monthly when cold and inflated to the inflation
pressure recommended by the vehicle manufacturer on the
vehicle placard or tire inflation pressure label. If your
vehicle has tires of a different size than the size indicated
on the vehicle placard or tire inflation pressure label, you
should determine the proper tire inflation pressure for
those tires.
As an added safety feature, your vehicle has been equipped
with a Tire Pressure Monitoring System (TPMS) that illumi-
nates a low tire pressure telltale when one or more of your
tires is significantly under-inflated. Accordingly, when the
low tire pressure telltale illuminates, you should stop and
check your tires as soon as possible and inflate them to the
proper pressure. Driving on a significantly under-inflated
tire causes the tire to overheat and can lead to tire failure.
Under-inflation also reduces fuel efficiency and tire tread life,
and may affect the vehicle’s handling and stopping ability.
248 UNDERSTANDING YOUR INSTRUMENT PANEL
Page 251 of 584

Please note that the TPMS is not a substitute for proper tire
maintenance, and it is the driver ’s responsibility to main-
tain correct tire pressure, even if under-inflation has not
reached the level to trigger illumination of the TPMS low
tire pressure telltale.
Your vehicle has also been equipped with a TPMS
malfunction indicator to indicate when the system is not
operating properly. The TPMS malfunction indicator is
combined with the low tire pressure telltale. When the
system detects a malfunction, the telltale will flash for
approximately one minute and then remain continu-
ously illuminated. This sequence will continue upon
subsequent vehicle start-ups as long as the malfunction
exists. When the malfunction indicator is illuminated,
the system may not be able to detect or signal low tire
pressure as intended. TPMS malfunctions may occur for
a variety of reasons, including the installation of re-
placement or alternate tires or wheels on the vehicle that
prevent the TPMS from functioning properly. Always
check the TPMS malfunction telltale after replacing oneor more tires or wheels on your vehicle, to ensure that
the replacement or alternate tires and wheels allow the
TPMS to continue to function properly.
CAUTION!
The TPMS has been optimized for the original equip-
ment tires and wheels. TPMS pressures and warning
have been established for the tire size equipped on
your vehicle. Undesirable system operation or sensor
damage may result when using replacement equip-
ment that is not of the same size, type, and/or style.
Aftermarket wheels can cause sensor damage. Using
aftermarket tire sealants may cause the Tire Pressure
Monitoring System (TPMS) sensor to become inoper-
able. After using an aftermarket tire sealant it is
recommended that you take your vehicle to an autho-
rized dealership to have your sensor function checked.4
UNDERSTANDING YOUR INSTRUMENT PANEL 249
Page 277 of 584

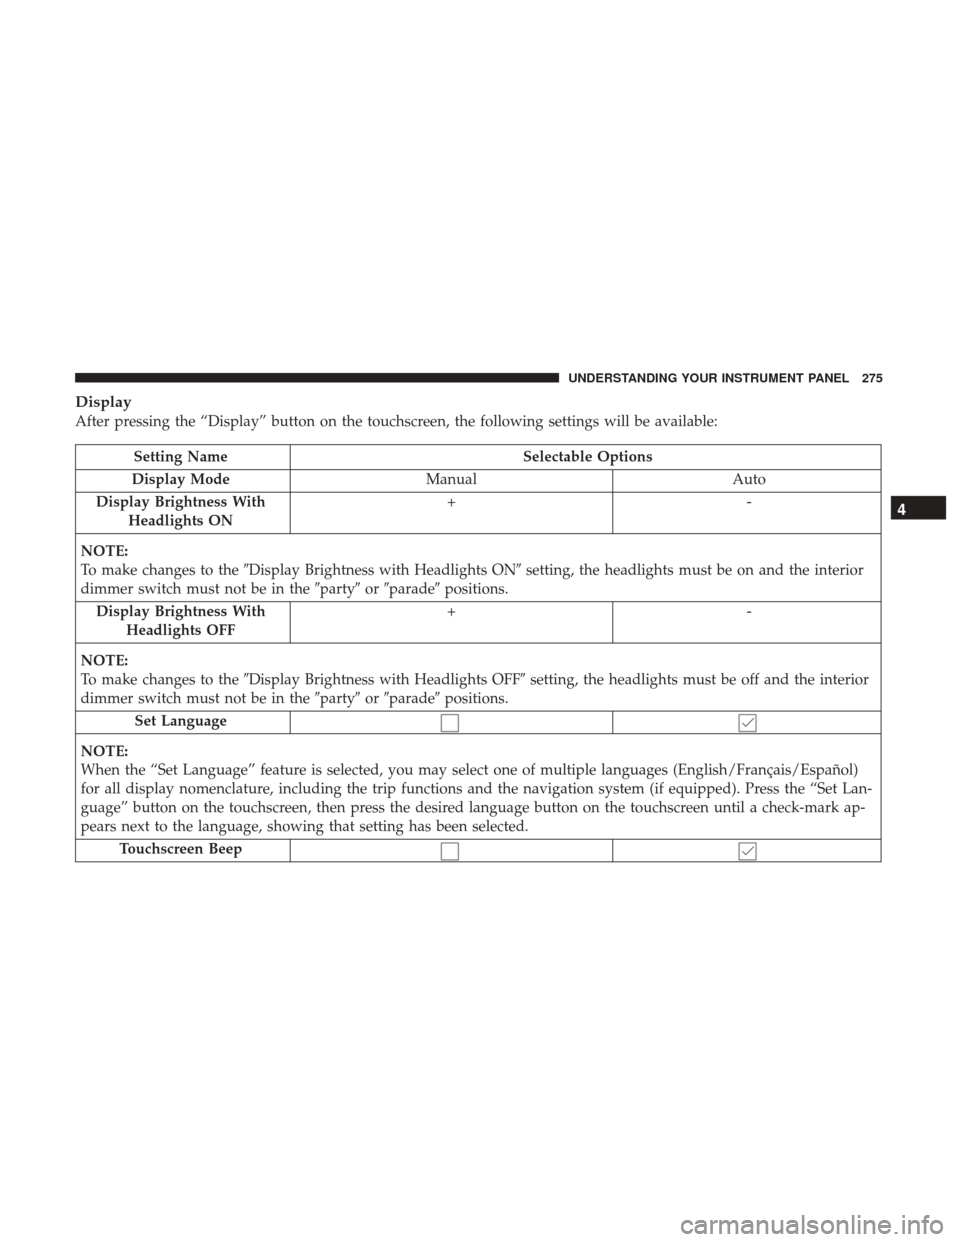
Display
After pressing the “Display” button on the touchscreen, the following settings will be available:
Setting NameSelectable Options
Display Mode Manual Auto
Display Brightness With Headlights ON +-
NOTE:
To make changes to the �Display Brightness with Headlights ON� setting, the headlights must be on and the interior
dimmer switch must not be in the �party�or�parade� positions.
Display Brightness With Headlights OFF +-
NOTE:
To make changes to the �Display Brightness with Headlights OFF� setting, the headlights must be off and the interior
dimmer switch must not be in the �party�or�parade� positions.
Set Language
NOTE:
When the “Set Language” feature is selected, you may select one of multiple languages (English/Français/Español)
for all display nomenclature, including the trip functions and the navigation system (if equipped). Press the “Set Lan-
guage” button on the touchscreen, then press the desired language button on the touchscreen until a check-mark ap-
pears next to the language, showing that setting has been selected. Touchscreen Beep
4
UNDERSTANDING YOUR INSTRUMENT PANEL 275
Page 278 of 584
Units
After pressing the “Units” button on the touchscreen you
may select each unit of measure independently displayed
in the Instrument Cluster Display, and navigation system
(if equipped). The following selectable units of measure are
listed below:
Setting NameSelectable Options
Units Custom
NOTE:
The “Custom” option allows you to set the “Speed” (MPH, or km/h), “Distance” (mi, or km), “Fuel Consumption”
[MPG (US), MPG (UK), L/100 km, or km/L], “Pressure” (psi, kPa, or bar), and “Temperature” (°C, or °F) units of
measure independently.
Voice
After pressing the “Voice” button on the touchscreen, the
following settings will be available:
Setting Name Selectable Options
Voice Response Length Brief Detailed
Show Command List AlwaysWith Help Never
276 UNDERSTANDING YOUR INSTRUMENT PANEL
Page 279 of 584
Clock & Date
After pressing the “Clock & Date” button on the touch-
screen the following settings will be available:
Setting NameSelectable Options
Set Time and Format 12 hour24 hour AMPM
NOTE: Within the “Set Time and Format” setting, press the corresponding arrow buttons on the touchscreen to adjust
to the correct time.
Set Date MonthDay Year
NOTE: Within the “Set Date” setting, press the corresponding arrow buttons on the touchscreen to adjust to the cur-
rent date.
4
UNDERSTANDING YOUR INSTRUMENT PANEL 277
Page 297 of 584

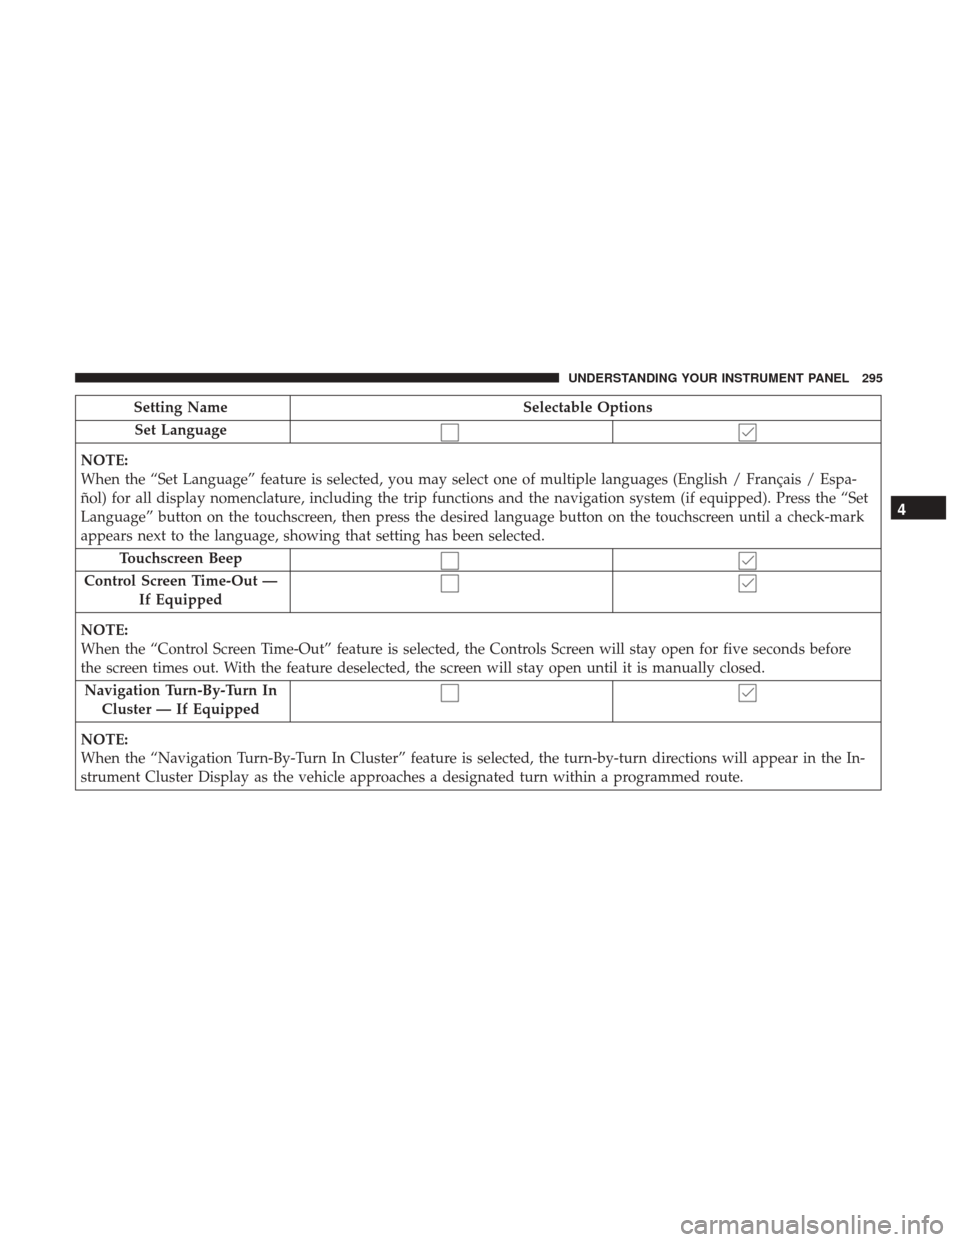
Setting NameSelectable Options
Set Language
NOTE:
When the “Set Language” feature is selected, you may select one of multiple languages (English / Français / Espa-
ñol) for all display nomenclature, including the trip functions and the navigation system (if equipped). Press the “Set
Language” button on the touchscreen, then press the desired language button on the touchscreen until a check-mark
appears next to the language, showing that setting has been selected. Touchscreen Beep
Control Screen Time-Out — If Equipped
NOTE:
When the “Control Screen Time-Out” feature is selected, the Controls Screen will stay open for five seconds before
the screen times out. With the feature deselected, the screen will stay open until it is manually closed. Navigation Turn-By-Turn In Cluster — If Equipped
NOTE:
When the “Navigation Turn-By-Turn In Cluster” feature is selected, the turn-by-turn directions will appear in the In-
strument Cluster Display as the vehicle approaches a designated turn within a programmed route.
4
UNDERSTANDING YOUR INSTRUMENT PANEL 295
Page 298 of 584
Units
After pressing the “Units” button on the touchscreen you
may select each unit of measure independently displayed
in the Instrument Cluster Display, and navigation system
(if equipped). The following selectable units of measure are
listed below:
Setting NameSelectable Options
Units Custom
NOTE:
The “Custom” option allows you to set the “Speed” (MPH, or km/h), “Distance” (mi, or km), “Fuel Consumption”
[MPG (US), MPG (UK), L/100 km, or km/L], “Pressure” (psi, kPa, or bar), and “Temperature” (°C, or °F) units of
measure independently.
Voice
After pressing the “Voice” button on the touchscreen, the
following settings will be available:
Setting Name Selectable Options
Voice Response Length Brief Detailed
Show Command List AlwaysWith Help Never
296 UNDERSTANDING YOUR INSTRUMENT PANEL
Page 362 of 584

2. Listen to the Uconnect prompts. After the beep, repeatone of the pre-defined messages and follow the system
prompts.
PRE-DEFINED VOICE TEXT REPLY RESPONSES
Yes. Stuck in traffic. See you later.
No. Start without
me. I’ll be late.
Okay. Where are you? I will be
minutes late.
Call me. Are you there
yet?
I’ll call you later. I need
directions. See you in
of minutes.
I’m on my way. Can’t talk right
now.
I’m lost. Thanks.
TIP:
Your mobile phone must have the full implementation of
the Message Access Profile (MAP) to take advantage of this
feature. For details about MAP, visit UconnectPhone.com.
Apple iPhone iOS 6 or later supports reading incoming
text messages only. To enable this feature on your Apple
iPhone, follow these 4 simple steps:
TIP: Voice Text Reply is not compatible with iPhone, but if
your vehicle is equipped with Siri Eyes Free, you can use
your voice to send a text message.
iPhone Notification Settings
1 — Select “Settings”
2 — Select “Bluetooth”
3 — Select the (i) for the paired vehicle
4 — Turn on “Show Notifications”
360 UNDERSTANDING YOUR INSTRUMENT PANEL