2017 CHEVROLET MALIBU you are driver
[x] Cancel search: you are driverPage 309 of 419
Chevrolet Malibu Owner Manual (GMNA-Localizing-U.S./Canada/Mexico-10122664) - 2017 - crc - 5/23/16
308 Vehicle Care
7. Install a new bulb into thesocket.
8. Install the bulb socket into thetaillamp assembly by turning itclockwise.
9. Install the trunk trim, hex nuts,and push pins.
Taillamps, Turn Signal,
Stoplamps, and Back-Up
Lamps (LTZ)
Caution
Improper lamp assembly removal
and installation can cause leaks
and water intrusion which may
cause damage to the taillamp. Do
not remove the taillamp assembly
to replace a bulb. Use the trunk
opening to access the bulb.
The stoplamp/taillamp and trunkdeck inboard taillamp are LEDs. Toreplace, see your dealer.
Back-Up Lamp
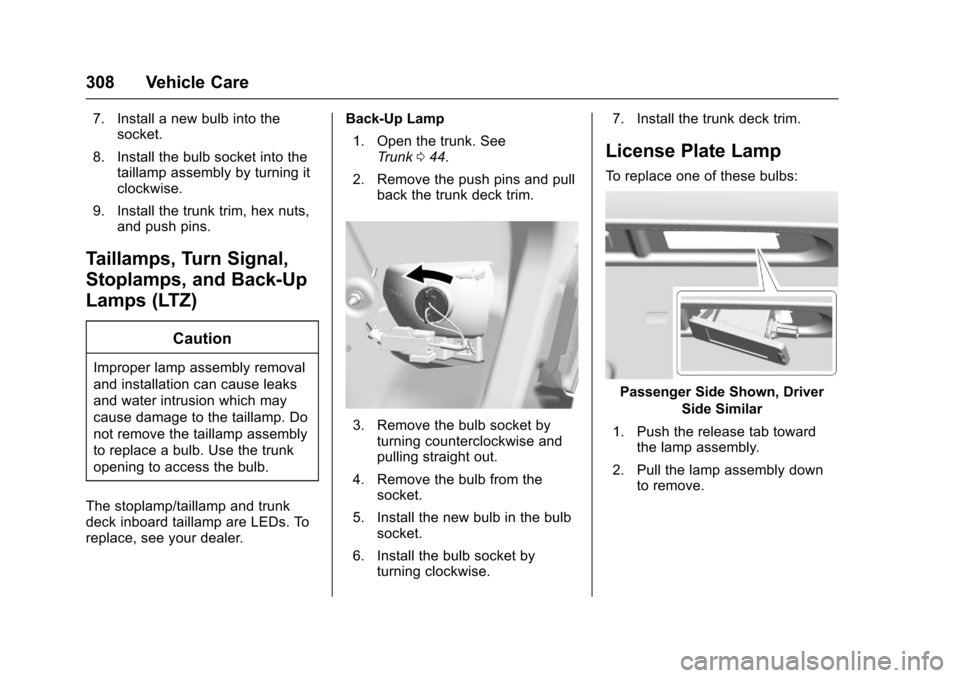
1. Open the trunk. SeeTr u n k044.
2. Remove the push pins and pullback the trunk deck trim.
3. Remove the bulb socket byturning counterclockwise andpulling straight out.
4. Remove the bulb from thesocket.
5. Install the new bulb in the bulbsocket.
6. Install the bulb socket byturning clockwise.
7. Install the trunk deck trim.
License Plate Lamp
To r e p l a c e o n e o f t h e s e b u l b s :
Passenger Side Shown, Driver
Side Similar
1. Push the release tab towardthe lamp assembly.
2. Pull the lamp assembly downto remove.
Page 328 of 419
Chevrolet Malibu Owner Manual (GMNA-Localizing-U.S./Canada/Mexico-10122664) - 2017 - crc - 5/23/16
Vehicle Care 327
Tire Pressure Monitor
System
The Tire Pressure Monitor System(TPMS) uses radio and sensortechnology to check tire pressurelevels. The TPMS sensors monitorthe air pressure in your tires andtransmit tire pressure readings to areceiver located in the vehicle.
Each tire, including the spare (ifprovided), should be checkedmonthly when cold and inflated tothe inflation pressure recommendedby the vehicle manufacturer on thevehicle placard or tire inflationpressure label. (If your vehicle hastires of a different size than the sizeindicated on the vehicle placard ortire inflation pressure label, youshould determine the proper tireinflation pressure for those tires.)
As an added safety feature, yourvehicle has been equipped with atire pressure monitoring system(TPMS) that illuminates a low tirepressure telltale when one or moreof your tires is significantlyunder-inflated.
Accordingly, when the low tirepressure telltale illuminates, youshould stop and check your tires assoon as possible, and inflate themto the proper pressure. Driving on asignificantly under-inflated tirecauses the tire to overheat and canlead to tire failure. Under-inflationalso reduces fuel efficiency and tiretread life, and may affect thevehicle's handling and stoppingability.
Please note that the TPMS is not asubstitute for proper tiremaintenance, and it is the driver'sresponsibility to maintain correct tirepressure, even if under-inflation hasnot reached the level to triggerillumination of the TPMS low tirepressure telltale.
Yo u r v e h i c l e h a s a l s o b e e nequipped with a TPMS malfunctionindicator to indicate when thesystem is not operating properly.The TPMS malfunction indicator iscombined with the low tire pressuretelltale. When the system detects amalfunction, the telltale will flash forapproximately one minute and thenremain continuously illuminated.
This sequence will continue uponsubsequent vehicle start-ups aslong as the malfunction exists.
When the malfunction indicator isilluminated, the system may not beable to detect or signal low tirepressure as intended. TPMSmalfunctions may occur for a varietyof reasons, including the installationof replacement or alternate tires orwheels on the vehicle that preventthe TPMS from functioning properly.Always check the TPMS malfunctiontelltale after replacing one or moretires or wheels on your vehicle toensure that the replacement oralternate tires and wheels allow theTPMS to continue to functionproperly.
SeeTire Pressure MonitorOperation0328.
SeeRadio FrequencyStatement0393.
Page 329 of 419
Chevrolet Malibu Owner Manual (GMNA-Localizing-U.S./Canada/Mexico-10122664) - 2017 - crc - 5/23/16
328 Vehicle Care
Tire Pressure Monitor
Operation
This vehicle may have a TirePressure Monitor System (TPMS).The TPMS is designed to warn thedriver when a low tire pressurecondition exists. TPMS sensors aremounted onto each tire and wheelassembly, excluding the spare tireand wheel assembly. The TPMSsensors monitor the air pressure inthe tires and transmits the tirepressure readings to a receiverlocated in the vehicle.
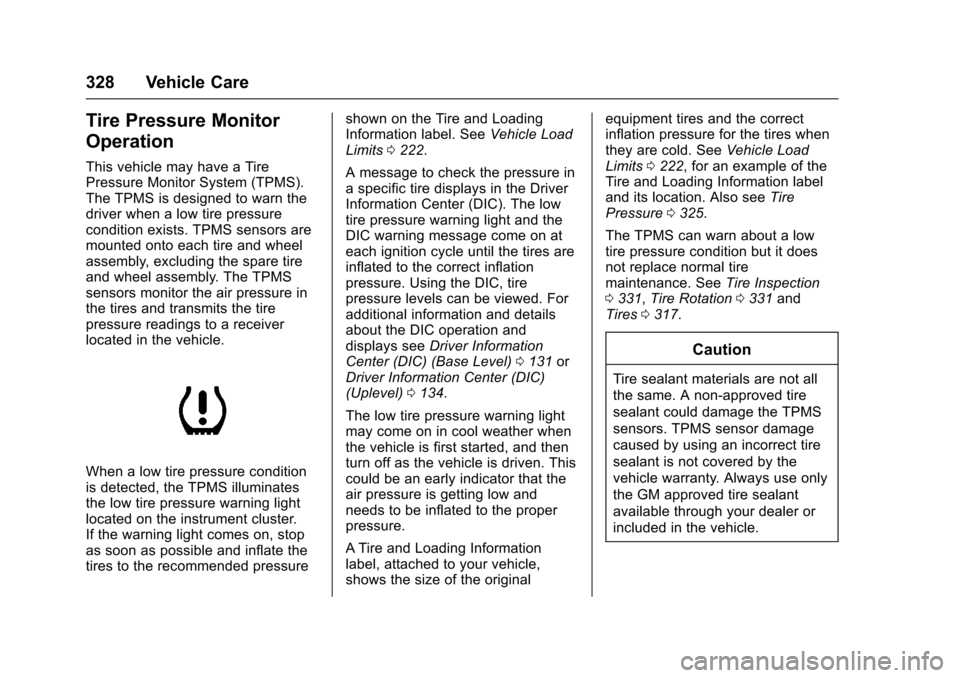
When a low tire pressure conditionis detected, the TPMS illuminatesthe low tire pressure warning lightlocated on the instrument cluster.If the warning light comes on, stopas soon as possible and inflate thetires to the recommended pressure
shown on the Tire and LoadingInformation label. SeeVehicle LoadLimits0222.
AmessagetocheckthepressureinaspecifictiredisplaysintheDriverInformation Center (DIC). The lowtire pressure warning light and theDIC warning message come on ateach ignition cycle until the tires areinflated to the correct inflationpressure. Using the DIC, tirepressure levels can be viewed. Foradditional information and detailsabout the DIC operation anddisplays seeDriver InformationCenter (DIC) (Base Level)0131orDriver Information Center (DIC)(Uplevel)0134.
The low tire pressure warning lightmay come on in cool weather whenthe vehicle is first started, and thenturn off as the vehicle is driven. Thiscould be an early indicator that theair pressure is getting low andneeds to be inflated to the properpressure.
ATire and Loading Informationlabel, attached to your vehicle,shows the size of the original
equipment tires and the correctinflation pressure for the tires whenthey are cold. SeeVehicle LoadLimits0222,foranexampleoftheTire and Loading Information labeland its location. Also seeTirePressure0325.
The TPMS can warn about a lowtire pressure condition but it doesnot replace normal tiremaintenance. SeeTire Inspection0331,Tire Rotation0331andTires0317.
Caution
Tire sealant materials are not all
the same. A non-approved tire
sealant could damage the TPMS
sensors. TPMS sensor damage
caused by using an incorrect tire
sealant is not covered by the
vehicle warranty. Always use only
the GM approved tire sealant
available through your dealer or
included in the vehicle.
Page 331 of 419
Chevrolet Malibu Owner Manual (GMNA-Localizing-U.S./Canada/Mexico-10122664) - 2017 - crc - 5/23/16
330 Vehicle Care
matched to the tire/wheel positions,using a TPMS relearn tool, in thefollowing order: driver side front tire,passenger side front tire, passengerside rear tire, and driver side rear.See your dealer for service or topurchase a relearn tool. A TPMSrelearn tool can also be purchased.See Tire Pressure Monitor SensorActivation Tool atwww.gmtoolsandequipment.com orcall 1-800-GM TOOLS(1-800-468-6657).
There are two minutes to match thefirst tire/wheel position, andfive minutes overall to match all fourtire/wheel positions. If it takeslonger, the matching process stopsand must be restarted.
The TPMS sensor matchingprocess is:
1. Set the parking brake.
2. Place the vehicle in ON/RUN/START. SeeIgnitionPositions0225.
3. Make sure the Tire Pressureinfo page option is turned on.The info pages on the DIC can
be turned on and off throughthe Settings menu. SeeDriverInformation Center (DIC) (BaseLevel)0131orDriverInformation Center (DIC)(Uplevel)0134.
4. Use the DIC controls on theright side of the steering wheelto scroll to the Tire Pressurescreen under the DICinfo page.
5. Press and holdVin the center
of the DIC controls.
The horn sounds twice tosignal the receiver is in relearnmode and the TIRELEARNING ACTIVE messagedisplays on the DIC screen.
6. Start with the driver sidefront tire.
7. Place the relearn tool againstthe tire sidewall, near the valvestem. Then press the button toactivate the TPMS sensor.Ahornchirpconfirmsthatthesensor identification code hasbeen matched to this tire andwheel position.
8. Proceed to the passenger sidefront tire, and repeat theprocedure in Step 7.
9. Proceed to the passenger siderear tire, and repeat theprocedure in Step 7.
10. Proceed to the driver side reartire, and repeat the procedurein Step 7. The horn sounds twotimes to indicate the sensoridentification code has beenmatched to the driver side reartire, and the TPMS sensormatching process is no longeractive. The TIRE LEARNINGACTIVE message on the DICdisplay screen goes off.
11 . Tu r n t h e i g n i t i o n o f f .
12. Set all four tires to therecommended air pressurelevel as indicated on the Tireand Loading Information label.
Page 354 of 419
Chevrolet Malibu Owner Manual (GMNA-Localizing-U.S./Canada/Mexico-10122664) - 2017 - crc - 5/23/16
Vehicle Care 353
Caution
Ignoring these steps could result
in costly damage to the vehicle
that would not be covered by the
vehicle warranty. Trying to start
the vehicle by pushing or pulling it
will not work, and it could damage
the vehicle.
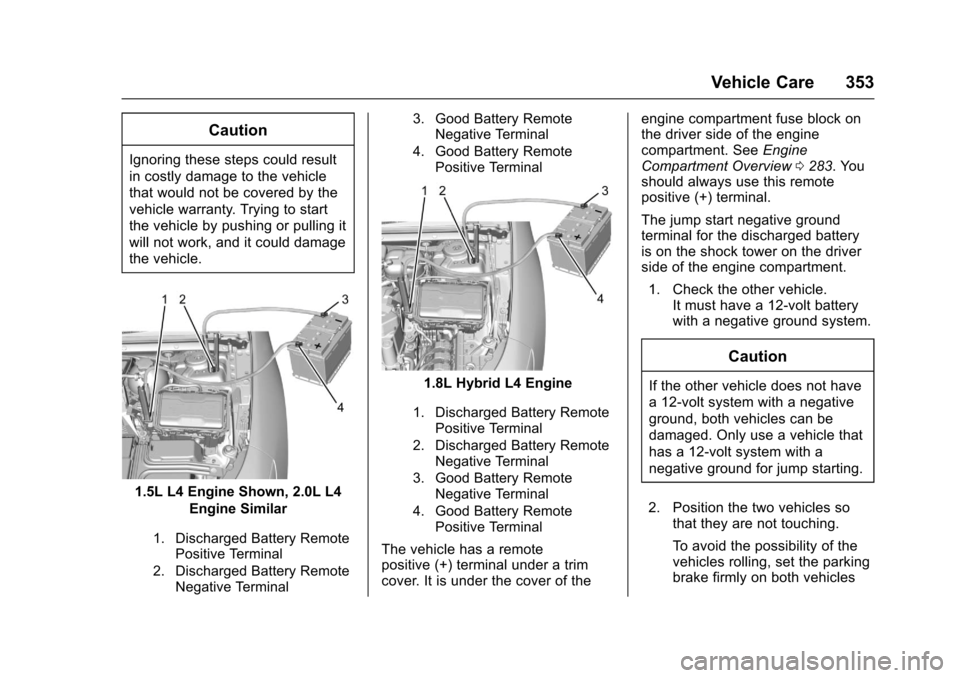
1.5L L4 Engine Shown, 2.0L L4
Engine Similar
1. Discharged Battery RemotePositive Terminal
2. Discharged Battery RemoteNegative Terminal
3. Good Battery RemoteNegative Terminal
4. Good Battery RemotePositive Terminal
1.8L Hybrid L4 Engine
1. Discharged Battery RemotePositive Terminal
2. Discharged Battery RemoteNegative Terminal
3. Good Battery RemoteNegative Terminal
4. Good Battery RemotePositive Terminal
The vehicle has a remotepositive (+) terminal under a trimcover. It is under the cover of the
engine compartment fuse block onthe driver side of the enginecompartment. SeeEngineCompartment Overview0283.Youshould always use this remotepositive (+) terminal.
The jump start negative groundterminal for the discharged batteryis on the shock tower on the driverside of the engine compartment.
1. Check the other vehicle.It must have a 12-volt batterywith a negative ground system.
Caution
If the other vehicle does not have
a12-voltsystemwithanegative
ground, both vehicles can be
damaged. Only use a vehicle that
has a 12-volt system with a
negative ground for jump starting.
2. Position the two vehicles sothat they are not touching.
To a v o i d t h e p o s s i b i l i t y o f t h evehicles rolling, set the parkingbrake firmly on both vehicles
Page 367 of 419

Chevrolet Malibu Owner Manual (GMNA-Localizing-U.S./Canada/Mexico-10122664) - 2017 - crc - 5/23/16
366 Vehicle Care
Cargo Cover and
Convenience Net
Wash with warm water and milddetergent. Do not use chlorinebleach. Rinse with cold water, andthen dry completely.
Care of Safety Belts
Keep belts clean and dry.
{Warning
Do not bleach or dye safety belt
webbing. It may severely weaken
the webbing. In a crash, they
might not be able to provide
adequate protection. Clean and
rinse safety belt webbing only
with mild soap and lukewarm
water. Allow the webbing to dry.
Floor Mats
{Warning
If a floor mat is the wrong size or
is not properly installed, it can
interfere with the pedals.
Interference with the pedals can
cause unintended acceleration
and/or increased stopping
distance which can cause a crash
and injury. Make sure the floor
mat does not interfere with the
pedals.
Use the following guidelines forproper floor mat usage:
.The original equipment floormats were designed for yourvehicle. If the floor mats needreplacing, it is recommendedthat GM certified floor mats bepurchased. Non-GM floor matsmay not fit properly and mayinterfere with the pedals. Alwayscheck that the floor mats do notinterfere with the pedals.
.Do not use a floor mat if thevehicle is not equipped with afloor mat retainer on the driverside floor.
.Use the floor mat with thecorrect side up. Do not turnit over.
.Do not place anything on top ofthe driver side floor mat.
.Use only a single floor mat onthe driver side.
.Do not place one floor mat ontop of another.
Removing and Replacing the
Floor Mats
If equipped, pull up on the rear ofthe floor mat to unlock each retainerand remove.
Page 389 of 419
Chevrolet Malibu Owner Manual (GMNA-Localizing-U.S./Canada/Mexico-10122664) - 2017 - crc - 5/23/16
388 Customer Information
Services Provided
.Emergency Fuel Delivery:Delivery of enough fuel for thevehicle to get to the nearestservice station.
.Lock-Out Service:Service tounlock the vehicle if you arelocked out. A remote unlock maybe available if you have OnStar.For security reasons, the drivermust present identificationbefore this service is given.
.Emergency Tow from a PublicRoad or Highway:To w t o t h enearest Chevrolet dealer forwarranty service, or if the vehiclewas in a crash and cannot bedriven. Assistance is not givenwhen the vehicle is stuck in thesand, mud, or snow.
.Flat Tire Change:Service tochange a flat tire with the sparetire. The spare tire, if equipped,must be in good condition andproperly inflated. It is the owner'sresponsibility for the repair orreplacement of the tire if it is notcovered by the warranty.
.Battery Jump Start:Service tojump start a dead battery.
.Tr i p I n t e r r u p t i o n B e n e f i t s a n dAssistance:If your trip isinterrupted due to a warrantyevent, incidental expenses maybe reimbursed within thePowertrain warranty period.Items considered are reasonableand customary hotel, meals,rental car, or a vehicle beingdelivered back to the customer,up to 805 km (500 mi).
Services Not Included in
Roadside Assistance
.Impound towing caused byviolation of any laws.
.Legal fines.
.Mounting, dismounting,or changing of snow tires,chains, or other traction devices.
Service is not provided if a vehicleis in an area that is not accessibleto the service vehicle or is not aregularly traveled or maintainedpublic road, which includes ice andwinter roads. Off-road use is notcovered.
Services Specific to
Canadian-Purchased Vehicles
.Fuel Delivery:Reimbursementis up to 7 liters. If available,diesel fuel delivery may berestricted. Propane and otherfuels are not provided throughthis service.
.Lock-Out Service:Vehicleregistration is required.
.Tr i p I n t e r r u p t i o n B e n e f i t s a n dAssistance:Must be over150 km from where your trip wasstarted to qualify.Pre-authorization, originaldetailed receipts, and a copy ofthe repair orders are required.Once authorization has beenreceived, the RoadsideAssistance advisor will help tomake arrangements and explainhow to receive payment.
.Alternative Service:Ifassistance cannot be providedright away, the RoadsideAssistance advisor may givepermission to get localemergency road service. You willreceive payment, up to $100,
Page 392 of 419

Chevrolet Malibu Owner Manual (GMNA-Localizing-U.S./Canada/Mexico-10122664) - 2017 - crc - 5/23/16
Customer Information 391
Aftermarket collision parts are alsoavailable. These are made bycompanies other than GM and maynot have been tested for the vehicle.As a result, these parts may fitpoorly, exhibit premature durability/corrosion problems, and may notperform properly in subsequentcollisions. Aftermarket parts are notcovered by the GM New VehicleLimited Warranty, and any vehiclefailure related to such parts is notcovered by that warranty.
Repair Facility
GM also recommends that youchoose a collision repair facility thatmeets your needs before you everneed collision repairs. Your dealermay have a collision repair centerwith GM-trained technicians andstate-of-the-art equipment, or beable to recommend a collision repaircenter that has GM-trainedtechnicians and comparableequipment.
Insuring the Vehicle
Protect your investment in the GMvehicle with comprehensive andcollision insurance coverage. Thereare significant differences in thequality of coverage afforded byvarious insurance policy terms.Many insurance policies providereduced protection to the GMvehicle by limiting compensation fordamage repairs through the use ofaftermarket collision parts. Someinsurance companies will notspecify aftermarket collision parts.When purchasing insurance, werecommend that you ensure that thevehicle will be repaired with GMoriginal equipment collision parts.If such insurance coverage is notavailable from your currentinsurance carrier, consider switchingto another insurance carrier.
If the vehicle is leased, the leasingcompany may require you to haveinsurance that ensures repairs withGenuine GM Original EquipmentManufacturer (OEM) parts orGenuine Manufacturer replacement
parts. Read the lease carefully, asyou may be charged at the end ofthe lease for poor quality repairs.
If a Crash Occurs
If there has been an injury, callemergency services for help. Do notleave the scene of a crash until allmatters have been taken care of.Move the vehicle only if its positionputs you in danger, or you areinstructed to move it by a policeofficer.
Give only the necessary informationto police and other parties involvedin the crash.
For emergency towing seeRoadside AssistanceProgram0387.
Gather the following information:
.Driver name, address, andtelephone number.
.Driver license number.
.Owner name, address, andtelephone number.
.Vehicle license plate number.