2017 CHEVROLET MALIBU run flat
[x] Cancel search: run flatPage 220 of 419
Chevrolet Malibu Owner Manual (GMNA-Localizing-U.S./Canada/Mexico-10122664) - 2017 - crc - 5/23/16
Driving and Operating 219
Hydroplaning
Hydroplaning is dangerous. Watercan build up under the vehicle'stires so they actually ride on thewater. This can happen if the road iswet enough and you are going fastenough. When the vehicle ishydroplaning, it has little or nocontact with the road.
There is no hard and fast rule abouthydroplaning. The best advice is toslow down when the road is wet.
Other Rainy Weather Tips
Besides slowing down, other wetweather driving tips include:
.Allow extra following distance.
.Pass with caution.
.Keep windshield wipingequipment in good shape.
.Keep the windshield washer fluidreservoir filled.
.Have good tires with propertread depth. SeeTires0317.
.Turn off cruise control.
Hill and Mountain Roads
Driving on steep hills or throughmountains is different than drivingon flat or rolling terrain. Tips include:
.Keep the vehicle serviced and ingood shape.
.Check all fluid levels and brakes,tires, cooling system, andtransmission.
.Shift to a lower gear when goingdown steep or long hills.
{Warning
Using the brakes to slow the
vehicle on a long downhill slope
can cause brake overheating, can
reduce brake performance, and
could result in a loss of braking.
Shift the transmission to a lower
gear to let the engine assist the
brakes on a steep downhill slope.
{Warning
Coasting downhill in N (Neutral)
or with the ignition off is
dangerous. This can cause
overheating of the brakes and
loss of steering. Always have the
engine running and the vehicle
in gear.
.Drive at speeds that keep thevehicle in its own lane. Do notswing wide or cross thecenter line.
.Be alert on top of hills;something could be in your lane(e.g., stalled car, accident).
.Pay attention to special roadsigns (e.g., falling rocks area,winding roads, long grades,passing or no-passing zones)and take appropriate action.
Page 340 of 419
Chevrolet Malibu Owner Manual (GMNA-Localizing-U.S./Canada/Mexico-10122664) - 2017 - crc - 5/23/16
Vehicle Care 339
{Warning
Changing a tire can be
dangerous. The vehicle can slip
off the jack and roll over or fall
causing injury or death. Find a
level place to change the tire. To
help prevent the vehicle from
moving:
1. Set the parking brake firmly.
2. Put an automatictransmission in P (Park) or amanual transmission in1(First) or R(Reverse).
3. Turn off the engine and donot restart while the vehicleis raised.
4. Do not allow passengers toremain in the vehicle.
5. Place wheel blocks,if equipped, on both sides ofthe tire at the oppositecorner of the tire beingchanged.
This vehicle may come with a jackand spare tire or a tire sealant andcompressor kit. To use the jackingequipment to change a spare tiresafely, follow the instructions below.Then seeTire Changing0346.Touse the tire sealant and compressorkit, seeTire Sealant andCompressor Kit0339.
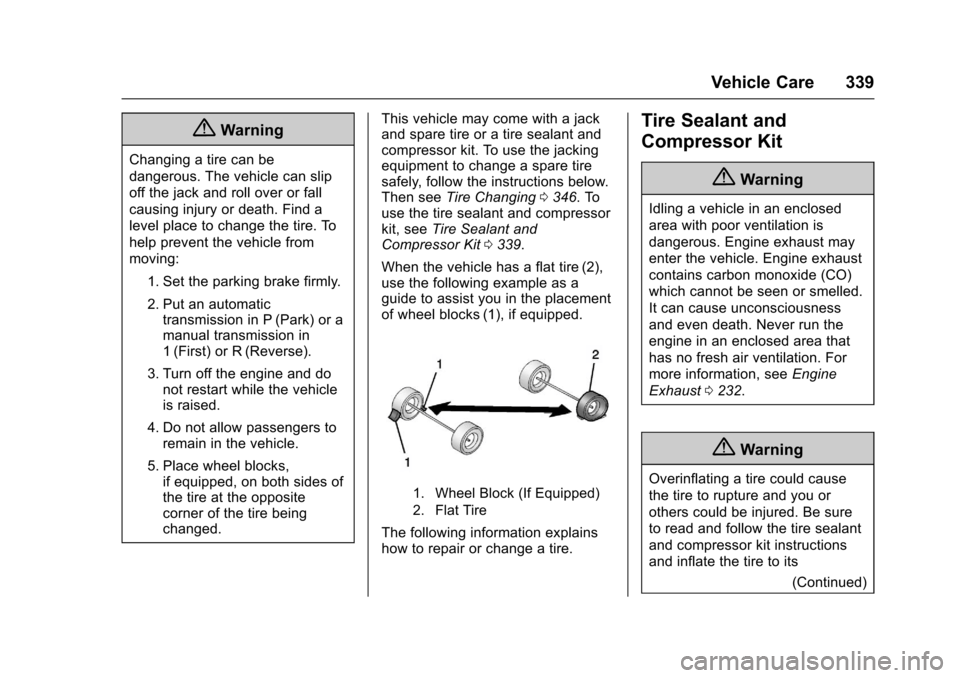
When the vehicle has a flat tire (2),use the following example as aguide to assist you in the placementof wheel blocks (1), if equipped.
1. Wheel Block (If Equipped)
2. Flat Tire
The following information explainshow to repair or change a tire.
Tire Sealant and
Compressor Kit
{Warning
Idling a vehicle in an enclosed
area with poor ventilation is
dangerous. Engine exhaust may
enter the vehicle. Engine exhaust
contains carbon monoxide (CO)
which cannot be seen or smelled.
It can cause unconsciousness
and even death. Never run the
engine in an enclosed area that
has no fresh air ventilation. For
more information, seeEngine
Exhaust0232.
{Warning
Overinflating a tire could cause
the tire to rupture and you or
others could be injured. Be sure
to read and follow the tire sealant
and compressor kit instructions
and inflate the tire to its
(Continued)
Page 343 of 419
Chevrolet Malibu Owner Manual (GMNA-Localizing-U.S./Canada/Mexico-10122664) - 2017 - crc - 5/23/16
342 Vehicle Care
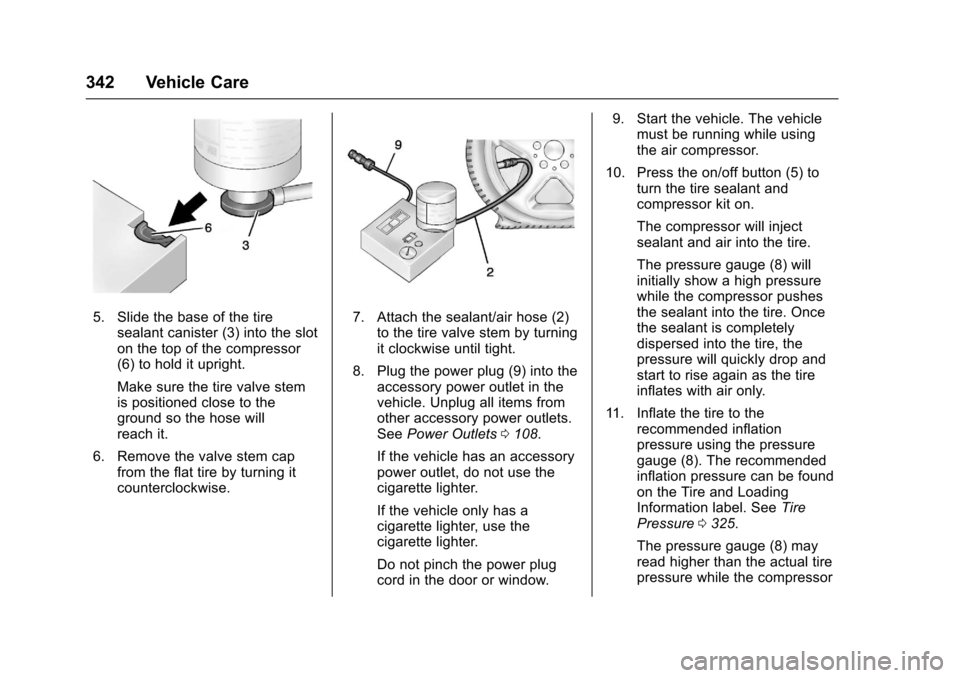
5. Slide the base of the tiresealant canister (3) into the sloton the top of the compressor(6) to hold it upright.
Make sure the tire valve stemis positioned close to theground so the hose willreach it.
6. Remove the valve stem capfrom the flat tire by turning itcounterclockwise.
7. Attach the sealant/air hose (2)to the tire valve stem by turningit clockwise until tight.
8. Plug the power plug (9) into theaccessory power outlet in thevehicle. Unplug all items fromother accessory power outlets.SeePower Outlets0108.
If the vehicle has an accessorypower outlet, do not use thecigarette lighter.
If the vehicle only has acigarette lighter, use thecigarette lighter.
Do not pinch the power plugcord in the door or window.
9. Start the vehicle. The vehiclemust be running while usingthe air compressor.
10. Press the on/off button (5) toturn the tire sealant andcompressor kit on.
The compressor will injectsealant and air into the tire.
The pressure gauge (8) willinitially show a high pressurewhile the compressor pushesthe sealant into the tire. Oncethe sealant is completelydispersed into the tire, thepressure will quickly drop andstart to rise again as the tireinflates with air only.
11 . I n f l a t e t h e t i r e t o t h erecommended inflationpressure using the pressuregauge (8). The recommendedinflation pressure can be foundon the Tire and LoadingInformation label. SeeTirePressure0325.
The pressure gauge (8) mayread higher than the actual tirepressure while the compressor
Page 346 of 419

Chevrolet Malibu Owner Manual (GMNA-Localizing-U.S./Canada/Mexico-10122664) - 2017 - crc - 5/23/16
Vehicle Care 345
1. Remove the compressor fromits storage location. SeeStoring the Tire Sealant andCompressor Kit0346.
2. Remove the air only hose (10)and the power plug (9) from thebottom of the compressor.
3. Place the compressor on theground near the flat tire.
Make sure the tire valve stemis positioned close to theground so the hose willreach it.
4. Remove the valve stem capfrom the flat tire by turning itcounterclockwise.
5. Attach the air only hose (10) tothe tire valve stem by turning itclockwise until tight.
6. Plug the power plug (9) into theaccessory power outlet in thevehicle. Unplug all items fromother accessory power outlets.SeePower Outlets0108.
If the vehicle has an accessorypower outlet, do not use thecigarette lighter.
If the vehicle only has acigarette lighter, use thecigarette lighter.
Do not pinch the power plugcord in the door or window.
7. Start the vehicle. The vehiclemust be running while usingthe air compressor.
8. Press the on/off button (5) toturn the tire sealant andcompressor kit on.
The compressor will inflate thetire with air only.
9. Inflate the tire to therecommended inflationpressure using the pressuregauge (8). The recommendedinflation pressure can be foundon the Tire and LoadingInformation label. SeeTirePressure0325.
The pressure gauge (8) mayread higher than the actual tirepressure while the compressoris on. Turn the compressor offto get an accurate pressure
reading. The compressor maybe turned on/off until thecorrect pressure is reached.
Caution
If the recommended pressure
cannot be reached after
approximately 25 minutes, the
vehicle should not be driven
farther. The tire is too severely
damaged and the tire sealant and
compressor kit cannot inflate the
tire. Remove the power plug from
the accessory power outlet and
unscrew the inflating hose from
the tire valve. SeeRoadside
Assistance Program0387.
10. Press the on/off button (5) toturn the tire sealant andcompressor kit off.
Be careful while handling thecompressor as it could bewarm after usage.
11 . U n p l u g t h e p o w e r p l u g ( 9 ) f r o mthe accessory power outlet inthe vehicle.
Page 347 of 419
Chevrolet Malibu Owner Manual (GMNA-Localizing-U.S./Canada/Mexico-10122664) - 2017 - crc - 5/23/16
346 Vehicle Care
12. Turn the air only hose (10)counterclockwise to remove itfrom the tire valve stem.
13. Replace the tire valvestem cap.
14. Return the air only hose (10)and power plug (9) back totheir original storage location.
15. Return the equipment to itsoriginal storage location in thevehicle.
The tire sealant and compressor kithas accessory adapters located in acompartment on the bottom of itshousing that can be used to inflateair mattresses, balls, etc.
Storing the Tire Sealant
and Compressor Kit
To a c c e s s t h e t i r e s e a l a n t a n dcompressor kit:
1. Open the trunk. SeeTr u n k044.
2. Lift the cover.
3. Turn the wing nutcounterclockwise to remove thetire sealant and compressorkit bag.
4. Remove the tire sealant andcompressor kit from the bag.
To s t o r e t h e t i r e s e a l a n t a n dcompressor kit, reverse the steps.
Tire Changing
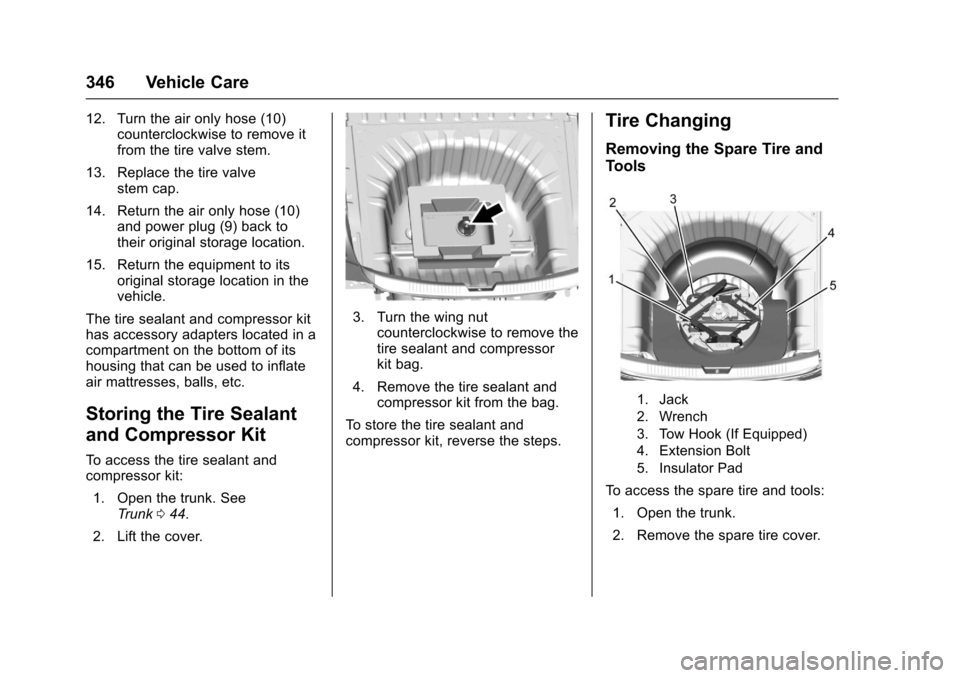
Removing the Spare Tire and
Tools
1. Jack
2. Wrench
3. Tow Hook (If Equipped)
4. Extension Bolt
5. Insulator Pad
To a c c e s s t h e s p a r e t i r e a n d t o o l s :
1. Open the trunk.
2. Remove the spare tire cover.
Page 356 of 419
Chevrolet Malibu Owner Manual (GMNA-Localizing-U.S./Canada/Mexico-10122664) - 2017 - crc - 5/23/16
Vehicle Care 355
10. Start the vehicle with the goodbattery and run the engine atidle speed for at leastfour minutes.
11 . Tr y t o s t a r t t h e v e h i c l e t h a t h a dthe dead battery. If it will notstart after a few tries, itprobably needs service.
For hybrid vehicles, the engine willonly start if needed after pressingON/RUN/START. The vehicle readylight will come on when thepropulsion system is on and ready.In cold temperatures, the engine willnot run with the hood open. Closethe hood.
Caution
If the jumper cables are
connected or removed in the
wrong order, electrical shorting
may occur and damage the
vehicle. The repairs would not be
covered by the vehicle warranty.
Always connect and remove the
jumper cables in the correct order,
(Continued)
Caution (Continued)
making sure that the cables do
not touch each other or other
metal.
Jumper Cable Removal
Reverse the sequence exactly whenremoving the jumper cables.
After starting the disabled vehicleand removing the jumper cables,allow it to idle for several minutes.
Towing the Vehicle
Caution
Incorrectly towing a disabled
vehicle may cause damage. The
damage would not be covered by
the vehicle warranty.
Do not lash or hook to
suspension components. Use the
proper straps around the tires to
secure the vehicle.
Have the vehicle towed on a wheellift tow truck. A flatbed car carriercould damage the vehicle. Thewheel lift tow truck must raise therear of the vehicle and wheel dolliesmust be used to lift the front wheelsoff the ground.
Consult your dealer or aprofessional towing service if thedisabled vehicle must be towed.
Page 411 of 419

Chevrolet Malibu Owner Manual (GMNA-Localizing-U.S./Canada/Mexico-10122664) - 2017 - crc - 5/23/16
410 Index
Door (cont'd)
Locks . . . . . . . . . . . . . . . . . . . . . . . . . . . 40
Power Locks . . . . . . . . . . . . . . . . . . . . 42
Drive Belt Routing, Engine . . . . . . 382
Driver Assistance Systems . . . . . 252
Driver Information
Center (DIC) . . . . . . . . . . . . . 131, 134
Driving
Assistance Systems . . . . . . . . . . 257
Characteristics and
To w i n g T i p s . . . . . . . . . . . . . . . . . 2 7 2
Defensive . . . . . . . . . . . . . . . . . . . . . 216
Drunk . . . . . . . . . . . . . . . . . . . . . . . . . 216
For Better Fuel Economy . . . . . . . 29
Hill and Mountain Roads . . . . . . 219
If the Vehicle is Stuck . . . . . . . . . 221
Loss of Control . . . . . . . . . . . . . . . 218
Off-Road Recovery . . . . . . . . . . . 217
Vehicle Load Limits . . . . . . . . . . . 222
Wet Roads . . . . . . . . . . . . . . . . . . . 218
Winter . . . . . . . . . . . . . . . . . . . . . . . . 220
Dual Automatic Climate
Control System . . . . . . . . . . . . . . . . 208
E
Electric Parking Brake . . . . . . . . . . 238
Electric Parking Brake Light . . . . 124
Electrical Equipment,
Add-On . . . . . . . . . . . . . . . . . . . . . . . 277
Electrical System
Engine Compartment Fuse
Block . . . . . . . . . . . . . . . . . . . . . . . . .311
Fuses . . . . . . . . . . . . . . . . . . . . . . . . 310
Instrument Panel Fuse
Block . . . . . . . . . . . . . . . . . . . . . . . . 315
Overload . . . . . . . . . . . . . . . . . . . . . 310
Emergency
OnStar®...................... 398
Energy Information . . . . . . . . . . . . . 131
Engine
Air Cleaner/Filter . . . . . . . . . . . . . 292
Check and Service Engine
Soon Light . . . . . . . . . . . . . . . . . . 122
Compartment Overview . . . . . . . 283
Coolant . . . . . . . . . . . . . . . . . . . . . . . 295
Coolant Temperature
Gauge . . . . . . . . . . . . . . . . . . . . . . .119
Cooling System . . . . . . . . . . 293, 294
Cooling System Messages . . . 140
Drive Belt Routing . . . . . . . . . . . . 382
Exhaust . . . . . . . . . . . . . . . . . . . . . . 232
Heater . . . . . . . . . . . . . . . . . . . . . . . . 229
Oil Life System . . . . . . . . . . . . . . . 291
Oil Messages . . . . . . . . . . . . . . . . . 141
Oil Pressure Light . . . . . . . . . . . . 128
Overheating . . . . . . . . . . . . . . . . . . 297
Power Messages . . . . . . . . . . . . . 141
Engine (cont'd)
Running While Parked . . . . . . . . 233
Starting . . . . . . . . . . . . . . . . . . . . . . . 227
Entry Lighting . . . . . . . . . . . . . . . . . . . 169
Equipment, Towing . . . . . . . . . . . . . 276
Event Data Recorders . . . . . . . . . . 395
Exit Lighting . . . . . . . . . . . . . . . . . . . . 169
Extended Parking . . . . . . . . . . . . . . . 232
Extender, Safety Belt . . . . . . . . . . . . 69
Exterior Lamp Controls . . . . . . . . . 163
Exterior Lamps Off Reminder . . . 165
Exterior Lighting Battery
Saver . . . . . . . . . . . . . . . . . . . . . . . . . 170
F
Features
Memory . . . . . . . . . . . . . . . . . . . . . . . . . 12
Filter,
Engine Air Cleaner . . . . . . . . . . . 292
Flash-to-Pass . . . . . . . . . . . . . . . . . . . 165
Flashers, Hazard Warning . . . . . . 166
Flat Tire . . . . . . . . . . . . . . . . . . . . . . . . 338
Changing . . . . . . . . . . . . . . . . . . . . . 346
Floor Mats . . . . . . . . . . . . . . . . . . . . . . 366
Fluid
Automatic Transmission . . . . . . 292
Brakes . . . . . . . . . . . . . . . . . . . . . . . . 300
Washer . . . . . . . . . . . . . . . . . . . . . . . 299
Folding Mirrors . . . . . . . . . . . . . . . . . . 49
Page 418 of 419

Chevrolet Malibu Owner Manual (GMNA-Localizing-U.S./Canada/Mexico-10122664) - 2017 - crc - 5/23/16
Index 417
T
Ta c h o m e t e r . . . . . . . . . . . . . . . . . . . . . 11 7
Ta i l l a m p s
Bulb Replacement . . . . . . . 307, 308
Te x t Te l e p h o n e ( T T Y ) U s e r s . . . . 3 8 6
Theft-Deterrent Systems . . . . . . . . . 47
Immobilizer . . . . . . . . . . . . . . . . . . . . . 47
Time . . . . . . . . . . . . . . . . . . . . . . . . . . . . 107
Tires . . . . . . . . . . . . . . . . . . . . . . . . . . . . 317
All-Season . . . . . . . . . . . . . . . . . . . . 318
Buying New Tires . . . . . . . . . . . . . 333
Chains . . . . . . . . . . . . . . . . . . . . . . . . 337
Changing . . . . . . . . . . . . . . . . . . . . . 346
Compact Spare . . . . . . . . . . . . . . . 351
Designations . . . . . . . . . . . . . . . . . 322
Different Size . . . . . . . . . . . . . . . . . 334
If a Tire Goes Flat . . . . . . . . . . . . 338
Inspection . . . . . . . . . . . . . . . . . . . . 331
Low Profile . . . . . . . . . . . . . . . . . . . 319
Messages . . . . . . . . . . . . . . . . . . . . 146
Pressure . . . . . . . . . . . . . . . . . . . . . . 326
Pressure Light . . . . . . . . . . . . . . . . 127
Pressure Monitor Operation . . 328
Pressure Monitor System . . . . . 327
Rotation . . . . . . . . . . . . . . . . . . . . . . 331
Sealant and
Compressor Kit . . . . . . . . . . . . . 339
Tires (cont'd)
Sealant and Compressor
Kit, Storing . . . . . . . . . . . . . . . . . . 346
Sidewall Labeling . . . . . . . . . . . . . 320
Te r m i n o l o g y a n d D e f i n i t i o n s . . 3 2 2
Uniform Tire Quality
Grading . . . . . . . . . . . . . . . . . . . . . 335
Wheel Alignment and Tire
Balance . . . . . . . . . . . . . . . . . . . . . 336
Wheel Replacement . . . . . . . . . . 336
When It Is Time for New
Tires . . . . . . . . . . . . . . . . . . . . . . . . 332
Winter . . . . . . . . . . . . . . . . . . . . . . . . 318
To w i n g
Driving Characteristics . . . . . . . . 272
Equipment . . . . . . . . . . . . . . . . . . . . 276
General Information . . . . . . . . . . 272
Recreational Vehicle . . . . . . . . . . 356
Trailer . . . . . . . . . . . . . . . . . . . . . . . . 275
Vehicle . . . . . . . . . . . . . . . . . . . . . . . 355
Traction
Control System (TCS)/
StabiliTrak®Light . . . . . . . . . . . . 127
Off Light . . . . . . . . . . . . . . . . . . . . . . 126
Traction Control/Electronic
Stability Control . . . . . . . . . . . . . . . 241
Trademarks and License
Agreements . . . . . . . . . . . . . . . . . . . 202
Trailer
To w i n g . . . . . . . . . . . . . . . . . . . . . . . . 2 7 5
Transmission
Automatic . . . . . . . . . . . . . . . . . . . . . 233
Fluid, Automatic . . . . . . . . . . . . . . 292
Messages . . . . . . . . . . . . . . . . . . . . 146
Transportation Program,
Courtesy . . . . . . . . . . . . . . . . . . . . . . 389
Trip Odometer . . . . . . . . . . . . . . . . . . 117
Trunk . . . . . . . . . . . . . . . . . . . . . . . . . . . . 44
Turn and Lane-Change
Signals . . . . . . . . . . . . . . . . . . . . . . . . 167
Turn Signal
Bulb Replacement . . . . . . . 307, 308
U
Umbrella Storage . . . . . . . . . . . . . . . 102
Uniform Tire Quality Grading . . . 335
Universal Remote System . . . . . . 159
Operation . . . . . . . . . . . . . . . . . . . . . 162
Programming . . . . . . . . . . . . . . . . . 159
USB Port . . . . . . . . . . . . . . . . . . . . . . . 184
Using This Manual . . . . . . . . . . . . . . . . 2
V
Vehicle
Alarm System . . . . . . . . . . . . . . . . . . 46
Canadian Owners . . . . . . . . . . . . . . . 2
Control . . . . . . . . . . . . . . . . . . . . . . . 216