2017 CHEVROLET MALIBU Door locks
[x] Cancel search: Door locksPage 6 of 419
Chevrolet Malibu Owner Manual (GMNA-Localizing-U.S./Canada/Mexico-10122664) - 2017 - crc - 6/1/16
In Brief 5
In Brief
Instrument Panel
Instrument Panel Overview . . . . . . 6
Initial Drive Information
Initial Drive Information . . . . . . . . . . 8Stop/Start System . . . . . . . . . . . . . . . 8Remote Keyless Entry (RKE)System . . . . . . . . . . . . . . . . . . . . . . . . 8Remote Vehicle Start . . . . . . . . . . . 8Door Locks . . . . . . . . . . . . . . . . . . . . . 9Trunk Release . . . . . . . . . . . . . . . . . . 9Windows . . . . . . . . . . . . . . . . . . . . . . . 10Seat Adjustment . . . . . . . . . . . . . . . 10Memory Features . . . . . . . . . . . . . . 12Second Row Seats . . . . . . . . . . . . 12Heated and Ventilated Seats . . . 12Head Restraint Adjustment . . . . 13Safety Belts . . . . . . . . . . . . . . . . . . . . 13Passenger Sensing System . . . 13Mirror Adjustment . . . . . . . . . . . . . . 14Steering Wheel Adjustment . . . . 14Interior Lighting . . . . . . . . . . . . . . . . 15Exterior Lighting . . . . . . . . . . . . . . . 16Windshield Wiper/Washer . . . . . . 16Climate Controls . . . . . . . . . . . . . . . 17Transmission . . . . . . . . . . . . . . . . . . 18
Vehicle Features
Infotainment System . . . . . . . . . . . 19Radio(s) . . . . . . . . . . . . . . . . . . . . . . . 20Satellite Radio . . . . . . . . . . . . . . . . . 20Portable Audio Devices . . . . . . . . 20Bluetooth®..................... 20Steering Wheel Controls . . . . . . . 21Cruise Control . . . . . . . . . . . . . . . . . 22Driver InformationCenter (DIC) . . . . . . . . . . . . . . . . . 22Forward Collision Alert (FCA)System . . . . . . . . . . . . . . . . . . . . . . . 23Forward AutomaticBraking (FAB) . . . . . . . . . . . . . . . . 23Front Pedestrian Braking (FPB)System . . . . . . . . . . . . . . . . . . . . . . . 23Lane Keep Assist (LKA) . . . . . . . 23Lane Change Alert (LCA) . . . . . . 24Rear Vision Camera (RVC) . . . . 24Rear Cross Traffic Alert (RCTA)System . . . . . . . . . . . . . . . . . . . . . . . 24Parking Assist . . . . . . . . . . . . . . . . . 24Automatic ParkingAssist (APA) . . . . . . . . . . . . . . . . . . 24Power Outlets . . . . . . . . . . . . . . . . . 24Universal Remote System . . . . . 25Sunroof . . . . . . . . . . . . . . . . . . . . . . . . 25
Hybrid Features
Hybrid Features . . . . . . . . . . . . . . . 26
High Voltage SafetyInformation . . . . . . . . . . . . . . . . . . . 26Regenerative Braking(Hybrid Only) . . . . . . . . . . . . . . . . . 27Battery . . . . . . . . . . . . . . . . . . . . . . . . . 27Service . . . . . . . . . . . . . . . . . . . . . . . . 27
Performance and Maintenance
Traction Control/ElectronicStability Control . . . . . . . . . . . . . . 27Tire Pressure Monitor . . . . . . . . . . 28Fuel (1.5L and 1.8LEngines) . . . . . . . . . . . . . . . . . . . . . 28Fuel (2.0L Engine) . . . . . . . . . . . . . 28E85 or FlexFuel . . . . . . . . . . . . . . . . 29Engine Oil Life System . . . . . . . . 29Driving for Better FuelEconomy . . . . . . . . . . . . . . . . . . . . . 29Roadside AssistanceProgram . . . . . . . . . . . . . . . . . . . . . . 30
Page 10 of 419
Chevrolet Malibu Owner Manual (GMNA-Localizing-U.S./Canada/Mexico-10122664) - 2017 - crc - 6/1/16
In Brief 9
Remote start can be extended.
Canceling a Remote Start
To c a n c e l a r e m o t e s t a r t , d o o n e o fthe following:
.Press and hold/until the
parking lamps turn off.
.Turn on the hazard warningflashers.
.Turn the vehicle on and then off.
SeeRemote Vehicle Start038.
Door Locks
To l o c k o r u n l o c k t h e d o o r s f r o m t h eoutside:
.PressQorKon the Remote
Keyless Entry (RKE) transmitter.SeeRemote Keyless Entry(RKE) System Operation032.
.Use the key in the driver door.The key lock cylinder has acover. SeeDoor Locks040.
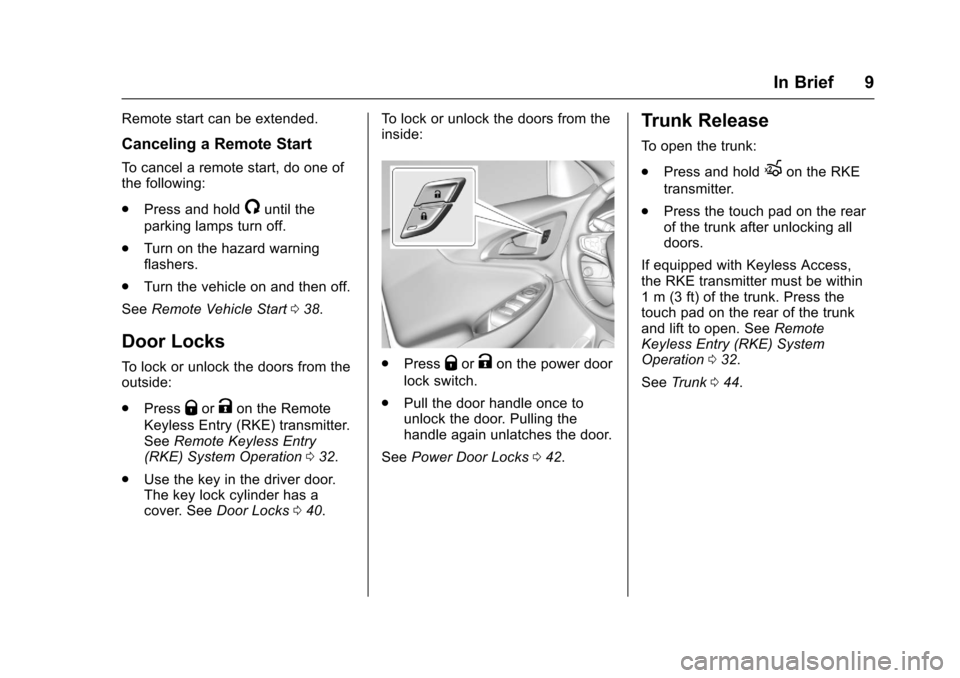
To l o c k o r u n l o c k t h e d o o r s f r o m t h einside:
.PressQorKon the power door
lock switch.
.Pull the door handle once tounlock the door. Pulling thehandle again unlatches the door.
SeePower Door Locks042.
Trunk Release
To o p e n t h e t r u n k :
.Press and holdXon the RKE
transmitter.
.Press the touch pad on the rearof the trunk after unlocking alldoors.
If equipped with Keyless Access,the RKE transmitter must be within1m(3ft)ofthetrunk.Pressthetouch pad on the rear of the trunkand lift to open. SeeRemoteKeyless Entry (RKE) SystemOperation032.
SeeTr u n k044.
Page 32 of 419
Chevrolet Malibu Owner Manual (GMNA-Localizing-U.S./Canada/Mexico-10122664) - 2017 - crc - 5/23/16
Keys, Doors, and Windows 31
Keys, Doors, and
Windows
Keys and Locks
Keys . . . . . . . . . . . . . . . . . . . . . . . . . . . 31Remote Keyless Entry (RKE)System . . . . . . . . . . . . . . . . . . . . . . . 32Remote Keyless Entry (RKE)System Operation . . . . . . . . . . . . 32Remote Vehicle Start . . . . . . . . . . 38Door Locks . . . . . . . . . . . . . . . . . . . . 40Power Door Locks . . . . . . . . . . . . . 42Delayed Locking . . . . . . . . . . . . . . . 42Automatic Door Locks . . . . . . . . . 43Lockout Protection . . . . . . . . . . . . . 43Safety Locks . . . . . . . . . . . . . . . . . . . 43
Doors
Trunk . . . . . . . . . . . . . . . . . . . . . . . . . . 44
Vehicle Security
Vehicle Security . . . . . . . . . . . . . . . . 46Vehicle Alarm System . . . . . . . . . 46Immobilizer . . . . . . . . . . . . . . . . . . . . 47Immobilizer Operation . . . . . . . . . 47
Exterior Mirrors
Convex Mirrors . . . . . . . . . . . . . . . . 48Power Mirrors . . . . . . . . . . . . . . . . . . 48
Folding Mirrors . . . . . . . . . . . . . . . . . 49Heated Mirrors . . . . . . . . . . . . . . . . . 49Reverse Tilt Mirrors . . . . . . . . . . . . 49
Interior Mirrors
Interior Rearview Mirrors . . . . . . . 49Manual Rearview Mirror . . . . . . . . 49Automatic Dimming RearviewMirror . . . . . . . . . . . . . . . . . . . . . . . . . 49
Windows
Windows . . . . . . . . . . . . . . . . . . . . . . . 50Power Windows . . . . . . . . . . . . . . . 50Sun Visors . . . . . . . . . . . . . . . . . . . . . 52
Roof
Sunroof . . . . . . . . . . . . . . . . . . . . . . . . 52
Keys and Locks
Keys
{Warning
Leaving children in a vehicle with
aRemoteKeylessEntry(RKE)
transmitter is dangerous and
children or others could be
seriously injured or killed. They
could operate the power windows
or other controls or make the
vehicle move. The windows will
function with the RKE transmitter
in the vehicle, and children or
others could be caught in the path
of a closing window. Do not leave
children in a vehicle with an RKE
transmitter.
Page 33 of 419
Chevrolet Malibu Owner Manual (GMNA-Localizing-U.S./Canada/Mexico-10122664) - 2017 - crc - 5/23/16
32 Keys, Doors, and Windows
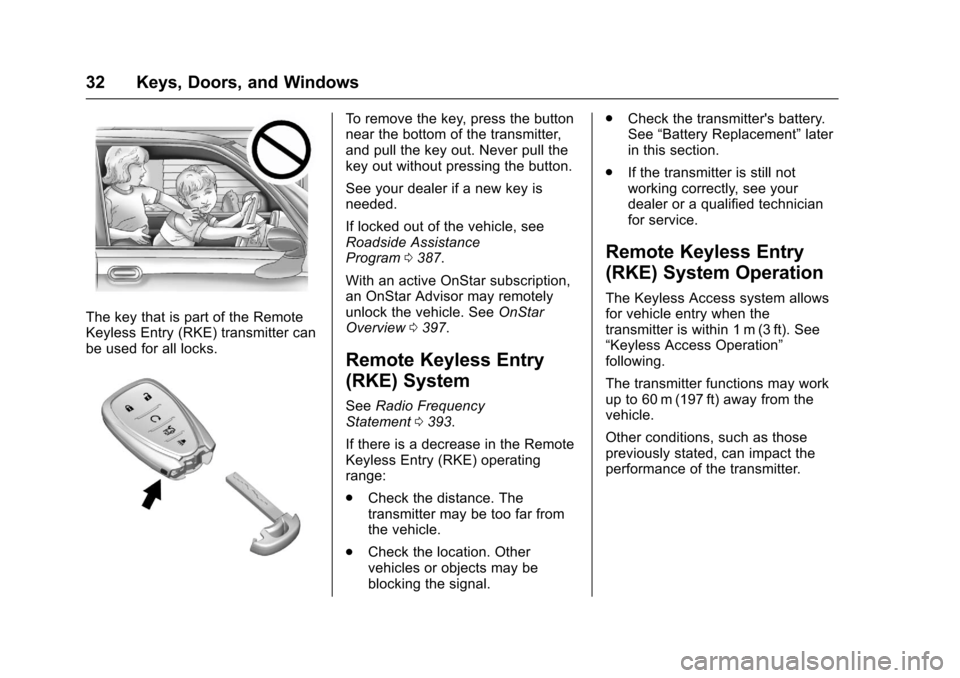
The key that is part of the RemoteKeyless Entry (RKE) transmitter canbe used for all locks.
To r e m o v e t h e k e y, p r e s s t h e b u t t o nnear the bottom of the transmitter,and pull the key out. Never pull thekey out without pressing the button.
See your dealer if a new key isneeded.
If locked out of the vehicle, seeRoadside AssistanceProgram0387.
With an active OnStar subscription,an OnStar Advisor may remotelyunlock the vehicle. SeeOnStarOverview0397.
Remote Keyless Entry
(RKE) System
SeeRadio FrequencyStatement0393.
If there is a decrease in the RemoteKeyless Entry (RKE) operatingrange:
.Check the distance. Thetransmitter may be too far fromthe vehicle.
.Check the location. Othervehicles or objects may beblocking the signal.
.Check the transmitter's battery.See“Battery Replacement”laterin this section.
.If the transmitter is still notworking correctly, see yourdealer or a qualified technicianfor service.
Remote Keyless Entry
(RKE) System Operation
The Keyless Access system allowsfor vehicle entry when thetransmitter is within 1 m (3 ft). See“Keyless Access Operation”following.
The transmitter functions may workup to 60 m (197 ft) away from thevehicle.
Other conditions, such as thosepreviously stated, can impact theperformance of the transmitter.
Page 36 of 419
Chevrolet Malibu Owner Manual (GMNA-Localizing-U.S./Canada/Mexico-10122664) - 2017 - crc - 5/23/16
Keys, Doors, and Windows 35
untilQon the interior door is
pressed, or until the vehicle isturned on.
Remote Left In Vehicle Alert
When the vehicle is turned off and aremote is left in the vehicle, the hornwill chirp three times after all doorsare closed. To turn on or off seeVehicle Personalization0147.
Remote No Longer In Vehicle Alert
If the vehicle is on, with a dooropen, and then all doors are closed,the vehicle will check for an RKEtransmitter(s) inside. If an RKEtransmitter is not detected, the DICwill display NO REMOTEDETECTED and the horn will chirpthree times.
This occurs only once each time thevehicle is driven. SeeVehiclePersonalization0147
Keyless Trunk Opening
Press the touch pad on the rear ofthe trunk to open it if the RKEtransmitter is within 1 m (3 ft) of thetrunk.
Keyed Access
To a c c e s s a v e h i c l e w i t h a d e a dtransmitter battery, seeDoorLocks040.
Programming Transmitters to
the Vehicle
Only RKE transmitters programmedto the vehicle will work. If atransmitter is lost or stolen, areplacement can be purchased andprogrammed through your dealer.The vehicle can be reprogrammedso that lost or stolen transmitters nolonger work. Any remainingtransmitters will need to bereprogrammed. Each vehicle canhave up to eight transmittersmatched to it.
Programming with RecognizedTransmitters
Anewtransmittercanbeprogrammed to the vehicle whenthere are two recognizedtransmitters. To program, the vehiclemust be off and all of thetransmitters, both currentlyrecognized and new, must bewith you.
1. Place the two recognizedtransmitter(s) in the transmitterpocket with the buttons facingthe rear of the vehicle. Thetransmitter pocket is inside thecenter console storage area.
2. Remove the key lock cylindercap on the driver door handle.SeeDoor Locks040.Insertthe vehicle key of the newtransmitter into the key lockcylinder on the outside of thedriver door and turn the keycounterclockwise five timeswithin 10 seconds.
The Driver Information Center(DIC) displays READY FORREMOTE #2, 3, 4 or 5.
Page 37 of 419
Chevrolet Malibu Owner Manual (GMNA-Localizing-U.S./Canada/Mexico-10122664) - 2017 - crc - 5/23/16
36 Keys, Doors, and Windows
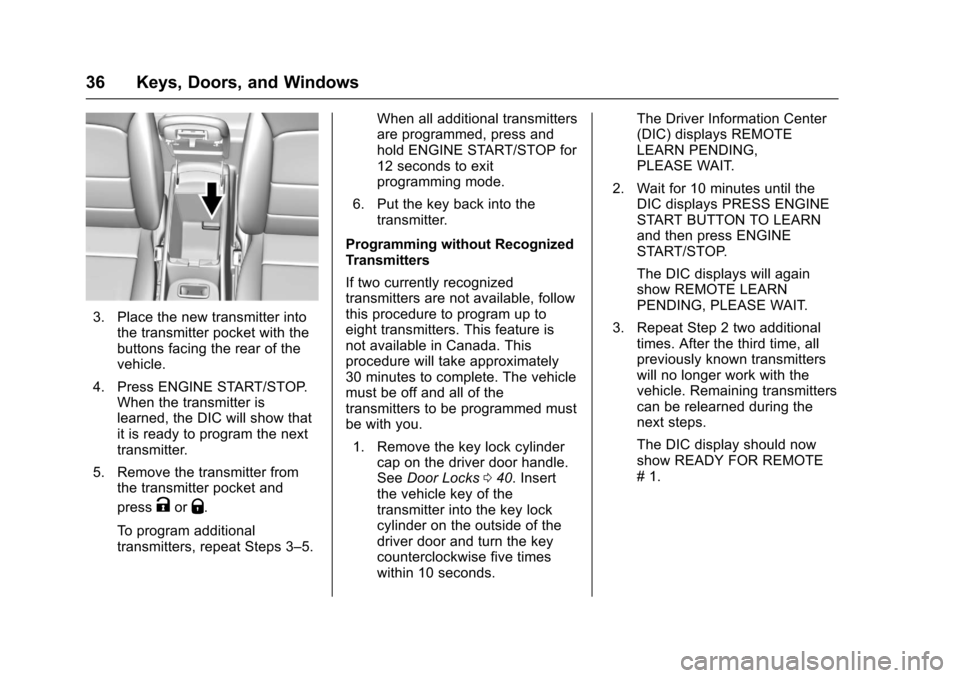
3. Place the new transmitter intothe transmitter pocket with thebuttons facing the rear of thevehicle.
4. Press ENGINE START/STOP.When the transmitter islearned, the DIC will show thatit is ready to program the nexttransmitter.
5. Remove the transmitter fromthe transmitter pocket and
pressKorQ.
To p r o g r a m a d d i t i o n a ltransmitters, repeat Steps 3–5.
When all additional transmittersare programmed, press andhold ENGINE START/STOP for12 seconds to exitprogramming mode.
6. Put the key back into thetransmitter.
Programming without RecognizedTransmitters
If two currently recognizedtransmitters are not available, followthis procedure to program up toeight transmitters. This feature isnot available in Canada. Thisprocedure will take approximately30 minutes to complete. The vehiclemust be off and all of thetransmitters to be programmed mustbe with you.
1. Remove the key lock cylindercap on the driver door handle.SeeDoor Locks040.Insertthe vehicle key of thetransmitter into the key lockcylinder on the outside of thedriver door and turn the keycounterclockwise five timeswithin 10 seconds.
The Driver Information Center(DIC) displays REMOTELEARN PENDING,PLEASE WAIT.
2. Wait for 10 minutes until theDIC displays PRESS ENGINESTART BUTTON TO LEARNand then press ENGINESTART/STOP.
The DIC displays will againshow REMOTE LEARNPENDING, PLEASE WAIT.
3. Repeat Step 2 two additionaltimes. After the third time, allpreviously known transmitterswill no longer work with thevehicle. Remaining transmitterscan be relearned during thenext steps.
The DIC display should nowshow READY FOR REMOTE#1.
Page 41 of 419
Chevrolet Malibu Owner Manual (GMNA-Localizing-U.S./Canada/Mexico-10122664) - 2017 - crc - 5/23/16
40 Keys, Doors, and Windows
Conditions in Which Remote StartWill Not Work
The remote vehicle start feature willnot operate if:
.Atransmitterisinthevehicle.
.The hood is not closed.
.The hazard warning flashersare on.
.The malfunction indicator lampis on.
.The engine coolant temperatureis too high.
.The oil pressure is low.
.Tw o r e m o t e v e h i c l e s t a r t s , o r asingle remote start with anextension, have alreadybeen used.
.The vehicle is not in P (Park).
Door Locks
{Warning
Unlocked doors can be
dangerous.
.Passengers, especiallychildren, can easily openthe doors and fall out of amoving vehicle. The doorscan be unlocked andopened while the vehicle ismoving. The chance ofbeing thrown out of thevehicle in a crash isincreased if the doors arenot locked. So, allpassengers should wearsafety belts properly and thedoors should be lockedwhenever the vehicle isdriven.
.Yo u n g c h i l d r e n w h o g e t i n t ounlocked vehicles may beunable to get out. A childcan be overcome byextreme heat and can sufferpermanent injuries or even
(Continued)
Warning (Continued)
death from heat stroke.Always lock the vehiclewhenever leaving it.
.Outsiders can easily enterthrough an unlocked doorwhen you slow down or stopthe vehicle. Locking thedoors can help prevent thisfrom happening.
To l o c k o r u n l o c k t h e d o o r s f r o m t h eoutside:
.PressQorKon the Remote
Keyless Entry (RKE) transmitter.SeeRemote Keyless Entry(RKE) System Operation032.
.Use the key in the driver door.The key lock cylinder is coveredwith a cap.
Page 43 of 419
Chevrolet Malibu Owner Manual (GMNA-Localizing-U.S./Canada/Mexico-10122664) - 2017 - crc - 5/23/16
42 Keys, Doors, and Windows
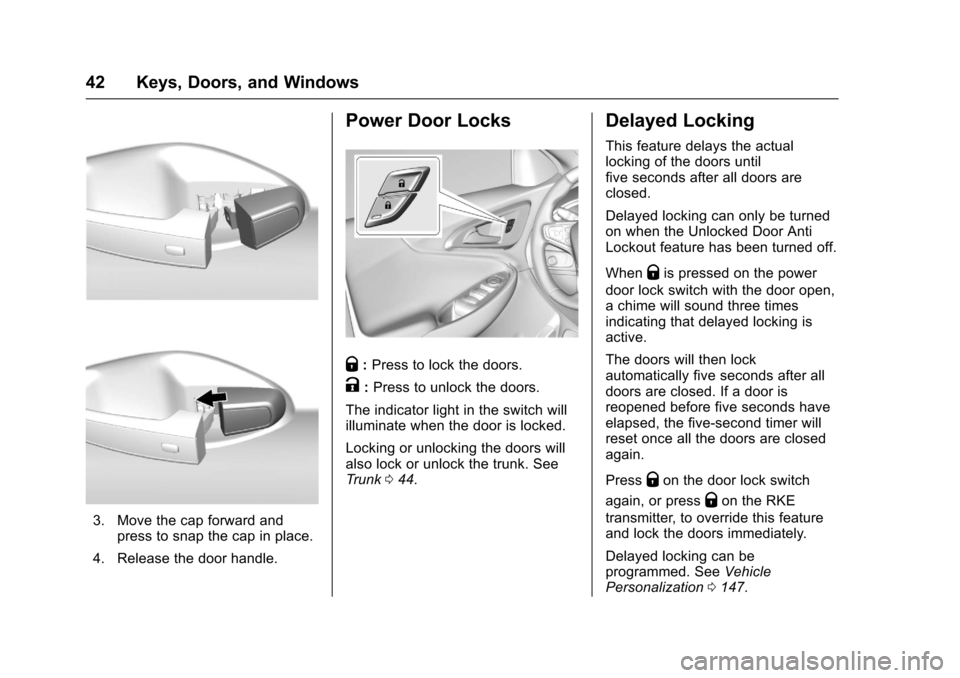
3. Move the cap forward andpress to snap the cap in place.
4. Release the door handle.
Power Door Locks
Q:Press to lock the doors.
K:Press to unlock the doors.
The indicator light in the switch willilluminate when the door is locked.
Locking or unlocking the doors willalso lock or unlock the trunk. SeeTr u n k044.
Delayed Locking
This feature delays the actuallocking of the doors untilfive seconds after all doors areclosed.
Delayed locking can only be turnedon when the Unlocked Door AntiLockout feature has been turned off.
WhenQis pressed on the power
door lock switch with the door open,achimewillsoundthreetimesindicating that delayed locking isactive.
The doors will then lockautomatically five seconds after alldoors are closed. If a door isreopened before five seconds haveelapsed, the five-second timer willreset once all the doors are closedagain.
PressQon the door lock switch
again, or pressQon the RKE
transmitter, to override this featureand lock the doors immediately.
Delayed locking can beprogrammed. SeeVehiclePersonalization0147.