2017 CHEVROLET MALIBU fuses
[x] Cancel search: fusesPage 4 of 419
Chevrolet Malibu Owner Manual (GMNA-Localizing-U.S./Canada/Mexico-10122664) - 2017 - crc - 5/23/16
Introduction 3
{Danger
Danger indicates a hazard with a
high level of risk which will result
in serious injury or death.
{Warning
Warning indicates a hazard that
could result in injury or death.
Caution
Caution indicates a hazard that
could result in property or vehicle
damage.
Acirclewithaslashthroughitisasafety symbol which means“DoNot,”“Do not do this,”or“Do not letthis happen.”
Symbols
The vehicle has components andlabels that use symbols instead oftext. Symbols are shown along withthe text describing the operation orinformation relating to a specificcomponent, control, message,gauge, or indicator.
M:Shown when the ownermanual has additional instructionsor information.
*:Shown when the servicemanual has additional instructionsor information.
0:Shown when there is moreinformation on another page—“see page.”
Vehicle Symbol Chart
Here are some additional symbolsthat may be found on the vehicleand what they mean. For moreinformation on the symbol, refer tothe Index.
9:Airbag Readiness Light
#:Air Conditioning
!:Antilock Brake System (ABS)
%:Audio Steering Wheel Controlsor OnStar®(if equipped)
$:Brake System Warning Light
":Charging System
I:Cruise Control
`:Do Not Puncture
^:Do Not Service
B:Engine Coolant Temperature
O:Exterior Lamps
g:First Responder
_:Flame/Fire Prohibited
#:Fog Lamps
.:Fuel Gauge
+:Fuses
3:Headlamp High/Low-BeamChanger
j:LATCH System Child Restraints
*:Malfunction Indicator Lamp
::Oil Pressure
Page 109 of 419
Chevrolet Malibu Owner Manual (GMNA-Localizing-U.S./Canada/Mexico-10122664) - 2017 - crc - 5/23/16
108 Instruments and Controls
4. Touch0to return to the
Time and Date menu.
Setting the 12/24 Hour Format
1. Press{,thentouchSettings.
2. Touch Time and Date, thenselect 12h or 24h format.
3. Touch0to return to the
Time and Date menu.
Setting the Month and Day
Format
1. Press{,thentouchSettings.
2. Touch Time and Date, then SetDate Format.
3. Select DD/MM/YYYY (day/month/year), MM/DD/YYYY(month/day/year), or YYYY/MM/DD (year/month/day)format.
4. Touch0to return to the
Time and Date menu.
Power Outlets
Power Outlet 12 Volt DirectCurrent
The accessory power outlets can beused to plug in electrical equipment,such as a cell phone or MP3 player.
There are two accessory poweroutlets:
.One on the center stack belowthe climate control system.
.One on the rear of the centerfloor console.
The outlet is powered when theignition is in ON/RUN or ACC/ACCESSORY, or until the driverdoor is opened within 10 minutes ofturning off the vehicle. SeeRetainedAccessory Power (RAP)0230.
Open the protective cover to use theaccessory power outlet.
Certain electrical accessories maynot be compatible with theaccessory power outlets and couldoverload vehicle or adapter fuses.If there is a problem, see yourdealer.
When adding electrical equipment,be sure to follow the installationinstructions included with theequipment. SeeAdd-On ElectricalEquipment0277.
Caution
Hanging heavy equipment from
the power outlet can cause
damage not covered by the
vehicle warranty. The power
outlets are designed for
accessory power plugs only, such
as cell phone charge cords.
Always unplug electrical equipmentwhen not in use and do not plug inequipment that exceeds themaximum 20 amps rating.
Power Outlet 110/120 Volt
Alternating Current
If equipped with this power outlet itcan be used to plug in electricalequipment that uses a maximumlimit of 150 watts.
Page 168 of 419
Chevrolet Malibu Owner Manual (GMNA-Localizing-U.S./Canada/Mexico-10122664) - 2017 - crc - 5/23/16
Lighting 167
Turn and Lane-Change
Signals
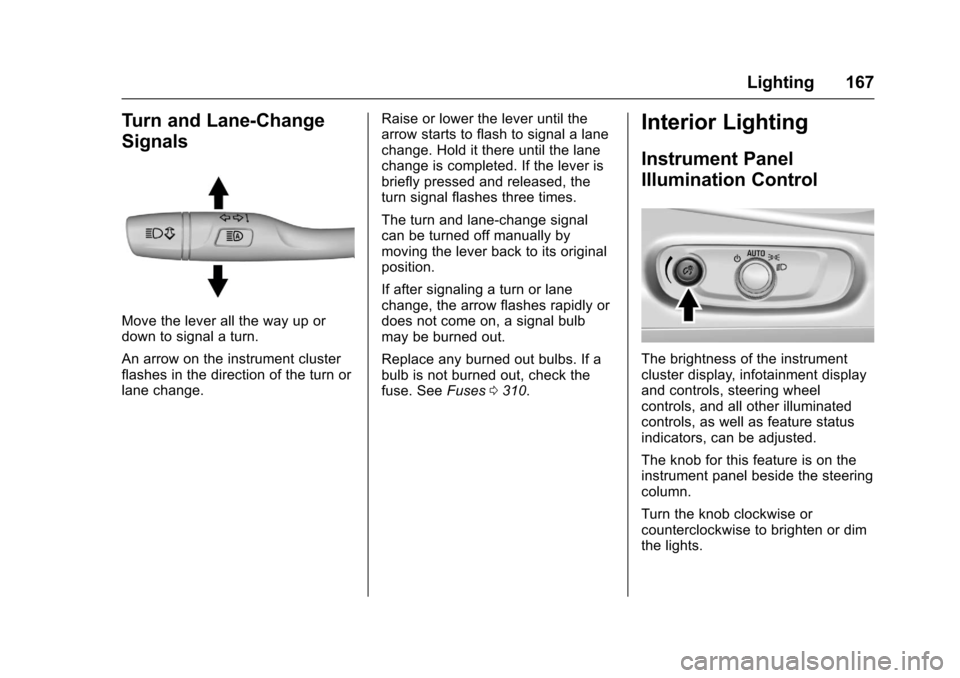
Move the lever all the way up ordown to signal a turn.
An arrow on the instrument clusterflashes in the direction of the turn orlane change.
Raise or lower the lever until thearrow starts to flash to signal a lanechange. Hold it there until the lanechange is completed. If the lever isbriefly pressed and released, theturn signal flashes three times.
The turn and lane-change signalcan be turned off manually bymoving the lever back to its originalposition.
If after signaling a turn or lanechange, the arrow flashes rapidly ordoes not come on, a signal bulbmay be burned out.
Replace any burned out bulbs. If abulb is not burned out, check thefuse. SeeFuses0310.
Interior Lighting
Instrument Panel
Illumination Control
The brightness of the instrumentcluster display, infotainment displayand controls, steering wheelcontrols, and all other illuminatedcontrols, as well as feature statusindicators, can be adjusted.
The knob for this feature is on theinstrument panel beside the steeringcolumn.
Turn the knob clockwise orcounterclockwise to brighten or dimthe lights.
Page 279 of 419
Chevrolet Malibu Owner Manual (GMNA-Localizing-U.S./Canada/Mexico-10122664) - 2017 - crc - 5/23/16
278 Vehicle Care
Vehicle Care
General Information
General Information . . . . . . . . . . 279California Proposition65 Warning . . . . . . . . . . . . . . . . . 279California PerchlorateMaterials Requirements . . . . . 279Accessories andModifications . . . . . . . . . . . . . . . . 280
Vehicle Checks
Doing Your OwnService Work . . . . . . . . . . . . . . . 280Hood . . . . . . . . . . . . . . . . . . . . . . . . . 281Engine CompartmentOverview . . . . . . . . . . . . . . . . . . . . 283Engine Oil . . . . . . . . . . . . . . . . . . . . 288Engine Oil Life System . . . . . . . 291Automatic TransmissionFluid . . . . . . . . . . . . . . . . . . . . . . . . 292Engine Air Cleaner/Filter . . . . . . 292Cooling System (Engine) . . . . . 293Cooling System (PowerElectronics) . . . . . . . . . . . . . . . . . 294Engine Coolant . . . . . . . . . . . . . . . 295Engine Overheating . . . . . . . . . . 297Washer Fluid . . . . . . . . . . . . . . . . . 299Brakes . . . . . . . . . . . . . . . . . . . . . . . 299Brake Fluid . . . . . . . . . . . . . . . . . . . 300
Battery - North America . . . . . . 301Starter Switch Check . . . . . . . . . 303Automatic Transmission ShiftLock Control FunctionCheck . . . . . . . . . . . . . . . . . . . . . . . 303Park Brake and P (Park)Mechanism Check . . . . . . . . . . 303Wiper Blade Replacement . . . . 304
Headlamp Aiming
Headlamp Aiming . . . . . . . . . . . . 305
Bulb Replacement
Bulb Replacement . . . . . . . . . . . . 305Halogen Bulbs . . . . . . . . . . . . . . . . 305LED Lighting . . . . . . . . . . . . . . . . . 305Headlamps, Front Turn Signal,Sidemarker, and ParkingLamps . . . . . . . . . . . . . . . . . . . . . . 305Ta i l l a m p s , T u r n S i g n a l ,Stoplamps, and Back-UpLamps (LS and LT) . . . . . . . . . . 307Ta i l l a m p s , T u r n S i g n a l ,Stoplamps, and Back-UpLamps (LTZ) . . . . . . . . . . . . . . . . 308License Plate Lamp . . . . . . . . . . 308Replacement Bulbs . . . . . . . . . . . 309
Electrical System
High Voltage Devices andWiring . . . . . . . . . . . . . . . . . . . . . . . 309Electrical System Overload . . . 310
Fuses . . . . . . . . . . . . . . . . . . . . . . . . 310Engine Compartment FuseBlock . . . . . . . . . . . . . . . . . . . . . . . . 311Instrument Panel FuseBlock . . . . . . . . . . . . . . . . . . . . . . . . 315
Wheels and Tires
Tires . . . . . . . . . . . . . . . . . . . . . . . . . . 317All-Season Tires . . . . . . . . . . . . . . 318Winter Tires . . . . . . . . . . . . . . . . . . 318Low-Profile Tires . . . . . . . . . . . . . 319Summer Tires . . . . . . . . . . . . . . . . 319Tire Sidewall Labeling . . . . . . . . 320Tire Designations . . . . . . . . . . . . . 322Tire Terminology andDefinitions . . . . . . . . . . . . . . . . . . 322Tire Pressure . . . . . . . . . . . . . . . . . 325Tire Pressure for High-SpeedOperation . . . . . . . . . . . . . . . . . . . 326Tire Pressure MonitorSystem . . . . . . . . . . . . . . . . . . . . . . 327Tire Pressure MonitorOperation . . . . . . . . . . . . . . . . . . . 328Tire Inspection . . . . . . . . . . . . . . . . 331Tire Rotation . . . . . . . . . . . . . . . . . 331When It Is Time for NewTires . . . . . . . . . . . . . . . . . . . . . . . . 332Buying New Tires . . . . . . . . . . . . . 333Different Size Tires andWheels . . . . . . . . . . . . . . . . . . . . . . 334
Page 311 of 419
Chevrolet Malibu Owner Manual (GMNA-Localizing-U.S./Canada/Mexico-10122664) - 2017 - crc - 5/23/16
310 Vehicle Care
Electrical System
Overload
The vehicle has fuses and circuitbreakers to protect against anelectrical system overload.
When the current electrical load istoo heavy, the circuit breaker opensand closes, protecting the circuituntil the current load returns tonormal or the problem is fixed. Thisgreatly reduces the chance of circuitoverload and fire caused byelectrical problems.
Fuses and circuit breakers protectpower devices in the vehicle.
Replace a bad fuse with a new oneof the identical size and rating.
If there is a problem on the road andafuseneedstobereplaced,thesame amperage fuse can beborrowed. Choose some feature ofthe vehicle that is not needed andreplace it as soon as possible.
Headlamp Wiring
An electrical overload may causethe lamps to go on and off, or insome cases to remain off. Have theheadlamp wiring checkedright away.
Windshield Wipers
If the wiper motor overheats due toheavy snow or ice, the windshieldwipers will stop until the motor coolsand will then restart.
Although the circuit is protectedfrom electrical overload, overloaddue to heavy snow or ice maycause wiper linkage damage.Always clear ice and heavy snowfrom the windshield before using thewindshield wipers.
If the overload is caused by anelectrical problem and not snow orice, be sure to get it fixed.
Fuses
The wiring circuits in the vehicle areprotected from short circuits byfuses. This greatly reduces thechance of damage caused byelectrical problems.
To c h e c k a f u s e , l o o k a t t h esilver-colored band inside the fuse.If the band is broken or melted,replace the fuse. Be sure to replaceabadfusewithanewoneoftheidentical size and rating.
Fuses of the same amperage canbe temporarily borrowed fromanother fuse location, if a fuse goesout. Replace the fuse as soon aspossible.
To i d e n t i f y a n d c h e c k f u s e s , c i r c u i tbreakers, and relays, seeEngineCompartment Fuse Block0311andInstrument Panel Fuse Block0315.
Page 314 of 419
Chevrolet Malibu Owner Manual (GMNA-Localizing-U.S./Canada/Mexico-10122664) - 2017 - crc - 5/23/16
Vehicle Care 313
The vehicle may not be equippedwith all of the fuses, relays, andfeatures shown.
Fuses Usage
1–
2–
3ABSpump
5ACDCinverter
6Rearclosure
7ATWS/Horn
8Window/Mirror/Seats
9Eboost
10 Left seat lumbar/Airbag HEV
11 D C D C b a t t e r y 1
12 Rear defogger
13 Heated mirror
14–
15 Passive entry/Passivestart
16 Front wiper
17 Passenger power seat
18 ABS valve
Fuses Usage
19 Driver power seat
21 Sunroof
22 Parking lamp
23 Active headlampleveling
24–
26 Transmission controlmodule/Ignition
27 Instrument panelbody/Ignition
28 Fuel pump
29 Regulated voltagecontrol/Ventilation
30 Malfunction indicatorlamp/SS
32 CVS
33 Front heated seat
34 Rear heated seat/BSM/ESS fan
35 Body controlmodule 6/Body controlmodule 7
36 Fuel module
Fuses Usage
38–
39–
40 Steering column lock
41–
43 Heated steering wheel
44 Active headlampleveling
45–
46 Engine controlmodule/Ignition
47–
48 Eboost (HEV)
49 DC DC battery 2
50–
51–
52–
53–
54–
55–
56–
Page 315 of 419
Chevrolet Malibu Owner Manual (GMNA-Localizing-U.S./Canada/Mexico-10122664) - 2017 - crc - 5/23/16
314 Vehicle Care
FusesUsage
57 Transmissionauxiliary pump
58–
59 High-beamheadlamps
60 Cooling fan
61–
62–
63–
65 A/C (HEV)
67–
68–
69 Right low-beam HIDheadlamp
70 Left low-beam HIDheadlamp
72 Starter pinion
74 Starter motor
75 Engine control module
76 Powertrain off engine
77–
FusesUsage
78 Horn
79 Washer pump
81 Transmission controlmodule/Engine controlmodule
83 Ignition coil
84 Powertrain on engine
85 Engine control moduleswitch 2
86 Engine control moduleswitch 1
87 SAIR pump
88 Aeroshutter
89 Headlamp washer
91–
92 TPIM MGU pump
93 Active headlampleveling
95 SAIR solenoid
96 Fuel heater
97–
99 Coolant pump
RelaysUsage
04 AC DC inverter
20 Rear defogger
25 Front wiper control
31 Run/Crank
37 Front wiper speed
42 Transmissionauxiliary pump
64 A/C control
66 Powertrain
71 Low-beam HIDheadlamps
73 Starter motor
80 Starter pinion
90 SAIR solenoid
94 Headlamp washer
98 SAIR pump
Page 316 of 419
Chevrolet Malibu Owner Manual (GMNA-Localizing-U.S./Canada/Mexico-10122664) - 2017 - crc - 5/23/16
Vehicle Care 315
Instrument Panel Fuse
Block
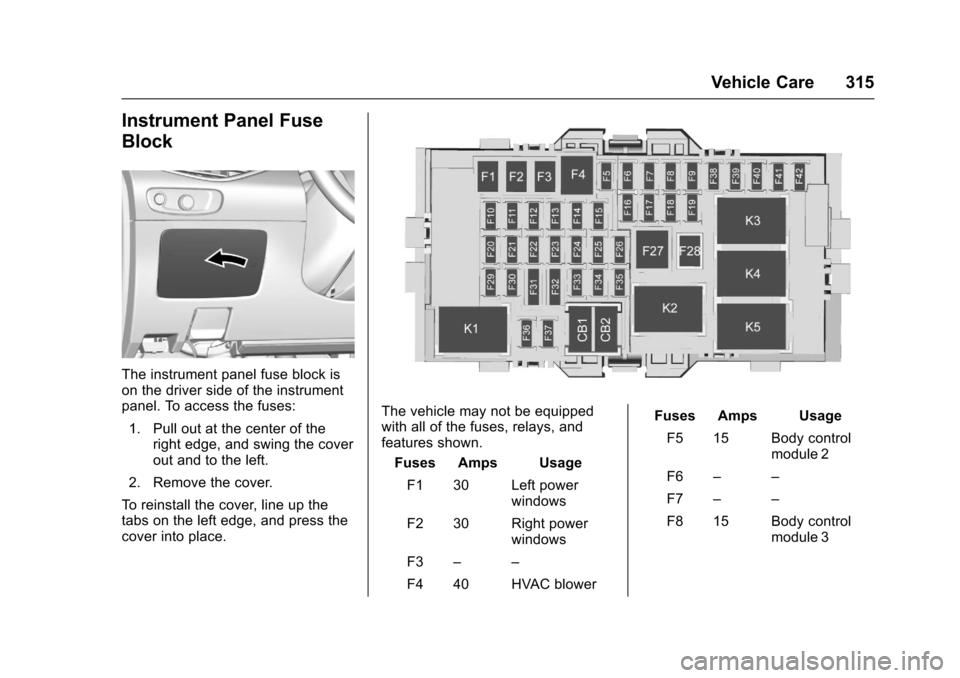
The instrument panel fuse block ison the driver side of the instrumentpanel. To access the fuses:
1. Pull out at the center of theright edge, and swing the coverout and to the left.
2. Remove the cover.
To r e i n s t a l l t h e c o v e r, l i n e u p t h etabs on the left edge, and press thecover into place.
The vehicle may not be equippedwith all of the fuses, relays, andfeatures shown.
Fuses Amps Usage
F1 30 Left powerwindows
F2 30 Right powerwindows
F3––
F4 40 HVAC blower
Fuses Amps Usage
F5 15 Body controlmodule 2
F6––
F7––
F8 15 Body controlmodule 3