2017 CHEVROLET MALIBU spare wheel
[x] Cancel search: spare wheelPage 348 of 419
Chevrolet Malibu Owner Manual (GMNA-Localizing-U.S./Canada/Mexico-10122664) - 2017 - crc - 5/23/16
Vehicle Care 347
3. Turn the retainer nutcounterclockwise and removethe spare tire. Place the sparetire next to the tire beingchanged.
4. The jack and tools are storedbelow the spare tire. Removethem from their container andplace them near the tire beingchanged.
Removing the Flat Tire and
Installing the Spare Tire
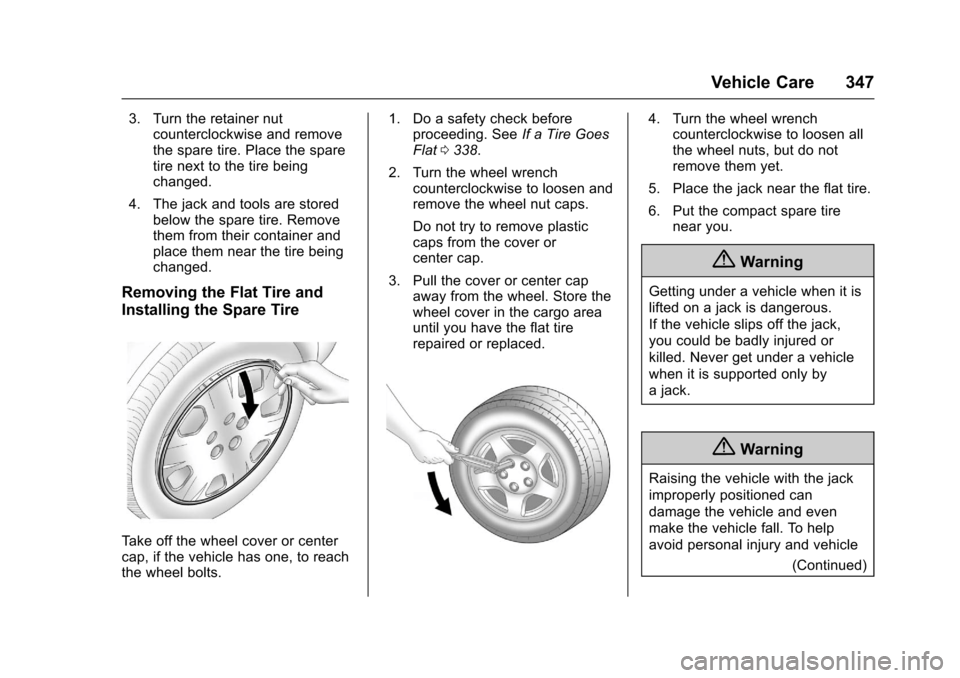
Ta k e o f f t h e w h e e l c o v e r o r c e n t e rcap, if the vehicle has one, to reachthe wheel bolts.
1. Do a safety check beforeproceeding. SeeIf a Tire GoesFlat0338.
2. Turn the wheel wrenchcounterclockwise to loosen andremove the wheel nut caps.
Do not try to remove plasticcaps from the cover orcenter cap.
3. Pull the cover or center capaway from the wheel. Store thewheel cover in the cargo areauntil you have the flat tirerepaired or replaced.
4. Turn the wheel wrenchcounterclockwise to loosen allthe wheel nuts, but do notremove them yet.
5. Place the jack near the flat tire.
6. Put the compact spare tirenear you.
{Warning
Getting under a vehicle when it is
lifted on a jack is dangerous.
If the vehicle slips off the jack,
you could be badly injured or
killed. Never get under a vehicle
when it is supported only by
ajack.
{Warning
Raising the vehicle with the jack
improperly positioned can
damage the vehicle and even
make the vehicle fall. To help
avoid personal injury and vehicle
(Continued)
Page 350 of 419
Chevrolet Malibu Owner Manual (GMNA-Localizing-U.S./Canada/Mexico-10122664) - 2017 - crc - 5/23/16
Vehicle Care 349
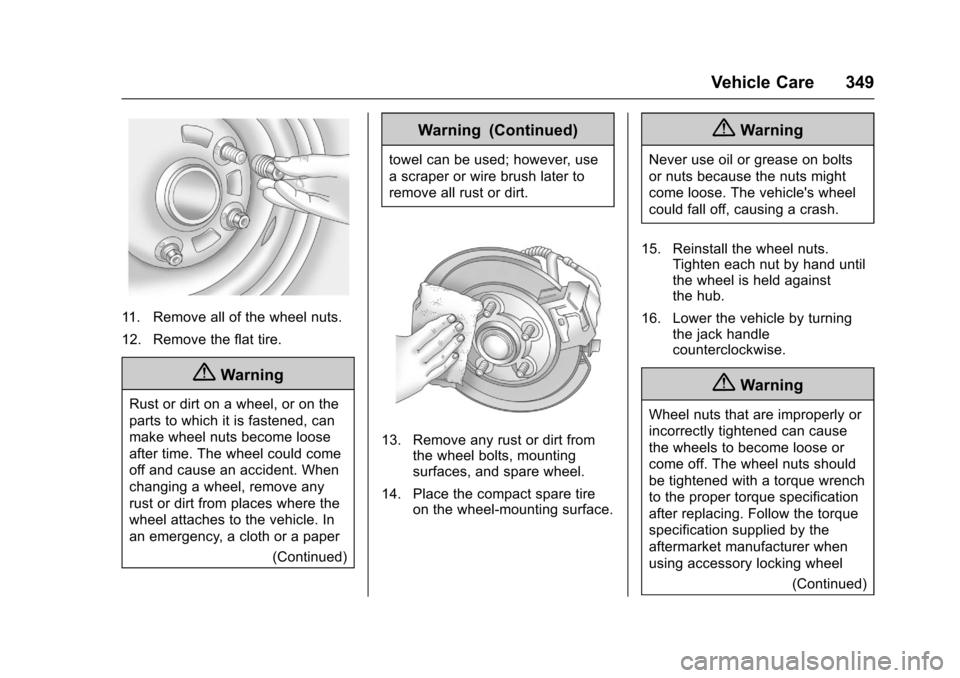
11 . R e m o v e a l l o f t h e w h e e l n u t s .
12. Remove the flat tire.
{Warning
Rust or dirt on a wheel, or on the
parts to which it is fastened, can
make wheel nuts become loose
after time. The wheel could come
off and cause an accident. When
changing a wheel, remove any
rust or dirt from places where the
wheel attaches to the vehicle. In
an emergency, a cloth or a paper
(Continued)
Warning (Continued)
towel can be used; however, use
ascraperorwirebrushlaterto
remove all rust or dirt.
13. Remove any rust or dirt fromthe wheel bolts, mountingsurfaces, and spare wheel.
14. Place the compact spare tireon the wheel-mounting surface.
{Warning
Never use oil or grease on bolts
or nuts because the nuts might
come loose. The vehicle's wheel
could fall off, causing a crash.
15. Reinstall the wheel nuts.Tighten each nut by hand untilthe wheel is held againstthe hub.
16. Lower the vehicle by turningthe jack handlecounterclockwise.
{Warning
Wheel nuts that are improperly or
incorrectly tightened can cause
the wheels to become loose or
come off. The wheel nuts should
be tightened with a torque wrench
to the proper torque specification
after replacing. Follow the torque
specification supplied by the
aftermarket manufacturer when
using accessory locking wheel
(Continued)
Page 351 of 419
Chevrolet Malibu Owner Manual (GMNA-Localizing-U.S./Canada/Mexico-10122664) - 2017 - crc - 5/23/16
350 Vehicle Care
Warning (Continued)
nuts. SeeCapacities and
Specifications0381for original
equipment wheel nut torque
specifications.
Caution
Improperly tightened wheel nuts
can lead to brake pulsation and
rotor damage. To avoid expensive
brake repairs, evenly tighten the
wheel nuts in the proper
sequence and to the proper
torque specification. See
Capacities and Specifications
0381for the wheel nut torque
specification.
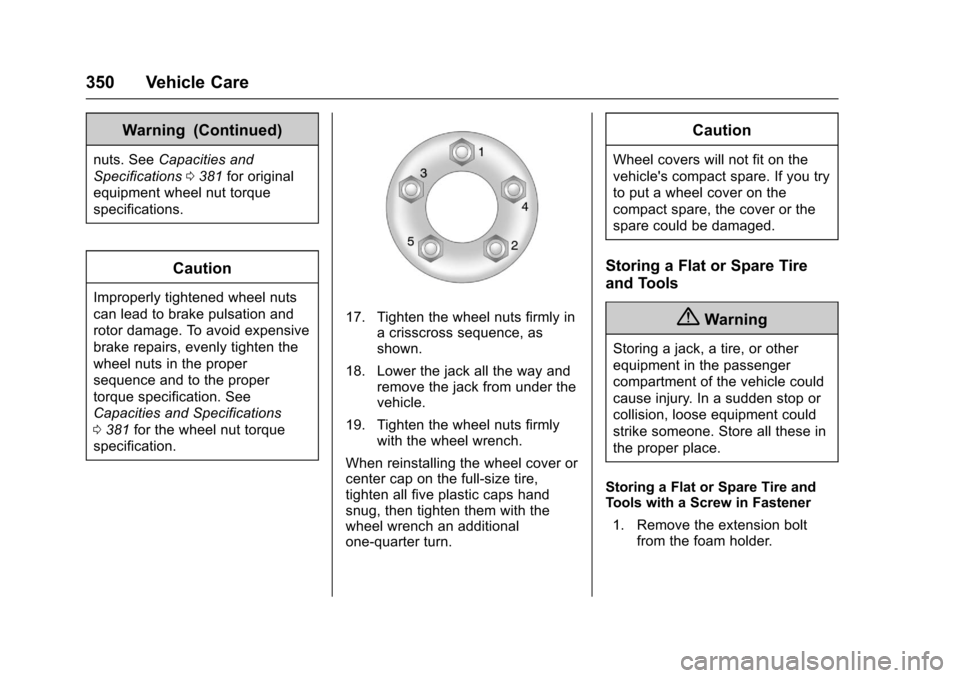
17. Tighten the wheel nuts firmly inacrisscrosssequence,asshown.
18. Lower the jack all the way andremove the jack from under thevehicle.
19. Tighten the wheel nuts firmlywith the wheel wrench.
When reinstalling the wheel cover orcenter cap on the full-size tire,tighten all five plastic caps handsnug, then tighten them with thewheel wrench an additionalone-quarter turn.
Caution
Wheel covers will not fit on the
vehicle's compact spare. If you try
to put a wheel cover on the
compact spare, the cover or the
spare could be damaged.
Storing a Flat or Spare Tire
and Tools
{Warning
Storing a jack, a tire, or other
equipment in the passenger
compartment of the vehicle could
cause injury. In a sudden stop or
collision, loose equipment could
strike someone. Store all these in
the proper place.
Storing a Flat or Spare Tire andTools with a Screw in Fastener
1. Remove the extension boltfrom the foam holder.
Page 352 of 419
Chevrolet Malibu Owner Manual (GMNA-Localizing-U.S./Canada/Mexico-10122664) - 2017 - crc - 5/23/16
Vehicle Care 351
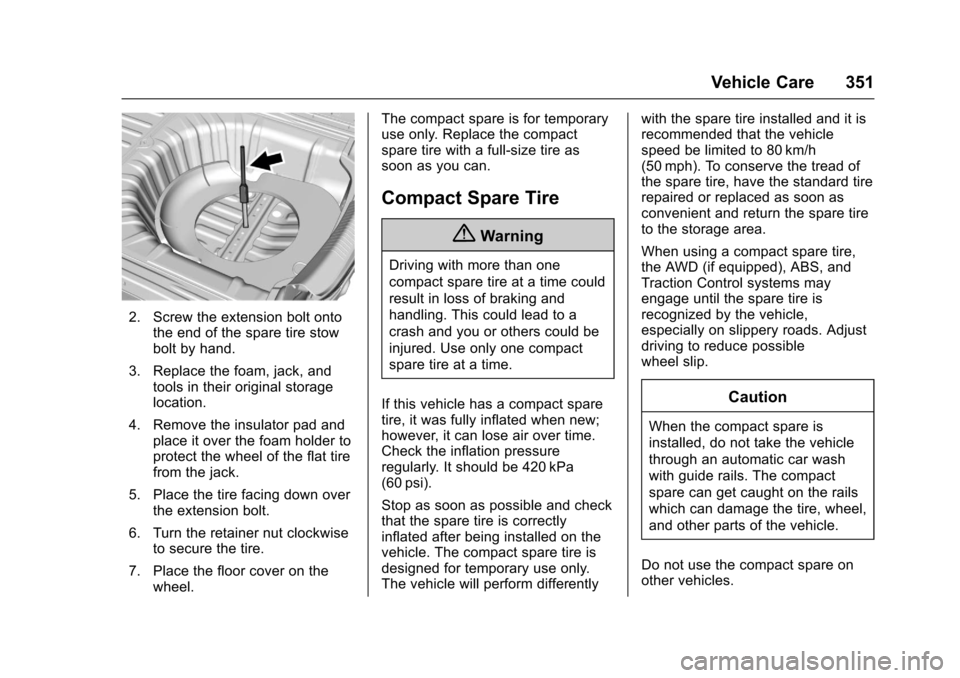
2. Screw the extension bolt ontothe end of the spare tire stowbolt by hand.
3. Replace the foam, jack, andtools in their original storagelocation.
4. Remove the insulator pad andplace it over the foam holder toprotect the wheel of the flat tirefrom the jack.
5. Place the tire facing down overthe extension bolt.
6. Turn the retainer nut clockwiseto secure the tire.
7. Place the floor cover on thewheel.
The compact spare is for temporaryuse only. Replace the compactspare tire with a full-size tire assoon as you can.
Compact Spare Tire
{Warning
Driving with more than one
compact spare tire at a time could
result in loss of braking and
handling. This could lead to a
crash and you or others could be
injured. Use only one compact
spare tire at a time.
If this vehicle has a compact sparetire, it was fully inflated when new;however, it can lose air over time.Check the inflation pressureregularly. It should be 420 kPa(60 psi).
Stop as soon as possible and checkthat the spare tire is correctlyinflated after being installed on thevehicle. The compact spare tire isdesigned for temporary use only.The vehicle will perform differently
with the spare tire installed and it isrecommended that the vehiclespeed be limited to 80 km/h(50 mph). To conserve the tread ofthe spare tire, have the standard tirerepaired or replaced as soon asconvenient and return the spare tireto the storage area.
When using a compact spare tire,the AWD (if equipped), ABS, andTraction Control systems mayengage until the spare tire isrecognized by the vehicle,especially on slippery roads. Adjustdriving to reduce possiblewheel slip.
Caution
When the compact spare is
installed, do not take the vehicle
through an automatic car wash
with guide rails. The compact
spare can get caught on the rails
which can damage the tire, wheel,
and other parts of the vehicle.
Do not use the compact spare onother vehicles.
Page 353 of 419
Chevrolet Malibu Owner Manual (GMNA-Localizing-U.S./Canada/Mexico-10122664) - 2017 - crc - 5/23/16
352 Vehicle Care
Do not mix the compact spare tire orwheel with other wheels or tires.They will not fit. Keep the spare tireand its wheel together.
Caution
Tire chains will not fit the compact
spare. Using them can damage
the vehicle and the chains. Do not
use tire chains on the compact
spare.
Jump Starting
Jump Starting - North
America
For more information about thevehicle 12-volt battery, seeBattery -North America0301.
If the battery has run down, youmay want to use another vehicleand some jumper cables to startyour vehicle. Be sure to use thefollowing steps to do it safely.
{Warning
WA R N I N G :Battery posts,
terminals, and related
accessories contain lead and lead
compounds, chemicals known to
the State of California to cause
cancer and birth defects or other
reproductive harm. Batteries also
contain other chemicals known to
the State of California to cause
cancer.WASH HANDS AFTER
HANDLING.
(Continued)
Warning (Continued)
SeeCalifornia Proposition
65 Warning0279.
{Warning
Batteries can hurt you. They can
be dangerous because:
.They contain acid that canburn you.
.They contain gas that canexplode or ignite.
.They contain enoughelectricity to burn you.
If you do not follow these steps
exactly, some or all of these
things can hurt you.
Page 417 of 419

Chevrolet Malibu Owner Manual (GMNA-Localizing-U.S./Canada/Mexico-10122664) - 2017 - crc - 5/23/16
416 Index
Seats (cont'd)
Power Adjustment, Front . . . . . . . 57
Rear . . . . . . . . . . . . . . . . . . . . . . . . . . . . 62
Reclining Seatbacks . . . . . . . . . . . . 57
Securing Child Restraints . . . . 96, 98
Security
Light . . . . . . . . . . . . . . . . . . . . . . . . . . 129
Messages . . . . . . . . . . . . . . . . . . . . 145
OnStar®...................... 398
Vehicle . . . . . . . . . . . . . . . . . . . . . . . . . 46
Vehicle Alarm . . . . . . . . . . . . . . . . . . . 46
Service . . . . . . . . . . . . . . . . . . . . . . . . . 213
Accessories and
Modifications . . . . . . . . . . . . . . . . 280
Climate Control System . . . . . . . 205
Doing Your Own Work . . . . . . . . 280
Engine Soon Light . . . . . . . . . . . . 122
Maintenance Records . . . . . . . . 379
Maintenance, General
Information . . . . . . . . . . . . . . . . . . 368
Parts Identification Label . . . . . 380
Publications Ordering
Information . . . . . . . . . . . . . . . . . . 392
Scheduling Appointments . . . . . 389
Vehicle Messages . . . . . . . . . . . . 145
Service Electric Parking
Brake Light . . . . . . . . . . . . . . . . . . . . 125
Services
Special Application . . . . . . . . . . . 374
Servicing the Airbag . . . . . . . . . . . . . 81
Shift Lock Control Function
Check, Automatic
Transmission . . . . . . . . . . . . . . . . . . 303
Shifting
Into Park . . . . . . . . . . . . . . . . . . . . . . 230
Out of Park . . . . . . . . . . . . . . . . . . . 231
Side Blind Zone Alert (SBZA) . . . 263
Signals, Turn and
Lane-Change . . . . . . . . . . . . . . . . . 167
Spare Tire
Compact . . . . . . . . . . . . . . . . . . . . . . 351
Special Application Services . . . . 374
Specifications and
Capacities . . . . . . . . . . . . . . . . . . . . . 381
Speedometer . . . . . . . . . . . . . . . . . . . 117
StabiliTrak
OFF Light . . . . . . . . . . . . . . . . . . . . . 127
Start Assist, Hill . . . . . . . . . . . . . . . . . 240
Start Vehicle, Remote . . . . . . . . . . . 38
Starter Switch Check . . . . . . . . . . . 303
Starting the Engine . . . . . . . . . . . . . 227
Starting the Vehicle
Messages . . . . . . . . . . . . . . . . . . . . . 146
Steering . . . . . . . . . . . . . . . . . . . . . . . . 217
Heated Wheel . . . . . . . . . . . . . . . . 105
Steering (cont'd)
Wheel Adjustment . . . . . . . . . . . . 104
Wheel Controls . . . . . . . . . . . . . . . 104
Steering System Messages . . . . . 145
Stoplamps and Back-up Lamps
Bulb Replacement . . . . . . . 307, 308
Storage Areas
Center Console . . . . . . . . . . . . . . . 102
Convenience Net . . . . . . . . . . . . . 102
Glove Box . . . . . . . . . . . . . . . . . . . . 101
Umbrella . . . . . . . . . . . . . . . . . . . . . . 102
Storage Compartments . . . . . . . . . 101
Storing the Tire Sealant and
Compressor Kit . . . . . . . . . . . . . . . 346
Stuck Vehicle . . . . . . . . . . . . . . . . . . . 221
Summer Tires . . . . . . . . . . . . . . . . . . 319
Sun Visors . . . . . . . . . . . . . . . . . . . . . . . 52
Sunroof . . . . . . . . . . . . . . . . . . . . . . . . . . 52
Symbols . . . . . . . . . . . . . . . . . . . . . . . . . . 3
System
Forward Collision
Alert (FCA) . . . . . . . . . . . . . . . . . . 258
Infotainment . . . . . . . . . . . . . 171, 396
Systems
Driver Assistance . . . . . . . . . . . . . 252
Page 418 of 419

Chevrolet Malibu Owner Manual (GMNA-Localizing-U.S./Canada/Mexico-10122664) - 2017 - crc - 5/23/16
Index 417
T
Ta c h o m e t e r . . . . . . . . . . . . . . . . . . . . . 11 7
Ta i l l a m p s
Bulb Replacement . . . . . . . 307, 308
Te x t Te l e p h o n e ( T T Y ) U s e r s . . . . 3 8 6
Theft-Deterrent Systems . . . . . . . . . 47
Immobilizer . . . . . . . . . . . . . . . . . . . . . 47
Time . . . . . . . . . . . . . . . . . . . . . . . . . . . . 107
Tires . . . . . . . . . . . . . . . . . . . . . . . . . . . . 317
All-Season . . . . . . . . . . . . . . . . . . . . 318
Buying New Tires . . . . . . . . . . . . . 333
Chains . . . . . . . . . . . . . . . . . . . . . . . . 337
Changing . . . . . . . . . . . . . . . . . . . . . 346
Compact Spare . . . . . . . . . . . . . . . 351
Designations . . . . . . . . . . . . . . . . . 322
Different Size . . . . . . . . . . . . . . . . . 334
If a Tire Goes Flat . . . . . . . . . . . . 338
Inspection . . . . . . . . . . . . . . . . . . . . 331
Low Profile . . . . . . . . . . . . . . . . . . . 319
Messages . . . . . . . . . . . . . . . . . . . . 146
Pressure . . . . . . . . . . . . . . . . . . . . . . 326
Pressure Light . . . . . . . . . . . . . . . . 127
Pressure Monitor Operation . . 328
Pressure Monitor System . . . . . 327
Rotation . . . . . . . . . . . . . . . . . . . . . . 331
Sealant and
Compressor Kit . . . . . . . . . . . . . 339
Tires (cont'd)
Sealant and Compressor
Kit, Storing . . . . . . . . . . . . . . . . . . 346
Sidewall Labeling . . . . . . . . . . . . . 320
Te r m i n o l o g y a n d D e f i n i t i o n s . . 3 2 2
Uniform Tire Quality
Grading . . . . . . . . . . . . . . . . . . . . . 335
Wheel Alignment and Tire
Balance . . . . . . . . . . . . . . . . . . . . . 336
Wheel Replacement . . . . . . . . . . 336
When It Is Time for New
Tires . . . . . . . . . . . . . . . . . . . . . . . . 332
Winter . . . . . . . . . . . . . . . . . . . . . . . . 318
To w i n g
Driving Characteristics . . . . . . . . 272
Equipment . . . . . . . . . . . . . . . . . . . . 276
General Information . . . . . . . . . . 272
Recreational Vehicle . . . . . . . . . . 356
Trailer . . . . . . . . . . . . . . . . . . . . . . . . 275
Vehicle . . . . . . . . . . . . . . . . . . . . . . . 355
Traction
Control System (TCS)/
StabiliTrak®Light . . . . . . . . . . . . 127
Off Light . . . . . . . . . . . . . . . . . . . . . . 126
Traction Control/Electronic
Stability Control . . . . . . . . . . . . . . . 241
Trademarks and License
Agreements . . . . . . . . . . . . . . . . . . . 202
Trailer
To w i n g . . . . . . . . . . . . . . . . . . . . . . . . 2 7 5
Transmission
Automatic . . . . . . . . . . . . . . . . . . . . . 233
Fluid, Automatic . . . . . . . . . . . . . . 292
Messages . . . . . . . . . . . . . . . . . . . . 146
Transportation Program,
Courtesy . . . . . . . . . . . . . . . . . . . . . . 389
Trip Odometer . . . . . . . . . . . . . . . . . . 117
Trunk . . . . . . . . . . . . . . . . . . . . . . . . . . . . 44
Turn and Lane-Change
Signals . . . . . . . . . . . . . . . . . . . . . . . . 167
Turn Signal
Bulb Replacement . . . . . . . 307, 308
U
Umbrella Storage . . . . . . . . . . . . . . . 102
Uniform Tire Quality Grading . . . 335
Universal Remote System . . . . . . 159
Operation . . . . . . . . . . . . . . . . . . . . . 162
Programming . . . . . . . . . . . . . . . . . 159
USB Port . . . . . . . . . . . . . . . . . . . . . . . 184
Using This Manual . . . . . . . . . . . . . . . . 2
V
Vehicle
Alarm System . . . . . . . . . . . . . . . . . . 46
Canadian Owners . . . . . . . . . . . . . . . 2
Control . . . . . . . . . . . . . . . . . . . . . . . 216