2017 CHEVROLET EXPRESS CARGO VAN lock
[x] Cancel search: lockPage 78 of 346
Chevrolet Express Owner Manual (GMNA-Localizing-U.S./Canada/Mexico-9967827) - 2017 - crc - 5/2/16
Seats and Restraints 77
{Warning
Children can be seriously injured
or strangled if a shoulder belt is
wrapped around their neck. The
shoulder belt can tighten but
cannot be loosened if it is locked.
The shoulder belt locks when it is
pulled all the way out of the
retractor. It unlocks when the
shoulder belt is allowed to go all
the way back into the retractor,
but it cannot do this if it is
wrapped around a child’sneck.
If the shoulder belt is locked and
tightened around a child’sneck,
the only way to loosen the belt is
to cut it.
Buckle any unused safety belts
behind the child restraint so
children cannot reach them. Pull
the shoulder belt all the way out
of the retractor to set the lock,
and tighten the belt behind the
child restraint after the child
restraint has been installed.
Caution
Do not let the LATCH
attachments rub against the
vehicle’ssafetybelts.Thismay
damage these parts. If necessary,
move buckled safety belts to
avoid rubbing the LATCH
attachments.
Do not fold the rear seatback
when the seat is occupied. Do not
fold the empty rear seat with a
safety belt buckled. This could
damage the safety belt or the
seat. Unbuckle and return the
safety belt to its stowed position,
before folding the seat.
If you need to secure more than onechild restraint in the rear seat, seeWhere to Put the Restraint072.
This system is designed to makethe installation of child restraintseasier. When using lower anchors,do not use the vehicle's safety belts.Instead, use the vehicle's anchorsand child restraint attachments to
secure the restraints. Somerestraints also use another vehicleanchor to secure a top tether.
1. Attach and tighten the lowerattachments to the loweranchors. If the child restraintdoes not have lowerattachments or the desiredseating position does not havelower anchors, secure the childrestraint with the top tether andthe safety belts. Refer to yourchild restraint manufacturerinstructions and theinstructions in this manual.
1.1. Find the lower anchorsfor the desired seatingposition.
1.2. Put the child restraint onthe seat.
1.3. Attach and tighten thelower attachments on thechild restraint to the loweranchors.
2. If the child restraintmanufacturer recommends thatthe top tether be attached,attach and tighten the top
Page 81 of 346
Chevrolet Express Owner Manual (GMNA-Localizing-U.S./Canada/Mexico-9967827) - 2017 - crc - 5/2/16
80 Seats and Restraints
If the child restraint or vehicle seatposition does not have the LATCHsystem, you will be using the safetybelt to secure the child restraint.Be sure to follow the instructionsthat came with the child restraint.
If more than one child restraintneeds to be installed in the rearseat, be sure to readWhere to Putthe Restraint072.
1. Put the child restraint onthe seat.
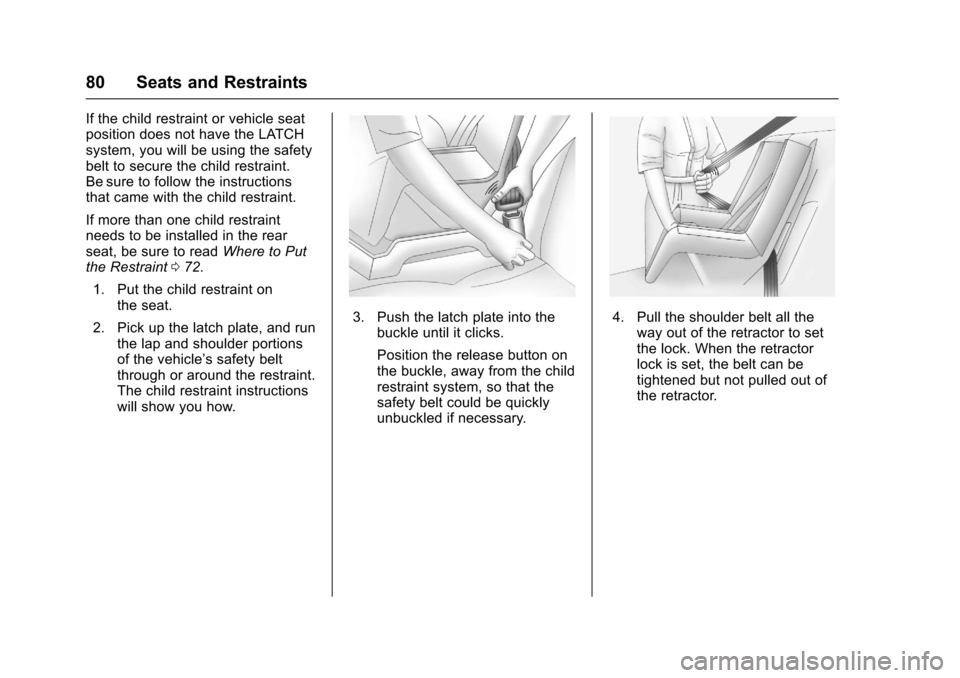
2. Pick up the latch plate, and runthe lap and shoulder portionsof the vehicle’ssafetybeltthrough or around the restraint.The child restraint instructionswill show you how.
3. Push the latch plate into thebuckle until it clicks.
Position the release button onthe buckle, away from the childrestraint system, so that thesafety belt could be quicklyunbuckled if necessary.
4. Pull the shoulder belt all theway out of the retractor to setthe lock. When the retractorlock is set, the belt can betightened but not pulled out ofthe retractor.
Page 82 of 346
Chevrolet Express Owner Manual (GMNA-Localizing-U.S./Canada/Mexico-9967827) - 2017 - crc - 5/2/16
Seats and Restraints 81
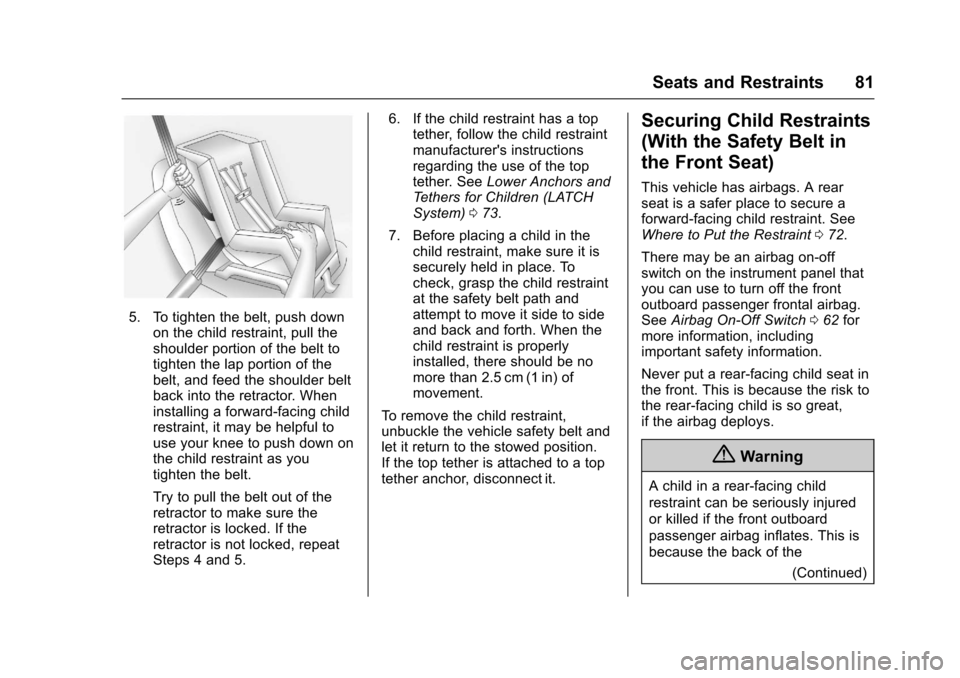
5. To tighten the belt, push downon the child restraint, pull theshoulder portion of the belt totighten the lap portion of thebelt, and feed the shoulder beltback into the retractor. Wheninstalling a forward-facing childrestraint, it may be helpful touse your knee to push down onthe child restraint as youtighten the belt.
Try to pull the belt out of theretractor to make sure theretractor is locked. If theretractor is not locked, repeatSteps 4 and 5.
6. If the child restraint has a toptether, follow the child restraintmanufacturer's instructionsregarding the use of the toptether. SeeLower Anchors andTe t h e r s f o r C h i l d r e n ( L AT C HSystem)073.
7. Before placing a child in thechild restraint, make sure it issecurely held in place. Tocheck, grasp the child restraintat the safety belt path andattempt to move it side to sideand back and forth. When thechild restraint is properlyinstalled, there should be nomore than 2.5 cm (1 in) ofmovement.
To r e m o v e t h e c h i l d r e s t r a i n t ,unbuckle the vehicle safety belt andlet it return to the stowed position.If the top tether is attached to a toptether anchor, disconnect it.
Securing Child Restraints
(With the Safety Belt in
the Front Seat)
This vehicle has airbags. A rearseat is a safer place to secure aforward-facing child restraint. SeeWhere to Put the Restraint072.
There may be an airbag on-offswitch on the instrument panel thatyou can use to turn off the frontoutboard passenger frontal airbag.SeeAirbag On-Off Switch062formore information, includingimportant safety information.
Never put a rear-facing child seat inthe front. This is because the risk tothe rear-facing child is so great,if the airbag deploys.
{Warning
Achildinarear-facingchild
restraint can be seriously injured
or killed if the front outboard
passenger airbag inflates. This is
because the back of the
(Continued)
Page 84 of 346
Chevrolet Express Owner Manual (GMNA-Localizing-U.S./Canada/Mexico-9967827) - 2017 - crc - 5/2/16
Seats and Restraints 83
light should light and stay litwhen the vehicle is started.SeeAirbag On-Off Light0100.
2. Put the child restraint onthe seat.
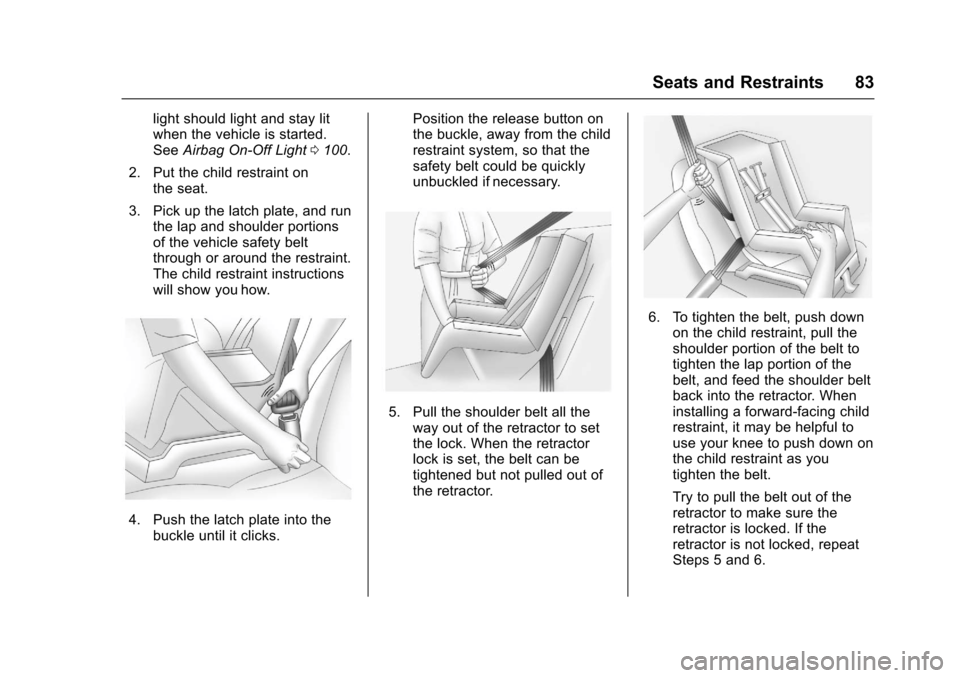
3. Pick up the latch plate, and runthe lap and shoulder portionsof the vehicle safety beltthrough or around the restraint.The child restraint instructionswill show you how.
4. Push the latch plate into thebuckle until it clicks.
Position the release button onthe buckle, away from the childrestraint system, so that thesafety belt could be quicklyunbuckled if necessary.
5. Pull the shoulder belt all theway out of the retractor to setthe lock. When the retractorlock is set, the belt can betightened but not pulled out ofthe retractor.
6. To tighten the belt, push downon the child restraint, pull theshoulder portion of the belt totighten the lap portion of thebelt, and feed the shoulder beltback into the retractor. Wheninstalling a forward-facing childrestraint, it may be helpful touse your knee to push down onthe child restraint as youtighten the belt.
Try to pull the belt out of theretractor to make sure theretractor is locked. If theretractor is not locked, repeatSteps 5 and 6.
Page 88 of 346

Chevrolet Express Owner Manual (GMNA-Localizing-U.S./Canada/Mexico-9967827) - 2017 - crc - 5/2/16
Instruments and Controls 87
Instruments and
Controls
Controls
Steering Wheel Adjustment . . . . 88Steering Wheel Controls . . . . . . . 88Horn . . . . . . . . . . . . . . . . . . . . . . . . . . . 89Windshield Wiper/Washer . . . . . . 89Compass . . . . . . . . . . . . . . . . . . . . . . 90Clock . . . . . . . . . . . . . . . . . . . . . . . . . . 92Power Outlets . . . . . . . . . . . . . . . . . 93Cigarette Lighter . . . . . . . . . . . . . . . 94Ashtrays . . . . . . . . . . . . . . . . . . . . . . . 94
Warning Lights, Gauges, and
Indicators
Warning Lights, Gauges, andIndicators . . . . . . . . . . . . . . . . . . . . 94Instrument Cluster . . . . . . . . . . . . . 95Speedometer . . . . . . . . . . . . . . . . . . 96Odometer . . . . . . . . . . . . . . . . . . . . . . 96Trip Odometer . . . . . . . . . . . . . . . . . 96Fuel Gauge . . . . . . . . . . . . . . . . . . . . 96Engine Oil Pressure Gauge . . . . 97Engine Coolant TemperatureGauge . . . . . . . . . . . . . . . . . . . . . . . . 98Voltmeter Gauge . . . . . . . . . . . . . . . 99Safety Belt Reminders . . . . . . . . . 99Airbag Readiness Light . . . . . . . . 99
Airbag On-Off Light . . . . . . . . . . . 100Charging System Light . . . . . . . 101Malfunction Indicator Lamp(Check Engine Light) . . . . . . . . 102Brake System WarningLight . . . . . . . . . . . . . . . . . . . . . . . . 104Antilock Brake System (ABS)Warning Light . . . . . . . . . . . . . . . 104To w / H a u l M o d e L i g h t . . . . . . . . . 1 0 5StabiliTrak®OFF Light . . . . . . . . 105Traction Control System (TCS)/StabiliTrak®Light . . . . . . . . . . . 105Tire Pressure Light . . . . . . . . . . . 106Engine Oil Pressure Light . . . . 106Low Fuel Warning Light . . . . . . 107Security Light . . . . . . . . . . . . . . . . . 107High-Beam On Light . . . . . . . . . . 107Cruise Control Light . . . . . . . . . . 107
Information Displays
Driver InformationCenter (DIC) . . . . . . . . . . . . . . . . 108
Vehicle Messages
Vehicle Messages . . . . . . . . . . . . 112Battery Voltage and ChargingMessages . . . . . . . . . . . . . . . . . . . 112Brake System Messages . . . . . 112Compass Messages . . . . . . . . . . 113Door Ajar Messages . . . . . . . . . . 113
Engine Cooling SystemMessages . . . . . . . . . . . . . . . . . . . 113Engine Oil Messages . . . . . . . . . 114Engine Power Messages . . . . . 114Fuel System Messages . . . . . . . 115Key and Lock Messages . . . . . . 115Lamp Messages . . . . . . . . . . . . . . 115Object Detection SystemMessages . . . . . . . . . . . . . . . . . . . 115Ride Control SystemMessages . . . . . . . . . . . . . . . . . . . 116Airbag System Messages . . . . . 117Security Messages . . . . . . . . . . . 117Service Vehicle Messages . . . . 117Tire Messages . . . . . . . . . . . . . . . . 118Transmission Messages . . . . . . 118Vehicle ReminderMessages . . . . . . . . . . . . . . . . . . . 119
Vehicle Personalization
Vehicle Personalization . . . . . . . 119
Page 89 of 346
Chevrolet Express Owner Manual (GMNA-Localizing-U.S./Canada/Mexico-9967827) - 2017 - crc - 5/2/16
88 Instruments and Controls
Controls
Steering Wheel
Adjustment
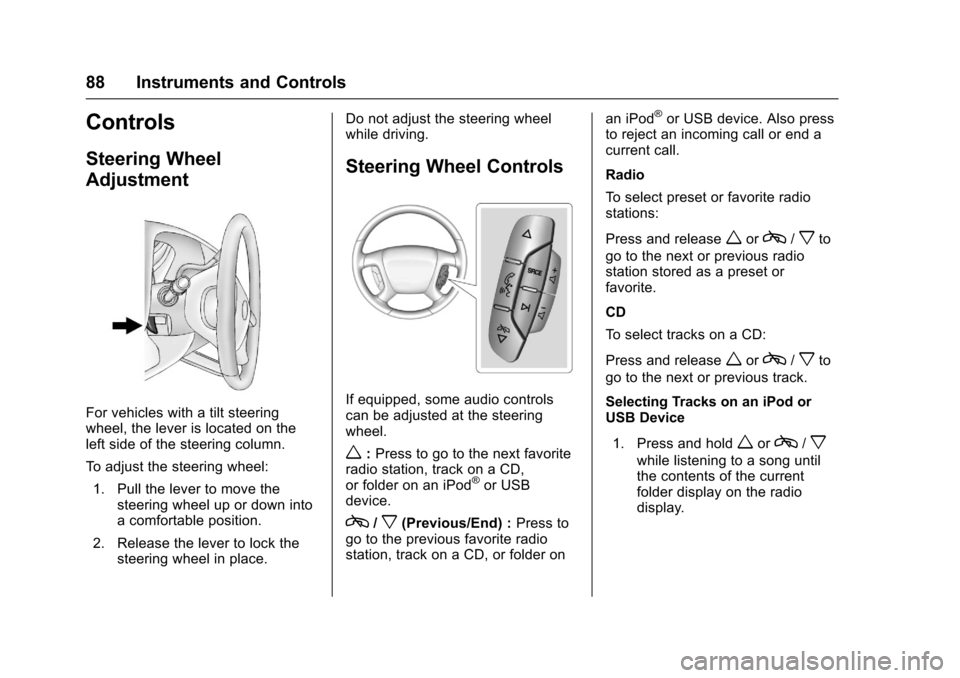
For vehicles with a tilt steeringwheel, the lever is located on theleft side of the steering column.
To a d j u s t t h e s t e e r i n g w h e e l :
1. Pull the lever to move thesteering wheel up or down intoacomfortableposition.
2. Release the lever to lock thesteering wheel in place.
Do not adjust the steering wheelwhile driving.
Steering Wheel Controls
If equipped, some audio controlscan be adjusted at the steeringwheel.
w:Press to go to the next favoriteradio station, track on a CD,or folder on an iPod®or USBdevice.
c/x(Previous/End) :Press togo to the previous favorite radiostation, track on a CD, or folder on
an iPod®or USB device. Also pressto reject an incoming call or end acurrent call.
Radio
To s e l e c t p r e s e t o r f a v o r i t e r a d i ostations:
Press and releaseworc/xto
go to the next or previous radiostation stored as a preset orfavorite.
CD
To s e l e c t t r a c k s o n a C D :
Press and releaseworc/xto
go to the next or previous track.
Selecting Tracks on an iPod orUSB Device
1. Press and holdworc/x
while listening to a song untilthe contents of the currentfolder display on the radiodisplay.
Page 91 of 346
Chevrolet Express Owner Manual (GMNA-Localizing-U.S./Canada/Mexico-9967827) - 2017 - crc - 5/2/16
90 Instruments and Controls
6:Use to adjust the delay timebetween wipes. Turn the band upfor more frequent wipes or down forless frequent wipes.
d:Slow wipes.
a:Fast wipes.
9:Use to turn the wipers off.
When driving during the day and thewipers are activated, the headlamps automatically turn on aftercompleting eight wipe cycles.
Clear ice and snow from the wiperblades before using them. If frozento the windshield, carefully loosen orthaw them. Damaged blades shouldbe replaced.
Windshield Washer
The windshield wiper paddle is ontop of the turn signal lever.
L:Push the paddle to spraywasher fluid on the windshield. Thewipers will clear the window andthen either stop or return to thepreset speed.
{Warning
In freezing weather, do not use
the washer until the windshield is
warmed. Otherwise the washer
fluid can form ice on the
windshield, blocking your vision.
Compass
This vehicle may have a compass inthe Driver Information Center (DIC).
Compass Zone
Yo u r d e a l e r w i l l s e t t h e c o r r e c t z o n efor your location.
Under certain circumstances, suchas during a long distancecross-country trip or moving to anew state or province, it will benecessary to compensate forcompass variance by resetting thezone through the DIC if the zone isnot set correctly.
Compass variance is the differencebetween the earth's magnetic northand true geographic north. If thecompass is not set to the zonewhere you live, the compass may
give false readings. The compassmust be set to the variance zone inwhich the vehicle is traveling.
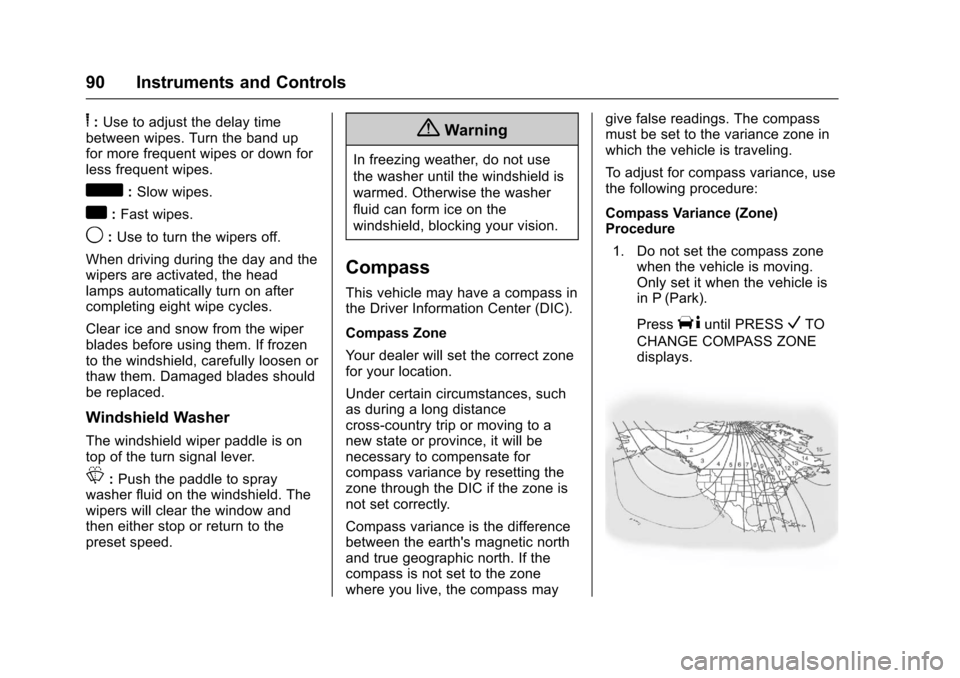
To a d j u s t f o r c o m p a s s v a r i a n c e , u s ethe following procedure:
Compass Variance (Zone)Procedure
1. Do not set the compass zonewhen the vehicle is moving.Only set it when the vehicle isin P (Park).
PressTuntil PRESSVTO
CHANGE COMPASS ZONEdisplays.
Page 93 of 346
Chevrolet Express Owner Manual (GMNA-Localizing-U.S./Canada/Mexico-9967827) - 2017 - crc - 5/2/16
92 Instruments and Controls
Clock
The clock can be set with either theradio turned on or off.
AM-FM Radio
To s e t t h e t i m e :
1. PressHuntil the hour begins
flashing on the display. Pressthis button a second time andthe minutes begin flashing ondisplay.
PressHathirdtimeandthe
12HR or 24HR time formatbegins flashing.
2. While either the hour or the
minutes are flashing, turn thef
knob, on the upper right side ofthe radio, clockwise orcounterclockwise to increase ordecrease the time. While the12HR or 24HR time format is
flashing, turn thefknob
clockwise or counterclockwiseto select the default timesettings.
3. PressHagain until the clock
display stops flashing to set thecurrently displayed time;otherwise, the flashing stopsafter five seconds and thecurrent time displayed isautomatically set.
Radio with CD/MP3
To s e t t h e t i m e a n d d a t e :
1. PressHand the HR, MIN, MM,
DD, and YYYY (hour, minute,month, day, and year) display.
2. Press the softkey under anyone of the tabs to be changed.Every time the softkey ispressed again, the time or thedate if selected, increasesby one.
Another way to increase the
time or date is to press¨
SEEK or\FWD (forward).
3. To decrease, press©SEEK or
sREV. Turn thefknob, onthe upper right side of theradio, to adjust the selectedsetting.
Changing the Time and DateDefault Settings
To c h a n g e t h e t i m e o r d a t e d e f a u l tsettings:
1. PressHand then the softkey
under the forward arrow that iscurrently displayed on the radioscreen until the time 12H(hour) and 24H (hour), and thedate MM/DD (month and day)and DD/MM (day and month)are displayed.
2. Press the softkey under thedesired option.
3. PressHagain to apply the
selected default, or let thescreen time out.