Page 147 of 346
Chevrolet Express Owner Manual (GMNA-Localizing-U.S./Canada/Mexico-9967827) - 2017 - crc - 5/2/16
146 Infotainment System
To e x i t m u s i c n a v i g a t o r m o d e , p r e s sthe softkey below the Back tab toreturn to normal MP3 playback.
CD Player Messages
CHECK DISC :If this messagedisplays and/or the CD ejects, itcould be for one of the followingreasons:
.It is very hot. When thetemperature returns to normal,the CD should play.
.The road is very rough. Whenthe road becomes smoother, theCD should play.
.The CD is dirty, scratched, wet,or upside down.
.The air is very humid. If so, waitabout an hour and try again.
.There was a problem whileburning the CD.
.The label is caught in the CDplayer.
If the CD is not playing correctly, forany other reason, try a knowngood CD.
If any error occurs repeatedly or ifan error cannot be corrected,contact your dealer. If the radiodisplays an error message, write itdown and provide it to your dealerwhen reporting the problem.
Auxiliary Devices
Using the Auxiliary Input Jack
Radios with an auxiliary input jackon the lower right side of thefaceplate can connect to an externalaudio device such as an iPod®,MP3 player, or CD player, for use asanother source for audio listening.This input jack is not an audiooutput; do not plug headphones intothe front auxiliary input jack.
Drivers are encouraged to set upany auxiliary device while thevehicle is in P (Park). SeeDefensive Driving0165for moreinformation on driver distraction.
To u s e a p o r t a b l e a u d i o p l a y e r ,connect a 3.5 mm (1/8 in) cable tothe radio's front auxiliary input jack.When a device is connected, press
the radio CD/AUX button to beginplaying audio from the device overthe vehicle speakers.
For optimal sound quality, increasethe portable audio device's volumeto the loudest level.
It is always best to power theportable audio device through itsown battery while playing.
O:Turn clockwise orcounterclockwise to increase ordecrease the volume of the portableplayer. Additional volumeadjustments might have to be madefrom the portable device if thevolume is not loud or soft enough.
BAND :If equipped, press to listento the radio when a portable audiodevice is playing. The portableaudio device continues playing.
CD/AUX :If equipped, press to playaCDwhenaportableaudiodeviceis playing. Press again and thesystem begins playing audio fromthe connected portable audio player.If a portable audio player is notconnected,“No Input Device Found”displays.
Page 159 of 346
Chevrolet Express Owner Manual (GMNA-Localizing-U.S./Canada/Mexico-9967827) - 2017 - crc - 5/2/16
158 Climate Controls
Climate Controls
Climate Control Systems
Climate Control Systems . . . . . 158Rear Heating System . . . . . . . . . 160Rear Climate ControlSystem . . . . . . . . . . . . . . . . . . . . . . 161
Air Vents
Air Vents . . . . . . . . . . . . . . . . . . . . . 163
Maintenance
Service . . . . . . . . . . . . . . . . . . . . . . . 163
Climate Control Systems
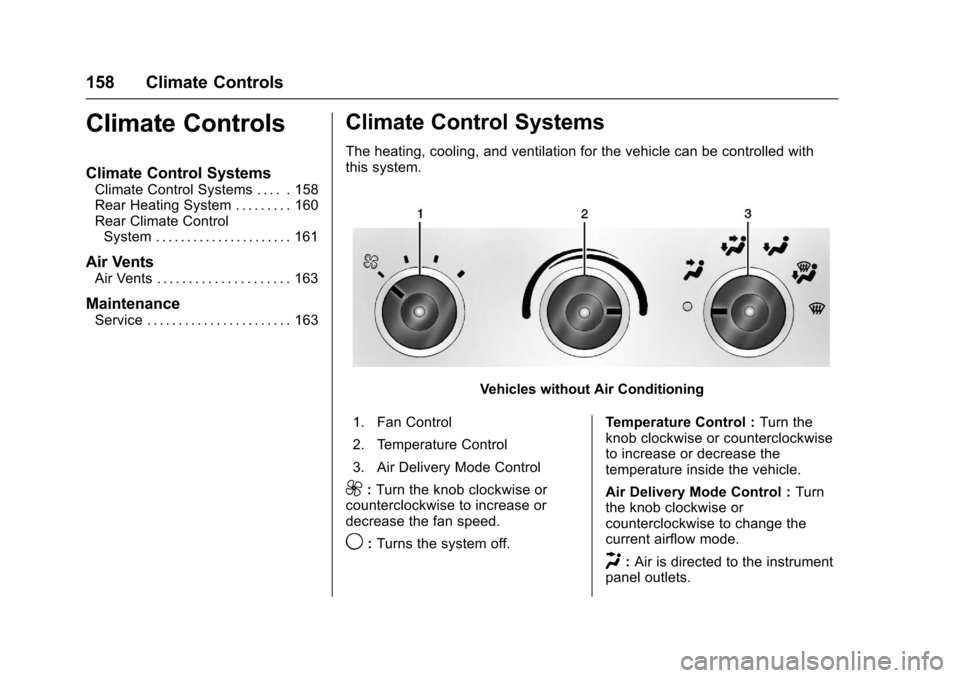
The heating, cooling, and ventilation for the vehicle can be controlled withthis system.
Vehicles without Air Conditioning
1. Fan Control
2. Temperature Control
3. Air Delivery Mode Control
9:Turn the knob clockwise orcounterclockwise to increase ordecrease the fan speed.
9:Turns the system off.
Te m p e r a t u r e C o n t r o l :Turn theknob clockwise or counterclockwiseto increase or decrease thetemperature inside the vehicle.
Air Delivery Mode Control :Turnthe knob clockwise orcounterclockwise to change thecurrent airflow mode.
H:Air is directed to the instrumentpanel outlets.
Page 163 of 346
Chevrolet Express Owner Manual (GMNA-Localizing-U.S./Canada/Mexico-9967827) - 2017 - crc - 5/2/16
162 Climate Controls
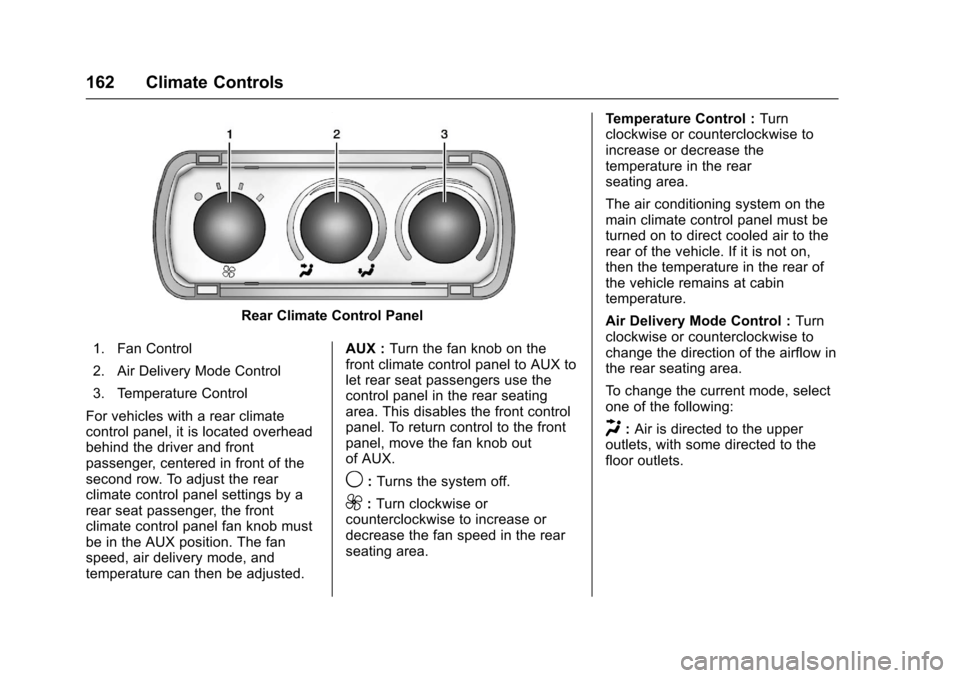
Rear Climate Control Panel
1. Fan Control
2. Air Delivery Mode Control
3. Temperature Control
For vehicles with a rear climatecontrol panel, it is located overheadbehind the driver and frontpassenger, centered in front of thesecond row. To adjust the rearclimate control panel settings by arear seat passenger, the frontclimate control panel fan knob mustbe in the AUX position. The fanspeed, air delivery mode, andtemperature can then be adjusted.
AUX :Turn the fan knob on thefront climate control panel to AUX tolet rear seat passengers use thecontrol panel in the rear seatingarea. This disables the front controlpanel. To return control to the frontpanel, move the fan knob outof AUX.
9:Turns the system off.
9:Turn clockwise orcounterclockwise to increase ordecrease the fan speed in the rearseating area.
Te m p e r a t u r e C o n t r o l :Turnclockwise or counterclockwise toincrease or decrease thetemperature in the rearseating area.
The air conditioning system on themain climate control panel must beturned on to direct cooled air to therear of the vehicle. If it is not on,then the temperature in the rear ofthe vehicle remains at cabintemperature.
Air Delivery Mode Control :Turnclockwise or counterclockwise tochange the direction of the airflow inthe rear seating area.
To c h a n g e t h e c u r r e n t m o d e , s e l e c tone of the following:
H:Air is directed to the upperoutlets, with some directed to thefloor outlets.
Page 202 of 346
Chevrolet Express Owner Manual (GMNA-Localizing-U.S./Canada/Mexico-9967827) - 2017 - crc - 5/6/16
Driving and Operating 201
Warning (Continued)
.Fuel can spray out if the fuelcap is opened too quickly.This spray can happen if thetank is nearly full, and ismore likely in hot weather.Open the fuel cap slowlyand wait for any hiss noiseto stop, then unscrew thecap all the way.
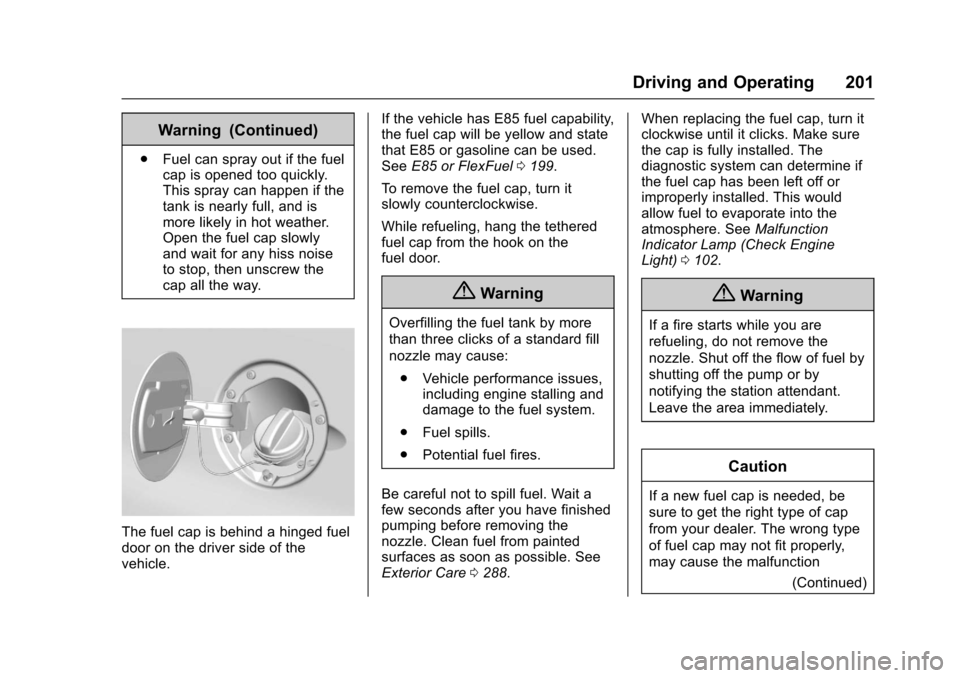
The fuel cap is behind a hinged fueldoor on the driver side of thevehicle.
If the vehicle has E85 fuel capability,the fuel cap will be yellow and statethat E85 or gasoline can be used.SeeE85 or FlexFuel0199.
To r e m o v e t h e f u e l c a p , t u r n i tslowly counterclockwise.
While refueling, hang the tetheredfuel cap from the hook on thefuel door.
{Warning
Overfilling the fuel tank by more
than three clicks of a standard fill
nozzle may cause:
.Vehicle performance issues,including engine stalling anddamage to the fuel system.
.Fuel spills.
.Potential fuel fires.
Be careful not to spill fuel. Wait afew seconds after you have finishedpumping before removing thenozzle. Clean fuel from paintedsurfaces as soon as possible. SeeExterior Care0288.
When replacing the fuel cap, turn itclockwise until it clicks. Make surethe cap is fully installed. Thediagnostic system can determine ifthe fuel cap has been left off orimproperly installed. This wouldallow fuel to evaporate into theatmosphere. SeeMalfunctionIndicator Lamp (Check EngineLight)0102.
{Warning
If a fire starts while you are
refueling, do not remove the
nozzle. Shut off the flow of fuel by
shutting off the pump or by
notifying the station attendant.
Leave the area immediately.
Caution
If a new fuel cap is needed, be
sure to get the right type of cap
from your dealer. The wrong type
of fuel cap may not fit properly,
may cause the malfunction
(Continued)
Page 244 of 346
Chevrolet Express Owner Manual (GMNA-Localizing-U.S./Canada/Mexico-9967827) - 2017 - crc - 5/2/16
Vehicle Care 243
1. Use a small tool to unlatch theoutboard clip on the lamp bypushing inboard and prying thelamp assembly forward.
2. Remove the lamp from thegrille.
3. Turn the bulb socketcounterclockwise one-quarterturn and remove it from thelamp assembly.
4. Remove the bulb from thesocket by pulling it straight out.
5. Replace the bulb.
6. Turn the bulb socket clockwiseto reinstall it in the lampassembly.
7. Reinstall the lamp assemblyinto the grille until the outboardclip snaps into place.
Taillamps
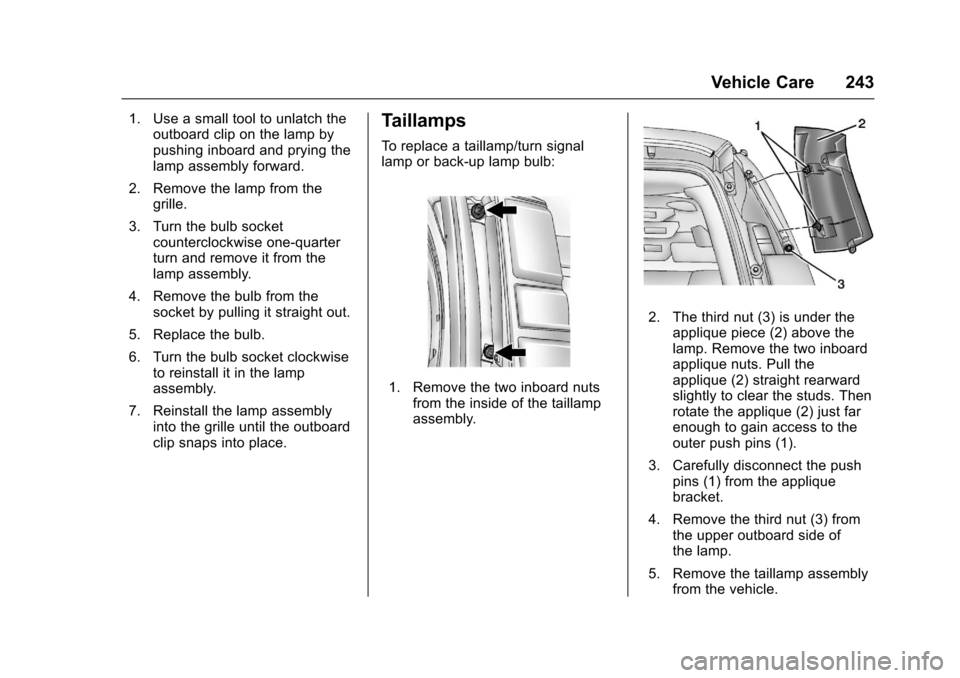
To r e p l a c e a t a i l l a m p / t u r n s i g n a llamp or back-up lamp bulb:
1. Remove the two inboard nutsfrom the inside of the taillampassembly.
2. The third nut (3) is under theapplique piece (2) above thelamp. Remove the two inboardapplique nuts. Pull theapplique (2) straight rearwardslightly to clear the studs. Thenrotate the applique (2) just farenough to gain access to theouter push pins (1).
3. Carefully disconnect the pushpins (1) from the appliquebracket.
4. Remove the third nut (3) fromthe upper outboard side ofthe lamp.
5. Remove the taillamp assemblyfrom the vehicle.