2017 CHEVROLET COLORADO lock
[x] Cancel search: lockPage 96 of 419

Chevrolet Colorado Owner Manual (GMNA-Localizing-U.S./Canada/Mexico-10122675) - 2017 - crc - 8/22/16
Seats and Restraints 95
Crew Cab
When using the lap-shoulder belt tosecure the child restraint in thisposition, follow the instructions thatcame with the child restraint and thefollowing instructions:
1. If the head restraint interfereswith the proper installation ofthe child restraint, the headrestraint may be removed. See“Head Restraint/HeadrestRemoval and Reinstallation”underLower Anchors andTe t h e r s f o r C h i l d r e n ( L AT C HSystem)077.
2. If the child restraintmanufacturer recommendsusing a top tether, adjust thetop tether to its full length andattach it to the top tetheranchor. Refer to theinstructions that came with thechild restraint and seeLowerAnchors and Tethers forChildren (LATCH System)077.
3. Put the child restraint onthe seat.
4. Pick up the latch plate, and runthe lap and shoulder portionsof the vehicle's safety beltthrough or around the restraint.The child restraint instructionswill show you how.
5. Push the latch plate into thebuckle until it clicks.
Position the release button onthe buckle, away from the childrestraint system, so that thesafety belt could be quicklyunbuckled if necessary.
6. Pull the shoulder belt all theway out of the retractor to setthe lock. When the retractorlock is set, the belt can betightened but not pulled out ofthe retractor.
Page 97 of 419

Chevrolet Colorado Owner Manual (GMNA-Localizing-U.S./Canada/Mexico-10122675) - 2017 - crc - 8/22/16
96 Seats and Restraints
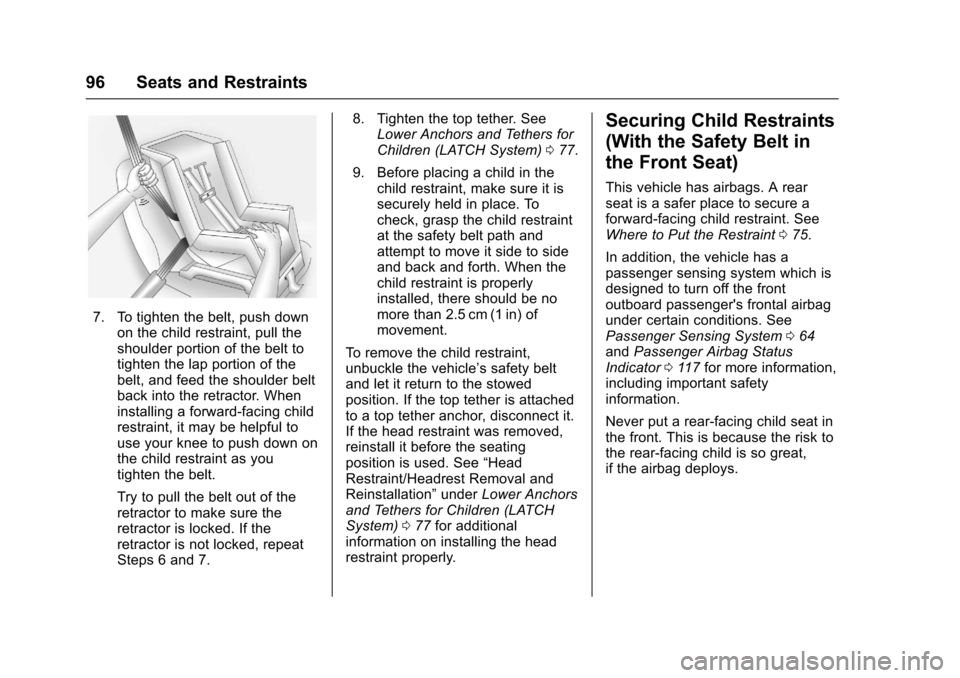
7. To tighten the belt, push downon the child restraint, pull theshoulder portion of the belt totighten the lap portion of thebelt, and feed the shoulder beltback into the retractor. Wheninstalling a forward-facing childrestraint, it may be helpful touse your knee to push down onthe child restraint as youtighten the belt.
Try to pull the belt out of theretractor to make sure theretractor is locked. If theretractor is not locked, repeatSteps 6 and 7.
8. Tighten the top tether. SeeLower Anchors and Tethers forChildren (LATCH System)077.
9. Before placing a child in thechild restraint, make sure it issecurely held in place. Tocheck, grasp the child restraintat the safety belt path andattempt to move it side to sideand back and forth. When thechild restraint is properlyinstalled, there should be nomore than 2.5 cm (1 in) ofmovement.
To r e m o v e t h e c h i l d r e s t r a i n t ,unbuckle the vehicle’ssafetybeltand let it return to the stowedposition. If the top tether is attachedto a top tether anchor, disconnect it.If the head restraint was removed,reinstall it before the seatingposition is used. See“HeadRestraint/Headrest Removal andReinstallation”underLower Anchorsand Tethers for Children (LATCHSystem)077for additionalinformation on installing the headrestraint properly.
Securing Child Restraints
(With the Safety Belt in
the Front Seat)
This vehicle has airbags. A rearseat is a safer place to secure aforward-facing child restraint. SeeWhere to Put the Restraint075.
In addition, the vehicle has apassenger sensing system which isdesigned to turn off the frontoutboard passenger's frontal airbagunder certain conditions. SeePassenger Sensing System064andPassenger Airbag StatusIndicator011 7for more information,including important safetyinformation.
Never put a rear-facing child seat inthe front. This is because the risk tothe rear-facing child is so great,if the airbag deploys.
Page 99 of 419

Chevrolet Colorado Owner Manual (GMNA-Localizing-U.S./Canada/Mexico-10122675) - 2017 - crc - 8/22/16
98 Seats and Restraints
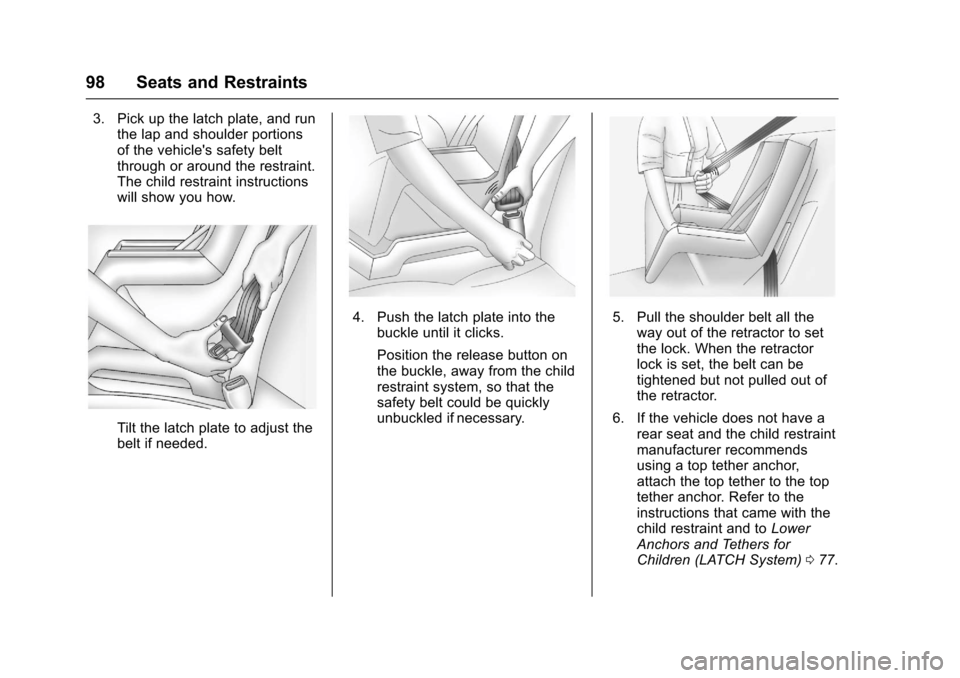
3. Pick up the latch plate, and runthe lap and shoulder portionsof the vehicle's safety beltthrough or around the restraint.The child restraint instructionswill show you how.
Tilt the latch plate to adjust thebelt if needed.
4. Push the latch plate into thebuckle until it clicks.
Position the release button onthe buckle, away from the childrestraint system, so that thesafety belt could be quicklyunbuckled if necessary.
5. Pull the shoulder belt all theway out of the retractor to setthe lock. When the retractorlock is set, the belt can betightened but not pulled out ofthe retractor.
6. If the vehicle does not have arear seat and the child restraintmanufacturer recommendsusing a top tether anchor,attach the top tether to the toptether anchor. Refer to theinstructions that came with thechild restraint and toLowerAnchors and Tethers forChildren (LATCH System)077.
Page 100 of 419

Chevrolet Colorado Owner Manual (GMNA-Localizing-U.S./Canada/Mexico-10122675) - 2017 - crc - 8/22/16
Seats and Restraints 99
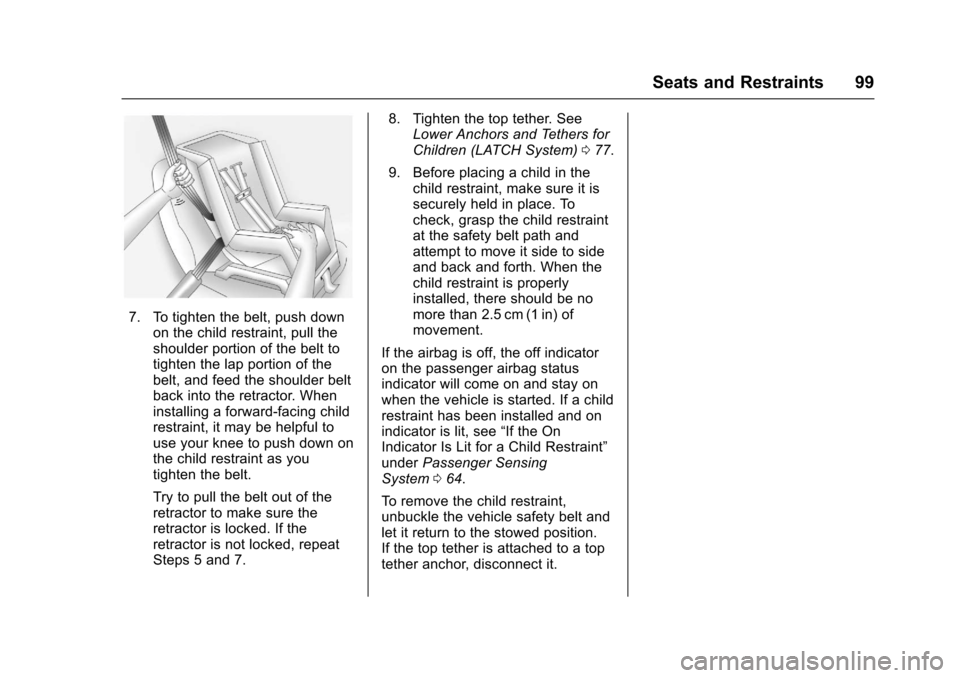
7. To tighten the belt, push downon the child restraint, pull theshoulder portion of the belt totighten the lap portion of thebelt, and feed the shoulder beltback into the retractor. Wheninstalling a forward-facing childrestraint, it may be helpful touse your knee to push down onthe child restraint as youtighten the belt.
Try to pull the belt out of theretractor to make sure theretractor is locked. If theretractor is not locked, repeatSteps 5 and 7.
8. Tighten the top tether. SeeLower Anchors and Tethers forChildren (LATCH System)077.
9. Before placing a child in thechild restraint, make sure it issecurely held in place. Tocheck, grasp the child restraintat the safety belt path andattempt to move it side to sideand back and forth. When thechild restraint is properlyinstalled, there should be nomore than 2.5 cm (1 in) ofmovement.
If the airbag is off, the off indicatoron the passenger airbag statusindicator will come on and stay onwhen the vehicle is started. If a childrestraint has been installed and onindicator is lit, see“If the OnIndicator Is Lit for a Child Restraint”underPassenger SensingSystem064.
To r e m o v e t h e c h i l d r e s t r a i n t ,unbuckle the vehicle safety belt andlet it return to the stowed position.If the top tether is attached to a toptether anchor, disconnect it.
Page 103 of 419

Chevrolet Colorado Owner Manual (GMNA-Localizing-U.S./Canada/Mexico-10122675) - 2017 - crc - 8/22/16
102 Instruments and Controls
Instruments and
Controls
Controls
Steering Wheel Adjustment . . . 103Steering Wheel Controls . . . . . . 104Horn . . . . . . . . . . . . . . . . . . . . . . . . . . 104Windshield Wiper/Washer . . . . 104Compass . . . . . . . . . . . . . . . . . . . . . 105Clock . . . . . . . . . . . . . . . . . . . . . . . . . 106Power Outlets . . . . . . . . . . . . . . . . 107Wireless Charging . . . . . . . . . . . . 107
Warning Lights, Gauges, and
Indicators
Warning Lights, Gauges, andIndicators . . . . . . . . . . . . . . . . . . . 109Instrument Cluster (BaseLevel) . . . . . . . . . . . . . . . . . . . . . . . 110Instrument Cluster(Uplevel) . . . . . . . . . . . . . . . . . . . . 112Speedometer . . . . . . . . . . . . . . . . . 114Odometer . . . . . . . . . . . . . . . . . . . . . 114Trip Odometer . . . . . . . . . . . . . . . . 114Ta c h o m e t e r . . . . . . . . . . . . . . . . . . . 11 4Fuel Gauge . . . . . . . . . . . . . . . . . . . 114Engine Coolant TemperatureGauge . . . . . . . . . . . . . . . . . . . . . . 115Safety Belt Reminders . . . . . . . . 116
Airbag Readiness Light . . . . . . . 117Passenger Airbag StatusIndicator . . . . . . . . . . . . . . . . . . . . . 117Charging System Light . . . . . . . 118Malfunction Indicator Lamp(Check Engine Light) . . . . . . . . 118Brake System WarningLight . . . . . . . . . . . . . . . . . . . . . . . . 120Antilock Brake System (ABS)Warning Light . . . . . . . . . . . . . . . 121Up-Shift Light (ManualTransmission) . . . . . . . . . . . . . . . 121To w / H a u l M o d e L i g h t . . . . . . . . . 1 2 1Hill Descent Control Light . . . . 121Lane Departure Warning(LDW) Light . . . . . . . . . . . . . . . . . 122Vehicle Ahead Indicator . . . . . . 122Traction Off Light . . . . . . . . . . . . . 122StabiliTrak®OFF Light . . . . . . . . 122Traction Control System (TCS)/StabiliTrak®Light . . . . . . . . . . . 123Tire Pressure Light . . . . . . . . . . . 123Engine Oil Pressure Light . . . . 124Low Fuel Warning Light (BaseLevel) . . . . . . . . . . . . . . . . . . . . . . . 124Low Fuel Warning Light(Uplevel) . . . . . . . . . . . . . . . . . . . . 124Security Light . . . . . . . . . . . . . . . . . 125High-Beam On Light . . . . . . . . . . 125Front Fog Lamp Light . . . . . . . . . 125Lamps On Reminder . . . . . . . . . 125
Cruise Control Light . . . . . . . . . . 125Door Ajar Light (UplevelCluster) . . . . . . . . . . . . . . . . . . . . . 126
Information Displays
Driver Information Center (DIC)(Base Level) . . . . . . . . . . . . . . . . 126Driver Information Center (DIC)(Uplevel) . . . . . . . . . . . . . . . . . . . . 129
Vehicle Messages
Vehicle Messages . . . . . . . . . . . . 132Battery Voltage and ChargingMessages . . . . . . . . . . . . . . . . . . . 132Brake System Messages . . . . . 133Compass Messages . . . . . . . . . . 133Door Ajar Messages . . . . . . . . . . 133Engine Cooling SystemMessages . . . . . . . . . . . . . . . . . . . 133Engine Oil Messages . . . . . . . . . 134Engine Power Messages . . . . . 134Fuel System Messages . . . . . . . 135Key and Lock Messages . . . . . 135Lamp Messages . . . . . . . . . . . . . . 135Object Detection SystemMessages . . . . . . . . . . . . . . . . . . . 135Ride Control SystemMessages . . . . . . . . . . . . . . . . . . . 136Airbag System Messages . . . . 136Safety Belt Messages . . . . . . . . 136Security Messages . . . . . . . . . . . 137
Page 104 of 419

Chevrolet Colorado Owner Manual (GMNA-Localizing-U.S./Canada/Mexico-10122675) - 2017 - crc - 8/22/16
Instruments and Controls 103
Steering SystemMessages . . . . . . . . . . . . . . . . . . . 137Starting the VehicleMessages . . . . . . . . . . . . . . . . . . . 137Tire Messages . . . . . . . . . . . . . . . . 137Transmission Messages . . . . . . 138Vehicle ReminderMessages . . . . . . . . . . . . . . . . . . . 139Vehicle Speed Messages . . . . . 139
Vehicle Personalization
Vehicle Personalization . . . . . . . 139
Controls
Steering Wheel
Adjustment
To a d j u s t t h e s t e e r i n g w h e e l :
1. Pull the lever down.
2. Move the steering wheel upor down.
3. Pull the lever up to lock thesteering wheel in place.
Tilt and Telescoping SteeringWheel
To a d j u s t t h e t i l t a n d t e l e s c o p i n gsteering wheel, if equipped:
1. Pull the lever down.
2. Move the steering wheel upor down.
3. Pull or push the steering wheelcloser or away from you.
4. Pull the lever up to lock thesteering wheel in place.
Do not adjust the steering wheelwhile driving.
Page 106 of 419

Chevrolet Colorado Owner Manual (GMNA-Localizing-U.S./Canada/Mexico-10122675) - 2017 - crc - 8/22/16
Instruments and Controls 105
LO :Use for slow wipes.
INT :Move the lever up to INT for
intermittent wipes, then turn thex
INT band up for more frequentwipes or down for less frequentwipes.
OFF :Use to turn the wipers off.
1X :For a single wipe, briefly movethe wiper lever down. For severalwipes, hold the wiper lever down.
nL:Pull the windshield wiperlever toward you to spray windshieldwasher fluid and activate the wipers.The wipers will continue until thelever is released or the maximumwash time is reached. When thewindshield wiper lever is released,additional wipes may occurdepending on how long thewindshield washer had been
activated. SeeWasher Fluid0298for information on filling thewindshield washer fluid reservoir.
{Warning
In freezing weather, do not use
the washer until the windshield is
warmed. Otherwise the washer
fluid can form ice on the
windshield, blocking your vision.
Clear snow and ice from the wiperblades and windshield before usingthem. If frozen to the windshield,carefully loosen or thaw them.Damaged blades should bereplaced. SeeWiper BladeReplacement0305.
Heavy snow or ice can overload thewiper motor.
Wiper Parking
If the ignition is turned to OFF whilethe wipers are on LO, HI, or INT,they will immediately stop.
If the windshield wiper lever is thenmoved to OFF before the driverdoor is opened or within 10 minutes,the wipers will restart and move tothe base of the windshield.
If the ignition is turned to OFF whilethe wipers are performing wipes dueto windshield washing, the wiperscontinue to run until they reach thebase of the windshield.
Compass
The vehicle may have a compassdisplay on the Driver InformationCenter (DIC). The compass receivesits heading and other informationfrom the Global PositioningSystem (GPS) antenna,StabiliTrak®,andvehiclespeedinformation.
The compass system is designed tooperate for a certain number ofmiles or degrees of turn beforeneeding a signal from the GPSsatellites. When the compassdisplay shows CAL, drive thevehicle for a short distance in anopen area where it can receive aGPS signal. The compass system
Page 107 of 419

Chevrolet Colorado Owner Manual (GMNA-Localizing-U.S./Canada/Mexico-10122675) - 2017 - crc - 8/22/16
106 Instruments and Controls
will automatically determine when aGPS signal is restored and provideaheadingagain.SeeCompassMessages0133for the messagesthat may be displayed for thecompass.
Clock
Setting the Time and Date with
Faceplate Controls
To s e t t h e t i m e o r d a t e :
1. Select SETTINGS from theHome Page, then select Timeand Date.
2. Select the desired function.
3. Turn the MENU knob toincrease or decrease the value.
4. Press the MENU knob to go tothe next value. After the lastvalue is selected, the systemwill update and return to the
Settings menu. PressoBACK
to go to the last menu andsave the changes.
Auto Set requires an activeconnection to OnStar.
If auto timing is set, the timedisplayed on the clock may notupdate immediately when drivinginto a new time zone.
To s e t t h e c l o c k d i s p l a y :
1. Select SETTINGS from theHome Page, then select Timeand Date.
2. Select Clock Display.
3. Turn the MENU knob to Offor On.
4. Press the MENU knob toselect.
PressoBACK to go to the last
menu and save the changes.
Setting the Time and Date with
Touchscreen Controls
To s e t t h e t i m e :
1. Touch SETTINGS on the HomePage, then touch Timeand Date.
2. Touch Set Time, then touch«
orªto increase or decrease
hours, minutes, and AM or PM.To u c h 1 2–24 Hr for 12 or24 hour clock.
3. TouchSto go back to the
previous menu.
Auto Set requires an activeconnection to OnStar.
If auto timing is set, the timedisplayed on the clock may notupdate immediately when drivinginto a new time zone.
To s e t t h e d a t e :
1. Touch SETTINGS on the HomePage, then touch Timeand Date.
2. Touch Set Date, then touch«
orªto increase or decrease
month, day, or year.
3. TouchSto go back to the
previous menu.