2017 CHEVROLET CITY EXPRESS change time
[x] Cancel search: change timePage 15 of 348

Chevrolet Express Owner Manual (GMNA-Localizing-U.S./Canada/Mexico-
9967827) - 2017 - crc - 9/26/16
14 In Brief
Exterior Lighting
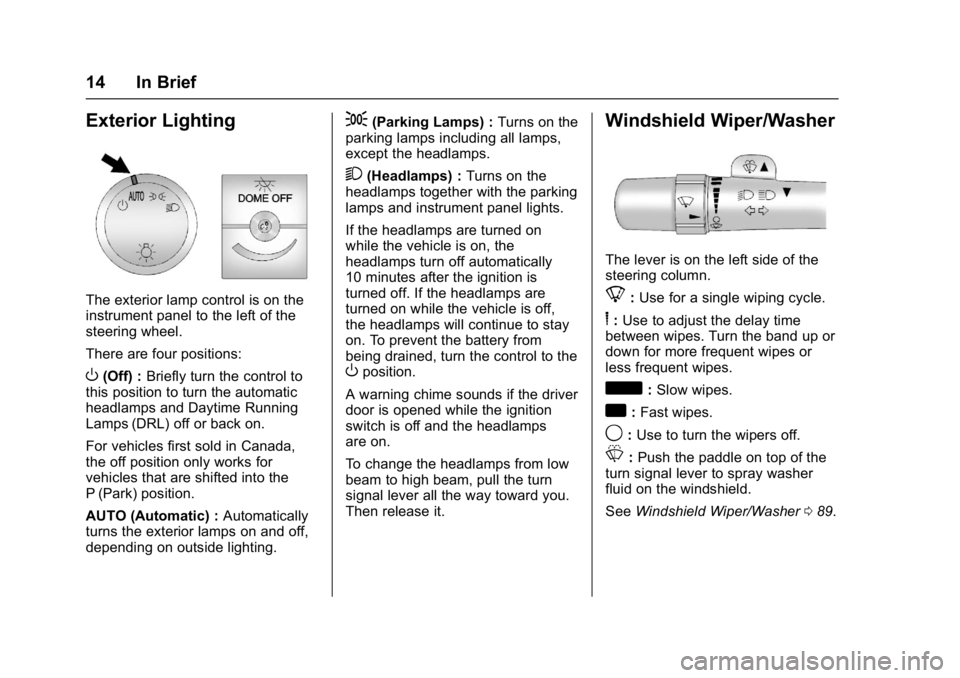
The exterior lamp control is on the
instrument panel to the left of the
steering wheel.
There are four positions:
O(Off) :Briefly turn the control to
this position to turn the automatic
headlamps and Daytime Running
Lamps (DRL) off or back on.
For vehicles first sold in Canada,
the off position only works for
vehicles that are shifted into the
P (Park) position.
AUTO (Automatic) : Automatically
turns the exterior lamps on and off,
depending on outside lighting.
;(Parking Lamps) : Turns on the
parking lamps including all lamps,
except the headlamps.
2(Headlamps) : Turns on the
headlamps together with the parking
lamps and instrument panel lights.
If the headlamps are turned on
while the vehicle is on, the
headlamps turn off automatically
10 minutes after the ignition is
turned off. If the headlamps are
turned on while the vehicle is off,
the headlamps will continue to stay
on. To prevent the battery from
being drained, turn the control to the
Oposition.
A warning chime sounds if the driver
door is opened while the ignition
switch is off and the headlamps
are on.
To change the headlamps from low
beam to high beam, pull the turn
signal lever all the way toward you.
Then release it.
Windshield Wiper/Washer
The lever is on the left side of the
steering column.
8: Use for a single wiping cycle.
6: Use to adjust the delay time
between wipes. Turn the band up or
down for more frequent wipes or
less frequent wipes.
d: Slow wipes.
a:Fast wipes.
9: Use to turn the wipers off.
L:Push the paddle on top of the
turn signal lever to spray washer
fluid on the windshield.
See Windshield Wiper/Washer 089.
Page 19 of 348

Chevrolet Express Owner Manual (GMNA-Localizing-U.S./Canada/Mexico-
9967827) - 2017 - crc - 9/26/16
18 In Brief
A choice of additional information
such as Channel, Song, Artist, and
CAT (category) can display.
Continue pressing to highlight the
desired tab, or press the softkey
located under any one of the tabs
and the information about that tab
displays.
For more information about these
and other radio features, see
Infotainment0132.
Storing a Favorite Station
Depending on which radio the
vehicle has, radio stations are
stored as either favorites or presets.
For vehicles with a FAV button, a
maximum of 36 stations can be
stored as favorites using the six
softkeys below the radio station
frequency tabs and by using the
radio FAV button. Press FAV to go
through up to six pages of favorites,
each having six favorite stations
available per page. Each page of
favorites can contain any
combination of AM and FM stations. For more information on storing a
favorite station, see
Operation
0 136.
Setting the Clock
To set the time and date for the
Radio with CD/MP3:
1. Press
Hand the HR, MIN, MM,
DD, and YYYY (hour, minute,
month, day, and year) display.
2. Press the softkey under any one of the tabs to be changed.
3. Press
©SEEK or¨SEEK,s
REV or\FWD, or turnf
clockwise or counterclockwise
to increase or decrease the
time or date.
For detailed instructions on setting
the clock for your specific audio
system, see Clock092.
Satellite Radio
SiriusXM®is a satellite radio service
based in the 48 contiguous United
States and 10 Canadian provinces.
SiriusXM satellite radio has a wide variety of programming and
commercial-free music, coast to
coast, and in digital-quality sound.
A fee is required to receive the
SiriusXM service.
For more information, refer to:
.
www.siriusxm.com or call
1-888-601-6296 (U.S.)
. www.siriusxm.ca or call
1-877-438-9677 (Canada)
See Satellite Radio 0139.
Portable Audio Devices
This vehicle may have an auxiliary
input on the radio faceplate and a
USB port on the instrument panel.
External devices such as an iPod
®,
laptop computer, MP3 player,
or USB storage device can be
connected to the auxiliary port using
a 3.5 mm (1/8 in) input cable or the
USB port depending on the audio
system.
See "Using the Auxiliary Input Jack"
and "Using the USB Port" in
Auxiliary Devices 0146.
Page 23 of 348

Chevrolet Express Owner Manual (GMNA-Localizing-U.S./Canada/Mexico-
9967827) - 2017 - crc - 9/26/16
22 In Brief
Fuel (Diesel)
For diesel vehicles, do not use
gasoline. See“Fuel for Diesel
Engines” in the Duramax diesel
supplement.
E85 or FlexFuel
FlexFuel Possible
Certain models are compatible with
E85 fuel. See E85 or FlexFuel
0 199.
Engine Oil Life System
The engine oil life system calculates
engine oil life based on vehicle use
and displays a DIC message when
it is necessary to change the engine
oil and filter. The oil life system
should be reset to 100% only
following an oil change. Resetting the Oil Life System
1. Turn the ignition to ON/RUN, with the engine off.
2. Fully press and release the accelerator pedal slowly three
times within five seconds.
3. Turn the key to LOCK/OFF.
See Engine Oil Life System 0221.
Driving for Better Fuel
Economy
Driving habits can affect fuel
mileage. Here are some driving tips
to get the best fuel economy
possible.
.
Avoid fast starts and accelerate
smoothly.
. Brake gradually and avoid
abrupt stops.
. Avoid idling the engine for long
periods of time.
. When road and weather
conditions are appropriate, use
cruise control. .
Always follow posted speed
limits or drive more slowly when
conditions require.
. Keep vehicle tires properly
inflated.
. Combine several trips into a
single trip.
. Replace the vehicle's tires with
the same TPC Spec number
molded into the tire's sidewall
near the size.
. Follow recommended scheduled
maintenance.
Roadside Assistance
Program
U.S.: 1-800-243-8872
TTY Users (U.S. Only):
1-888-889-2438
Canada: 1-800-268-6800
New Chevrolet owners are
automatically enrolled in the
Roadside Assistance Program.
See Roadside Assistance Program
0 317.
Page 69 of 348

Chevrolet Express Owner Manual (GMNA-Localizing-U.S./Canada/Mexico-
9967827) - 2017 - crc - 9/26/16
68 Seats and Restraints
Warning (Continued)
That could cause serious or fatal
injuries. The shoulder belt should
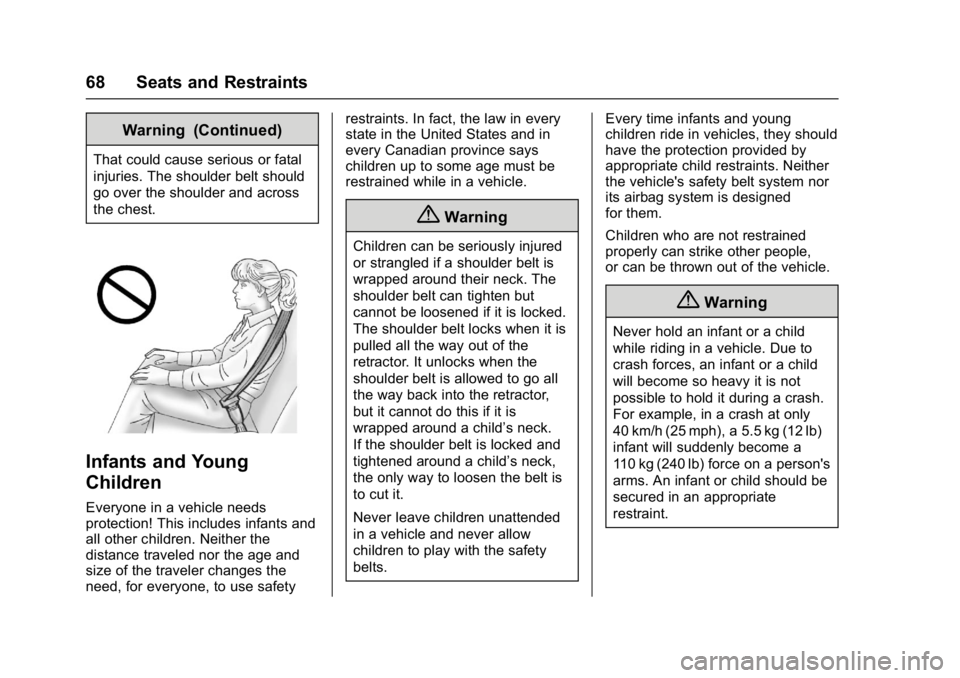
go over the shoulder and across
the chest.
Infants and Young
Children
Everyone in a vehicle needs
protection! This includes infants and
all other children. Neither the
distance traveled nor the age and
size of the traveler changes the
need, for everyone, to use safetyrestraints. In fact, the law in every
state in the United States and in
every Canadian province says
children up to some age must be
restrained while in a vehicle.
{Warning
Children can be seriously injured
or strangled if a shoulder belt is
wrapped around their neck. The
shoulder belt can tighten but
cannot be loosened if it is locked.
The shoulder belt locks when it is
pulled all the way out of the
retractor. It unlocks when the
shoulder belt is allowed to go all
the way back into the retractor,
but it cannot do this if it is
wrapped around a child’s neck.
If the shoulder belt is locked and
tightened around a child’s neck,
the only way to loosen the belt is
to cut it.
Never leave children unattended
in a vehicle and never allow
children to play with the safety
belts.
Every time infants and young
children ride in vehicles, they should
have the protection provided by
appropriate child restraints. Neither
the vehicle's safety belt system nor
its airbag system is designed
for them.
Children who are not restrained
properly can strike other people,
or can be thrown out of the vehicle.
{Warning
Never hold an infant or a child
while riding in a vehicle. Due to
crash forces, an infant or a child
will become so heavy it is not
possible to hold it during a crash.
For example, in a crash at only
40 km/h (25 mph), a 5.5 kg (12 lb)
infant will suddenly become a
110 kg (240 lb) force on a person's
arms. An infant or child should be
secured in an appropriate
restraint.
Page 91 of 348

Chevrolet Express Owner Manual (GMNA-Localizing-U.S./Canada/Mexico-
9967827) - 2017 - crc - 9/26/16
90 Instruments and Controls
6:Use to adjust the delay time
between wipes. Turn the band up
for more frequent wipes or down for
less frequent wipes.
d: Slow wipes.
a:Fast wipes.
9: Use to turn the wipers off.
When driving during the day and the
wipers are activated, the head
lamps automatically turn on after
completing eight wipe cycles.
Clear ice and snow from the wiper
blades before using them. If frozen
to the windshield, carefully loosen or
thaw them. Damaged blades should
be replaced.
Windshield Washer
The windshield wiper paddle is on
top of the turn signal lever.
L: Push the paddle to spray
washer fluid on the windshield. The
wipers will clear the window and
then either stop or return to the
preset speed.
{Warning
In freezing weather, do not use
the washer until the windshield is
warmed. Otherwise the washer
fluid can form ice on the
windshield, blocking your vision.
Compass
This vehicle may have a compass in
the Driver Information Center (DIC).
Compass Zone
Your dealer will set the correct zone
for your location.
Under certain circumstances, such
as during a long distance
cross-country trip or moving to a
new state or province, it will be
necessary to compensate for
compass variance by resetting the
zone through the DIC if the zone is
not set correctly.
Compass variance is the difference
between the earth's magnetic north
and true geographic north. If the
compass is not set to the zone
where you live, the compass may give false readings. The compass
must be set to the variance zone in
which the vehicle is traveling.
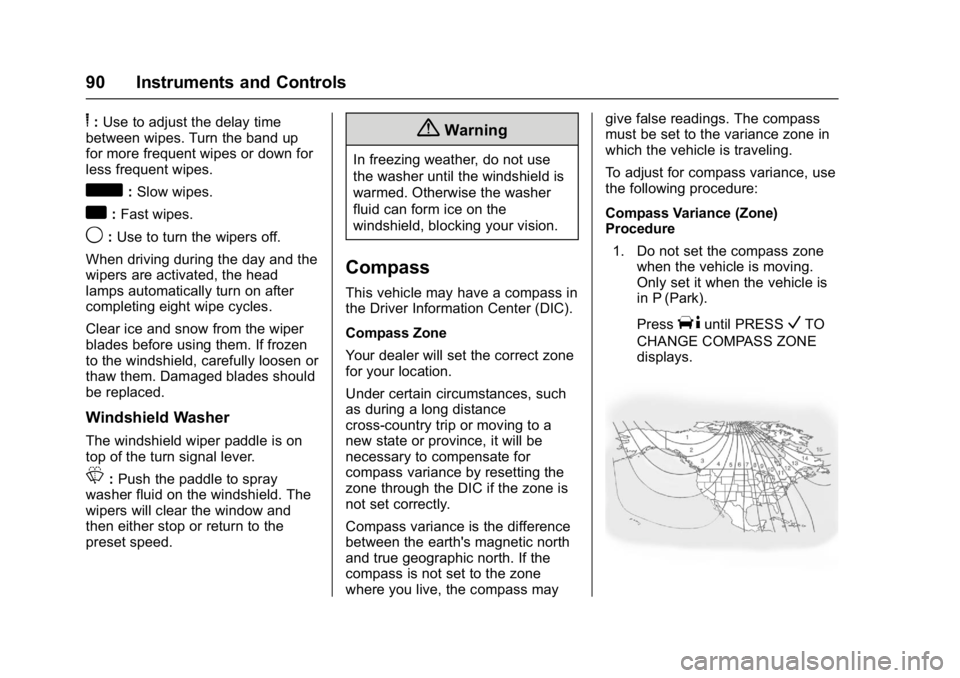
To adjust for compass variance, use
the following procedure:
Compass Variance (Zone)
Procedure
1. Do not set the compass zone when the vehicle is moving.
Only set it when the vehicle is
in P (Park).
Press
Tuntil PRESSVTO
CHANGE COMPASS ZONE
displays.
Page 93 of 348

Chevrolet Express Owner Manual (GMNA-Localizing-U.S./Canada/Mexico-
9967827) - 2017 - crc - 9/26/16
92 Instruments and Controls
Clock
The clock can be set with either the
radio turned on or off.
AM-FM Radio
To set the time:1. Press
Huntil the hour begins
flashing on the display. Press
this button a second time and
the minutes begin flashing on
display.
Press
Ha third time and the
12HR or 24HR time format
begins flashing.
2. While either the hour or the minutes are flashing, turn the
f
knob, on the upper right side of
the radio, clockwise or
counterclockwise to increase or
decrease the time. While the
12HR or 24HR time format is
flashing, turn the
fknob
clockwise or counterclockwise
to select the default time
settings. 3. Press
Hagain until the clock
display stops flashing to set the
currently displayed time;
otherwise, the flashing stops
after five seconds and the
current time displayed is
automatically set.
Radio with CD/MP3
To set the time and date:
1. Press
Hand the HR, MIN, MM,
DD, and YYYY (hour, minute,
month, day, and year) display.
2. Press the softkey under any one of the tabs to be changed.
Every time the softkey is
pressed again, the time or the
date if selected, increases
by one.
Another way to increase the
time or date is to press
¨
SEEK or\FWD (forward).
3. To decrease, press
©SEEK or
sREV. Turn thefknob, on
the upper right side of the
radio, to adjust the selected
setting. Changing the Time and Date
Default Settings
To change the time or date default
settings:
1. Press
Hand then the softkey
under the forward arrow that is
currently displayed on the radio
screen until the time 12H
(hour) and 24H (hour), and the
date MM/DD (month and day)
and DD/MM (day and month)
are displayed.
2. Press the softkey under the desired option.
3. Press
Hagain to apply the
selected default, or let the
screen time out.
Power Outlets
Power Outlets 12 Volt Direct
Current
The accessory power outlets can be
used to plug in electrical equipment,
such as a cell phone or an MP3
player.
Page 110 of 348

Chevrolet Express Owner Manual (GMNA-Localizing-U.S./Canada/Mexico-
9967827) - 2017 - crc - 9/26/16
Instruments and Controls 109
Trip/Fuel Menu Items
3:Press this button to scroll
through the following menu items:
Odometer
Press
3until XX km (mi)
displays. This display shows the
distance the vehicle has been
driven in either kilometers (km) or
miles (mi).
Trip Odometers
Press
3until A or B displays.
This display shows the current
distance traveled in either
kilometers (km) or miles (mi) since
the last reset for each trip odometer.
Both trip odometers can be used at
the same time.
Each trip odometer can be reset to
zero separately by pressing
Vwhile
the desired trip odometer is
displayed.
The trip odometer has a feature
called the retro-active reset. This
can be used to set the trip odometer
to the number of kilometers (miles)
driven since the ignition was last turned on. This can be used if the
trip odometer is not reset at the
beginning of the trip.
To use the retro-active reset feature,
press and hold
Vfor at least
four seconds. The trip odometer will
display the number of
kilometers (km) or miles (mi) driven
since the ignition was last turned on
and the vehicle was moving. Once
the vehicle begins moving, the trip
odometer will accumulate mileage.
For example, if the vehicle was
driven 8 km (5 miles) before it is
started again, and then the
retro-active reset feature is
activated, the display will show 8 km
(5 miles). As the vehicle begins
moving, the display will then
increase to 8.1 km (5.1 miles),
8.2 km (5.2 miles), etc.
If the retro-active reset feature is
activated after the vehicle is started,
but before it begins moving, the
display will show the number of
kilometers (km) or miles (mi) that
were driven during the last ignition
cycle. Fuel Range
Press
3until FUEL RANGE
displays. This display shows the
approximate number of remaining
kilometers (km) or miles (mi) the
vehicle can be driven without
refueling. The display will show
LOW if the fuel level is low.
The fuel range estimate is based on
an average of the fuel economy
over recent driving history and the
amount of fuel remaining in the fuel
tank. This estimate will change if
driving conditions change. For
example, if driving in traffic and
making frequent stops, this display
may read one number, but if the
vehicle is driven on a freeway, the
number may change even though
the same amount of fuel is in the
fuel tank. This is because different
driving conditions produce different
fuel economies. Generally, freeway
driving produces better fuel
economy than city driving.
If the vehicle is low on fuel, the
FUEL LEVEL LOW message will be
displayed. See Fuel System
Messages 0115.
Page 111 of 348

Chevrolet Express Owner Manual (GMNA-Localizing-U.S./Canada/Mexico-
9967827) - 2017 - crc - 9/26/16
110 Instruments and Controls
Average Economy
Press
3until AVG ECONOMY
displays. This display shows the
approximate average liters per
100 kilometers (L/100 km) or miles
per gallon (mpg). This number is
calculated based on the number of
L/100 km (mpg) recorded since the
last time this menu item was reset.
To reset AVG ECONOMY, press and
hold
V. The display will return
to zero.
Fuel Used
Press
3until FUEL USED
displays. This display shows the
number of liters (L) or gallons (gal)
of fuel used since the last reset of
this menu item. To reset the fuel
used information, press and hold
V
while FUEL USED is displayed.
Timer
Press
3until TIMER displays.
This display can be used as a timer.
To start the timer, press
Vwhile
TIMER is displayed. The display will
show the amount of time that has passed since the timer was last
reset, not including time the ignition
is off. Time will continue to be
counted as long as the ignition is
on, even if another display is being
shown on the DIC. The timer will
record up to 99 hours, 59 minutes
and 59 seconds (99:59:59) after
which the display will return to zero.
To stop the timer, press
Vbriefly
while TIMER is displayed.
To reset the timer to zero, press and
hold
Vwhile TIMER is displayed.
Average Speed
Press
3until AVERAGE SPEED
displays. This display shows the
average speed of the vehicle in
kilometers per hour (km/h) or miles
per hour (mph). This average is
calculated based on the various
vehicle speeds recorded since the
last reset of this value. To reset the
value, press and hold
V. The
display will return to zero. Digital Tachometer
Press
3until
Tachometer ##00 RPM displays.
This display shows the engine
speed in revolutions per
minute (RPM).
Blank Display
This display shows no information.
Vehicle Information Menu
Items
T: Press this button to scroll
through the following menu items:
Oil Life
Press
Tuntil OIL LIFE
REMAINING displays. This display
shows an estimate of the oil's
remaining useful life. If you see
99% OIL LIFE REMAINING on the
display, that means 99% of the
current oil life remains. The engine
oil life system will alert you to
change the oil on a schedule
consistent with your driving
conditions.