2017 CHEVROLET CITY EXPRESS change time
[x] Cancel search: change timePage 137 of 348
Chevrolet Express Owner Manual (GMNA-Localizing-U.S./Canada/Mexico-
9967827) - 2017 - crc - 9/26/16
136 Infotainment System
10. CD/AUX.Press to scroll through
selecting the CD or an
auxiliary device.
11.
\FWD
. Press and hold to fast
forward through a track.
12.
sREV
. Press and hold to go
backward fast through a
track.
13.
P
. Press to turn the
infotainment system on
or off.
. Turn to adjust the volume.
14.
¨SEEK
. Seeks or scans to the next
station.
15.
©SEEK
. Seeks or scans to the
previous station. 16. BAND
.Press to scroll through the
available bands FM1, FM2,
AM, or SXM if equipped.
17.
H
. Press to set the clock
and date.
Operation
Using the Radio
O:Press to turn the system on
and off.
Turn clockwise or counterclockwise
to increase or decrease the volume.
4: Press to switch the display
between the radio station frequency
and the time. While the ignition is
off, press this button to display the
time. Press to display additional text
information related to the current
FM-RDS station or MP3 song.
A choice of additional information
such as Channel, Song, Artist, and
CAT (category) can display.
Continue pressing to highlight the desired tab, or press the softkey
under any one of the tabs and the
information about that tab displays.
Speed Compensated Volume
(SCV) :
SCV automatically adjust
the radio volume to compensate for
road and wind noise as the vehicle
speed changes while driving, so that
the volume level stays consistent.
To activate SCV:
1. Set the radio volume to the desired level.
2. Press the MENU button to display the radio setup menu.
3. Press the softkey under the AUTO VOLUM (automatic
volume) tab on the radio
display.
4. Press the softkey under the desired SCV setting (OFF, Low,
Med, or High) to select the
level of radio volume
compensation. The display
times out after approximately
10 seconds. Each higher
setting allows for more radio
volume compensation at faster
vehicle speeds.
Page 146 of 348
Chevrolet Express Owner Manual (GMNA-Localizing-U.S./Canada/Mexico-
9967827) - 2017 - crc - 9/26/16
Infotainment System 145
©SEEK :Press to go to the start of
the track, if more than 10 seconds
have played. Press and hold or
press multiple times to continue
moving backward through tracks.
¨SEEK : Press to go to the next
track. Press and hold or press
multiple times to continue moving
forward through tracks.
sREV : Press and hold to reverse
playback quickly. Sound is heard at
a reduced volume and the elapsed
time of the file displays. Release
s
REV to resume playing.
\FWD : Press and hold to
advance playback quickly. Sound is
heard at a reduced volume and the
elapsed time of the file displays.
Release
\FWD to resume
playing. The elapsed time of the file
displays.
S c:Press the softkey below theS ctab to go to the first track in
the previous folder.
c T:Press the softkey below thec Ttab to go to the first track in
the next folder. RDM :
For Radios with CD/MP3.
Press to listen to tracks in random,
rather than sequential order.
To use random:
1. Press the softkey under the RDM tab until Random Current
Disc displays.
2. Press the softkey again to turn off random play.
h:Press the softkey below thehtab to play the files in order by
artist or album.
The player scans the disc to sort the
files by artist and album ID3 tag
information. It can take several
minutes to scan the disc depending
on the number of files on the disc.
The radio may begin playing while it
is scanning in the background.
When the scan is finished, the disc
begins playing files in order by
artist. The current artist playing is
shown on the second line of the
display. Once all songs by that artist
are played, the player moves to the
next artist in alphabetical order and
begins playing files by that artist. To listen to files by another artist,
press the softkey below either arrow
tab. The disc goes to the next or
previous artist in alphabetical order.
Continue pressing either softkey
below the arrow tab until the desired
artist displays.
To change from playback by artist to
playback by album:
1. Press the softkey below the Sort By tab.
2. Press one of the softkeys below the Album tab from the
sort screen.
3. Press the softkey below the Back tab to return to the main
music navigator screen.
The album name displays on the
second line between the arrows,
and songs from the current album
begin to play. Once all songs from
that album have played, the player
moves to the next album in
alphabetical order on the CD and
begins playing MP3s from that
album.
Page 153 of 348
Chevrolet Express Owner Manual (GMNA-Localizing-U.S./Canada/Mexico-
9967827) - 2017 - crc - 9/26/16
152 Infotainment System
can be used while the key is in the
ON/RUN or ACC/ACCESSORY
position. The range of the Bluetooth
system can be up to 9.1 m (30 ft).
Not all phones support all functions,
and not all phones work with the
in-vehicle Bluetooth system. See
www.gm.com/bluetooth for more
information on compatible phones in
U.S. and Canada only.
Voice Recognition
The Bluetooth system uses voice
recognition to interpret voice
commands to dial phone numbers
and name tags.
For additional information, say
“Help”while you are in a voice
recognition menu.
Noise : Keep interior noise levels to
a minimum. The system may not
recognize voice commands if there
is too much background noise.
When to Speak : A short tone
sounds after the system responds
indicating when it is waiting for a
voice command. Wait until the tone
and then speak. How to Speak :
Speak clearly in a
calm and natural voice.
Audio System
When using the in-vehicle Bluetooth
system, sound comes through the
vehicle's front audio system
speakers and overrides the audio
system. Use the audio system
volume knob, during a call, to
change the volume level. The
adjusted volume level remains in
memory for later calls. To prevent
missed calls, a minimum volume
level is used if the volume is turned
down too low.
Bluetooth Controls
Use the buttons on the steering
wheel to operate the in-vehicle
Bluetooth system. See Steering
Wheel Controls 088.
b/g:Press to answer incoming
calls, confirm system information,
and start speech recognition.
c/x: Press to end a call, reject
a call, or cancel an operation.
Pairing
A Bluetooth-enabled cell phone
must be paired to the Bluetooth
system and then connected to the
vehicle before it can be used. See
the cell phone manufacturer's user
guide for Bluetooth functions before
pairing the cell phone. If a Bluetooth
phone is not connected, calls will be
made using OnStar Hands-Free
Calling, if equipped. See OnStar,
if equipped.
Pairing Information
. A Bluetooth phone with MP3
capability cannot be paired to
the vehicle as a phone and an
MP3 player at the same time.
. Up to five cell phones can be
paired to the Bluetooth system.
. The pairing process is disabled
when the vehicle is moving.
. Pairing only needs to be
completed once, unless the
pairing information on the cell
phone changes or the cell phone
is deleted from the system.
Page 155 of 348
Chevrolet Express Owner Manual (GMNA-Localizing-U.S./Canada/Mexico-
9967827) - 2017 - crc - 9/26/16
154 Infotainment System
3. Say“Change phone.”
. If another cell phone is
found, the response will be
“
connected.”
. If another cell phone is not
found, the original phone
remains connected.
Storing and Deleting Phone
Numbers
The system can store up to 30
phone numbers as name tags in the
Hands-Free Directory that is shared
between the Bluetooth and OnStar
systems, if equipped.
The following commands are used
to delete and store phone numbers.
Store : This command will store a
phone number, or a group of
numbers as a name tag.
Digit Store : This command allows
a phone number to be stored as a
name tag by entering the digits one
at a time.
Delete : This command is used to
delete individual name tags. Delete All Name Tags :
This
command deletes all stored name
tags in the Hands-Free Calling
Directory and the OnStar
Turn-by-Turn Destinations Directory,
if equipped.
Using the “Store”Command
1. Press and hold
b/gfor
two seconds.
2. Say “Store.”
3. Say the phone number or group of numbers you want to
store all at once with no
pauses, then follow the
directions given by the system
to save a name tag for this
number.
Using the “Digit Store” Command
If an unwanted number is
recognized by the system, say
“Clear” at any time to clear the last
number.
To hear all of the numbers
recognized by the system, say
“Verify” at any time. 1. Press and hold
b/gfor
two seconds.
2. Say “Digit Store.”
3. Say each digit, one at a time, that you want to store. After
each digit is entered, the
system repeats back the digit it
heard followed by a tone. After
the last digit has been entered,
say “Store,” and then follow the
directions given by the system
to save a name tag for this
number.
Using the “Delete”Command
1. Press and hold
b/gfor
two seconds.
2. Say “Delete.”
3. Say the name tag you want to delete.
Using the “Delete All Name Tags”
Command
This command deletes all stored
name tags in the Hands-Free
Calling Directory and the OnStar
Turn-by-Turn Destinations Directory,
if equipped.
Page 156 of 348
Chevrolet Express Owner Manual (GMNA-Localizing-U.S./Canada/Mexico-
9967827) - 2017 - crc - 9/26/16
Infotainment System 155
To delete all name tags:1. Press and hold
b/gfor
two seconds.
2. Say “Delete all name tags.”
Listing Stored Numbers
The list command will list all stored
numbers and name tags.
Using the “List”Command
1. Press and hold
b/gfor
two seconds.
2. Say “Directory.”
3. Say “Hands-Free Calling.”
4. Say “List.”
Making a Call
Calls can be made using the
following commands.
Dial or Call : The dial or call
command can be used
interchangeably to dial a phone
number or a stored name tag.
Digit Dial : This command allows a
phone number to be dialed by
entering the digits one at a time. Re-dial :
This command is used to
dial the last number used on the cell
phone.
Using the “Dial”or“Call”
Command
1. Press and hold
b/gfor
two seconds.
2. Say “Dial”or“Call.”
3. Say the entire number without pausing, or say the name tag.
Once connected, the person called
will be heard through the audio
speakers.
Calling Emergency
1. Press and hold
b/gfor
two seconds. The system
responds “Ready,”followed by
a tone.
2. Say “Dial”or“Call.”
3. Say [emergency number].
4. Say “Dial”or“Call.”
Once connected, the person called
will be heard through the audio
speakers. Using the
“Digit Dial” Command
The digit dial command allows a
phone number to be dialed by
entering the digits one at a time.
After each digit is entered, the
system repeats back the digit it
heard followed by a tone.
If an unwanted number is
recognized by the system, say
“Clear” at any time to clear the last
number.
To hear all of the numbers
recognized by the system, say
“Verify” at any time.
1. Press and hold
b/gfor
two seconds.
2. Say “Digit Dial.”
3. Say each digit, one at a time, that you want to dial. After
each digit is entered, the
system repeats back the digit it
heard followed by a tone. After
the last digit has been entered,
say “Dial.”
Once connected, the person called
will be heard through the audio
speakers.
Page 178 of 348
Chevrolet Express Owner Manual (GMNA-Localizing-U.S./Canada/Mexico-
9967827) - 2017 - crc - 9/26/16
Driving and Operating 177
A warning tone will sound when the
driver door is opened, the ignition is
in ACC/ACCESSORY or LOCK/OFF
and the key is in the ignition.
Starting the Engine
If the vehicle has a diesel engine,
see the Duramax diesel
supplement.
To place the transmission in the
proper gear:
Move the shift lever to P (Park) or
N (Neutral). The engine will not start
in any other position. To restart the
engine when the vehicle is already
moving, use N (Neutral) only.
Caution
If you add electrical parts or
accessories, you could change
the way the engine operates. Any
resulting damage would not be
covered by the vehicle warranty.
SeeAdd-On Electrical Equipment
0 212.
Caution
Do not try to shift to P (Park) if the
vehicle is moving. If you do, you
could damage the transmission.
Shift to P (Park) only when the
vehicle is stopped.
Caution
If the steering wheel is turned
until it reaches the end of its
travel, and is held in that position
while starting the vehicle, damage
may occur to the hydraulic power
steering system and there may be
loss of power steering assist.
Starting Procedure 1. With your foot off the accelerator pedal, turn the
ignition key to START. When
the engine starts, let go of the
key. The idle speed will go
down as your engine gets
warm. Do not race the engine
immediately after starting it. Operate the engine and
transmission gently to allow the
oil to warm up and lubricate all
moving parts.
When the Low Fuel warning
lamp is on and the FUEL
LEVEL LOW message is
displayed in the Driver
Information Center (DIC), the
Computer-Controlled Cranking
System is disabled to prevent
possible vehicle component
damage. When this happens,
hold the ignition switch in the
START position to continue
engine cranking.
Caution
Cranking the engine for long
periods of time, by returning the
ignition to the START position
immediately after cranking has
ended, can overheat and damage
the cranking motor, and drain the
battery. Wait at least 15 seconds
between each try, to let the
cranking motor cool down.
Page 189 of 348
Chevrolet Express Owner Manual (GMNA-Localizing-U.S./Canada/Mexico-
9967827) - 2017 - crc - 9/26/16
188 Driving and Operating
Tow/Haul Mode Grade Braking
Tow/Haul Mode Grade Braking is
only enabled while the Tow/Haul
Mode is selected and the vehicle is
not in the Range Selection Mode.
See“Tow/Haul Mode” listed
previously and Manual Mode0186.
Tow/Haul Mode Grade Braking
assists in maintaining desired
vehicle speeds when driving on
downhill grades by using the engine
and transmission to slow the
vehicle.
To disable or enable Tow/Haul Mode
Grade Braking within the current
ignition key cycle, press and hold
the Tow/Haul button for
three seconds. A DIC message will
be displayed. See Transmission
Messages 0118.
See Towing Equipment 0210.
For other forms of grade braking,
see Automatic Transmission 0183
and Cruise Control 0192.
Brakes
Antilock Brake
System (ABS)
This vehicle has an Antilock Brake
System (ABS), an advanced
electronic braking system that helps
prevent a braking skid.
When the vehicle begins to drive
away, ABS checks itself.
A momentary motor or clicking noise
may be heard while this test is going
on, and it may even be noticed that
the brake pedal moves a little. This
is normal.
If there is a problem with ABS, this
warning light stays on. See Antilock
Brake System (ABS) Warning Light
0 104. If driving safely on a wet road and it
becomes necessary to slam on the
brakes and continue braking to
avoid a sudden obstacle, a
computer senses the wheels are
slowing down. If one of the wheels
is about to stop rolling, the computer
will separately work the brakes at
each wheel.
ABS can change the brake pressure
to each wheel, as required, faster
than any driver could. This can help
you steer around the obstacle while
braking hard.
As the brakes are applied, the
computer keeps receiving updates
on wheel speed and controls
braking pressure accordingly.
Remember: ABS does not change
the time needed to get a foot up to
the brake pedal or always decrease
stopping distance. If you get too
close to the vehicle in front of you,
there will not be enough time to
apply the brakes if that vehicle
suddenly slows or stops. Always
leave enough room up ahead to
stop, even with ABS.
Page 197 of 348
Chevrolet Express Owner Manual (GMNA-Localizing-U.S./Canada/Mexico-
9967827) - 2017 - crc - 9/26/16
196 Driving and Operating
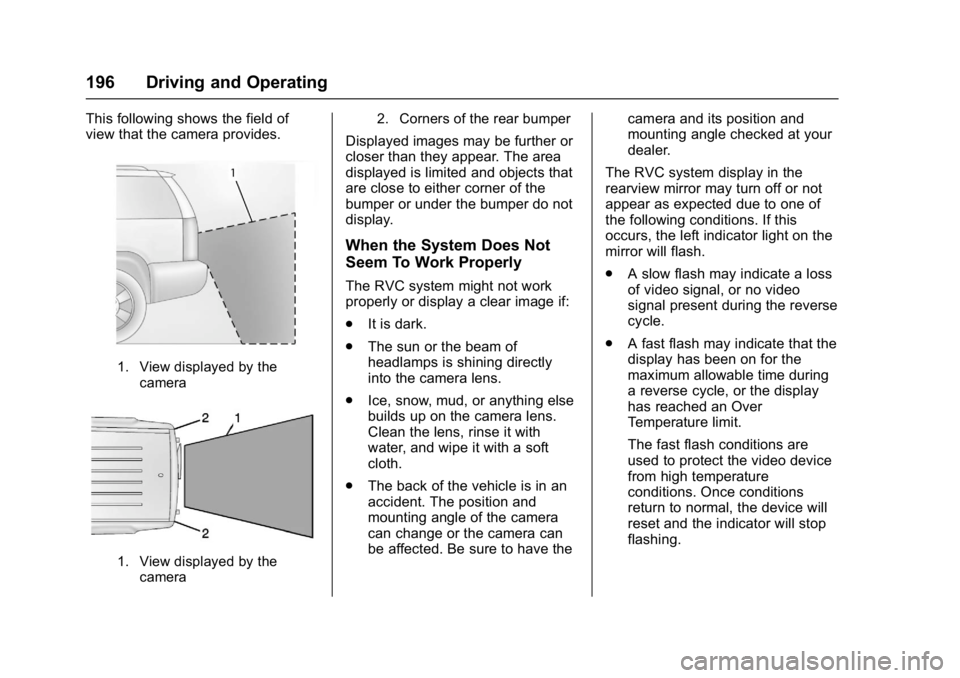
This following shows the field of
view that the camera provides.
1. View displayed by thecamera
1. View displayed by thecamera 2. Corners of the rear bumper
Displayed images may be further or
closer than they appear. The area
displayed is limited and objects that
are close to either corner of the
bumper or under the bumper do not
display.
When the System Does Not
Seem To Work Properly
The RVC system might not work
properly or display a clear image if:
.
It is dark.
. The sun or the beam of
headlamps is shining directly
into the camera lens.
. Ice, snow, mud, or anything else
builds up on the camera lens.
Clean the lens, rinse it with
water, and wipe it with a soft
cloth.
. The back of the vehicle is in an
accident. The position and
mounting angle of the camera
can change or the camera can
be affected. Be sure to have the camera and its position and
mounting angle checked at your
dealer.
The RVC system display in the
rearview mirror may turn off or not
appear as expected due to one of
the following conditions. If this
occurs, the left indicator light on the
mirror will flash.
. A slow flash may indicate a loss
of video signal, or no video
signal present during the reverse
cycle.
. A fast flash may indicate that the
display has been on for the
maximum allowable time during
a reverse cycle, or the display
has reached an Over
Temperature limit.
The fast flash conditions are
used to protect the video device
from high temperature
conditions. Once conditions
return to normal, the device will
reset and the indicator will stop
flashing.