2017 AUDI TT ROADSTER homelink
[x] Cancel search: homelinkPage 33 of 314

CD
CD
.... N
" N ,-I 0 r--. V, co
@ Tips
-You can still open and close the windows for
approximately 10 minutes after turn ing the
ignition off. The power windows do not
switch off until the driver's door or front passenger's door has been opened.
- When opening the doors and when open
i ng/closing the power top, the windows au
tomatically lower approximately 10 mm.
Convenience opening/closing
All windows can be opened and closed at the
same time.
Convenience opening feature
• Press the Im button on the remote control key
until all windows reach the desired position.
Convenience closing feature
• Press the {D button on the remote control key
u nti l all windows are closed¢
A or
Convenience closing with the convenience
key*
• Touch the sensor* on the door handle long
enough until all windows and the power top*
are closed . Do not place your hand in the door
hand le when doing this.
Setting convenience opening in the
Infotainment system
• Select in the Infotainment system: !MENUI but
ton
> Vehicle> left control button >Vehicle set
tings .
To enable the convenience window opening func
tion, the
Long press to open windows function
must be switched
on.
.&_ WARNING
- Never close the windows or power top* care lessly or in an uncontrolled manner, be
cause this increases the risk of injury.
- For security reasons, the windows and the
power top* can only be opened and closed
with the remote control key at a maximum
distance of approximately 6 ft (2 m) away
Open ing and closing
from the vehicle . Always pay attention when
pressing the
Im button to close the w indows
and the power top* so that no one is
pinched. The closing process w ill stop im
mediately when the
Im button is released .
Correcting power window malfunctions
You can reactivate the one-touch up/down func
tion if it malfunctions.
• Pull the power window switch up until the win
dow is completely raised.
• Release the switch and pull it up aga in for at
least one second .
Garage door opener
(Homelink)
Description
Applies to : veh icles w ith garage door o pen er (Home link)
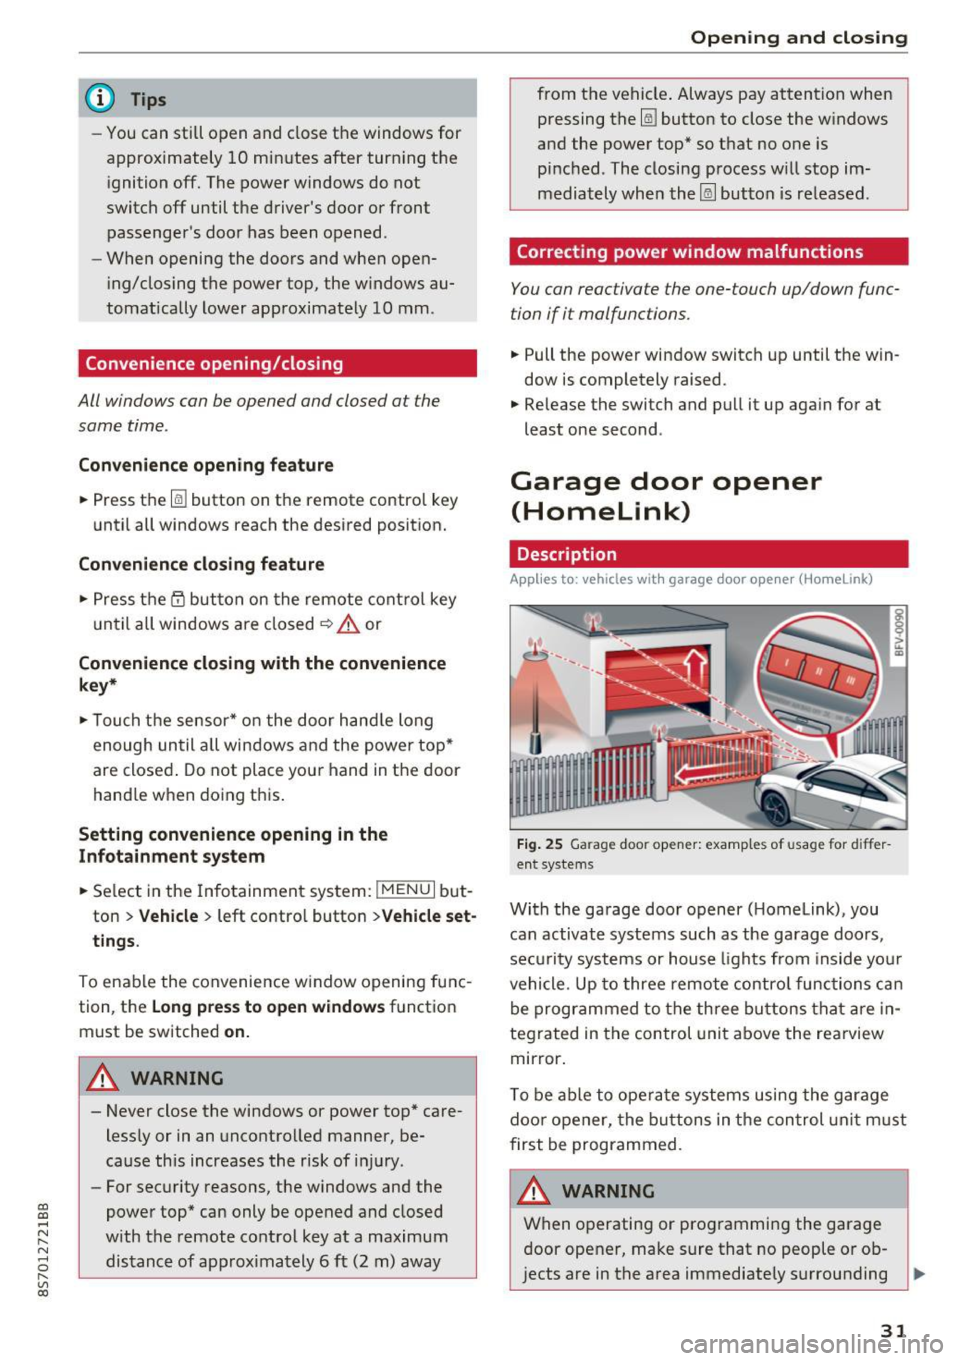
Fig. 25 Garage door opener: examples of usage for differ
ent systems
With the garage door opener ( Homelink), you
can activate systems such as the garage doors,
security systems or house lights from inside your
vehicle. Up to three remote control functions can
be programmed to the three buttons that are in
tegrated in the control unit above the rearview
mirror.
T o be able to operate systems using the garage
door opener, the buttons in the control unit must
first be programmed.
A WARNING ~
When operating or programming the garage
door opener, make sure that no people or ob
jects are in the area immediately surrounding ..,.
31
Page 34 of 314

Opening and closing
the equipment. Peop le can be injured or prop
erty can be damaged if struck when closing.
(D Tips
- For secu rity reasons, we recommend that
you clear the programmed buttons before
selling the vehicle.
- For additional information about Homelink,
v is it
www .homelink .com.
- For the Declaration of Conformity with the
provisions from the FCC in the United States
and Industry Canada, see¢
page 296 .
Operation
Applies to: ve hicles w ith garage doo r opener (Homeli nk)
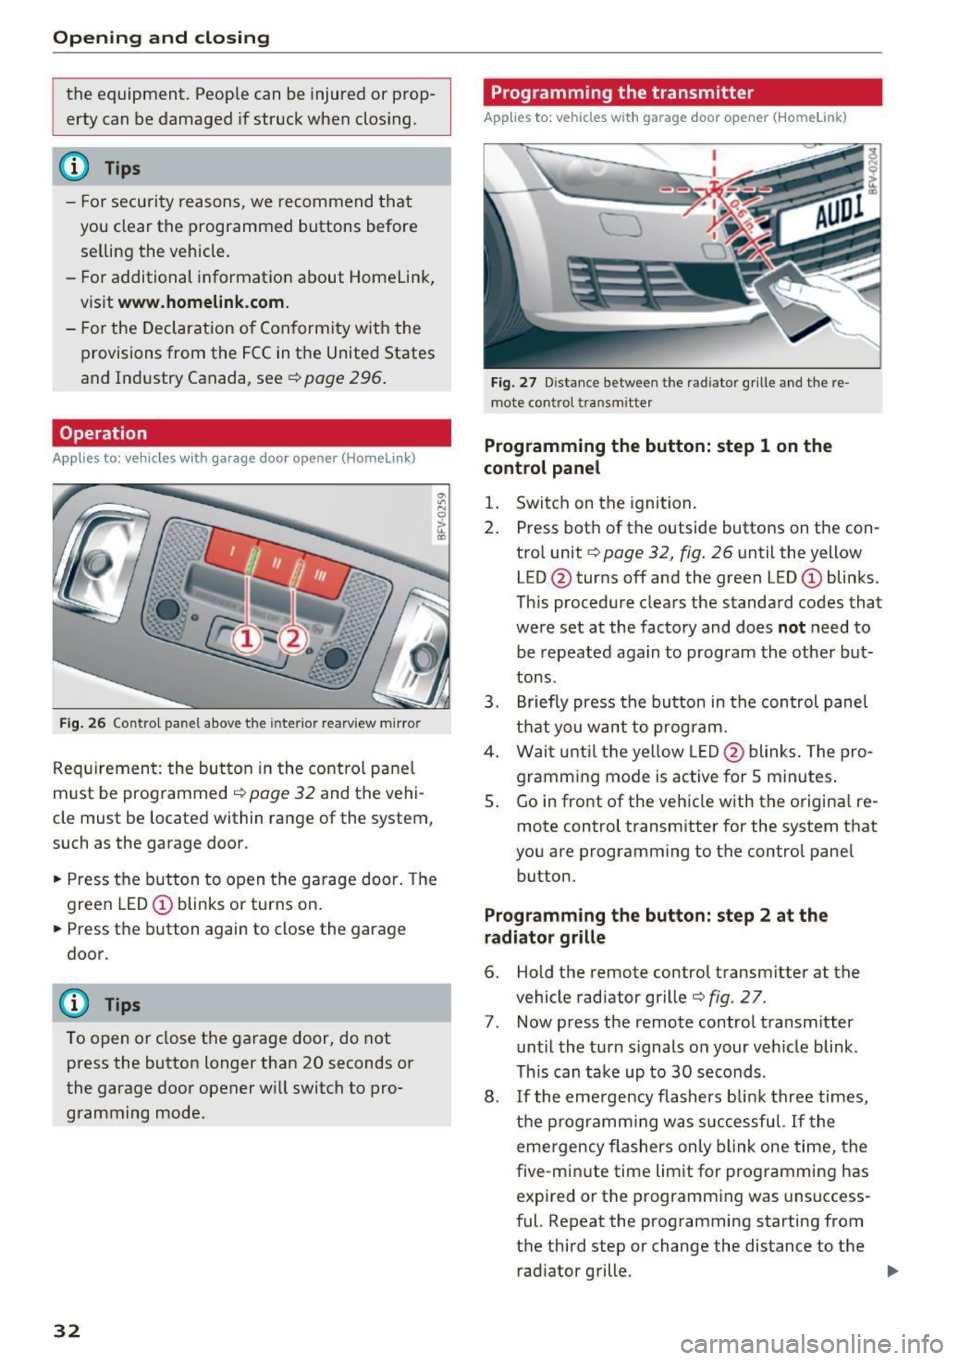
Fig. 26 Contro l pa nel above the inter io r rearview mirror
Requirement: the but ton in the control panel
m ust be programmed
i:!> page 32 and the vehi
cle must be located within range of the system,
such as the garage door .
.. Press the button to open the garage door. The
green LED
CD blinks or turns on.
.. Press the button again to close the garage
door.
(D} Tips
To open or close the garage door, do not
press the button longer than 20 seconds or
the garage door opener w ill switch to pro
gramming mode.
32
Programming the transmitter
App lies to : vehicles wit h garage door o pener (Horne link)
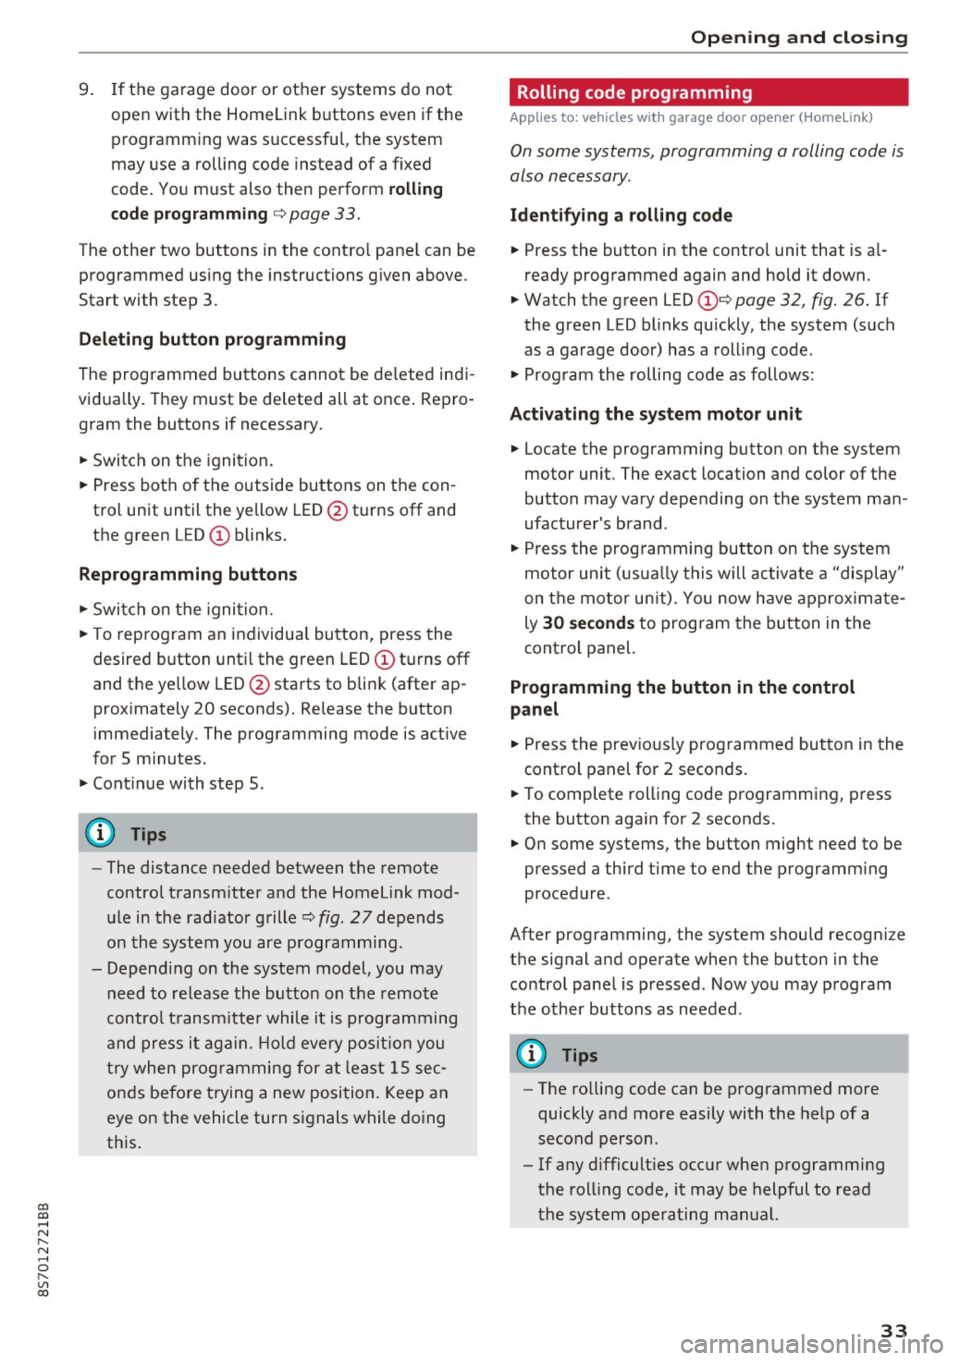
Fig. 27 D istance between the rad iator g rille and the re
mote contro l transm itter
Programming the button: step 1 on the
control panel
1. Switch on the ignition.
2. Press both of the outside buttons on the con
trol unit ¢
page 32, fig. 26 until the yellow
LED @turns off and the green LED
CD blinks.
This procedure clears the standard codes that
were set at the factory and does
not need to
be repeated again to program the other but
tons.
3. Briefly press the button in the control panel
that you want to program.
4. Wait until the yellow LED@blinks. The pro
gramming mode is active for S minutes.
5. Go in front of the vehicle w ith the origina l re
mote control transmitter for the system that
you are programming to the control panel button .
Programming the button: step 2 at the
radiator grille
6. Hold the remote control transmitter at the
vehicle radiator grille¢
fig. 27.
7 . Now press the remote control transm itter
until the turn signals on your veh icle blink .
This can take up to 30 seconds .
8. If the eme rgency flashers blink three times,
the programming was successful. If the
emergency flashers only blink one time, the
five -min ute time limit for programming has
expired or the programming was unsuccess
ful. Repeat the programming starting from
the third step or change the distance to the radiator grille.
Page 35 of 314

co
co
.... N
" N .... 0
" "' c:o
9. If the garage door or other systems do not
open with the Home link buttons even if the programm ing was successfu l, the system
may use a rolling code instead of a fixed
code. You must also then perform
ro lling
c o de progr amm ing
c:> page 33 .
The other two buttons in the contro l pane l can be
programmed using the instructions given above.
Star t wi th step 3 .
Dele ting button prog ramm ing
The programmed buttons cannot be de leted indi
vidually. They must be deleted all at once . Repro
gram the buttons if necessary.
"' Switch on the ignition.
.. Press both of the outside buttons on the con
trol unit until the yellow LED @turns off and
the green LED@ blinks.
Reprogramming button s
"'Switch on the ignition.
"'T o reprogram an individua l button, press the
desired b utton until the green LED(!) turns off
and the ye llow LED @star ts to blink (after ap
proximately 20 seconds). Release the button
immediately. The programming mode is active
for S m inutes.
"' Cont inue with step 5 .
@ Tips
-The distance needed between the remote
control transm itter and the Homelink mod
ule in the rad iator grille c:>
fig. 27 depends
on the system you are programm ing .
- Depending on the system model, you may need to release the button on the remote
control t ransm itter while it is programming
and press it again. Hold every posit ion you
try when programming for at least 15 sec
onds befo re trying a new posi tion. Keep an
eye on the vehicle turn signals while doing
this .
Op ening and cl osing
Rolling code programming
Applies to: vehicles with garage door opener (Home link)
On some systems, programming a rolling code is
also necessary.
Id enti fying a rolling c ode
"' Press the button in the control unit that is a l
ready programmed again and hold it down.
"' Watch the green LED (!)c:>
page 32 , fig. 26. If
the green L ED bl inks quickly, the system (such
as a garage door) has a roll ing code .
"' Program the rolling code as follows:
Acti vating the sys tem moto r unit
.. Locate the programming button on the system
motor unit. The exact location and color of the
button may vary depending on the system man
ufacturer 's brand .
"' Press the programming button on the system
motor unit (usua lly this will activa te a "display "
on the motor un it) . You now have approx ima te
ly
30 se cond s to prog ram the button in the
control panel.
Programming the button in the control
pan el
.. Press the previous ly programmed button in the
control panel for 2 seconds .
.. To complet e rolling code programming, press
the button again for 2 seconds.
.. On some systems, the button might need to be
pressed a third time to end the programm ing
procedure .
After programming, the system should recogni ze
the signal and operate when the button in the
control panel is pressed . Now you may program
the other buttons as needed .
(D Tips
-The ro lling code can be programmed more
quickly and more easily with the help of a
second person .
- If any d ifficult ies occur when programm ing
the roll ing code, it may be helpful to read
the system operating manual.
33
Page 298 of 314

Consumer inf orm ation
Attempting to work on electronic components
and the software used with them can cause mal
functions. Because of the way e lectronic compo
nents are interconnected with each other, such
malfunct ions can also have an adverse affect on
other systems that are not directly involved. This
means that you risk both a substantial reduction
in the operationa l safety of your veh icle and an
i n creased wea r of ve hicle parts~ ,&..
Author ized Audi dealers w ill perform this work in
a profess io nal and competent manner or, in spe
cial cases, refer you to a p rofessional company
that spec ial izes in such modifications.
_8. WARNING
Improper repairs and modifica tions can
change the way vehicle system s work and
cause damage to the vehicle and serious per
sonal injury.
(J} Note
I f emergency repa irs mus t be pe rformed else
where, have the vehicle examined by an a u
thorized A udi dealer as soon as possib le .
Declaration of Compliance, Telecommuni
cation and Electronic Systems
Radio Frequency Devices and Radiocommunica
tion Equipment User Manual Notice.
The manufacturer is not responsible for any radio
or TV interference caused by unauthorized modi
fications to this eq uipment .
Devices
The fo llow ing devices each comp ly w ith FCC Part
15 .19, FCC 15.2 1 an d RSS -Gen Issue 1:
- Audi s ide ass ist*
- Cell phone package*
- Convenience key*
- Electronic immobilizer
- Ga rage door opener (Homelink)*
- Remo te contro l key
296
FCC Part 15.19
This device complies wi th part 15 o f the FCC
Rules . Operation is subject to the fo llowing two
condit ions:
(1) This dev ice may not c ause ha rmf ul interfer
ence, and
(2) this dev ice must accept any inte rference re
ce ived, in cl ud ing interfe rence that may cause un
desire d ope ra tion.
FCC Part 15.21
CAUTION :
Changes or modifications not express ly approved
by the party responsible for compliance could
vo id the user's a uthority to operate the equ ip
ment .
RSS-Gen Is sue 1
Operat ion is s ubject to the following two cond i
tions:
(1) this dev ice may not cause inte rfe rence, and
(2) this dev ice must accept any inte rference, in
clud ing in te rfe rence that may cause undesi red
ope ration o f the dev ice.
Page 304 of 314

Index
Fueling Fuel filler door emergency release . . . . . . 234
Fuel gauge . . . . . . . . . . . . . . . . . . . . . . . . . . . 8
Fuel tank capacity . . . . . . . . . . . . . . . . . . . 291
Opening the fuel filler door . . . . . . . . . . . . 233
With reserve canister (emergency fueling) 234
Fuses Assignment . . . . . . . . . . . . . . . . . . . . . . . . 282
Replacing . . . . . . . . . . . . . . . . . . . . . . . . . . 281
G
Garage door opener (Home link) . . . . . . . . . . 31
Garment hooks . . . . . . . . . . . . . . . . . . . . . . . . 49
Gasoline . . . . . . . . . . . . . . . . . . . . . . . . . . . . 231
Octane rating . . . . . . . . . . . . . . . . . . . . . . . 231
Recommendation ................ ... . 231
Generator (indicator light) . . . . . . . . . . . . . . . 13
Global commands (voice recognition
system) . . . . . . . . . . . . . . . . . . . . . . . . . . . . . 109
Glossary of tire and loading terminology . . 248
Glove compartment . . . . . . . . . . . . . . . . . . . . 49
Gross Vehicle Weight Rat ing (GVWR) . . . . . 290
H
Handsfree . . . . . . . . . . . . . . . . . . . . . . . . . . . 114
Headlight range control system . . . . . . . . . . 39
Headlight range control system (indicator
light) . . . . . . . . . . . . . . . . . . . . . . . . . . . . . . . . 16
Headlights . . . . . . . . . . . . . . . . . . . . . . . . . . . 40
Cleaning . . . . . . . . . . . . . . . . . . . . . . . . . . . 267
H eadlight range control system . . . . . . . . . 39
Washer system . . . . . . . . . . . . . . . . . . . . . . 43
Heated exterior mirrors . . . . . . . . . . . . . . . . . . . . . . 42
Rear window . . . . . . . . . . . . . . . . . . . . . . . . . 54
Seats . . . . . . . . . . . . . . . . . . . . . . . . . . . . . . . 54
Washer nozzles . . . . . . . . . . . . . . . . . . . . . . 43
Heating and ventilation system
Adjusting a ir vents . . . . . . . . . . . . . . . . . . . . 54
Hex socket . . . . . . . . . . . . . . . . . . . . . . . . . . . 272
High voltage warn ing label . . . . . . . . . . . . . 290
Hill descent control . . . . . . . . . . . . . . . . . . . . 68
Hill hold assist . . . . . . . . . . . . . . . . . . . . . . . . 63
also refer to Hill hold assist . . . . . . . . . . . . 63
Hold assist (hill) . . . . . . . . . . . . . . . . . . . . . . . 63
302
Home address . . . . . . . . . . . . . . . . . . . . 138, 142
Homelink (garage door opener) . . . . . . . . . . 31
Horn . . . . . . . . . . . . . . . . . . . . . . . . . . . . . . . . . 6
How many airbags does my vehicle have? . . 203
How safety belt pretensioners work . . . . . . 194
I
Ignition (indicator light) . . . . . . . . . . . . . . . . 13
Imbalance (wheels) . . . . . . . . . . . . . . . . . . . 254
Immobilizer . . . . . . . . . . . . . . . . . . . . . . . . . . 24
Important things to do before driving . . . . 181
Importing and exporting (contacts) . . . . . . 123
Improperly worn safety belts . . . . . . . . . . . 194
Indicator lights . . . . . . . . . . . . . . . . . . . . . . . . . 9
Airbag system . . . . . . . . . . . . . . . . . . . . . . 208
PASSENGER AIR BAG . . . . . . . . . . . . . . . . . 208
Infant seats . . . . . . . . . . . . . . . . . . . . . . . . . 223
Inflation pressure (tires) . . . . . . . . . . . . . . . 256
Input Using the MMI touch . . . . . . . . . . . . . . . 98, 99
Using the speller . . . . . . . . . . . . . . . . . . . . 102
Input level (media) . . . . . . . . . . . . . . . . . . . . 167
Inspection interval . . . . . . . . . . . . . . . . . . . . 245
Installing child safety seats Safety be lts . . . . . . . . . . . . . . . . . . . . . . . . 227
Instrument cluster . . . . . . . . . . . . . . . . . . . . . . 8
Instruments . . . . . . . . . . . . . . . . . . . . . . . . . . . 8
Adjusting the lighting . . . . . . . . . . . . . . . . . 42
Interior lighting . . . . . . . . . . . . . . . . . . . . . . . 41
Intermittent (windshield w ipers) . . . . . . . . . 43
Internet
refer to Audi connect . . . . . . . . . . . . . . . . . 12 7
Internet radio . . . . . . . . . . . . . . . . . . . . . . . . 161
iPod
refer to Aud i m usic interface . . . . . . . . . . . 162
iTunes tagging . . . . . . . . . . . . . . . . . . . . . . . 151
J
Joystick function (MMI)
101
Jukebox . . . . . . . . . . . . . . . . . . . . . . . . . . . . . 158
Jump -starting . . . . . . . . . . . . . . . . . . . . . . . . 284
Jumper cables . . . . . . . . . . . . . . . . . . . . . . . . 285