2017 AUDI TT ROADSTER wheel
[x] Cancel search: wheelPage 263 of 314
co
co
.... N
" N .... 0
" "' c:o
tread pattern), summer tires provide less trac
tion on ice and snow.
.,. Use w inter tires on a ll fo ur wheels.
.,. Only use win ter tires that are approved for your
vehicle.
... Please note that the maximum permitted
speed may be lower with winter tires ¢,& .An
authori zed Aud i dealer or authori zed Aud i Serv
ice F acility can inform you about the maximum
permitted speed for your tires .
... Check the tire pressure after installing wheels
¢ page 256 .
The effectiveness of winter tires is reduced great
ly when the tread is worn down to a depth of
0 .1 57 in (4 mm) . The character istics of winter
tires a lso decrease great ly as t he tire ages, re
ga rdless of the remaining tread .
_& WARNING
-Never dr ive faste r than the maxim um per
mitted speed for your t ires. This cou ld cause
the tires to heat up too much . Th is increases
the risk of an acc ident because it can cause
the tire to burst.
- Always adapt yo ur dr iv ing to the road and
traff ic conditions. Drive carefully and red uce
your speed on icy or slippery roads. Even
winter tires can lose traction on black ice.
@ For the sake of the environment
Reinstall summer ti res at the approp riate
time, because they provide better handling
when roads are free of snow and ice. Summer
tires cause less road noise, t ire wear and fuel
consumption .
You can also use all season tires instead of
w inter t ires . Please note that in some coun
tries where w inter t ires are required, only
w inter t ires with the
& symbol may be per
m itted.
Snow chains
-
Snow chains no t only imp rove the d riving in w in
ter road conditions, but also the braking.
Wh eel s
... On ly install snow chains on the front wheels.
This applies a lso to vehicles with a ll wheel
drive* .
... Check and correct the seating of the snow
chains after driving a few feet, if necessary. Fol
low the instructions from the manufacturer .
... Note the maximum speed of 30 mph (SO km/
h) . Note the local regulations .
Use of snow cha ins is only permitted with certa in
rim/tire comb inat ions due to technical reasons .
Check with an authorized Audi dealer or author
i zed Audi Se rvice Facility to see if you may use
snow c hains.
You must remove the snow chains on roads with out snow . O therwise, you co uld impair driving
ability a nd damage the t ires .
_& WARNING
Using incor rect snow chains or install ing snow
ch ains incor rec tly c an resu lt in loss of veh icle
control, which increases the risk of an acci
dent .
(D Note
-Snow chains can damage the rims/wheel
cove rs* if the chains come into direct con
tact with them . Remove the wheel covers*
first. Use coated snow chains.
- Us ing snow chains that add more tha n O.S3
in (13,S mm) of height can severe ly damage
the whee l housings and other vehicle com
ponents.
(D Tips
When using snow chains, it may be usefu l to
switch on sport mode ¢
page 89.
Low aspect ratio tires
Your Audi is factory-equ ipped with low aspect ra
tio t ires . These tires have been thoroughly tested
and been selected spec ifically for your model for
the ir superb performance, road feel and handl ing
under a var iety of dr iv ing condit ions. Ask your au-
thorized Audi dea le r fo r more details . .,.
261
Page 264 of 314
Wheels
The low aspect ratio of these tires is i ndicated by
a numeral of
55 or less in the tire's si ze designa
tion. The numera l rep resents the rat io o f the
tire's sidewall he ight in relat ion to its tread width
expressed in percentage . Conventional tires have
a height/w idt h rat io of 60 o r more.
The performance of low -aspect-ratio tire s is par ·
ticularly sensitive to improper inflation pres
sure.
It i s therefore important that low aspect
ratio tires ar e inflat ed to the specifi ed pr essure
and that the inflation pre ssure is regularly
checked and maintained . Tire pre ssure s should
be checked at le ast once a month and always
before a long trip¢
page 256.
What you can do to avoid tire and rim
damage
Low aspect rat io tires can be damaged more easi
ly by impact wi th potholes, cu rbs, g ullies or
ridges on the road, pa rt ic ul arly if the tire is un
derinflated .
I n order to minim ize t he oc currence of impac t
d a mage to the t ires of your ve hicle, we recom
mend that you ob5erve the following precau
tions:
- Always mai nta in recommended inf lation pres
s ur es . Che ck your tire p ress ure every 2,000
miles (3, 000 km) and ad d air if necessary .
- Drive caref ully on roads with potho les, deep
gull ies or r idges . The im pact from d riving
th rough or ove r su ch obs tacles can damage
your tires. Impact with a curb may also cause
damage to your tires.
-A fter any impact, immediately inspect your
ti res or have them inspected by the nearest au
thori zed Audi dea ler. Replace a damaged tire as
soon as possib le.
- Inspect yo ur tires every 2,000 miles (3,000 km)
for damage and wear. Damage is not always easy to see. Damage can lead to loss of air and
underinflation, which cou ld eventually cause
ti re failure . If you believe that a tire may have
been damaged, re place the t ire as soon as pos
s ible.
- T hese tires may wear more qu ick ly than othe rs .
- Please a lso remember t hat, w hile these tires
deliver responsive handling, they may r ide less
262
comforta bly and make more noise than o ther
choices .
Reduced performance in winter/cold season
condition s
All tires are des igned for certain purposes . The
l ow aspect ratio , ultra h igh performance tires
o rigina lly installed on your vehicle are intended
for maximum d ry and wet road perfo rmance and
handling. They a re not suitable for co ld, snowy or
i cy weather conditions . If you drive under those
c ircumstances, you should equip you r vehicle
with all-season o r winter tires, which offer better
t ra ct ion unde r th ose condi tio ns. We suggest yo u
u se the recommen ded snow or a ll-season tires
spe cified for your vehicle, o r th e ir equiv alent.
Refer to¢
pag e 260 for more detailed informa
t ion regard ing winter tires.
Uniform tire quality grading
- Tr ea d wea r
- Tr actio n AA ABC
- T empe ratu re ABC
Quality grades can be found where applicable on
the tire side wall between tread shoulder and
max imum section width
¢ page 246, fig . 188.
For example : Tread wear 200 , Traction AA , Tem
perature
A .
All passenge r ca r tir es must conform to Federal
Safety Req uirements in a ddition to these grades.
Tread wear
The tread wear grade is a compa rative rating
based on the wea r ra te o f the tire w hen tested
u nder con trolled cond itions on a specified gov
ernment test course .
Fo r example, a tire g raded 150 wou ld wea r one
a n d one half (1 1/2) times as well o n the govern
ment cou rse as a t ire graded 100.
The re lative pe rformance of tires depends upon
t h e ac tual cond itions of the ir use, however, and
m ay dep art significan tly from the no rm due to
variations in driv ing habi ts, service pract ices and
diffe rences in road characteristics and climate. ..,.
Page 265 of 314

co
co
.... N
" N .... 0
" "' c:o
Traction
The traction grades, from highest to lowest, are
AA, A, B and
C. Those grades represent the tire's
ability to stop on wet pavement as measured un
der controlled conditions on specified govern
ment test surfaces of asphalt and concrete . A tire
marked C may have poor traction performance
¢ _& .
Temperature
The temperature grades are A (the highest), B ,
and
C, representing the tire's resistance to the
generation of heat and its ability to dissipate
heat when tested under controlled conditions on
a specified indoor laboratory test wheel.
Sustained high temperature can cause the mate rial of the tire to degenerate and reduce tire life,
and excessive temperature can lead to sudden
tire failure
c:> .& .
The grade C corresponds to a level of perform
ance which all passenger car tires must meet un
der the Federal Motor Vehicle Safety Standard No.
109 . Grades Band A represent higher levels
of performance on the laboratory test wheel than
the minimum required by law.
A WARNING
The traction grade assigned to this tire is
based on straight -ahead braking traction
tests, and does not include acceleration, cor
nering, hydroplaning or peak traction charac
teristics.
A WARNING
The temperature grade for this tire is estab
lished for a tire that is properly inflated and
not overloaded . Excessive speed, underinfla
tion, or excessive loading, either separately or
in combination, can cause heat buildup and
possible tire failure.
A WARNING
Temperature grades apply to tires that are properly inflated and not over or underinflat
ed.
Wheels
Tire pressure monitoring system
ill General notes
Each tire, including the spare (if provided),
should be checked monthly when cold and inflat
ed to the inflation pressure recommended by the
vehicle manufacturer on the vehicle placard or
tire inflation pressure label. (If your vehicle has
tires of a different size than the size ind icated on
the vehicle placard or tire inflation pressure la bel, you should determine the proper tire infla
tion pressure for those tires).
As an added safety feature, your vehicle has been equipped with a tire pressure monitoring system
(TPMS) that illuminates a low tire pressure tell
tale when one or more of your tires is significant
ly under-inflated. Accordingly, when the low tire
pressure telltale illuminates, you should stop and
check your tires as soon as possible, and inflate
them to the proper pressure . Driving on a signifi
cantly under-inflated tire causes the tire to over
heat and can lead to tire failure . Under-inflation
also reduces fuel efficiency and tire tread life,
and may affect the vehicle's handling and stop
ping ability .
Please note that the TPMS is not a substitute for
proper tire maintenance, and it is the driver's re
sponsibility to maintain correct tire pressure, even if under-inflation has not reached the level
to trigger illumination of the TPMS low tire pres
sure telltale .
Your vehicle has also been equipped with a TPMS malfunction indicator to indicate when the sys
tem is not operating properly . The TPMS mal
function indicator is combined with the low tire
pressure telltale. When the system detects a
malfunction, the telltale will flash for approxi
mately one minute and then remain continuously
illuminated. This sequence will continue upon
subsequent vehicle start-ups as long as the mal
function exists.
When the malfunction indicator is illuminated,
the system may not be able to detect or signal low tire pressure as intended. TPMS malfunctions
may occur for a variety of reasons, including the .,.
263
Page 266 of 314

Wheels
installation of replacement or alternate tires or
wheels on the vehicle that prevent the TPMS
from functioning properly. Always check the
TPMS malfunction telltale after replacing one or
more tires or wheels on your vehicle to ensure
that the replacement or alternate tires and
wheels allow the TPMS to continue to function
proper ly .
If the Tire Pressure Monitoring System
indicator appears
The tire pressure indicator in the instrument
cluster informs you if the tire pressure is too low
or if there is a system malfunction.
Using the ABS sensors, the tire pressure monitor
ing system compares the tire tread circumfer
ence and vibration characteristics of the individu
al tires. If the pressure changes in one or more
tires, this is indicated in the Infotainment system
disp lay with an indicator light
RR and a message.
If only one tire is affected , the location of that
tire will be indicated.
The tire pressures must be stored in the Infotain
ment system again each time the pressures
change (switching between partial and full load pressure) or after changing or replacing a tire on
your vehicle ¢
page 265 . The tire pressure moni
toring system only monitors the tire pressure you
have stored. Refer to the tire pressure label for
the recommended tire pressure for your vehicle
¢ page 256, fig.191.
Tire tread circumference and vibration character
istics can change and cause a tire pressure warn
ing if:
- the tire pressure in one or more tires is too low.
- the tire has structural damage .
- the tire was replaced or the tire pressure was
changed and it was not stored¢
page 265.
-the spare tire* is installed.
Indicator lights
RR -Loss of pressure in at least one tire ¢ ,& .
Check the tires and replace o r repair if necessary.
Check/correct the p ressures of a ll four tires and
store the pressure again in the Infotainment sys
tem ¢
page 265.
264
mm (T ire Pressure Monitoring System) Tire
pressure: malfunction! See owner's manual -
If
mm appears after switching on the ignit ion or
while driving and then the indicator light
RR in
the instrument cluster also starts to blink for
about one minute and then stays on permanent ly, there is a system malfunction. Try to store the
correct tire pressures¢
page 265. If the indica
tor light does turn off or turns on again after a
short period of time , drive to an authorized A udi
dealer or authorized Audi Service Facility immedi
ate ly to have the ma lfunction corrected.
_& WARNING
-If the tire pressure indicator appears in the
disp lay, reduce your speed immediately and
avoid any hard steering or brak ing maneu
vers. Stop as soon as poss ible and check the
tires and their pressure .
- The driver is responsible for maintain ing the
correct tire pressures . You must check the
tire pressures regularly .
- Under certain cond it ions (such as a sporty
driving style, w inter condit ions or unpaved
roads), the pressure monitor indicator may
be delayed.
- Do not use run-flat tires on your vehicle . Us
ing them when not perm itted can lead to
vehicle damage or accidents.
(D Tips
- The tire pressure monitoring system can al
so stop working when there is an ESC mal
function.
- Us ing snow chains may result in a system
ma lfunction.
- The tires w ith the identification "AO"
¢
page 253 have been matched w ith your
Audi t ire pressure monitoring system. We
recommend that you use these tires.
Page 269 of 314
co
co
.... N
" N .... 0
" "' c:o
wash operator to reduce the risk of accidents.
- To reduce the risk of cuts, protect yourself
from sharp metal components when wash
ing the underbody or the inside of the wheel
housings .
- After washing the vehicle, the brak ing effect
may be delayed due to mo isture on the
brake rotors or ice in the w inter . This in
creases the risk of an acc ident. The brakes
must be d ried fi rst w ith a few careful b rake
applications.
(D Note
- If you wash t he vehicle in an automatic car
wash, yo u m ust retract the extendable rear
spo iler* if necessary, and fold the exter ior
mir rors in to red uce the risk of damage.
Power folding e xte rior m irrors * mus t onl y
be fo lded in and ou t using the power folding
f u nct ion .
- To reduce the risk of pai nt d amage, do no t
wash the vehicle in di rect sunlig ht.
Ca re and cleaning
- To re duce the risk of damage, do not wash
the power top with a pressure washer .
- T o red uce the risk of damage to the surface,
do not use insect removing sponges, kitche n
sponges o r similar items .
- Matte finish painted veh icle components:
- To reduce the risk of damage to the sur-
face, do not use polishing agents or hard
wax.
- Never use protective wax. It can destroy
the matte finish effect .
- Do not place any stickers or magnetic
signs on vehicle parts painted with matte
finish paint . The paint could be damaged
when the stickers or magnets are re
moved.
@ For the sake of the environment
Only wash t he veh icle in facili ties s pec ially de
s igned for that pu rpose . This will reduce the
r isk of dirty wate r contamina ted with o il from
ente ring the sewe r sys tem.
Cleaning and care information
W hen cle aning and ca ring for individua l vehicle
components, refer to the following tables . The
info rmation contained there is simply recom
mendations. Fo r questions or for components t
h at are not l isted, cons ult an autho riz e d Aud i
dealer or au thorized A udi Service Fac ility . Also
fo llow the information found in¢& .
Exterior cleaning
Component Situation Solution
Windshield wiper
Deposits c::- page44
blades
Headlights /
Deposit s So
ft sponge wi th a m il d soap solutiona )
Tail light s
Sensors /
Deposits Sensors: soft cloth with solvent-free cleaning solut ion
Camera lenses Camera lenses: soft cloth w ith alcohol -free cleaning solu -
tion
Snow/ice H
and brus h/solvent-free de-icing spray
Wheels Road salt Water
Brake dust Acid-free special clean ing solution
Exhaust tail pipes Road salt Water, clea ning solution su itab le for stainless stee l, if nee-
essa ry
267
Page 274 of 314

Emerg ency assis ta nce
Emergency assistance
Trunk escape latch
In cas e of an emergency , the r ear lid can be
opened from the inside using the trunk escape
latch.
Fig. 192 Luggage compartment: Trunk escape latc h
• Pu sh the latch in the direction of the arrow un
til the lock releases .
The trunk escape latch inside the rear lid is made
of fluorescent material to g low in the dark.
_& WARNING
The trunk escape latch is to be used only in an
emergency.
General information
• Park the vehicle as far as poss ible from moving
traff ic in the event of a breakdown . In the event
of a flat tire , park the vehicle on a level surface .
It you are on a steep hi ll, be especially careful.
• Set the parking brake.
• Place the selector lever in the P position.
• Switch the emergency flashers on.
• Have the passengers exit the vehicle. They
should move to a safe place, for example be
hind a guard rail.
_& WARNING
Follow the steps given above . This is for your
protection and the for the safety of other driv
ers .
272
Equipment
Vehicle tool kit/tire mobility kit/
compressor
I
n
AUD I }
Fig. 193 Lu ggage compa rtmen t: cargo floor closed
The vehicle tool kit, t ire mobility kit and com
pressor are stored in the luggage compartment
u nder the cargo floo r cover .
• Push on the plastic handle and lift up the cargo
floor .
• Open the cargo floor.
Completely retract the vehicle jack a rm before
stor ing the veh icle jack* .
_& WARNING
Improper use of the veh icle jack can cause se
rious pe rsonal injuries.
- Never use the screw driver hex head to
tighten wheel bolts, since the bo lts cannot
attain the necessa ry tightening torque if yo u
use the hex head, potentially causing an ac
cide nt.
- The factory-supplied jack is intended only
for your vehicle mode l. Under no circum
stances should it be used to lift heavy
vehicles or other loads; you risk injuring
yourse lf.
- Never start the engine when the vehicle is
raised , which cou ld cause an accident .
- Support the vehicle securely with appropri
ate stands if work is to be performed under neath the vehicle; otherwise, there is a po
tential risk for injury.
- Never use the jack supplied with your Aud i
on another vehicle, particularly on a heavier
one. The jack is only su itab le for use on the
vehicle it came with .
Page 277 of 314
CD
CD
.... N
" N .... 0 r--. V, co
-If the t ire is t oo severely damaged, see an
aut horized Aud i dealer or authorized Aud i
Service Facility for assistance .
@ For the sake of the environment
You can give the used tire sealant bottle to an
authorized Audi dealer or authorized A udi
Serv ice Facility for disposal.
@ Tips
Remember to obtain a new bottle of sea lant
from an authorized Audi dea ler or authorized
Aud i Service Facility after repair ing a tire.
Replacing wheels
Preparation
You must complete the preparation before
changing a tire .
.,. Read and follow the important safety precau-
t ions
¢ page 272, General information .
.,. Set the parking b rake .
• Se lect the P selector lever pos ition .
.,. Lay out the vehicle tool kit¢
page 2 72 and the
spare tire¢
page 279 .
A WARNING
If you are cha nging a tire on a steep hill, use a
block or similar object to block the oppos ite
wheel to prevent the vehicle from moving.
A WARNING
You or your passenger co uld be injured while
chang ing a wheel if you do not follow these
safety precautions:
- If you have a flat tire, move a safe distance off the road. Turn off the engine, turn the
emergency flashers on and use other warn
ing devices to alert othe r mo to rists.
- Make sure that passengers wa it in a safe
place away from the vehicle and we ll away
from the road and traffic.
- To help prevent the vehicle from movi ng
sudden ly and possibly slipping off the jack,
always fully set t he parking brake and block
t h e whee l di agona lly o ppos ite the wheel be-
Em ergen cy a ssis tanc e
ing changed. When one front whee l is lifted
off the ground, placing the Automatic
Transmiss ion in P (Park) will
not prevent the
veh icle from moving.
- Before you change a wheel, be sure the
ground is leve l and firm.
If necessary, use a
sturdy board under the jack.
- Always store the vehicle tool kit, the jack
and the replaced tire in the luggage com
pa rtment
¢ page 185.
@ Tips
Obey all laws.
Removing the cover
Fig . 1 97 W hee l: whee l hub cover
F ig . 1 98 W hee l: whee l bolts w ith caps
Whe el hub covers*
.,. Insert the hook (from the vehicle tool kit) into
the ho le on the whee l hub cover ¢
fig. 197.
.,. Remove the wheel h ub cover .
Wheel bolts with caps*
.,. Slide the p lastic clip (from t he veh icle too l ki t)
on to the cap unt il it engages
¢ fig . 198.
• Remove the cap with the p lastic clip .
275
Page 278 of 314
Emergency assistance
Loosening the wheel bolts
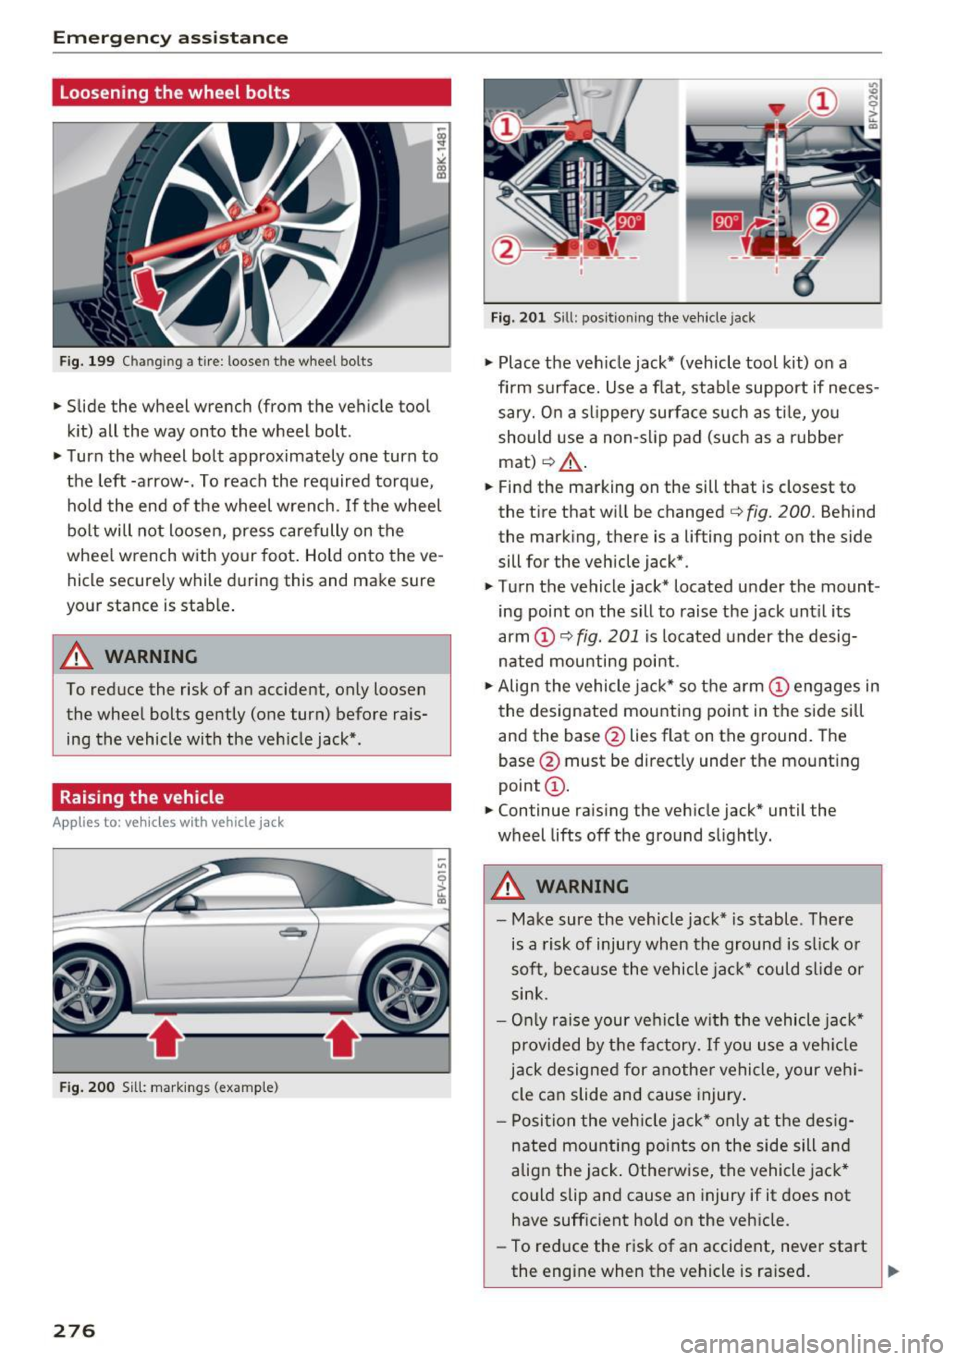
Fig. 199 Changing a tire: loosen the wheel bolts
• Slide the wheel wrench (from the vehicle tool
kit) all the way onto the wheel bolt.
• Turn the wheel bolt approximately one turn to
the left -arrow-. To reach the required torque,
hold the end of the wheel wrench. If the wheel
bolt will not loosen, press carefully on the
whee l wrench with your foot. Hold onto the ve
hicle securely while during this and make sure
your stance is stable .
A WARNING
To reduce the risk of an accident, only loosen
the wheel bolts gently (one turn) before rais
ing the vehicle with the veh icle jack*.
Raising the vehicle
Appl ies to: ve hicles w ith vehicle jack
- ,tr.-----,:
Fig. 200 Sill: markings (examp le)
276
Fig. 201 Sill: positio ning the vehicle jack
• Place the veh icle jack* (vehicle tool kit) on a
firm s urface. Use a flat, stable support if neces
sary. On a slippery surface such as tile, you
should use a non-slip pad (such as a rubber
mat)
c:> & .
• Find the marking on the sill that is closest to
the tire that will be changed
c:> fig. 200. Behind
the marking, there is a lifting point on the side
sill for the vehicle jack*.
• Tu rn the vehicle jack* located u nder the mount
ing point on the sill to raise the jack until its
arm
(D c:> fig. 201 i s located under the desig
nated mou nting point .
• Align the vehicle jack* so the arm @engages in
the designated mounting point in the side sill
and the base @lies flat on the ground. The
base @must be direct ly under the mounting
point @.
• Continue raising the vehicle jack* until the
wheel lifts off the ground slightly.
A WARNING
- Make sure the vehicle jack* is stable. There
is a risk of injury when the ground is slick or
soft, because the vehicle jack* could slide or
sink.
- Only raise your vehicle w ith the vehicle jack*
provided by the factory. If you use a vehicle
jack designed for another vehicle, your vehi
cle can slide and cause injury .
- Pos ition the vehicle jack* only at the desig
nated mounting points on the side sill and
align the jack . Otherwise, the vehicle jack*
co uld slip and cause an injury if it does not
have sufficient hold on the vehicle.
- To reduce the risk of an accident, never start
the engine when the vehicle is raised.