2017 AUDI Q7 radio
[x] Cancel search: radioPage 239 of 402
u (0 ...... N r--. N ...... 0
0
:E
Accessing media
You can start and operate various media
th rough the MMI control panel.
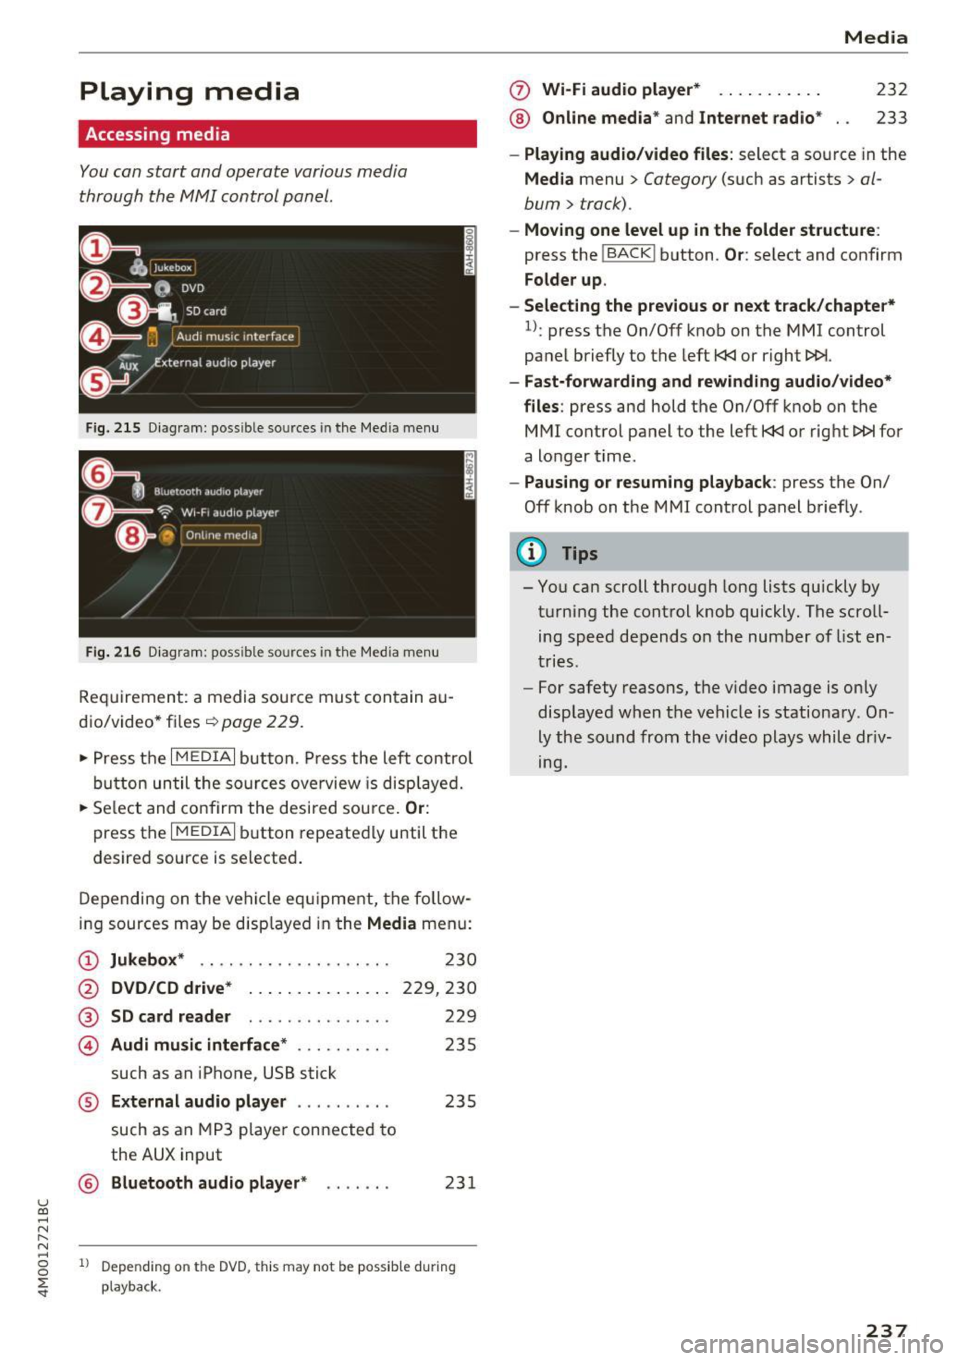
F ig . 2 15 Diag ram: possible sources in the Med ia m enu
Fi g. 216 D iagram : possible sources in the Media me nu
Req uirement: a media sou rce mu st con tain au
dio/video* files ¢
page 229.
~ Press t he I M EDIA i button. Press the left control
bu tton until the so urces ove rview is disp laye d.
~ Se le ct and confirm the desi red sou rce. Or :
press the I MEDIAi button repeated ly until the
desired source is selecte d.
D epen ding on t he veh icle eq uipment, the fo llow
ing sources may be disp layed in the
Media menu:
(D Jukebox * .. ... ... .... .. ... .. .
@ DVD /CD d rive * .. . .... ... .. .. .
®
© SD card reader
Audi mu sic interface * ......... .
such as an iPhone, USB stick 2
30
229,230
229
235
® External audio player . . . . . . . . . . 235
such as an MP3 playe r con nected to
the
AUX input
© B luetooth audio player * . . . . . . . 231
1l Depe ndi ng on the DVD, thi s may not be possib le d urin g
playba ck.
0 Wi-Fi audio player* ... ....... .
® Online med ia * and Internet radio * Media
232
233
-
Play ing audio /video files : select a source in the
Media menu > Category (such as artists > al
bum
> track).
- Moving one level up in the folder structure :
press the !BACKI button . Or: select and confirm
Folder up .
- Selecting the previous or next track /chapte r*
1
l: press the On/Off knob on the MMI control
panel briefly to the left
t
- Fast-forw arding and rewinding audio/video*
files :
press and hold the On/Off knob on the
MMI control pa nel to the left
t
a longer t ime .
-Paus ing or resuming playback : press the On/
Off knob on the MMI cont rol panel brief ly .
(D Tips
- You can scroll through long lists quickly by
turning the control knob quickly . The scroll
ing speed depends o n the numbe r of list en
tries .
- For safety reasons, t he v ideo image is on ly
displaye d when the vehicle is stationary. On
ly the so und from th e video plays whil e dr iv
ing.
237
Page 240 of 402
Media
Media center
Various categories for selecting audio/video*
files ore available in the media center .
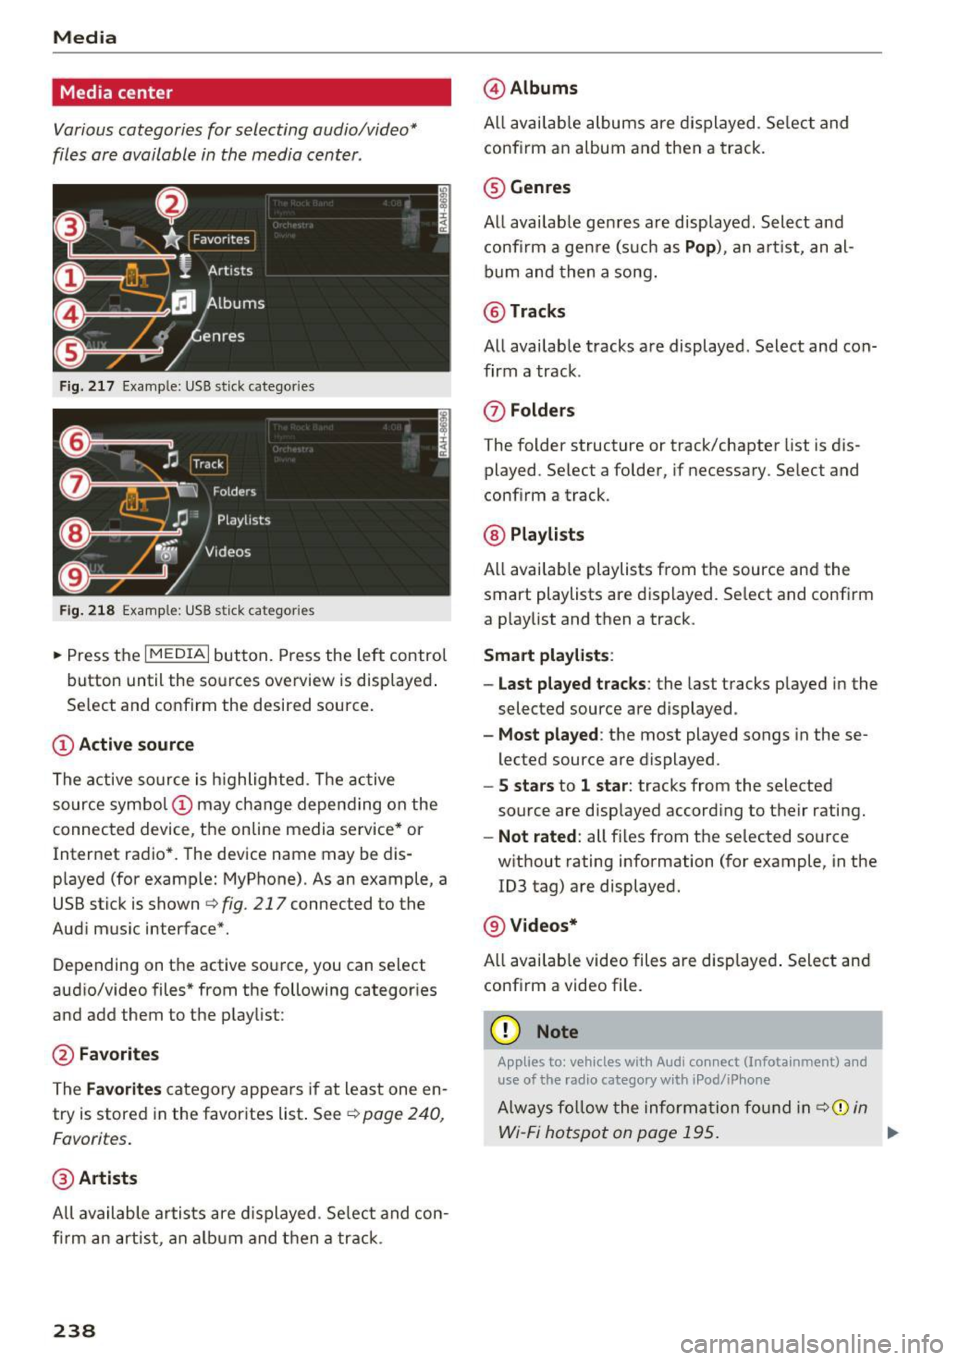
Fig. 217 Example : USB stick categories
F ig. 218 Example: USB stick cat egories
~ Press the I MEDIAi but ton. Press the left control
button until the sources overview is displayed .
Se lect and confirm the desired source.
(D Active source
The active source is highlighted . T he active
source symbol (!) may change depending on the
connected device, the online media service* or
Internet radio*. The device name may be dis
played (for example: MyPhone). As an example, a
USB stick is shown
Q fig . 217 connected to the
Aud i mus ic interface*.
Depending on the active source, you can select
aud io/video files * from the following categor ies
and add them to the playlist :
@Favorites
The Favorites category appea rs if at least one en
try is stored in the favorites list . See
Q poge 240,
Favorites.
@ Artists
All available artists are displayed. Select and con
firm an artist , an album and then a track .
238
@Albums
All available albums are displayed . Select and
conf irm an album and then a track.
® Genres
All available genres are displayed . Select and
confirm a genre (s uch as
Pop ), an artist, an al
bum and then a song.
@Tracks
All availab le tracks are displayed . Select and con
firm a track.
0 Folders
The folder structure or track/chapter list is dis
played. Se lect a folder , if necessary. Select and
conf irm a track .
@ Playlists
All available playlists from the source and the
smart playlists are displayed . Select and confirm
a playlist and then a track .
Smart playlists :
- Last played tracks :
the last tracks played in the
selected source are displayed.
-Most played : the most played songs in these
lected source are displayed.
- S stars to 1 star: tracks from the selected
source are disp layed according to their rating.
- Not rated: all files from the selected source
w ithout rating information (for example, in the
103 tag) are displayed.
@ Videos*
All availab le video files are displayed. Select and
conf irm a video file .
(D Note
Applies to: veh icles with Audi co nnect (Infotainment) a nd
use of the radio category w ith iPod/iP hone
Always follow the information found in q(i) in
Wi-Fi hotspot on page 195. .,.
Page 241 of 402
u (0 ...... N r--. N ...... 0
0
:E
-Only the categories supported by the medi
um are available. For example, CD/DVD
ROM tracks cannot be selected with catego
ries such as
Artists, Albums or Genres.
With an iPod/iPhone (source: Audi music in
terface¢
page 234), the Podcasts, Audio
books
and Composers categories are also
available .
- For safety reasons, the video image is only
displayed when the vehicle is stationary. On
ly the sound from the video plays while driv
ing .
- When synchronizing a portable device with
"Cloud" services, playlists may display incor
rectly in the MMI. Use the media center in
the device.
- With an iPod/iPhone (media source: Audi
music interface ¢
page 234), the Podcasts,
Audio books
and Composers categories are
also available.
(D Tips
Applies to: iPod/lPhone on Audi music Interface
- An Internet connection is required to use
the additional
Radio category, an on line
media service. Also see the chapter
¢
page 195, Wi-Fi hotspot. Also read the in
formation on the Audi music interface and
the supported devices¢
page 234.
-Depending on the Internet connection and
network traffic, a connection loss can occur
during playback of on line media services.
- The use of online media services depends on
the service availability of the third party
provider.
- Audi AG simply makes the access to on line
media services possible through the MMI
and does not take any responsibility for the
contents of the online media services.
Media
Free text search
Applies to: veh icles w ith free text search
You can search in the active source by tracks and
video files*, for example
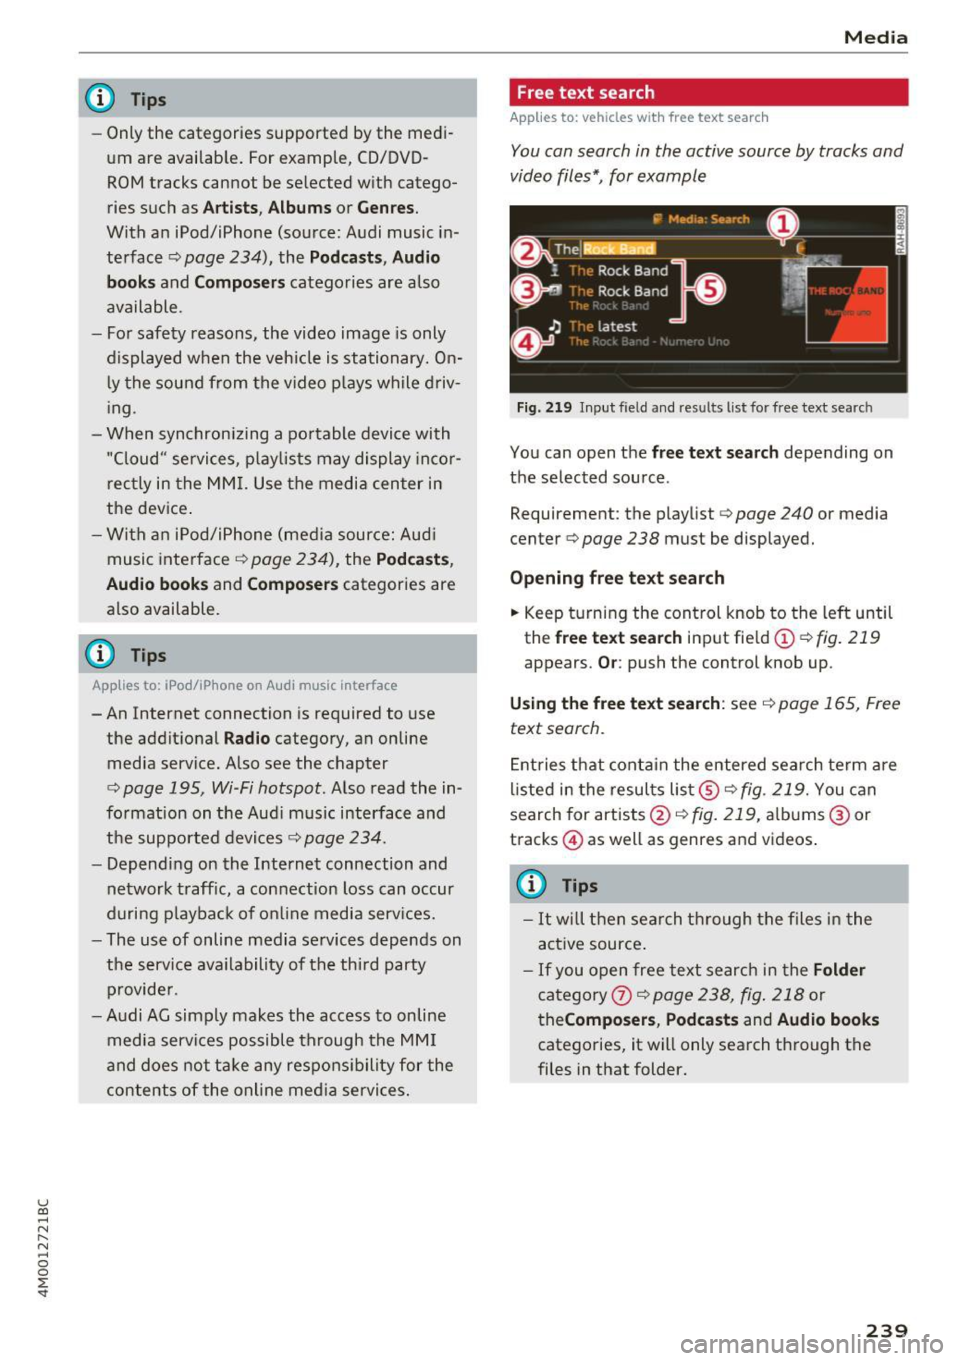
Fig. 219 Input field and results list for free text search
You can open the free text search depending on
the selected source .
Requirement: the playlist
¢ page 240 or media
center¢
page 238 must be displayed.
Opening free text search
.. Keep turning the control knob to the left until
the
free text search input field(!) ¢fig. 219
appears. Or: push the control knob up.
Using the free text search: see ¢ page 165, Free
text search.
Entries that contain the entered search term are
listed in the results list@¢
fig. 219. You can
search for artists @¢fig.
219, albums @or
tracks @) as well as genres and videos.
@ Tips
-It will then search through the files in the
active source.
-If you open free text search in the Folder
category 0 c;> page 238, fig. 218 or
theComposers, Podcasts and Audio books
categories, it will only search through the
files in that folder.
239
Page 247 of 402
u co ..... N r--... N ..... 0
0
:E: '
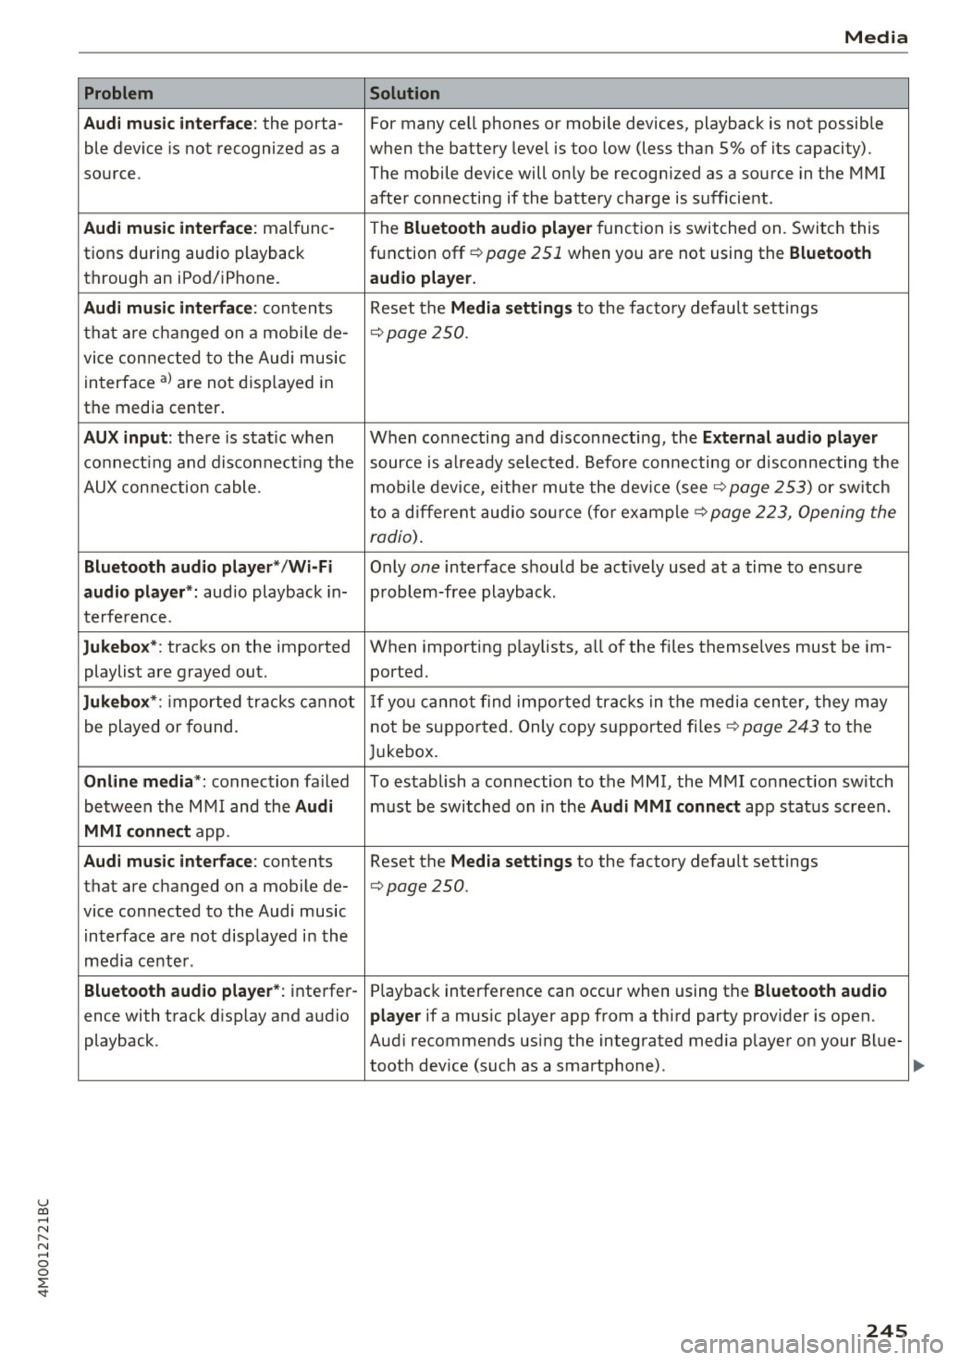
Audi music interface :
the porta-
ble device is not recogni zed as a
source.
Audi music interface : malfunc-
tions during audio playback
through an iPod/ iPhone.
Audi music interface : contents
that are changed on a mobile de-
vice connected to the Audi music
interface al are not displayed in
the media center.
AUX input: there is stat ic when
connecting and disconnecting the
AUX connection cable .
Bluetooth audio player* /Wi-Fi
audio player *:
aud io playback in-
terference.
Jukebox* : tracks on the imported
playlist are grayed out.
Jukebox* : imported tracks cannot
be played or found.
Online media *: connection failed
between the MMI and the
Audi
MMI connect
app.
Audi music interface: contents
that are changed on a mobile de-
vice connected to the Audi music interface are not displayed in the
med ia center .
Bluetooth audio player *: interfer-
ence with track d isplay and audio
playback.
Media
Solution
For many ce ll phones or mobile devices, playback is not possible
when the battery level is too low (less than 5% of its capacity).
The mobile de-vice will only be recognized as a source in the MMI
after connecting if the battery charge is sufficient .
The
Bluetooth audio player f unction is switched on. Switch this
function off
c:> page 2 51 when you a re not using the Bluetooth
audio player.
Reset the Media settings to the facto ry defau lt settings
c:> page250.
When connecting a nd disconnecting, the External audio player
source is already selected. Before connecting or disconnecting the
mobile device, either mute the device (see
c:> page 253) or switch
to a different audio source (for example
c:> page 223, Opening the
radio) .
Only one interface should be act ively used at a time to ensure
problem-free playback .
When importing playlists, a ll of the fi les themselves must be im-
ported.
If yo u cannot find impor ted tracks in the media center, they may
not be supported. Only copy supported files
c:> page 243 to the
Jukebox.
To establish a connection to the MMI, the MMI connection sw itch
must be switched on in the
Audi MMI connect app status screen .
Reset the
Media settings to the factory default settings
c:> page 250.
Playback interference can occur when using the Bluetooth audio
player
if a music player app from a th ird party provider is open.
Aud i recommends using the integrated media player on your Blue-
tooth dev ice (such as a smartphone) .
245
Page 252 of 402
System settings
wait for the signal tone (beep) to say a new
command.
Volume: yo u can adjust the volume of the
p rompts by turning the control knob.
Individual speech training (only when the vehi
cle is stat ionary): you can adapt the voice recog
n it ion system to your voice or pronunciation in
order to improve the system's ability to recognize
your speech . Individua l training is comprised of
20 speech entries that consist of commands and
sequences of numbers. You can delete the pro
grammed voice tra ining w ith the
Reset individu
al speech training
function.
Display brightness
You can adjust the brightness of the Infotain
m ent system disp lay by turning the contro l knob.
Factory settings
The following functions can be reset to the facto
ry default settings :
-Sound settings
- Radio
- Media settings
- Jukebox *
- Directory
-Telephone
- Bluetooth and Wi-Fi*
- Navigation settings*
- Navigation and online memory *
- Voice recognition system*
- Shortcut keys
- Message settings*
-Apps*
-Tool tips
- Audi connect *
- Audi smartphone interface*
You can se lect the desired functions individually
or all at once with the option
Select all entries .
Select and confirm Restore factory settings .
(D Tips
Make sure that not only the settings were de
leted but also the stored data, if applicable .
250
Connection manager
' Introduction
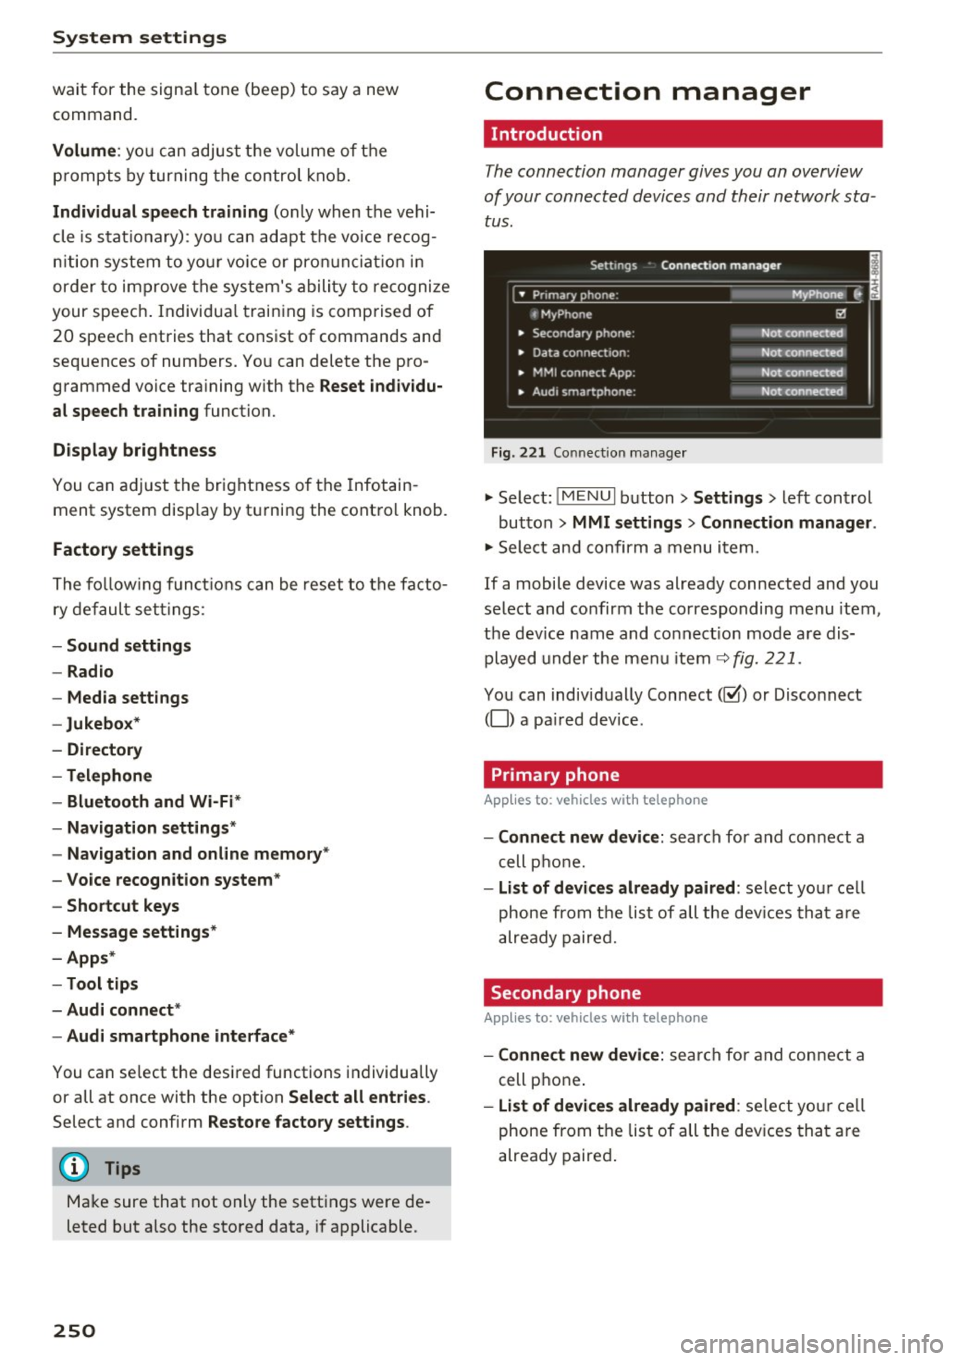
The connection manager gives you an overview
of your connected devices and their network sta
tus.
Settings Conne·ction manager I
====- .. · ~•_P_n_m_•~~-h~o_n~e_: ________ _____ M_ y ~ Phone ~
, MyPhone
• Secondary phone:
• Data connection :
• MMI connect App:
" Audi smartphone:
Fig. 221 Connect io n manager
@
Not connected
Not connected
Not connected
Not connected
"Select : !M ENUI button> Settings > left control
button >
MMI settings> Connection manager .
"Select and confirm a menu item.
If a mobile device was already connected and you
select and confirm the corresponding menu item,
the dev ice name and co nnect ion mode are dis
played under the menu item
c:!;> fig. 221.
You can individually Connect(~ or Disconnect
(0) a paired device .
' Primary phone
Applies to: vehicles with telephone
- Connect new device: search for and connect a
cell phone.
- List of devices already paired : select you r cell
phone from the list of all the devices that are
already paired.
Secondary phone
Applies to: vehicles with telephone
-Connect new device: search for and connect a
cell phone .
-list of devices already paired : select yo ur cell
phone from the list of all the devices that are
already paired.
Page 290 of 402

Airbag syste m
Make sure that the PASSENGER AIR BAG
OFF
11;; li ght comes on and stays on all t he
t ime whenever the ignition is switched on.
A WARNING
- If the PA SSEN GER AIR BAG OFF 11;; light
does not go out when an adult is si tting on
the front passe nger seat a fter ta king the
steps described above, make sure the adult is p roperly seated and restrained at one of
the rear seating positions.
- Have the airbag system inspected by your
authorized Aud i dealer before transporting
anyone on the front passenger seat.
@ Tips
If the capacitive passenger detection system
determines that the front passenger seat is
empty, the frontal airbag on the passenge r
side w ill be tu rned off, and the
PASSENGER
AIR BAG OFF
11;; light will stay on.
-
Repair , care and disposal of the airbags
Parts of the a irbag system are installed at many
different places on your Audi. Installing, remov ing, servic ing or repa iring a part in an area of the
ve hicle can damage a part of an airbag system
and prevent that system from working properly
i n a collision .
There are some important things you have to
know to make sure that the effectiveness of the
system w ill not be impaired and that discarded
components do not cause injury or pollute the
env ironment.
A WARNING
Improper care, serv icing and repai r proce
dures can increase the r is k of personal injury
and death by preventing an airbag from de
ploying when needed or dep loying an airbag
unexpectedly:
-
- Never cover, obstruct, or change the stee r
ing wheel horn pad or airbag cover or the in
strument pane l or modify them in any way.
288
- Never attach any objects s uch as c upholders
or telephone mountings to the surfaces cov
ering the a irbag un its.
- For cleaning the horn pad or instrument
panel, use only a soft, dry cloth or one mois
tened w ith plain water. Solvents or cleaners
could damage the airbag cover or change
the st iffness or strength of the material so
that the airbag canno t deploy and p rotect
properly.
- Never repair, adjust , or change any parts of
the airbag system.
- All work on the steering wheel, inst rument
panel, front seats or e lectr ica l system ( in
cluding the installation of a udio eq uipment,
cellular telephones and C B radios, etc.)
m ust be perfo rmed by a qualified techn ician
who has the training and specia l equipment
necessary.
- For any work on the airbag system, we strong ly recommend that you see your au
thorized A udi dealer or qualified workshop.
- Never modify the front b umper or parts of
the vehicle body.
- Always make sure that the side a irbag can
inflate w ithout interference:
- Never install seat covers or replacement
upholstery over the front seatbacks that
have not been specifically approved by
A udi.
- Never use additional seat c ushions that
cover the areas where the side airbags in
flate.
- Damage to the orig inal seat cove rs or to
the seam in the area of the s ide airbag
module mus t always be repaired immedi
ate ly by an autho riz ed Au di dealer.
- The a irbag system can deploy on ly once. Af
ter an airbag h as been deployed, i t m ust be
repla ced with new replacement parts de
signed and approved espec ia lly for your
Audi model version . Replacement of com
plete airbag systems or airbag components
must be perfo rmed by qua lified workshops
only. Make su re that any airbag service ac
tion is entered in your A udi Warranty
&
Ma intenance boo klet under AIRBAG RE-
PLAC EM EN T RECORD.
~
Page 337 of 402

u
"' .... N
" N .... 0
0
l'. ...
® Mud and snow capability
"M/5" or "M+S" indicates the tire
has properties making it suitable
to drive in mud or snow.~ indi
cates a winter tire .
@ Composition of the tire cord
and materials
The number of plies indicates the
number of rubber ized fabric lay
ers in the t ire. In general : the
more layers, the more weight a
tire can carry . Tire manufacturers
must also specify the materials
used in the ti re . These incl ude
stee l, nylon, polyester and other
materials .
@Maximum permitted load
This number indicates the maxi
mum load in kilograms and
pounds that the tire can carry .
@ Uniform tire quality grade
standards for treadwear,
traction and temperature resistance
T readwear , traction and tempera
ture ranges¢
page 350.
@ Running direction
The arrows indicate the running
direction of un idirectional t ires .
You must always follow the speci- fied running direction
¢
page 365.
€3) Maximum permitted
inflation pressure
Wheels
T his number ind icates the max i
mum pressure to which a tire can
be inflated unde r normal operat
ing conditions.
Glossary of tire and loading
terminology
Accessory weight
means the combined we igh t (in
excess of those standard items
wh ich may be replaced) of auto
matic transmission, power steer
ing, power brakes, power win
dows, power seats, radio, and
heater, to the extent that these
items are availab le as factory-in
stalled equipment (whether in
stalled or not).
Aspect ratio
means the ratio of the height to
the w idth of the tire in percent .
Numbers of 55 or lower indicate a
low s idewall for improved steer
ing response and better overall
handling on dry pavement .
335
Page 363 of 402

u (0 ...... N r--. N ...... 0
0
:E
Service Facility for assistance in these situations.
A WARNING
- Please note that the tire mob ility kit cannot
be used in all situations, and that it may on
ly be used temporarily.
- The tire sealant must not come in contact
with sk in, eyes, or clothes.
- If tire sealant gets in your eyes or on your
sk in, thoroughly rinse the affected area im
med iately w ith clean water.
- Do not inhale the fumes.
- If you swallow any of the t i re sealant, thor-
o ughly rinse yo ur mouth immediately and
drink a lot of water. Do not induce vomiting .
Seek medical attention immediately.
- Change your clothes immed iate ly if they get
t ire sealant on them.
- If an allergic reaction occurs , seek immedi
ate medical attention.
- Keep the tire sea lant away from children .
@ Tips
-If sealant lea ks, allow it to dry in pl ace. Yo u
ca n the n pee l it off like a sticker.
- Note the e xpiration date on the sealant bot
t le . Repl ace the tire sea lant a t an author
i zed Audi dealer or author ized Audi Se rvice
Facility .
- Radio reception can be interrupted when
operating the compressor.
- Obey all laws.
Repairing tires
Fig . 278 Co mponents of t he t ire mobility k it
Em ergen cy a ssis tanc e
Fig. 279 Tire mobil ity k it connect ion
Requirement: the tire mobility kit must be laid
out and ready fo r use ¢
page 360 .
Installing the tire mobility k it
.,. Open the cover @ on the compressor
¢fig . 2 78 .
.,. Remove the connector © and pressure hose ®
w ith pressure gauge from the housing.
.,. Insta ll the compressor press ure hose ® onto
t he flange @ on the t ire sealan t bot tle (!) .
.,. Insert the sea lant bottle with the flange at the
bottom into the opening ® on t he compressor
cover .
.. Remove the valve cap from the faulty t ire.
.. Install the filler hose@on the valve
0
¢fig. 279.
.,. Connect the plug©¢
fig. 2 78 to a n outlet in
the vehicle.
.,. Switch the ignit ion on .
Inflating a tire
.. Move the switch@¢ fig. 2 79 on the compres
sor into position
I.
.,. Inflate the tires to between 29 psi (200 k PA)
and 36 ps i (250 kPA) and read the pressure on
the gauge .
.,. If th is tire press ure is not re ached, remove the
fi ller hose. Drive slowly appro ximately 33 feet
( 1 0 m) forward or in reverse so that the sea lant
can be distr ibuted in the tire. Pump up the tire
aga in ¢ ,& .
A WARNING
--Read and follow the manufacturer's safety
precautions on the compressor and in the instr uctions on the bottle of sealant .
361