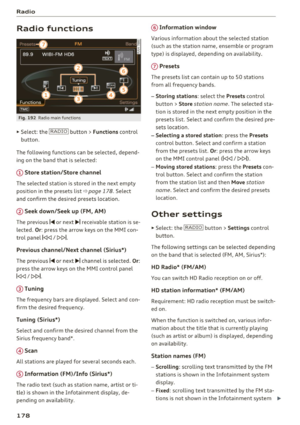
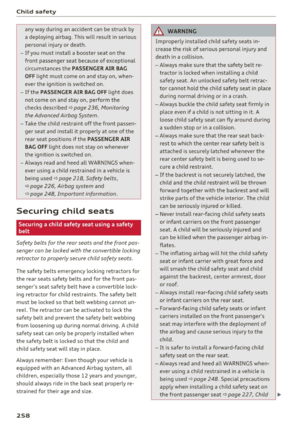
Page 41 of 354

C) C0 ....
"' " "' .... 0 0 :r
Sliding/tilting sunroof emergency closing
Applies to: vehicles with s liding/tilting sunroof
If the sun roof detects an object in its path when
it is clos ing, it w ill open ag ain au tomati cally. In
this case, you can close the roof w ith the power
emergency closing function.
.. Wi thin five seconds af te r the su nroof opens au
tomat ically, pull the swit ch unt il t he roo f
cl oses .
Panorama glass roof
Opening/closing the roof
Applies to: vehicles with panorama glass roof
Fig. 39 Sect io n of the front headlin er: pa norama g lass roof
b u tton
Fi g. 40 Rea r doo r: pa noram ic sunroo f button
@ Tilting the front segment of the roof
.. To tilt the sunroof completely, press the~
button up br iefly to the second level.
.. To close the sunroof comp lete ly, pull the
la.I
bu tton down b rief ly to t he se cond level q ,& .
.. To set a pos ition between opened and closed,
press/pull the
l-"'I bu tto n up to the first level
until the des ired position is reached .
Opening and closing
@ Sliding the front segment of the roof
.. To open the su nroof com plete ly, slide the but
ton ~ tow ard t he rear briefly to the second lev
el.
.. To close the sun roof completely, slide the~
button forward briefly to the second level
¢ _&. .
.. To select a partially open pos ition, slide the~
button forwa rd/back to the first level unti l the
desi red posit ion is reached .
Tilting the rear segment of the roof
The rear segment of t he roof can be operated
both from the cockpit and from the rear seat .
.. To t ilt the sun roof complete ly, press the
l-"'I
button i n the rear doo r briefly to the second
level ¢
fig. 40 .
.. To close the sunroof completely, pull the~
button up briefly to the second level
c:> ,& .
.. To set a position between opened and closed,
press/pu ll the~ button up to the first level
until the des ired posi tion i s re ach ed. O r
.. To o perate the roof fro m the cockpit, press the
! REAR MODE !but to n
¢ fig . 39 . Yo u can now
open/close the rear segment of the roof using
the ~ button in t he headliner . The
LED in t he
front of the headliner turns on when the rear
roof segment is t ilted .
After the ignition is sw itche d off, you can still op
erate the panoramic sun roof for about 10 m i
nutes. The switch is deactivated once the dr iver's
or front passenger's doo r is opened.
A WARNING
Be caref ul when closing the panoramic su n
r oof -oth erwise ser ious in ju ry could resul t!
Sw itch off t he igni tion when ex iting the veh i
cle .
(D Note
Always close the pano rama g lass roof when
l eav ing yo ur vehicle . R ain ca n cause damage
to the inte rior equip ment of your ve hicle, par-
ticu larly the electron ic eq uipm ent . .,,.
39
Page 42 of 354

Opening and clo sin g
@ Tips
- The panorama roof will on ly open down to
-4°F (-20°).
-To prevent both roof segments from co llid -
i ng with one another, you do not need to
- tilt the rear roof segment if the front roof
segment is already open.
- close the front roof segment if the rear
roof segment is already tilted.
Opening/closing the sun shade
Applies to: veh icles with panorama glass roof
© Front sun shade
• To open the sun shade completely, slide the~
button backward to the second level
¢ page 39, fig. 39 .
• To close the sun shade completely, slide the~
button forward briefly to the second level.
• To se lect a partially open position, slide the
l:c ... l
button to the first level until the sun shade has
reached the desired position.
© Rear sun shade
• To open the sun shade comple tely, press the li,. I
button in the rear door briefly down to the sec
ond leve l
9 page 39, fig. 40 .
• To close the sun shade completely, p ull the ~
button up to the second level¢.&_ .
• To se lect a partially open position, press/pull
the~ button to the f irst level until the desired
pos ition is reached . Or
• To ope rate the sun shade from the cockp it,
press the
I REAR MODEi b utton 9 page 39,
fig. 39.
You can now open/close the rear su n
shade using the
I;] bu tton in the headliner.
_& WARNING
Be careful when closing t he panoramic sun
roof -otherwise serious injury could result!
Switch off the ign ition when exiting the vehi
cle.
40
-
Roof segments/sun shade emergency
closing
Applies to: vehicles with pano rama glass roof
If the roo f segment o r su n shade detects an ob
ject in its path when it is closing, it will open
again automatically . In this case, you can then
close it wit h the power emergency closing func
tion.
• Withi n five seconds after the roof segment or
sun shade opens automat ica lly, pull the switch
until it closes.
Valet parking function
Applies to: vehicles with valet parking function
The valet parking function protects the luggage
compartment from unauthorized access.
Fig. 4 1 Glove compartment: va le t pa rkin g functio n button
Yo u can switch the va let parking function on
whe n someo ne else is parking your vehicle. When
the function is switched on, the vehicle can be
driven, locked and unlocked using the master
key, but access to the luggage compartment is
not permitted.
• Remove the integrated mechanical key
9 page29.
• Open the glove compartment.
• Press the
I VALET I button to switch the valet
parking function on . The LED in the button
turns on .
• Lock the g love compartment with the mechani
cal key.
• Onl y give the remote cont ro l key to the se rvice
personnel parking your car and keep the re-
moved mechanical key wit h you. .,.
Page 43 of 354

C) C0 ....
"' " "' .... 0 0 :r
The following buttons are deactivated when the
va let parking function is sw itched on :
-l'-"' I but ton in the dr iver's door
- I""' I button on the remote cont ro l key
- Hand le in the rear lid
When the valet parking f unction is switched on,
the message
Valet parking activated appears in
the instrument cluster display when you switch
the ign ition on.
Garage door opener
(Homelink)
Description
Ap plies to: ve hicles with ga rage door opener (Homelink)
Fig. 42 Garage door o pen er: examples o f usage fo r di ffer
ent systems
W ith the garage door opener (Homelin k), you
can act ivate sys tems su ch as th e garage doors,
secur ity systems o r house lights from i nsid e your
ve hicl e. Thr ee bu tto ns are integr ated in t he head
line r th at can be programmed to up to t hree re
mote cont rols .
To be able to operate sys tems using the ga rage
d oor ope ne r, t he but tons in the he adline r mu st
f ir st b e programme d.
A WARNING
When operating or programming t he gara ge
door o pener, make sure that n o people or ob
jects are in the area immedia tely sur round ing
the equipment. Peop le can be injured or p rop
erty can be damaged if str uck w hen clos ing.
Open ing and closing
(D Tips
- For security reasons , we recommen d that
you clear the programmed buttons befo re
selling t he ve hicle.
- For ad ditiona l information about Homelink,
visit www.homelink.com.
- For an ex planat ion on conform ity wit h the
FCC reg ulat io ns in t he Unite d States an d the
Indust ry Canada regulat ions, see
¢ page
339.
Programming buttons
Applies to: vehicles with garage door opener (Home link)
Fig. 43 Headliner: co ntrols
You can prog ram both fixe d code and rolling co de
systems using this procedure .
Programming/reprogramming buttons
"'S witch on the ign iti on.
"' Press and hold the b utton in t he headliner that
you would like to program for at least 10 sec
onds. Or
"' Select:
!CAR ! function button> Car systems
cont rol button > Vehicle settings > Garage
door opener > Program garage door opener .
"' Follow the i nstr uctions in t he Info tainment sys-
t em .
Deleting button programming
The programmed buttons cannot be deleted indi
vidually. They must be deleted all at once . Repro
gram the buttons if necessary .
"' Select: the
I CARI funct io n button> Car systems
cont rol button > Vehicle settings > Garage
door opener > Clear program settings > Yes .
41
Page 44 of 354
Opening and closing
Displaying the version /status /country code
.,. Se lect: ICARI f u n ct io n button> Car systems
contro l bu tton > Vehicle settings > Garage
door opener
> Version information .
(D Tips
The garage door opene r may nee d to be
synchronized with t he system motor after the
programmin g. Follow the manufacture r's in
structions for doing this.
Operation
App lies to: ve hicles w ith garage doo r opener (Homeli nk)
Req uirements: the button in the headliner must
be programmed
c::> page 41 and the vehicle must
be w it hi n range of the system, such as the garage
door .
.,. Press t he button to open the ga rage door. T he
LED
@ c::> page 41, fig. 43 blinks or tur ns on .
.,. Press the button again to open the garage
doo r.
0) Tips
When op ening o r closing the garage door, do
no t press and hold the bu tton longer ten sec
onds o r the ga rage door open er will switch to
pr og ra mming mode.
42
Page 45 of 354

C) C0 ....
"' ,....
"' .... 0 0 :r
Lights and Vision
Exterior Lighting
Switching the headlights on and off
Fig. 44 I nstrument pane l: l ig ht sw itc h w ith all -weather
li g hts
The headlights only wo rk when the ignition is
sw itche d on. While sta rting the engine or when
switching off the ignition, the headlights will go
off and only the side marker lig hts will be on .
I f the sys tem is not operati ng p roperly, a warning
symbol in the dr ive r informa tion d ispl ay is dis
p layed
.::> page 24 .
Light switch --r;..-
T u rn the swi tch ~ fig . 44 to the co rresponding
position . When the lights are switched on, the
:o o:
symbol turns on .
0 - The lights a re off or the daytime runni ng
l ights are on :
-USA models: The daytime running lig hts will
come on automatically when the ignition is on
and the light sw itch
c:> fig . 44 is in the O posi
t ion or the
AUTO position (only i n day light con
di tions). The
Daytime running lights function
can be turned o n and off i n the MM I
c:> page 45, i=> .&,.
-Canada models : The dayt ime runn ing lights
will come on au toma tically when t he igni tion is
on a nd the light swi tch
c:> fig . 44 is in the O po
s ition, the
:oo : pos ition or the AUTO position
(o nly in daylig ht conditions)
c::> &. .
AUTO -Automat ic he ad lights sw itch on and off
de pend ing on br igh tness, for example in tw ilight,
d uring rain or in tunne ls
c:> &. .
Lights and V ision
:oo: -Side ma rker ligh ts
iD -Low beam hea dlights
~ -All-weather lig hts
l2!l -Rear fog lights*. When the rear fog lights are
on, the symbol
O* on the sw itch will i lluminate .
All-weather lights
The front lights a re adjus ted au toma tic a lly so
that you are less likely to see g lare from your ow n
head lig hts, for example when d riving on a wet
road.
Automatic dynamic headlight range control*
Yo ur vehicle is equ ipped wi th a headlight r ange
contro l system so tha t the head lig hts do not
blind oncoming t raffic if the vehicle load
c h anges . The hea dlight range also ad justs auto
matically when brak ing and acce lerating .
Light functions
The following light funct ions are available de
p ending on veh icle equipment and o nly fu nction
whe n the light switch is in t he AUTO position.
You can deactivate these functions in the MMI under
Audi adaptive light c:> page 45 .
Static cornering light* -the cornering light
switches on automatically when the steering
whee l is turned at a certai n angle at s peeds up to
app roximately 44 mph (70 km/h) and when the
turn s ignal is activated at speeds up to approxi
mately 25 mph (40 km/h) . The area to t he side of
t h e ve hicle is illuminated better w hen turning.
Dynamic curve light * -the curve lig ht adapts it
self to the curves in the road .
Highway l ight function* -this function adapts
the lig hting for highway driving based on vehicle
speed .
A WARNING
---Automatic headlights are only int ended to
assist the driver. They do no t relieve the
driver of his responsib ility to check the
headligh ts and to turn them on manually
ac co rdi ng to t he cur rent light a nd v is ib ili ty
condi tio ns . Fo r example, fog c annot be
43
Page 46 of 354

Lights and Vision
detected by the light sensors. So always
switch on the headlights gD under these
weather conditions and when driving in the
dark .
- Crashes can happen when you cannot see
the road ahead and when you cannot be
seen by other motorists . Always turn on the
headlights so that you can see ahead and so
that others can see your car from the back.
- The rear fog lights should only be turned on in accordance with traffic regulation, as the
lights are bright for following traffic.
- Please observe legal regulations when using
the lighting systems described .
(D Tips
-The light sensor* for automatic dynamic
headlight range control* is located in the
rear view mirror mount . You should there
fore not apply any stickers to the windshield
in this area in order to prevent malfunctions
or failures .
- In the event of a light sensor malfunction,
the driver is notified in the instrument clus
ter display~
page 25.
- You will hear a warning tone if you open the
driver door when the exterior lights are
switched on.
- In cool or damp weather, the inside of the
headlights, turn signals and tail lights can
fog over due to the temperature difference
between the inside and outside. They will
clear shortly after switching them on. This
does not affect the service life of the light ing .
44
Turn signal and high beam lever
The turn signal lever operates the turn signals,
the high beams and the headlight flasher .
Fig. 45 Turn signal an d high beam leve r
Turn signals¢ Q
N 0 .... 0 :i: .. m
The turn signals activate when you move the lev
er into a turn signal position when the ignition is
switched on.
© -right turn signal
@-left turn signal
The turn signal blinks three times if you just tap
the lever.
High beams and headlight flasher ~D
Move the lever to the corresponding position:
@ -high beams on (vehicles with High beam as
sistant* ~
page 44)
@)-high beams off or headlight flasher
T he
Iii indicator light in the instrument cluster
turns on.
A WARNING
High beams can cause glare for other drivers,
which increases the risk of an accident . For
this reason, only use the high beams or the
headlight flasher when they will not create
glare for other drivers .
High beam assistant
Applies to: vehicles with high beam assistant
A camera on the rearview mirror mount can de-
tect light sources from other road users. The high
beams switch on or off automatically depending
ll>
Page 47 of 354

on the position of vehicles driving ahead and on
coming vehicles, the vehicle speed and other en
vironmental and traffic conditions.
Activating high beam assistant
Requirement: the light switch must be set to the
AUTO position and the high beam assistant must
be switched on in the Infotainment system
¢page 45.
.,. To activate the high beam assistant , tap the
lever forward @. T he
II indicator light ap
pears in the instrument cluster display and the
high beam assistant is switched on/off auto
matically. The
Ill indicator light also turns on if
the high beams are switched on.
Switching the high beams on/off manually
If the high beams did not switch on/off automat
ically as expected, you may switch them on or off
manually instead:
.,. To switch the high beams on manually, tap the
lever forward @. T he indicator light
Ill turns
on .
.,. To switch the high beams off manually, pu ll the
lever back@. The h igh beam assistant is deac
tivated.
Operating the headlight flasher
.,. To operate the headlight flasher when the high
beam assistant is activated and high beams are
switched off, pu ll the lever back @. The high
beam assistant rema ins active.
Messages in the instrument cluster display
Headlight assist: System fault!
Drive to an authorized Aud i dea le r or authorized
Aud i Service Facility immediately to have the
malfunction corrected. You can still switch the
high beams on or off manually.
Headlight assist: Unavailable No camera view
The camera view is blocked, for example by a
sticker or debris.
o The sensor is located between the interior rearco
~ view mirror and the windshield. Do not place any ,..._
~ stickers in this area on the windshield.
0 0 :c '
Lights and Vision
A WARNING
High beam assistant is only intended to assist
the driver. The driver is still respons ible for
controlling the headlights and switching
them manua lly depending on light and visibi l
it y conditions. It may be necessary to operate
them manually in situations such as:
- I n adverse weather conditions such as fog,
heavy rain, blowing snow or spraying water.
- On roads where oncoming traffic may be
pa rtia lly obscured, such as expressways.
- When there are road users that do not have
sufficient lighting, such as bicyclers or
vehicles with dirty tail lamps .
- I n tight curves and on steep hills.
- In poorly lit areas.
- W ith strong reflectors, such as signs.
- If the area of the w indshield near the sensor
is fogged over, dirty, icy or covered with a
sticker .
Adjusting the exterior lighting
The functions ore adjusted in the Infotainment
system .
.,. Select: !CAR ! function button > Car systems
control button > Vehicle settings > Exterior
lighting .
Automatic headlights
You can adjus t the following settings in the Au
tomatic headlights
menu:
Headlights activation time -you can adjust if the
headlights switch on
Early, Medium or Late ac
cording to the sensitivity of the light sensor.
Headlight assist* -you can switch the h igh beam
ass istant*
On and Off .
Daytime running lights*
USA models :
the daytime running lights can be
switched on/off. Select
On or Off.
Canada models:
this function cannot be switched
off. They activate automatically each time the ig -
nition is switched on .
ll>
45
Page 48 of 354

Lights and Vision
Coming home , Leaving home
The coming home func tion illuminates the area
outside the ve hicle when you turn the ignition off
and open the driver 's door. To t urn the f unct ion
on, s ele ct
Lights when lea ving car > On.
The leav ing home ill uminates t he area o utside
the vehicle when you unlock the vehicle . To turn
the function on, select
Lights when unlocking
car > On.
The com ing home and le aving home f unctions
only operate w hen it is dark and the light sw itch
is in the
AUTO position.
Emergency flashers
F ig. 46 Center conso le: eme rge ncy f la sh er butto n
The emergency flashers ma kes ot her drivers
aware of yo ur vehicle in dangerous si tuations .
• Press the
&,. button to switch the eme rgency
flashers on or off.
You can indicate a lane change or a turn when the
emergency flas hers are sw itched on by us ing the
t urn sig nal lever. The emerge ncy flashers stop
tempo rarily.
The emergency flashers also work when the igni
tion is turned off.
46
Interior lighting
Front and rear interior lighting
F ig . 47 Front head lin er: interio r li ghtin g co ntr ols
Fi g. 48 Rea r h eadl iner: Readi ng li ght
Press the corresponding button ¢ fig. 47:
~ - Int erio r l ight ing o n/off
[!I -Door cont act swi tc h on/off . T he inter io r li ght
i ng is controlled automa tic a lly .
~ - Reading lights on/off
~ * -Sw itch the rear reading lights on/off from
the cockpit .
I REAR MODE i* -Switching the rear reading lights
on/off from the cockp it: press the
I REAR MODE !
button and then the co rresponding button~ in
the cockpit .
Ambient lighting
Applies to: vehicles with amb ient l ig hting
You can select a color prof ile and b rightness for
the ambi ance lighting in var ious areas of the ve
hicle, called zones.