Page 177 of 354

0 co .... N ,..... N .... 0 0 :c '
specified, if possible . T he navigation system cal
culates an alternative route .
The route to be avoided t hat you have ente red
appl ies on ly to the current rou te and must be set
again, if needed.
The areas you have se lected to avoid will appea r
with red and wh ite shad ing on the map.
{D) Tips
If the MMI does not calcu late an alte rnative
route, that means the re is no ne ava ilable.
Accessing traffic
information
Auto rerouting (traffic)
App lies to: vehicles with navigation system and Sirius (satel
li te radio)
By receiving traffic information from the TMC or
satellite -depending on ava ilability - the MMI cal
culates an optim ized route and the possib le t ime
saved for the current route guidance . You can de
cide yourse lf which route you would like to use.
Traffic information (TMC)
Applies to: ve hicles with navigation system and Sirius (satel
li te radio)
Tfv1C traffic reports can be shown in the Infotain
ment display using Sirius* (satellite radio).
Info Audi connect I
@ EASTBOUND 59 mi _ ·
D ~ Slow traffic
@ NORTHBOUND
59 mi
(~ Road works
fJ!: ~ SOUTHBOUND
59 mi·
(~ Road works
Read Settings
I_
TMC _ t• "'"
Fig. 189 Access ing TMC traff ic info rma tion
~ Se lect: IIN FO I button .
The last act ive Info menu is shown in the Info
tainment display . To open the list with TMC tra f
fic information¢
fig. 189, press the !IN FO I but
ton again in th e
Info menu.
Na vigation
Reception of traffic information is indicated by
the
T MC symbol in the status line:
TMCsymbol Meaning
TMC stations are avai lable
Disp layed and dynam ic navigation is
switched
On ¢ page 173.
TMC stat io ns are not availa -
I s g rayed out ble a nd dynam ic navigation
i s sw itched
On .
Not disp layed Auto rerouti
ng is switched Off .
- Opening a detailed vie w of traffic informat ion :
select a nd confirm the traffic information from
t he l ist .
-Opening the next tr affic information : select
and confirm
Display n ext report .
- Showing the selected traffic information on
th e map :
select and confirm Show on map . The
shaded li ne shows the stree t and the length of
the t raff ic jam .
-Displaying the ne xt tr affic information on the
map :
press the control k nob aga in .
- Having traffic information r ead out: press the
Read control button .
Traffic information display
© Colored warn ing symbols : traffic incidents on
your route are shown in the upper section of the
li st and are sorted according to distance.
Warning symbols with~: avoided traffic inci
dents.
@ Grayed out warning symbols: traffi c inc iden ts
that are not on your route. They are sorted ac
cording to road type (expressway, highway, other
road), country and name.
(D Tips
-Cr itica l t raff ic information, s uch as warn
ings about wrong-way drivers, is automati
cally disp layed. To hide the traffic info rma
tion, press the
I BACK I button or the control
knob.
- TMC traffic reports are not available in Can
ada. For more informat ion, please contact
Sirius Canada.
175
Page 178 of 354

Navig ation
- Traffic reports are shown in the driver infor
mation system disp lay and can be selected
by turning the left thumbwheel.
Other settings
~ Se lect : IIN FO l button> Setting s control button.
Traffic report
Traffic info rmation that refers to a n active dest i
nation is given as a spoken announcement when
the func tion is sw itched
On.
Troubleshooting
Applies to: vehicles with navigation system
Problem Solution Ent
ertainm ent volume
Turn the On/Off knob to the right or left to the
adjust the volume during traffic reports .
Favorites that were a lready star- The favorites in the public MMI directory are visib le for a ll u sers in
ed are no longer displayed .
the vehicle.
If a cell phone is connected, both the favor ites from the private
d irectory and the favorites stored as public are displayed.
If you w ant to make a favorite ava ilable for all users, it must be
stored in the public MMI directory . A favorite in the private direc -
tory must be marked as a
P u blic contact if you want it to be ava il-
ab le for all use rs .
176
Page 179 of 354

C) C0 .--1
"' " "' .--1 0 0 :r
Radio
Accessing the radio
The radio supports the F M, A M and Sirius * (sate l
lite radio) bands. By means of an HD Radio re
ceiver, you also receive radio stations on the FM
and AM band i n digital format.
Fig. 190 FM stat ion list (H D radio)
• 006
SIRIUS i.
60s Hits
( -
007 ___ 70s Hits
008 80s Hits
009 ThePulse
010
011
•
Bridge
Radio 1
Fig. 191 S iri us stat io n list
~ Se lect: the I RADIO I bu tton.
- , I
Linking
Linking
Linking ~_:
Linking
Linking
Linking
t•JG ,,111
Af te r se le ct ing the radi o, the last m enu t hat was
ope n is displ ayed .
-Showing the station li st : p res s th e I RAD IO I
bu tton agai n. T he receiva ble s tat ion s are show n
on a rad io s ta ti on lis t¢
fig. 19 0 an d ca n be se
l ecte d direct ly .
- Selecting a station : sele ct and confir m a sta
tion from the s ta tion list. FM/ A M stations th at
can be received by digital radio are marked with
the HD symbol (!)
c:;, fig. 190 . If reception quali
ty declines, the radio automatica lly switches to
t h e a nalog FM/AM station. Digita l FM HD radio
stations may conta in mult iple addit io nal sta
t ions *. The available additiona l stations* are
listed un der t he radio station . When you leave
the reception a rea, additiona l stations* that
Radio
cannot be received are marked wit h a symbol
@ c:;,fig. 190 .
-Quick storing from the stat ion list : select and
confirm a station from the station list. Press
an d hold the control knob u nti l
Store station
name
here appears in the presets list. Select
and confirm the desired presets location.
- Selecting a stored station: press the Presets
control button . Select and confirm a stat ion
from the presets list.
-Selecting the frequency band : press the Band
control button. Select and conf irm the desired
band.
Or : press the IRADIOI button repeated ly
until the desired frequency band appears in the
title line
c:;,fig. 190.
-Updating the station list : select and conf irm
Update stat ion list . The station lists in the FM
and Sir ius* bands are updated automatically. If
the last stat ion that was play ing is no lo nger
ava ilab le afte r the stat ion lis t is updated, sta
t ion 184 is pl ayed automatically.
If there is a loss of radio signal (Sirius*), the fol
lowing system informat ion may display in the
station l ist:
LINKING : the tuner is currently not receiving a
satellite signal @c:;,
fig. 191
ANTENNA : the antenna is not ready. For addi
t iona l information, contact an authorized Audi
dealer or authorized Audi Service Facility.
T he system information turns off when the radio
stations are received again.
(D Tips
-HD Rad io reception is not availab le in Cana
da.
- Con tact the Si rius * prov ider if you wo uld like
to rece ive satellite p rogramming.
- Th at stat io ns in the AM station list are s till
displayed after you leave the reception area.
T here is no longer any reception .
- Bu ildings, tunnels, bridges, open areas, oth
er veh icles or objects on the veh icle roof can
affect reception.
- Sate llite rad io is not availab le in A laska and
Hawaii.
177
Page 180 of 354

Radio
Radio functions
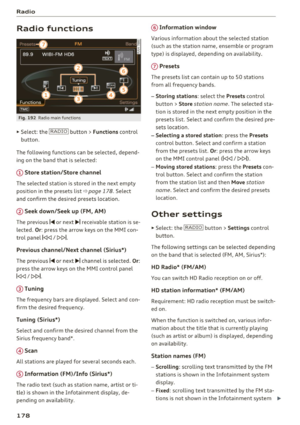
Fig . 192 Radio mai n functio n s
.. Se lect: the I RADIO I b utton> Functions cont rol
button.
The fo llow ing f unct io ns can be selected, depend
i n g on the band that is se le cted:
(!) Store station /Store channel
The se lected stat ion is stored in the next empty
position in the presets list
c:, page 178 . Select
a nd confi rm the desired p rese ts loca tion.
@ Seek down/Seek up (FM , AM)
The prev ious
I~ or next ~I receivable station is se
lected.
Or : press the arrow keys on the MMI con
trol pane l
lt>I.
Previou s channel /Next channel (Si rius*)
The prev ious I~ or next ~ I channel is selecte d. Or:
press the arrow keys on the MMI control pane l
lt>I.
@ Tuning
The frequ ency bars are disp laye d. Sele ct and con
fi rm the desired frequen cy .
Tuning (Sirius*)
Select a nd confirm the des ired channel from the
S ir iu s frequency ban d*.
@ Scan
All stations are played for several seconds each.
® Information (FM )/Info (Sirius*)
The radio text (such as station name, artist o r ti
tle) is show n in the Infotai nment display, de
pending on availability.
178
@ Information window
Va rious in forma tion about th e se lected st ation
(s uch as the sta tion name, ensemble or p rogram
type) is displaye d, depending on availability.
(J) Presets
The prese ts lis t can co nta in up to 50 sta tions
fro m al l frequency bands.
- Storing stations : select the Presets control
bu tton >
Store station name. The selected sta
tion is sto red in t he nex t emp ty pos ition in the
presets list. Sele ct and confir m th e des ired pre
se ts lo cati on .
- Selecting a stored station : press the Presets
control b utton. Selec t and con firm a st atio n
from t he p rese ts lis t.
Or: press the arrow keys
on the MMI cont rol panel
(l [> I).
-Moving stored station s: press the Presets con
t rol b utt on. Se lect and confirm the s tat ion
from the station list and then
Move station
name.
Se lect and conf irm the desired presets
location.
Other settings
.. Select: the I RADIO I button > Settings control
button.
The following se tt ings can be sele cte d d epend ing
o n the band that is selected ( FM, A M, Siri us*) :
HD Radio* (FM/AM)
Yo u can swit ch HD Radio reception o n or off.
HD station information* (FM/AM)
Requirement: HD radio recept io n must be switch
ed on .
When the funct ion is switched on, va rious i nfor
mation abo ut the t itle t hat is c urrent ly playing
(such as artist or album) is displayed, depending
o n ava ilab ility.
Station names (FM )
- Scrolling:
scro lling text t ransm itted by the FM
stat ions is shown in the Infotainment system
disp lay.
- Fixed : scrolling text transmitted by the FM sta
tions is not shown in the In fota inment system .,,.
Page 181 of 354

0 co .... N ,..... N .... 0 0 :c '
display. Only the current section of the scroll
ing text displayed.
-Off: scrolling text transmitted by the FM sta
tions is not shown in the Infotainment display.
Scro lling text from HD stations is shown in the
Infotainment display.
Channel info (Sirius*)
If track informat ion is available for the current ti
tle (such as artist or album), it will be displayed
in a pop-up window if this function is activated.
Station sorting (Sirius*)
-Channel number : the stations are sorted in as
c ending order a ccording to their station num
ber.
- Channel name : the stations are listed in alpha
betical order.
- Category and channel number : the stations are
sorted according to their category and then ac
cording to their channel number.
- Category and channel name : the stations are
so rted according to their category and then ac
cording to their station name.
Troubleshooting
Problem Solution
Radio
Category filter (Sirius*)
The stations shown in the station list can be fil
tered by yo ur personal preferences and by pro
gram type . The program categories that you can
select depend on what is offered by your provid
er. Select the
Deactivate category filter option to
deact ivate all filter opt ions and disp lay all availa
ble stations in the satell ite stat ion list.
Receiver serial number (Sirius*)
The electronic seria l number (ESN) is d isp layed.
The number is required when logging in to Sir
ius*.
Deleting presets
Requirement: a station must be stored in the
presets list¢
page 178 .
Stored stations can be deleted Individually or All
at once .
A station with poor reception is no Store the station ahead of time and then select it from the pre-
longer disp layed in the station list sets list later
(z) ¢ page 178, fig. 192.
once you switch to a different sta-
t ion.
179
Page 182 of 354

Media drive s and conn ections
Media drives and
connections
Introduction
There are various media drives and connections
ava ilable in the MMI. For example, you can play
aud io/video* f iles through the Jukebox, or you
can connect a portable device to the Audi music i n terface* a nd ope rate it through the MM I.
Notes
General information
Med ia and format restrictions :
the MMI (includ
ing the SD card reader and the USB storage de
vice connect ion*) was tested w ith a var iety of
p roducts and media on the market . However ,
there may be cases where ind iv idual devices or
media and audio/video* files may not be recog
n iz ed, may play on ly w ith restrict ions or may no t
p lay at a ll.
The MM I media dr ives do not suppo rt Windows
Media Audio 9 Vo ice, Windows Media Audio 9
L oss less and Windows Media
9 Profess ional for
mats .
Digital Right s Managem ent : please note that
the audio/v ideo* files are subjec t to copyright
p rotection .
The med ia drives do not play f iles that are pro
tected by ORM and that are ident ified with the
symbo l~ -
Data s ecurity : Never store important data on the
memory cards, the Jukebox, CDs/DVDs or porta
b le aud io devices . A udi is not responsib le for
damaged or lost files and med ia.
Lo ad ing t imes : the more files/folders/playlists
that a re on a storage medium, the longer it w ill
take to load the audio/v ideo* fi les . Audi recom
mends using storage media that on ly conta in au
d io/video files*. To decrease the t ime it takes to
load audio/video fi les*, create subfo lders (for ex
ample, for the artist or album). The loading time
will also increase when importing files.
A dditional information : when playing, audio
fi les are automatically displayed with any addi-
180
tiona l information that is stored (such as the ar
tist, track and album cover) . If this information is
not avai lab le on the storage medium, the MMI
will check Gracenote . However, in some cases,
the addit ional information may not be d isplayed .
Restri cted functionalit y: if functionality is re
stricted, reset the
Media setting s to the factory
default settings
c> page 206.
Reset the Jukebox to the factory defau lt settings
if functiona lity is restricted
c> page 206.
Fo r information abo ut the propert ies of s upport
ed med ia and fi le formats, see
c> page 186 .
(D Note
Always fo llow the information found in c> (D in
Wi-Fi
hotspot on page 160.
CD/DVD operation
CD /DVD and fo rmat re striction s:
the functionali
ty of individua l storage media may be limited due
to the variety of b lank CDs/DVDs available and
the various capacities . Aud io CDs or video DVDs
with copy protection, CDs/DVDs that do not con
form to the standard and mult isess ion CDs may
have l imited playback or may not play at all. Audi
r ecommends finaliz ing the recording process
whe n creat ing mult isess io n CDs . Mult isess ion is
not supported for DVDs .
Handling CDs/DVDs and th e DV D dri ve: To en
sure good, h igh-quality sound reproduction and
to prevent damage to the dr ive or disc reading er
r ors, always store CDs/DVDs in a protective
s leeve and do not expose them to direct s unlight.
Do
not u se:
- Damaged, dirty or sc ratched CDs/DVDs
- Single CDs/DVDs (3 inch/8 cm diameter)
- CD/DVDs that are not round
- CDs/DVDs w ith labels
- Protective rings
- Clean ing CDs
Thermal protection switch : CD/DVD playback
may be tempora rily unavailable if o utside tem
peratures a re extremely hot or co ld. A thermal
Page 183 of 354

C) C0 ....
"' " "' .... 0 0 :r
protection switch is installed to protect the CD/
DVD and the laser.
Laser devices : laser devices are divided into safe
ty classes 1 to 4 in accordance with DIN IEC 76
(CO) 6/VD E 0837. The various types of audio
equipment install ed conform to safety class
1.
T he laser uses so little power or is s hielded so
there is no danger when it is used correctly .
Device cover: do not remove the cover from the
device . The device does not contain any parts that
the owner can repair .
SD card reader
The SD card readers are located behind the cover
in the cen ter console.
Fig. 193 Insert ing the SD card
- Inserting the SD card: slide the SD card into
the card reader slot
(D w ith the label facing up
(contact sur faces facing down)
r=> fig. 193. The
angled corner of the SD card must point toward
the right front. Then push th e SD card into the
s lot until it clicks into place.
-Removing the SD card : press briefly on the SD
card . The card is re leased.
The SD card reader is started and operated
through the MMI
r=> page 189.
A WARNING
The card reader must always be closed while
driving for safety reasons .
CD Note
Only use one-piece SD cards. If adapter cards
(SD cards with more than one piece) are used,
the card could fall out of the adapter when
Media drives and connections
driving because of vibrations. Individua l
pieces could then become stuck in the drive
and impa ir the functionality.
(D Tips
Always keep the SD card in a suitable case to
protect it from dirt, dust particles and other
damage.
DVD drive
The DVD drive is located behind the cover inside
the center console.
Fig . 194 DVD drive
-Loading a CD/DVD: slide the CD/DVD straight
into the DVD slot @ with the label fac ing up
r=o fig. 194 .
-Ejecting a CD/DVD : press the button (D.
The CD/DVD is pulled in again automatically if it
is not removed from the DVD slot w ith in approxi
mately ten seconds after ejecting it.
The DVD drive is started and operated through
the MMI
r=>page 189.
CD Note
-Never force a CD/DVD into the drive. The
CD/DVD is pulled in automatically .
- Do not insert CDs/DVDs with labels into th e
drive. Labels can come loose from the CD/
DVD and damage the drive.
(D Tips
The CD/DVD playback is not ensured with au
dio files that have a high data rate.
181
Page 184 of 354

Media drive s and conn ections
DVD changer
Applies to: vehicles w ith DVD changer
The DVD changer is located in the glove com
partment.
@
F ig . 195 DVD c hanger
- Loading a CD /DVD : press the I LOADI button @
¢
fig. 195. The DVD change r is not ready to
load if the L ED in the DVD slot is red . The LEDs
in the DVD s lot @ blink green when the DVD
changer is ready to load . Slide the CD/DVD
straight into the DVD slot @with the labe l fac
ing up. The CD/DVD is automat ica lly loaded in
the next empty position in the DVD changer .
The corresponding button © lights up .
-Loading mul tiple CD s/ DV Ds at the same t ime :
press and hold the I LOAD I button @ longer
than two seconds . Wait until the green LEDs in
the DVD slot @start to blink . Slide the CDs/
DVDs one after the othe r straight into the s lot
@ wit h the label facing up. The CDs/DVDs are
a utomat ica lly loaded in the nex t empty posi
tions in the DVD changer .
-Loading a CD /DVD to a specific position : press
the
I L OAD I button @. The next empty pos it ion
© blinks. The occupied positions light up and
do not b link . Press the button for the desired
position and remove the CD/DVD if necessary .
Slide the CD/DVD you would like to load
straight into the DVD slot @with the labe l fac
ing up .
-Ejecting the current CD/DVD : press the button
CD briefly two times. The CD/DVD is pu lled back
i nto the DVD changer automatically if it is not
removed from the DVD slot w ith in 30 seconds
of ejecting it .
-Ejecting any CD /DVD : press the b utton CD and
then press a blink ing button @.
182
-Ejecting all CD s: press and ho ld the button CD
longer .
-Canceling the load ing pro ce ss: press the
!LOAD I button @ again d uring the loading proc
ess.
S ix CDs/DVDs can be loaded into the DVD chang
er. For information on the properties of support
ed file fo rmats, refer to ¢
page 187.
The DVD c hanger is sta rted and oper ated throug h
the MMI
¢ page 189.
(1} Tips
-Follow the instructions fo r handling C Ds/
DVDs.
- Whe n playi ng MP3 f iles w ith a variable b i
t rate, t he re may be a disc repancy between
t h e p lay time d isplayed and real t ime.
Jukebox
Audio/video files from a CD/DVD -ROM, a USB
storage device or an SD card can be copied to the
Jukebox.
... Select the I MEDIAi button> Source con trol b ut
ton >
Jukebox.
Adding fil es to the Jukebox
- Select ing files /fold ers :
select the Import con
trol b utton >
desired source > individual files or
folders.
P ress the All c o ntro l butto n to se lec t
All files o r fo lde rs. Or : selec t and confirm a
folder and press and hold the contro l knob.
- Starting the importing proc ess: press the
Start import con trol b utton . T he stat us o f the
import p rocess is shown in the Infotainment
disp lay and in the status line with the symbo l
@¢page 138, fig . 159.
- Hid ing the importing proce ss: se lect and con
firm
Continue importing in the background .
The importing process is hidden.
- Canceling the impo rt ing process : select and
confirm
Can cel import. Or : remove the source
that is being imported. Files a lready copied re-
ma in.
Ill>-