Page 59 of 170
52 |
V
EHICLE CONTROLS
Rear Operation
Use the On-Demand Multi-Use Display (ODMD) touchscreen to operate the
system.
Rear Lock: Disable
operation from the
rear.
Rear temperature
up/down
On-Demand Multi-Use Display (ODMD)
Close the menu Rear ON/OFF
Rear AUTO
Fan speed Airflow control
mode
If Rear Lock is turned on in the front, rear controls
cannot be operated.
ODMD screen
Select the REAR icon to
enter the rear climate
control screen.
Rear Climate Control ButtonsUse the buttons on the back of the center console to operate the rear system.
Temperature
controlRear
AUTO ON/OFF
button
Airflow
control
mode Fan speed
buttons
Page 61 of 170

54 |
V
EHICLE CONTROLS
Seat Heaters and Ventilation*
Quickly warm or ventilate the seats when the vehicle is on.
Front Seat Heaters or Ventilation
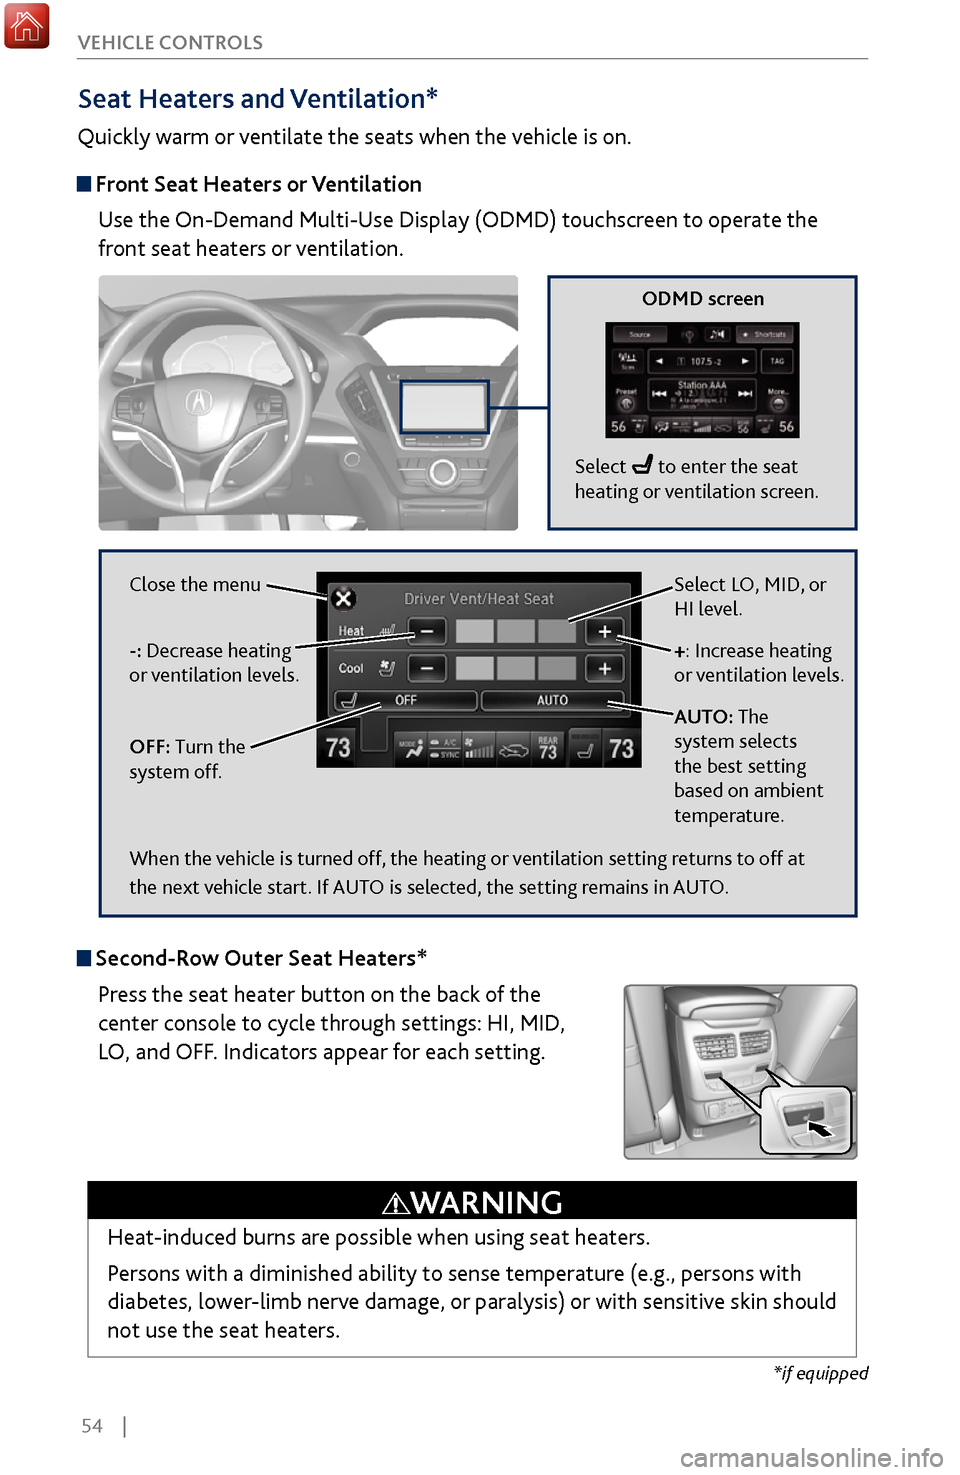
Use the On-Demand Multi-Use Display (ODMD) touchscreen to operate the
front seat heaters or ventilation.
Select LO, MID, or
HI level.
+: Increase heating
or ventilation levels.
AUTO: The
system selects
the best setting
based on ambient
temperature.
OFF: Turn the
system off. -: Decrease heating
or ventilation levels. Close the menu
ODMD screen
Select to enter the seat
heating or ventilation screen.
*if equipped
Second-Row Outer Seat Heaters*
Press the seat heater button on the back of the
center console to cycle through settings: HI, MID,
LO, and OFF. Indicators appear for each setting.
Heat-induced burns are possible when using seat heaters.
Persons with a diminished ability to sense temperature (e.g., persons with
diabetes, lower-limb nerve damage, or paralysis) or with sensitive skin should
not use the seat heaters.
WARNING
When the vehicle is turned off, the heating or ventilation setting returns to off at
the next vehicle start. If AUTO is selected, the setting remains in AUTO.
Page 62 of 170

| 55
V
EHICLE CONTROLS
*if equipped
Customized Features
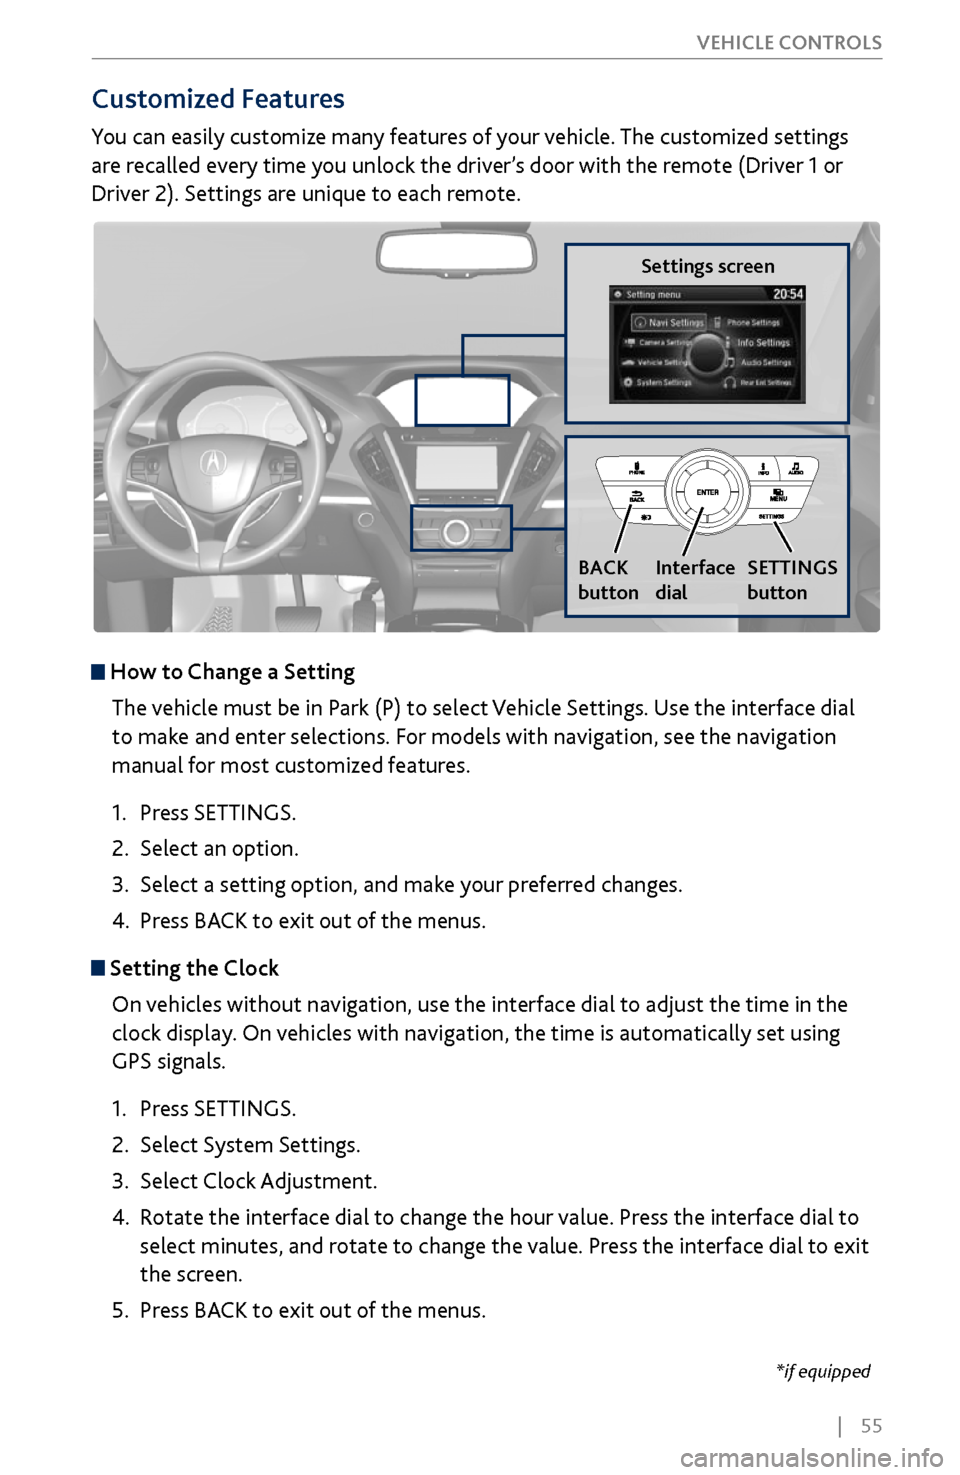
You can easily customize many features of your vehicle. The customized settings
are recalled every time you unlock the driver’s door with the remote (Driver 1 or
Driver 2). Settings are unique to each remote.
How to
Change a Setting
The vehicle must be in Park (P) to select Vehicle Settings. Use the interface dial
to make and enter selections. For models with navigation, see the navigation
manual for most customized features.
1.
Press SETTINGS.
2.
Select an option.
3.
Select a setting option, and make
your preferred changes.
4.
Press BA
CK to exit out of the menus.
Setting the Clock
On vehicles without navigation, use the interface dial to adjust the time in the
clock display. On vehicles with navigation, the time is automatically set using
GPS signals.
1.
Press SETTINGS.
2.
Select System Settings.
3.
Select Clock Adjustment
.
4.
Rotate the interface dial to
change the hour value. Press the interface dial to
select minutes, and rotate to change the value. Press the interface dial to exit
the screen.
5.
Press BA
CK to exit out of the menus.
Settings screen
BACK
button
Interface
dial SETTINGS
button
Page 63 of 170
56 |
AUDIO AND CONNECTIVITY
Learn how to operate the vehicle’s audio system.
Basic
Audio Operation
Connect audio devices and operate buttons and displays for the audio system.
USB Ports
The center console has three USB ports. All of them can charge a device. Connect
an audio device to the right-hand port for audio playback..
1.
Slide back the center console cov
er. Open a
USB port cover.
2.
Install the device to charge or
for playback.
The back of the second-row console* has two USB
ports. They are for charging devices.
Auxiliary Input Jack
Connect standard audio devices with a 1/8-inch (3.5 mm) stereo miniplug.
1.
Slide back the center console cov
er. Open the
AUX cover.
2.
Connect the device to the input
jack.
3.
Use the device to control the
audio.
*if equipped. Applicable laws may prohibit the operation of handheld electronic devices while operating a vehicle.
AUDIO AND CONNECTIVITY
for chargingfor audio
AUX jack
for charging
Page 65 of 170

58 |
AUDIO AND CONNECTIVITY
On-Demand Multi-Use Display™ (ODMD™)
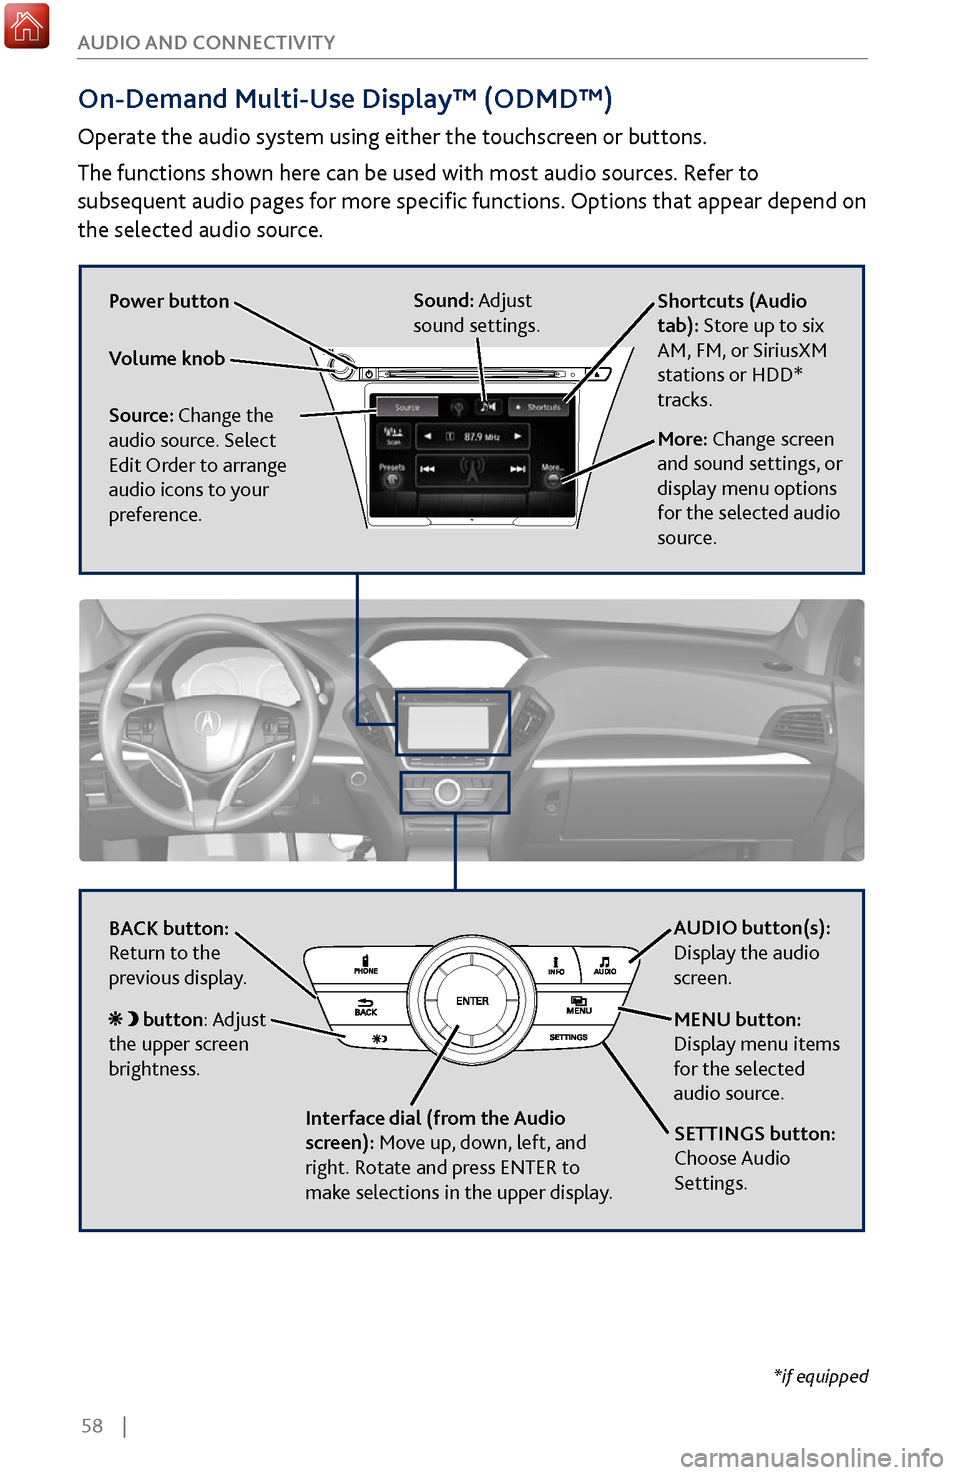
Operate the audio system using either the touchscreen or buttons.
The functions shown here can be used with most audio sources. Refer to
subsequent audio pages for more specific functions. Options that appear depend on
the selected audio source.
Power button
Shortcuts (Audio
tab): Store up to six
AM, FM, or SiriusXM
stations or HDD*
tracks.
More: Change screen
and sound settings, or
display menu options
for the selected audio
source.
Sound: Adjust
sound settings.
Volume knob
Source: Change the
audio source. Select
Edit Order to arrange
audio icons to your
preference.
BACK button:
Return to the
previous display. AUDIO button(s):
Display the audio
screen.
MENU button:
Display menu items
for the selected
audio source.
Interface dial (from the Audio
screen): Move up, down, left, and
right. Rotate and press ENTER to
make selections in the upper display.
button: Adjust
the upper screen
brightness.
SETTINGS button:
Choose Audio
Settings.
*if equipped
Page 66 of 170
| 59
AUDIO AND CONNECTIVITY
Interface dial (from
the Audio screen):
Rotate and press to
select preset stations
or the station list in
the upper display.
FM/AM Radio
Play FM or AM radio stations.
FM/AM radio display
*if equipped
Source: Select the
FM or AM icon.
Scan: Scan for stations
with a strong signal.
Skip/seek bar: Find a
station with a strong
signal.
Tune bar: Change the station.
Presets: Select and
hold a preset number
to store the current
station. Select a
preset to choose a
previously stored
station.
Page 67 of 170
60 |
AUDIO AND CONNECTIVITY
SiriusXM® Radio
Available on a subscription basis only. For more information or to subscribe, contact
your dealer, or visit
www.siriusxm.com (U.S.) or www.siriusxm.ca (Canada).
Available in the U.S. and Canada, except Hawaii, Alaska, and Puerto Rico.
SiriusXM® is a registered trademark of Sirius XM Radio, Inc.
SiriusXM Radio display
Source: Select the
SiriusXM icon.
Scan: Scan for channels. Skip/seek bar:
Change the channel. CATEGORY bar:
Change the category.
Presets: Select and
hold a preset number
to store the current
channel. Select a
preset to choose a
previously stored
channel. Interface dial (from
the Audio Screen):
Rotate and press to
select the channel
list or preset list in
the upper display.
Page 68 of 170

| 61
AUDIO AND CONNECTIVITY
Compact Disc (CD) / USB Flash Drive
For CDs: The audio system supports audio CDs, CD-Rs, and CD-RWs in MP3, WMA,
or AAC formats.
For USB: Connect your device to the USB port (see page 56).
Do not use CDs with adhesive labels or insert a damaged CD. Inserting these types
of CDs may cause them to get stuck or damage the audio unit.
NOTICE
Searching for Music
Search for tracks stored on the CD or USB. Use the interface dial to make and
enter selections.
1.
From
the audio screen, press MENU.
2.
Select Music Search.
3.
Select a search type (artist
, album, track, etc.) or
folder.
4.
Select the song you
want to play.
Source: Select the CD
or USB icon.
Scan: Scan tracks on
the CD or USB.
Random: Play tracks or
files in random order. CD
slot CD eject button
Folder
bar: Change
the folder. R
epeat: Repeat the
current track or file.
Interface dial (from
the Audio screen):
Rotate to view track
list, and press to
select a track in the
upper display.
Skip/seek bar:
Change the track.
MENU button:
Display menu items
in the upper display,
including Music Search.
CD display
USB display
CD playback shown