2016 YAMAHA YZ250F wheel
[x] Cancel search: wheelPage 110 of 356

CHASSIS
3-26
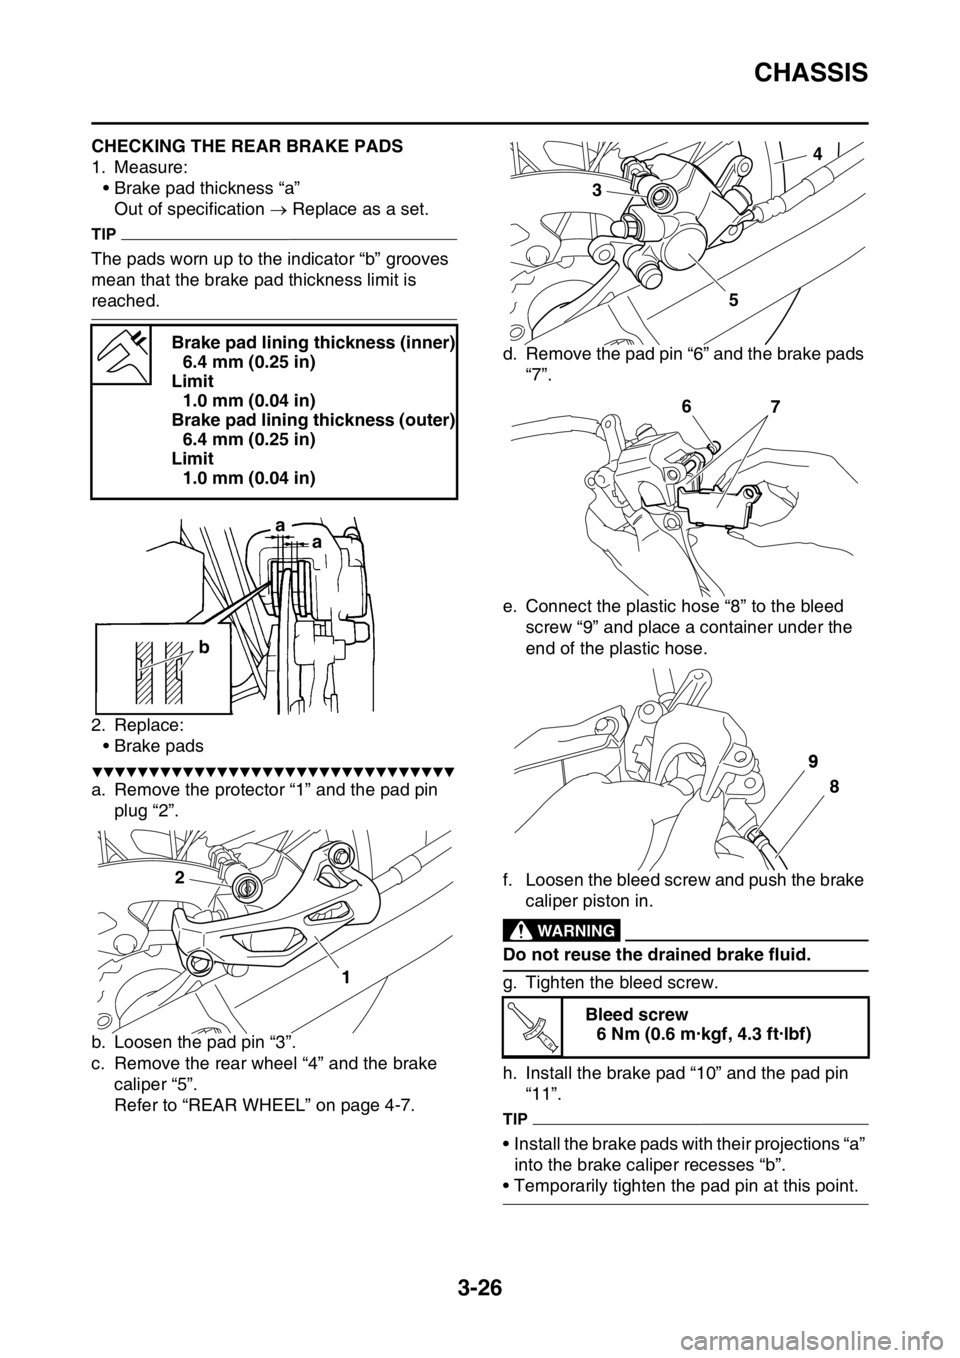
EAS1SM9093CHECKING THE REAR BRAKE PADS
1. Measure:
• Brake pad thickness “a”
Out of specification Replace as a set.
TIP
The pads worn up to the indicator “b” grooves
mean that the brake pad thickness limit is
reached.
2. Replace:
• Brake pads
▼▼▼▼▼▼▼▼▼▼▼▼▼▼▼▼▼▼▼▼▼▼▼▼▼▼▼▼▼▼▼▼
a. Remove the protector “1” and the pad pin
plug “2”.
b. Loosen the pad pin “3”.
c. Remove the rear wheel “4” and the brake
caliper “5”.
Refer to “REAR WHEEL” on page 4-7.d. Remove the pad pin “6” and the brake pads
“7”.
e. Connect the plastic hose “8” to the bleed
screw “9” and place a container under the
end of the plastic hose.
f. Loosen the bleed screw and push the brake
caliper piston in.
EWA
WARNING
Do not reuse the drained brake fluid.
g. Tighten the bleed screw.
h. Install the brake pad “10” and the pad pin
“11”.
TIP
• Install the brake pads with their projections “a”
into the brake caliper recesses “b”.
• Temporarily tighten the pad pin at this point. Brake pad lining thickness (inner)
6.4 mm (0.25 in)
Limit
1.0 mm (0.04 in)
Brake pad lining thickness (outer)
6.4 mm (0.25 in)
Limit
1.0 mm (0.04 in)
ba
a
1 2
Bleed screw
6 Nm (0.6 m·kgf, 4.3 ft·lbf)
34
5
7 6
9
8
T R..
Page 111 of 356

CHASSIS
3-27
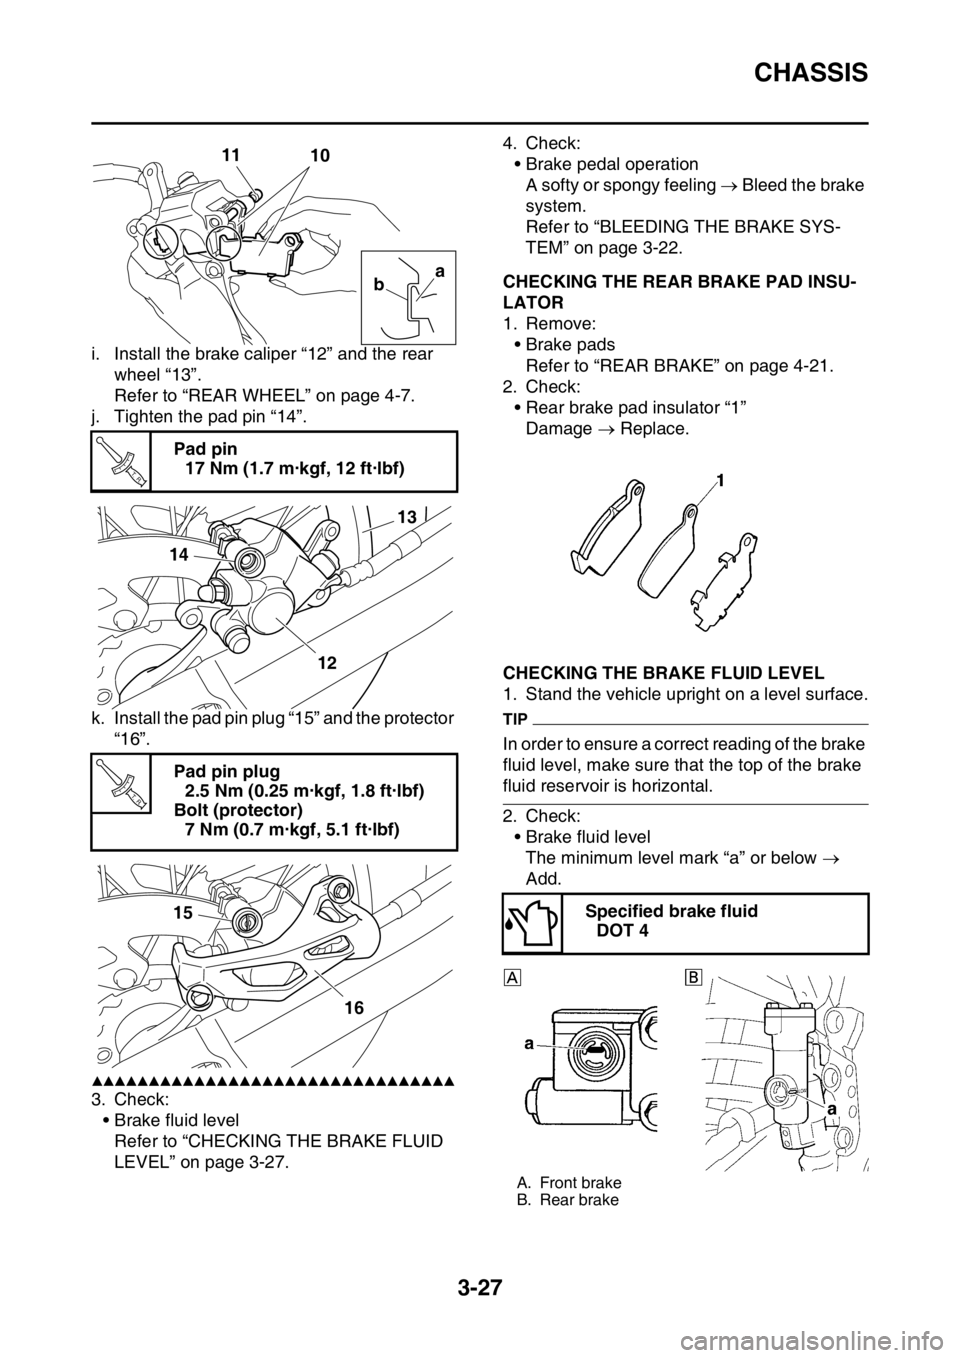
i. Install the brake caliper “12” and the rear
wheel “13”.
Refer to “REAR WHEEL” on page 4-7.
j. Tighten the pad pin “14”.
k. Install the pad pin plug “15” and the protector
“16”.
▲▲▲▲▲▲▲▲▲▲▲▲▲▲▲▲▲▲▲▲▲▲▲▲▲▲▲▲▲▲▲▲
3. Check:
• Brake fluid level
Refer to “CHECKING THE BRAKE FLUID
LEVEL” on page 3-27.4. Check:
• Brake pedal operation
A softy or spongy feeling Bleed the brake
system.
Refer to “BLEEDING THE BRAKE SYS-
TEM” on page 3-22.
EAS1SM9094CHECKING THE REAR BRAKE PAD INSU-
LATOR
1. Remove:
• Brake pads
Refer to “REAR BRAKE” on page 4-21.
2. Check:
• Rear brake pad insulator “1”
Damage Replace.
EAS1SM9095CHECKING THE BRAKE FLUID LEVEL
1. Stand the vehicle upright on a level surface.
TIP
In order to ensure a correct reading of the brake
fluid level, make sure that the top of the brake
fluid reservoir is horizontal.
2. Check:
• Brake fluid level
The minimum level mark “a” or below
Add.
EWA
Pad pin
17 Nm (1.7 m·kgf, 12 ft·lbf)
Pad pin plug
2.5 Nm (0.25 m·kgf, 1.8 ft·lbf)
Bolt (protector)
7 Nm (0.7 m·kgf, 5.1 ft·lbf)
10 11
a
b
T R..
13
14
12
T R..
15
16Specified brake fluid
DOT 4
A. Front brake
B. Rear brake
Page 112 of 356

CHASSIS
3-28
WARNING
• Use only the designated brake fluid. Other
brake fluids may cause the rubber seals to
deteriorate, causing leakage and poor
brake performance.
• Refill with the same type of brake fluid that
is already in the system. Mixing brake flu-
ids may result in a harmful chemical reac-
tion, leading to poor brake performance.
• When refilling, be careful that water does
not enter the brake fluid reservoir. Water
will significantly lower the boiling point of
the brake fluid and could cause vapor
lock.
ECA
NOTICE
Brake fluid may damage painted surfaces
and plastic parts. Therefore, always clean
up any spilt brake fluid immediately.
EAS1SM9096ADJUSTING THE DRIVE CHAIN SLACKECA13550
NOTICE
A drive chain that is too tight will overload
the engine and other vital parts, and one
that is too loose can skip and damage the
swingarm or cause an accident. Therefore,
keep the drive chain slack within the speci-
fied limits.
1. Use a suitable stand to raise the rear wheel
off the ground.
EWA13120
WARNING
Securely support the vehicle so that there is
no danger of it falling over.
2. Shift the transmission into the neutral posi-
tion.
3. Pull the drive chain up above the drive chain
guide installation bolt with a force of about
50 N (5.0 kgf, 36 lbf).
4. Check:
• Drive chain slack “a”
Out of specification Regulate.
TIP
Measure drive chain slack between the drive
chain guide and the bottom of the chain as
shown.5. Adjust:
• Drive chain slack
▼▼▼▼▼▼▼▼▼▼▼▼▼▼▼▼▼▼▼▼▼▼▼▼▼▼▼▼▼▼▼▼
a. Loosen the wheel axle nut “1”.
b. Loosen both locknuts “2”.
c. Turn the adjusting bolt “3” in direction “a” or
“b” until the specified drive chain slack is ob-
tained.
TIP
• To maintain the proper wheel alignment, ad-
just both sides evenly.
• Push the rear wheel forward to make sure that
there is no clearance between the swingarm
end plates and the ends of the swingarm.
d. Tighten the locknut.
e. Tighten the wheel axle nut.
▲▲▲▲▲▲▲▲▲▲▲▲▲▲▲▲▲▲▲▲▲▲▲▲▲▲▲▲▲▲▲▲
Drive chain slack
50–60 mm (1.97–2.36 in)
Direction “a”
The drive chain slack decreases.
Direction “b”
The drive chain slack increases.
Locknut
21 Nm (2.1 m·kgf, 15 ft·lbf)
Wheel axle nut
135 Nm (13.5 m·kgf, 98 ft·lbf)
a
1
32
a
b
T R..
T R..
Page 113 of 356

CHASSIS
3-29
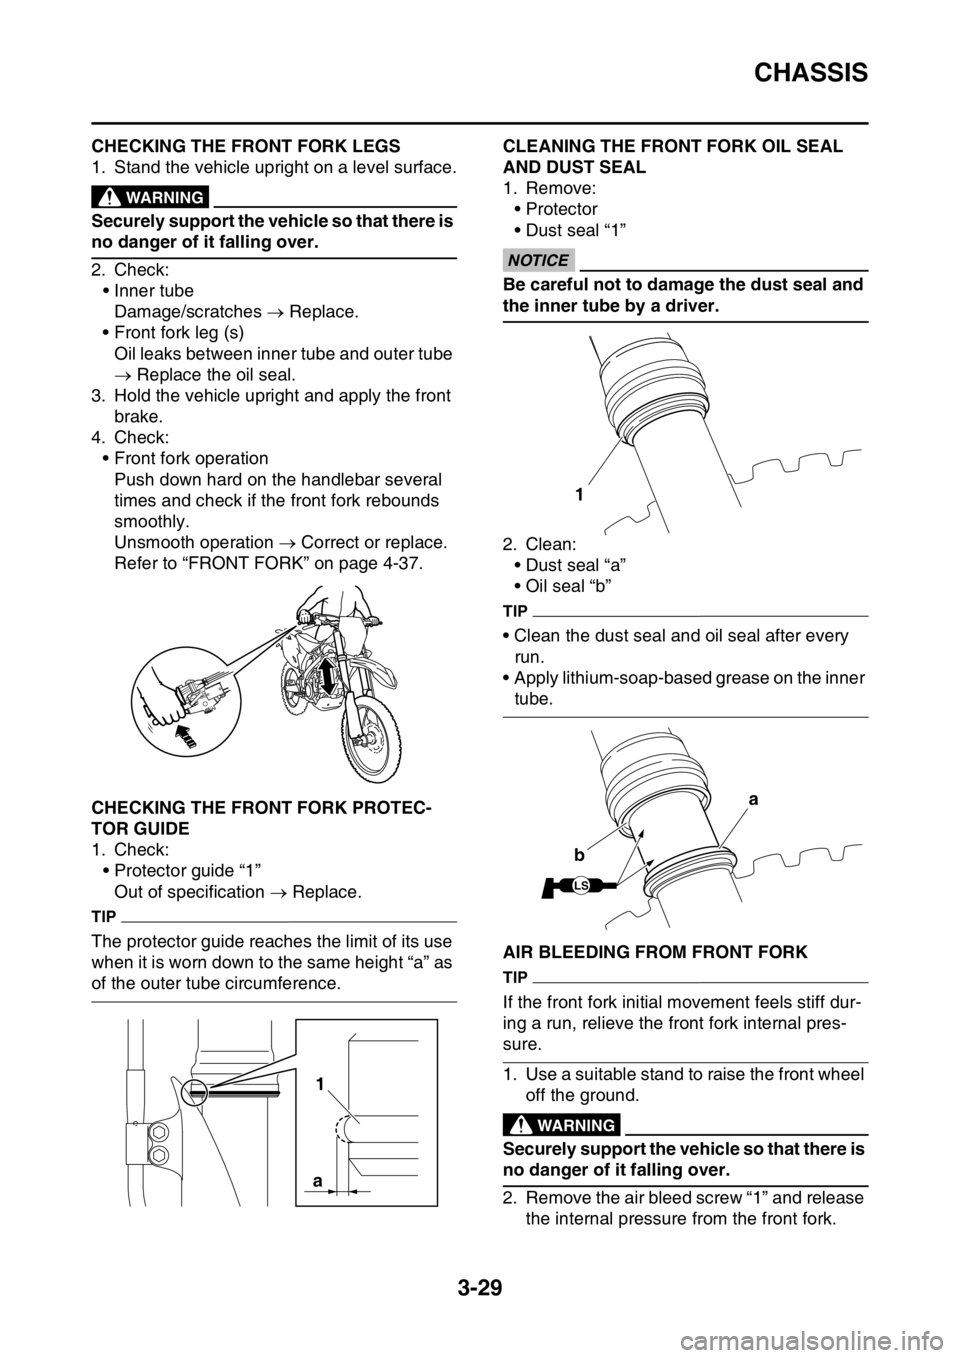
EAS1SM9097CHECKING THE FRONT FORK LEGS
1. Stand the vehicle upright on a level surface.
EWA
WARNING
Securely support the vehicle so that there is
no danger of it falling over.
2. Check:
• Inner tube
Damage/scratches Replace.
• Front fork leg (s)
Oil leaks between inner tube and outer tube
Replace the oil seal.
3. Hold the vehicle upright and apply the front
brake.
4. Check:
• Front fork operation
Push down hard on the handlebar several
times and check if the front fork rebounds
smoothly.
Unsmooth operation Correct or replace.
Refer to “FRONT FORK” on page 4-37.
EAS1SM9098CHECKING THE FRONT FORK PROTEC-
TOR GUIDE
1. Check:
• Protector guide “1”
Out of specification Replace.
TIP
The protector guide reaches the limit of its use
when it is worn down to the same height “a” as
of the outer tube circumference.
EAS1SM9099CLEANING THE FRONT FORK OIL SEAL
AND DUST SEAL
1. Remove:
•Protector
• Dust seal “1”
ECA
NOTICE
Be careful not to damage the dust seal and
the inner tube by a driver.
2. Clean:
• Dust seal “a”
• Oil seal “b”
TIP
• Clean the dust seal and oil seal after every
run.
• Apply lithium-soap-based grease on the inner
tube.
EAS1SM9100AIR BLEEDING FROM FRONT FORK
TIP
If the front fork initial movement feels stiff dur-
ing a run, relieve the front fork internal pres-
sure.
1. Use a suitable stand to raise the front wheel
off the ground.
EWA
WARNING
Securely support the vehicle so that there is
no danger of it falling over.
2. Remove the air bleed screw “1” and release
the internal pressure from the front fork.
1
a
1
LS
a
b
Page 115 of 356

CHASSIS
3-31
EAS1SM9102CHECKING THE SWINGARM OPERATION
1. Check:
• Swingarm smooth action
• Swingarm free play
Refer to “SWINGARM” on page 4-60.
EAS1SM9103CHECKING THE REAR SUSPENSION
1. Stand the vehicle upright on a level surface.
EWA
WARNING
Securely support the vehicle so that there is
no danger of it falling over.
2. Check:
• Rear shock absorber assembly
Gas leaks/oil leaks Replace the rear
shock absorber assembly.
Refer to “REAR SHOCK ABSORBER AS-
SEMBLY” on page 4-53.
3. Check:
• Rear shock absorber assembly smooth ac-
tion
• Rear suspension link smooth action
Sit astride the seat and shake your body up
and down several times to check whether
the rear shock absorber assembly operates
smoothly.
Unsmooth operation Correct or replace.
Refer to “REAR SHOCK ABSORBER AS-
SEMBLY” on page 4-53.
EAS1SM9104ADJUSTING THE REAR SHOCK ABSORB-
ER ASSEMBLY
Use a suitable stand to raise the rear wheel off
the ground.
EWA13120
WARNING
Securely support the vehicle so that there is
no danger of it falling over.
Spring preload
ECA@
NOTICE
Do not turn the adjuster forcibly beyond its
adjusting range.1. Remove:
• Rear frame
Refer to “REAR SHOCK ABSORBER AS-
SEMBLY” on page 4-53.
2. Adjust:
• Spring preload
▼▼▼▼▼▼▼▼▼▼▼▼▼▼▼▼▼▼▼▼▼▼▼▼▼▼▼▼▼▼▼▼
a. Loosen the locknut “1”.
b. Loosen the adjuster “2” until there is some
clearance between the spring and the ad-
juster.
c. Measure the spring free length “a”.
d. Turn the adjuster in the direction of “b” or “c”
to make an adjustment.
TIP
• Be sure to remove all dirt and mud from
around the locknut and adjusting ring before
adjustment.
• The length of the spring (installed) changes
1.5 mm (0.06 in) per turn of the adjusting ring.
Direction “b”
Spring preload is increased (suspen-
sion is harder).
Direction “c”
Spring preload is decreased (suspen-
sion is softer).
Spring preload adjusting positions
Minimum
Position in which the spring is
turned in 1.5 mm (0.06 in) from
its free length.
Standard
Position in which the spring is
turned in 10 mm (0.39 in) from its
free length.
Maximum
Position in which the spring is
turned in 18 mm (0.71 in) from its
free length.
Page 118 of 356

CHASSIS
3-34
2. Tighten:
• Spokes
Use a spoke nipple wrench “1” for tighten-
ing.
TIP
• Do not give a half turn (180 °) or more for one
tightening.
• Make sure that tightening after a break-in is
done until the initial looseness in nipples dis-
appears.
• Make sure that tightening is done in stages,
not at a time.
EAS1SM9107CHECKING THE WHEELS
1. Check:
• Wheel(s)
Damage/out-of-round Replace.
EWA
WARNING
Never attempt to make any repairs to the
wheel.
TIP
After replacing a tire or a wheel, always bal-
ance the wheel.
EAS1SM9108CHECKING THE WHEEL BEARINGS
1. Check:
• Wheel bearings
Refer to “CHECKING THE FRONT WHEEL”
on page 4-4 and “CHECKING THE REAR
WHEEL” on page 4-8.
EAS1SM9109
CHECKING AND ADJUSTING THE STEER-
ING HEAD
1. Use a suitable stand to raise the front wheel
off the ground.
EWA
WARNING
Securely support the vehicle so that there is
no danger of it falling over.
2. Check:
• Steering head
Grasp the bottom of the front fork legs and
gently rock the front fork.
Blinding/looseness Adjust the steering
head.
3. Remove:
• Handlebar
Refer to “HANDLEBAR” on page 4-31.
• Upper bracket
Refer to “STEERING HEAD” on page 4-49.
4. Adjust:
• Steering head
▼▼▼▼▼▼▼▼▼▼▼▼▼▼▼▼▼▼▼▼▼▼▼▼▼▼▼▼▼▼▼▼
a. Remove the washer “1”.
b. After loosening the ring nut “2” with a steer-
ing nut wrench “3”, tighten it to the specified
torque.
TIP
• Set the torque wrench at a right angle to the
steering nut wrench.
• Move the steering to the left and right a couple
of times to check that it moves smoothly. Spoke nipple wrench (6–7)
90890-01521
YM-01521
Spokes
2.5 Nm (0.25 m·kgf, 1.8 ft·lbf)
1
T R..
1
3
2
Page 123 of 356

4
CHASSIS
GENERAL CHASSIS........................................................................................ 4-1
REMOVING THE LEFT SIDE COVER ....................................................... 4-2
REMOVING THE SEAT ............................................................................. 4-2
REMOVING THE NUMBER PLATE ........................................................... 4-2
FRONT WHEEL................................................................................................ 4-3
REMOVING THE FRONT WHEEL............................................................. 4-4
CHECKING THE FRONT WHEEL ............................................................. 4-4
DISASSEMBLING THE FRONT WHEEL ................................................... 4-5
ASSEMBLING THE FRONT WHEEL ......................................................... 4-5
INSTALLING THE FRONT WHEEL ........................................................... 4-6
REAR WHEEL.................................................................................................. 4-7
REMOVING THE REAR WHEEL ............................................................... 4-8
CHECKING THE REAR WHEEL................................................................ 4-8
DISASSEMBLING THE REAR WHEEL ..................................................... 4-8
CHECKING AND REPLACING THE REAR WHEEL SPROCKET ............ 4-8
ASSEMBLING THE REAR WHEEL ........................................................... 4-9
INSTALLING THE REAR WHEEL.............................................................. 4-9
FRONT BRAKE.............................................................................................. 4-11
INTRODUCTION ...................................................................................... 4-15
CHECKING THE FRONT BRAKE DISC .................................................. 4-15
REMOVING THE FRONT BRAKE CALIPER ........................................... 4-15
DISASSEMBLING THE FRONT BRAKE CALIPER................................. 4-15
CHECKING THE FRONT BRAKE CALIPER ........................................... 4-16
ASSEMBLING THE FRONT BRAKE CALIPER ....................................... 4-16
INSTALLING THE BRAKE CALIPER PISTON ........................................ 4-16
INSTALLING THE FRONT BRAKE CALIPER ......................................... 4-17
REMOVING THE FRONT BRAKE MASTER CYLINDER ........................ 4-18
CHECKING THE FRONT BRAKE MASTER CYLINDER......................... 4-18
ASSEMBLING THE FRONT BRAKE MASTER CYLINDER .................... 4-18
INSTALLING THE FRONT BRAKE MASTER CYLINDER....................... 4-19
REAR BRAKE................................................................................................ 4-21
INTRODUCTION ...................................................................................... 4-25
CHECKING THE REAR BRAKE DISC..................................................... 4-25
REMOVING THE REAR BRAKE CALIPER ............................................. 4-26
DISASSEMBLING THE REAR BRAKE CALIPER ................................... 4-26
CHECKING THE REAR BRAKE CALIPER .............................................. 4-26
ASSEMBLING THE REAR BRAKE CALIPER ......................................... 4-26
INSTALLING THE BRAKE CALIPER PISTON ........................................ 4-27
INSTALLING THE REAR BRAKE CALIPER ............................................ 4-27
REMOVING THE REAR BRAKE MASTER CYLINDER .......................... 4-28
CHECKING THE REAR BRAKE MASTER CYLINDER ........................... 4-28
ASSEMBLING THE REAR BRAKE MASTER CYLINDER....................... 4-29
INSTALLING THE REAR BRAKE MASTER CYLINDER ......................... 4-29
Page 124 of 356

HANDLEBAR................................................................................................. 4-31
REMOVING THE HANDLEBAR............................................................... 4-33
CHECKING THE HANDLEBAR ............................................................... 4-33
INSTALLING THE HANDLEBAR ............................................................. 4-33
FRONT FORK................................................................................................. 4-37
REMOVING THE FRONT FORK LEGS ................................................... 4-39
DISASSEMBLING THE FRONT FORK LEGS ......................................... 4-39
CHECKING THE FRONT FORK LEGS ................................................... 4-40
ASSEMBLING THE FRONT FORK LEGS ............................................... 4-41
INSTALLING THE FRONT FORK LEGS ................................................. 4-47
STEERING HEAD........................................................................................... 4-49
REMOVING THE LOWER BRACKET...................................................... 4-50
CHECKING THE STEERING HEAD ........................................................ 4-50
INSTALLING THE STEERING HEAD ...................................................... 4-50
REAR SHOCK ABSORBER ASSEMBLY..................................................... 4-53
HANDLING THE REAR SHOCK ABSORBER ......................................... 4-56
DISPOSING OF A REAR SHOCK ABSORBER ...................................... 4-56
REMOVING THE REAR SHOCK ABSORBER ASSEMBLY.................... 4-56
REMOVING THE BEARING..................................................................... 4-56
CHECKING THE REAR SHOCK ABSORBER ASSEMBLY .................... 4-57
CHECKING THE CONNECTING ARM AND RELAY ARM ...................... 4-57
INSTALLING THE RELAY ARM............................................................... 4-57
INSTALLING THE REAR SHOCK ABSORBER ASSEMBLY .................. 4-58
SWINGARM.................................................................................................... 4-60
REMOVING THE SWINGARM................................................................. 4-61
REMOVING THE BEARING..................................................................... 4-61
CHECKING THE SWINGARM ................................................................. 4-61
INSTALLING THE SWINGARM ............................................................... 4-62
CHAIN DRIVE................................................................................................. 4-63
REMOVING THE DRIVE CHAIN.............................................................. 4-64
CHECKING THE DRIVE CHAIN .............................................................. 4-64
CHECKING THE DRIVE SPROCKET...................................................... 4-65
CHECKING THE REAR WHEEL SPROCKET ......................................... 4-65
INSTALLING THE DRIVE CHAIN ............................................................ 4-65